Owners Manual
Page 3
... Features ...1 Camera Views 2 Front View ...2 Back View ...2 Top View ...2 Bottom View ...3 Left / Right View ...3 The Mode Dial 3 Navigation Buttons 4 LED Indicators 6 LCD screen ...7 Capture/Video Mode Display 7 Camera Setup 12 Attaching the Wrist Strap 12 Inserting the Battery 12 Inserting an SD/MMC Memory Card 13 Charging the Battery 13 Turning On ...13 First Time Use 14 Getting Started 15 Taking your First Photo 15 Anti-Shake Function ...15 Using Quick Review ...15 Using Macro Mode ...15 Setting the Flash Mode ...16 Using the Zoom in/out Function 16 Using the Self-timer and...
... Features ...1 Camera Views 2 Front View ...2 Back View ...2 Top View ...2 Bottom View ...3 Left / Right View ...3 The Mode Dial 3 Navigation Buttons 4 LED Indicators 6 LCD screen ...7 Capture/Video Mode Display 7 Camera Setup 12 Attaching the Wrist Strap 12 Inserting the Battery 12 Inserting an SD/MMC Memory Card 13 Charging the Battery 13 Turning On ...13 First Time Use 14 Getting Started 15 Taking your First Photo 15 Anti-Shake Function ...15 Using Quick Review ...15 Using Macro Mode ...15 Setting the Flash Mode ...16 Using the Zoom in/out Function 16 Using the Self-timer and...
Owners Manual
Page 4
... Video Resolution ...23 White Balance ...23 Color ...23 Saturation ...23 Contrast ...23 Setup ...24 Photo, Video & Audio Playback 25 Playback Mode Display 25 Viewing Photos/Videos on the LCD Screen 27 Viewing M-Burst Photos 27 Listening to Audio Files 28 Listening to Voice Memo 28 Viewing Photos/Videos on your TV 28 Zooming In During Playback 29 Deleting Photos/Videos/Audios 29 Using the Playback Menu 29 DPOF ...30 Slideshow ...31 Resize ...31 Rotate ...32 Protect ...32 Red-Eye Compensation 33 Move ...33 Transferring Photos/Videos...
... Video Resolution ...23 White Balance ...23 Color ...23 Saturation ...23 Contrast ...23 Setup ...24 Photo, Video & Audio Playback 25 Playback Mode Display 25 Viewing Photos/Videos on the LCD Screen 27 Viewing M-Burst Photos 27 Listening to Audio Files 28 Listening to Voice Memo 28 Viewing Photos/Videos on your TV 28 Zooming In During Playback 29 Deleting Photos/Videos/Audios 29 Using the Playback Menu 29 DPOF ...30 Slideshow ...31 Resize ...31 Rotate ...32 Protect ...32 Red-Eye Compensation 33 Move ...33 Transferring Photos/Videos...
Owners Manual
Page 5
English Camera Settings 35 The Setup Menu 35 File Number ...35 Digital Zoom ...35 Quick View ...36 Continuous AF ...36 Camera Sound ...36 Auto LCD Off ...36 Auto Power Off ...37 Video Out ...37 USB Mode ...37 Date Stamp ...38 Date and Time ...38 Language ...38 Image Storage ...39 Format ...39 Reset ...39 Voice Memo ...39 PictBridge Print (PTP 40 Image Storage ...40 This Image ...41 Index Print ...42 DPOF Image ...42 All Images ...43 Specifications 44 Troubleshooting 47
English Camera Settings 35 The Setup Menu 35 File Number ...35 Digital Zoom ...35 Quick View ...36 Continuous AF ...36 Camera Sound ...36 Auto LCD Off ...36 Auto Power Off ...37 Video Out ...37 USB Mode ...37 Date Stamp ...38 Date and Time ...38 Language ...38 Image Storage ...39 Format ...39 Reset ...39 Voice Memo ...39 PictBridge Print (PTP 40 Image Storage ...40 This Image ...41 Index Print ...42 DPOF Image ...42 All Images ...43 Specifications 44 Troubleshooting 47
Owners Manual
Page 7
... this manual may be determined by turning the equipment off and on, the user is encouraged to try to correct the interference by any mechanical, electronic or other means, in any interference received, including interference that may void your new digital camera. All rights are designed to provide reasonable protection against harmful interference in a residential installation. No part...
... this manual may be determined by turning the equipment off and on, the user is encouraged to try to correct the interference by any mechanical, electronic or other means, in any interference received, including interference that may void your new digital camera. All rights are designed to provide reasonable protection against harmful interference in a residential installation. No part...
Owners Manual
Page 15
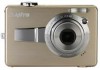
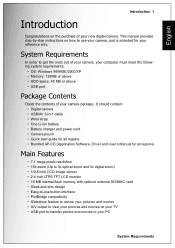
... Software, Driver and User's Manual for all regions) Main Features • 7.1 mega pixels resolution • 15x zoom (Up to 3x optical zoom and 5x digital zoom) • 1/2.5 inch CCD image sensor • 2.4 inch LTPS TFT LCD monitor • 16 MB internal flash memory with optional external SD/MMC card • Sleek and slim design • Easy-to-use button interface • PictBridge compatibility • Slideshow feature to review your pictures...
... Software, Driver and User's Manual for all regions) Main Features • 7.1 mega pixels resolution • 15x zoom (Up to 3x optical zoom and 5x digital zoom) • 1/2.5 inch CCD image sensor • 2.4 inch LTPS TFT LCD monitor • 16 MB internal flash memory with optional external SD/MMC card • Sleek and slim design • Easy-to-use button interface • PictBridge compatibility • Slideshow feature to review your pictures...
Owners Manual
Page 21
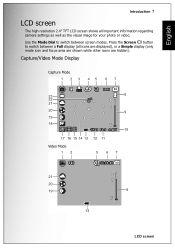
... 11 Video Mode 12 5 67 640 00:00:00 21 T 20 19 9 W 13 LCD screen Use the Mode Dial to switch between screen modes. English Introduction 7 LCD screen The high resolution 2.4" TFT LCD screen shows all icons are displayed), or a Simple display (only mode icon and focus area are shown while other icons are hidden). Press the Screen button to switch between a Full display (all important information regarding camera settings as well as the visual image for your photo or video.
... 11 Video Mode 12 5 67 640 00:00:00 21 T 20 19 9 W 13 LCD screen Use the Mode Dial to switch between screen modes. English Introduction 7 LCD screen The high resolution 2.4" TFT LCD screen shows all icons are displayed), or a Simple display (only mode icon and focus area are shown while other icons are hidden). Press the Screen button to switch between a Full display (all important information regarding camera settings as well as the visual image for your photo or video.

Owners Manual
Page 29
... delete a photo when using Quick Review: 1. Taking your camera, you are ready to confirm your First Photo Select This Image to delete the photo or Cancel to disable it . 3. You can capture all detail even when your subject is only available in Auto capture mode. Turn the Mode Dial to capture the image. The Macro icon displays on the LCD screen. When a camera steady warning icon appears, hold the Shutter button to Macro mode. The camera automatically adjusts the focus and exposure...
... delete a photo when using Quick Review: 1. Taking your camera, you are ready to confirm your First Photo Select This Image to delete the photo or Cancel to disable it . 3. You can capture all detail even when your subject is only available in Auto capture mode. Turn the Mode Dial to capture the image. The Macro icon displays on the LCD screen. When a camera steady warning icon appears, hold the Shutter button to Macro mode. The camera automatically adjusts the focus and exposure...

Owners Manual
Page 32
... camera. Press the Shutter button to delete the recording if needed . The self-timer LED is in Playback mode. Press the Shutter button again to indicate recording is steady on the LCD screen. 3. Start recording screen is used . 4. To record an audio file: 1. The elapsed time screen shows the length of a voice memo. If not, recording will continue until all free memory space is displayed after it's taken. To record a video clip: 1. Frame your subject using the LCD screen and press the Shutter button to playback the recording. Recording...
... camera. Press the Shutter button to delete the recording if needed . The self-timer LED is in Playback mode. Press the Shutter button again to indicate recording is steady on the LCD screen. 3. Start recording screen is used . 4. To record an audio file: 1. The elapsed time screen shows the length of a voice memo. If not, recording will continue until all free memory space is displayed after it's taken. To record a video clip: 1. Frame your subject using the LCD screen and press the Shutter button to playback the recording. Recording...

Owners Manual
Page 38
Video Capture Menu English 24 Capture Settings Setup See "The Setup Menu" on page 35 for more details on the setup menu options.
Video Capture Menu English 24 Capture Settings Setup See "The Setup Menu" on page 35 for more details on the setup menu options.

Owners Manual
Page 42
... as that the camera's video out format is displayed. See "Video Out" on the camera. 3. Video Audio 4. Turn the Mode Dial to Playback clip is set to pause. The most recent photo or video 2. Press the OK button at any time during audio playback. 6. Connect the USB/AV 3-in "Viewing Photos/Videos on the LCD Screen" on the TV screen. Use the Left/Right navigation buttons to Voice Memo A voice memo displays simultaneously when playback an image with voice...
... as that the camera's video out format is displayed. See "Video Out" on the camera. 3. Video Audio 4. Turn the Mode Dial to Playback clip is set to pause. The most recent photo or video 2. Press the OK button at any time during audio playback. 6. Connect the USB/AV 3-in "Viewing Photos/Videos on the LCD Screen" on the TV screen. Use the Left/Right navigation buttons to Voice Memo A voice memo displays simultaneously when playback an image with voice...

Owners Manual
Page 43
... Image: Select to delete the current image. • All Images: Select to crop the image. button to confirm. When zoomed out to remove unwanted files stored on internal memory or a memory card. DELETE CANCEL To delete a photo/video/audio: 1. Use the Up/Down navigation buttons to highlight an option and press the OK button to display the Delete THIS IMAGE ALL IMAGES 2. DPOF To access the Playback menu: SLIDESHOW 1. Deleting Photos/Videos/Audios The Delete function allows you to view photos in on saved photos...
... Image: Select to delete the current image. • All Images: Select to crop the image. button to confirm. When zoomed out to remove unwanted files stored on internal memory or a memory card. DELETE CANCEL To delete a photo/video/audio: 1. Use the Up/Down navigation buttons to highlight an option and press the OK button to display the Delete THIS IMAGE ALL IMAGES 2. DPOF To access the Playback menu: SLIDESHOW 1. Deleting Photos/Videos/Audios The Delete function allows you to view photos in on saved photos...
Owners Manual
Page 47
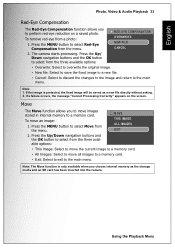
... the main menu. If the image is only available when you choose internal memory as a new file directly without asking. 2. Note: The Move function is protected, the fixed image will be saved as the storage media and an SD card has been inserted into the camera. If a failure occurs, the message "Cannot Processing Correctly" appears on a saved photo. Using the Playback Menu Press the Up/ Down navigation buttons and the...
... the main menu. If the image is only available when you choose internal memory as a new file directly without asking. 2. Note: The Move function is protected, the fixed image will be saved as the storage media and an SD card has been inserted into the camera. If a failure occurs, the message "Cannot Processing Correctly" appears on a saved photo. Using the Playback Menu Press the Up/ Down navigation buttons and the...

Owners Manual
Page 48
Copy the files from the drives to a free USB port on your PC. Connect the camera's USB port to the directory on your PC using the USB cable. Transferring Photos/Videos to install the camera driver. English 34 Photo, Video & Audio Playback Transferring Photos/Videos to your PC To transfer photos and videos to your PC: Use the software CD to your PC The camera's internal memory and/or SD/MMC card appear as removable drives in the file manager. Use ArcSoft PhotoImpression and ArcSoft VideoImpression...
Copy the files from the drives to a free USB port on your PC. Connect the camera's USB port to the directory on your PC using the USB cable. Transferring Photos/Videos to install the camera driver. English 34 Photo, Video & Audio Playback Transferring Photos/Videos to your PC To transfer photos and videos to your PC: Use the software CD to your PC The camera's internal memory and/or SD/MMC card appear as removable drives in the file manager. Use ArcSoft PhotoImpression and ArcSoft VideoImpression...
Owners Manual
Page 49
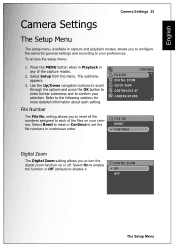
... modes. 2. RESET CONTINUE Digital Zoom The Digital Zoom setting allows you to configure the camera's general settings and according to your preferences. DIGITAL ZOOM ON OFF The Setup Menu The submenu appears. 3. Select On to enable the function or Off (default) to confirm your selection. Select Setup from the menu. CONTINUE FILE NO. Select Reset to reset or Continue to set the file numbers in continuous order. English Camera Settings Camera Settings 35 The Setup Menu The setup menu, available in capture and playback modes, allows you to turn...
... modes. 2. RESET CONTINUE Digital Zoom The Digital Zoom setting allows you to configure the camera's general settings and according to your preferences. DIGITAL ZOOM ON OFF The Setup Menu The submenu appears. 3. Select On to enable the function or Off (default) to confirm your selection. Select Setup from the menu. CONTINUE FILE NO. Select Reset to reset or Continue to set the file numbers in continuous order. English Camera Settings Camera Settings 35 The Setup Menu The setup menu, available in capture and playback modes, allows you to turn...

Owners Manual
Page 51
... available: • NTSC (default) • PAL VIDEO OUT NTSC PAL USB Mode The USB Mode setting allows you to select the transfer method between your PC. MSDC • MSDC (default): The camera is connected to a printer by a USB cable which the camera will power down when inactive. Use Up/Down navigation buttons to select from the menu options. The Setup Menu For details on PTP function, please See "PictBridge Print (PTP)" on page...
... available: • NTSC (default) • PAL VIDEO OUT NTSC PAL USB Mode The USB Mode setting allows you to select the transfer method between your PC. MSDC • MSDC (default): The camera is connected to a printer by a USB cable which the camera will power down when inactive. Use Up/Down navigation buttons to select from the menu options. The Setup Menu For details on PTP function, please See "PictBridge Print (PTP)" on page...

Owners Manual
Page 52
... each photo or video. You can also deactivate this function if you to set or adjust the date and time: • Press the Left/Right navigation buttons to select the Year field. • Press the Up/Down navigation buttons to select from the menu options. Setting a date stamp allows for easy sorting and the date will appear on the photo when printed. Use Up/Down navigation buttons to adjust the...
... each photo or video. You can also deactivate this function if you to set or adjust the date and time: • Press the Left/Right navigation buttons to select the Year field. • Press the Up/Down navigation buttons to select from the menu options. Setting a date stamp allows for easy sorting and the date will appear on the photo when printed. Use Up/Down navigation buttons to adjust the...
Owners Manual
Page 53
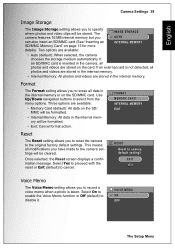
... original factory default settings. The camera features 16 MB internal memory but you to reset the camera to erase all photos and videos are stored in the internal memory. Use Up/Down navigation buttons to disable it. RESET Reset to cancel. Three options are available: IMAGE STORAGE AUTO INTERNAL MEMORY • Auto (default): When selected, the camera chooses the storage medium automatically. VOICE MEMO ON OFF The Setup Menu Two options are available: • Memory Card (default): All data on the card...
... original factory default settings. The camera features 16 MB internal memory but you to reset the camera to erase all photos and videos are stored in the internal memory. Use Up/Down navigation buttons to disable it. RESET Reset to cancel. Three options are available: IMAGE STORAGE AUTO INTERNAL MEMORY • Auto (default): When selected, the camera chooses the storage medium automatically. VOICE MEMO ON OFF The Setup Menu Two options are available: • Memory Card (default): All data on the card...

Owners Manual
Page 56
English 42 Camera Settings Index Print Use this function to select the Paper size. • Default Size • Letter • A4 2/140 IMAGE STORAGE THIS IMAGE INDEX PRINT DPOF IMAGE ALL IMAGES INDEX PRINT DEFAULT SIZE LETTER A4 2. After the number of copies. Press Up/Down navigation buttons to print all images in index format. 1. DPOF Image See "DPOF" on page 30 for detailed information. Size:Default CONTINUE CANCEL PictBridge Print (PTP) Press Up/Down navigation buttons to set the number of...
English 42 Camera Settings Index Print Use this function to select the Paper size. • Default Size • Letter • A4 2/140 IMAGE STORAGE THIS IMAGE INDEX PRINT DPOF IMAGE ALL IMAGES INDEX PRINT DEFAULT SIZE LETTER A4 2. After the number of copies. Press Up/Down navigation buttons to print all images in index format. 1. DPOF Image See "DPOF" on page 30 for detailed information. Size:Default CONTINUE CANCEL PictBridge Print (PTP) Press Up/Down navigation buttons to set the number of...
Owners Manual
Page 58
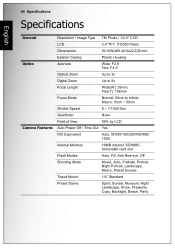
...(T): 106mm Focus Mode Normal: 50cm to infinity Macro: 10cm ~ 50cm Shutter Speed 8 ~ 1/1500 Sec. Viewfinder None Field of View 99% by LCD Auto Power Off / Time Out Yes ISO Equivalent Auto, ISO80/100/200/400/800/ 1000 Internal Memory 16MB internal, SD/MMC removable card slot Flash Modes Auto, Fill, Anti Red-eye, Off Shooting Mode Movie, Auto, P-Mode, Portrait, Night Portrait, Landscape, Macro, Preset Scenes Tripod Mount 1/4" Standard Preset Scene Sport, Sunset, Museum, Night Landscape, Snow, Fireworks, Copy...
...(T): 106mm Focus Mode Normal: 50cm to infinity Macro: 10cm ~ 50cm Shutter Speed 8 ~ 1/1500 Sec. Viewfinder None Field of View 99% by LCD Auto Power Off / Time Out Yes ISO Equivalent Auto, ISO80/100/200/400/800/ 1000 Internal Memory 16MB internal, SD/MMC removable card slot Flash Modes Auto, Fill, Anti Red-eye, Off Shooting Mode Movie, Auto, P-Mode, Portrait, Night Portrait, Landscape, Macro, Preset Scenes Tripod Mount 1/4" Standard Preset Scene Sport, Sunset, Museum, Night Landscape, Snow, Fireworks, Copy...
Owners Manual
Page 61
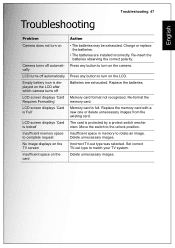
.... Re-format the memory card. Move the switch to rotate an image. Troubleshooting Troubleshooting 47 English Problem Camera does not turn on Camera turns off automatically LCD turns off automatically Empty battery icon is displayed on the LCD after which camera turns off LCD screen displays 'Card Requires Formatting' LCD screen displays 'Card is Full' LCD screen displays 'Card is full. Press any button to complete request No image displays on the TV screen Insufficient space on the camera. Memory card is locked' Insufficient memory space to turn on the card Action...
.... Re-format the memory card. Move the switch to rotate an image. Troubleshooting Troubleshooting 47 English Problem Camera does not turn on Camera turns off automatically LCD turns off automatically Empty battery icon is displayed on the LCD after which camera turns off LCD screen displays 'Card Requires Formatting' LCD screen displays 'Card is Full' LCD screen displays 'Card is full. Press any button to complete request No image displays on the TV screen Insufficient space on the camera. Memory card is locked' Insufficient memory space to turn on the card Action...


