Owners Manual
Page 3
... Features ...1 Camera Views 2 Front View ...2 Back View ...2 Top View ...2 Bottom View ...3 Left / Right View ...3 The Mode Dial 3 Navigation Buttons 4 LED Indicators 6 LCD screen ...7 Capture/Video Mode Display 7 Camera Setup 12 Attaching the Wrist Strap 12 Inserting the Battery 12 Inserting an SD/MMC Memory Card 13 Charging the Battery 13 Turning On ...13 First Time Use 14 Getting Started 15 Taking your First Photo 15 Anti-Shake Function ...15 Using Quick Review ...15 Using Macro Mode ...15 Setting the Flash Mode ...16 Using the Zoom in/out Function 16 Using the Self-timer and...
... Features ...1 Camera Views 2 Front View ...2 Back View ...2 Top View ...2 Bottom View ...3 Left / Right View ...3 The Mode Dial 3 Navigation Buttons 4 LED Indicators 6 LCD screen ...7 Capture/Video Mode Display 7 Camera Setup 12 Attaching the Wrist Strap 12 Inserting the Battery 12 Inserting an SD/MMC Memory Card 13 Charging the Battery 13 Turning On ...13 First Time Use 14 Getting Started 15 Taking your First Photo 15 Anti-Shake Function ...15 Using Quick Review ...15 Using Macro Mode ...15 Setting the Flash Mode ...16 Using the Zoom in/out Function 16 Using the Self-timer and...
Owners Manual
Page 4
... Video Resolution ...23 White Balance ...23 Color ...23 Saturation ...23 Contrast ...23 Setup ...24 Photo, Video & Audio Playback 25 Playback Mode Display 25 Viewing Photos/Videos on the LCD Screen 27 Viewing M-Burst Photos 27 Listening to Audio Files 28 Listening to Voice Memo 28 Viewing Photos/Videos on your TV 28 Zooming In During Playback 29 Deleting Photos/Videos/Audios 29 Using the Playback Menu 29 DPOF ...30 Slideshow ...31 Resize ...31 Rotate ...32 Protect ...32 Red-Eye Compensation 33 Move ...33 Transferring Photos/Videos...
... Video Resolution ...23 White Balance ...23 Color ...23 Saturation ...23 Contrast ...23 Setup ...24 Photo, Video & Audio Playback 25 Playback Mode Display 25 Viewing Photos/Videos on the LCD Screen 27 Viewing M-Burst Photos 27 Listening to Audio Files 28 Listening to Voice Memo 28 Viewing Photos/Videos on your TV 28 Zooming In During Playback 29 Deleting Photos/Videos/Audios 29 Using the Playback Menu 29 DPOF ...30 Slideshow ...31 Resize ...31 Rotate ...32 Protect ...32 Red-Eye Compensation 33 Move ...33 Transferring Photos/Videos...
Owners Manual
Page 5
English Camera Settings 35 The Setup Menu 35 File Number ...35 Digital Zoom ...35 Quick View ...36 Continuous AF ...36 Camera Sound ...36 Auto LCD Off ...36 Auto Power Off ...37 Video Out ...37 USB Mode ...37 Date Stamp ...38 Date and Time ...38 Language ...38 Image Storage ...39 Format ...39 Reset ...39 Voice Memo ...39 PictBridge Print (PTP 40 Image Storage ...40 This Image ...41 Index Print ...42 DPOF Image ...42 All Images ...43 Specifications 44 Troubleshooting 47
English Camera Settings 35 The Setup Menu 35 File Number ...35 Digital Zoom ...35 Quick View ...36 Continuous AF ...36 Camera Sound ...36 Auto LCD Off ...36 Auto Power Off ...37 Video Out ...37 USB Mode ...37 Date Stamp ...38 Date and Time ...38 Language ...38 Image Storage ...39 Format ...39 Reset ...39 Voice Memo ...39 PictBridge Print (PTP 40 Image Storage ...40 This Image ...41 Index Print ...42 DPOF Image ...42 All Images ...43 Specifications 44 Troubleshooting 47
Owners Manual
Page 7
... notice. No part of Conformity This device complies with the instructions, may cause undersired operation. Copyright This manual contains proprietary information protected by one or more of the FCC rules. These limits are reserved. This equipment generates, uses, and can be reproduced by the manufacturer may void your new digital camera. English Preface Preface i About this Manual This manual is designed...
... notice. No part of Conformity This device complies with the instructions, may cause undersired operation. Copyright This manual contains proprietary information protected by one or more of the FCC rules. These limits are reserved. This equipment generates, uses, and can be reproduced by the manufacturer may void your new digital camera. English Preface Preface i About this Manual This manual is designed...
Owners Manual
Page 15
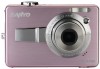
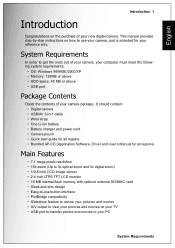
...-ion battery • Battery charger and power cord • Camera pouch • Quick start guide for all regions • Bundled AP-CD (Application Software, Driver and User's Manual for all regions) Main Features • 7.1 mega pixels resolution • 15x zoom (Up to 3x optical zoom and 5x digital zoom) • 1/2.5 inch CCD image sensor • 2.4 inch LTPS TFT LCD monitor • 16 MB internal flash memory with optional external SD/MMC card •...
...-ion battery • Battery charger and power cord • Camera pouch • Quick start guide for all regions • Bundled AP-CD (Application Software, Driver and User's Manual for all regions) Main Features • 7.1 mega pixels resolution • 15x zoom (Up to 3x optical zoom and 5x digital zoom) • 1/2.5 inch CCD image sensor • 2.4 inch LTPS TFT LCD monitor • 16 MB internal flash memory with optional external SD/MMC card •...
Owners Manual
Page 21
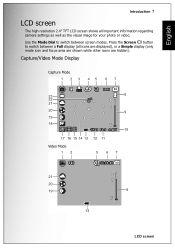
... screen modes. Press the Screen button to switch between a Full display (all important information regarding camera settings as well as the visual image for your photo or video. Capture/Video Mode Display Capture Mode 1 23 45 67 9999 23 8 22 21 T 20 9 19 18 W 1/125 F3.5 -1.0EV 10 17 16 15 14 13 12 11 Video Mode 12 5 67 640 00:00:00 21 T 20 19 9 W 13 LCD screen English Introduction 7 LCD screen...
... screen modes. Press the Screen button to switch between a Full display (all important information regarding camera settings as well as the visual image for your photo or video. Capture/Video Mode Display Capture Mode 1 23 45 67 9999 23 8 22 21 T 20 9 19 18 W 1/125 F3.5 -1.0EV 10 17 16 15 14 13 12 11 Video Mode 12 5 67 640 00:00:00 21 T 20 19 9 W 13 LCD screen English Introduction 7 LCD screen...

Owners Manual
Page 29
... Playback menu. Select This Image to delete the photo or Cancel to disable it . 3. Turn the Mode Dial to Auto mode. 2. Taking your First Photo Turn the camera on page 29 for close to start taking photos and movies. Press OK to confirm your camera, you are ready to the camera. See "Deleting Photos/Videos/ Audios" on and turn the Mode Dial to Macro mode. Using Macro Mode Macro mode is activated. Using Quick Review To delete a photo when using Quick Review: 1. The Macro icon displays on the LCD screen and press the Shutter button halfway. English Getting Started...
... Playback menu. Select This Image to delete the photo or Cancel to disable it . 3. Turn the Mode Dial to Auto mode. 2. Taking your First Photo Turn the camera on page 29 for close to start taking photos and movies. Press OK to confirm your camera, you are ready to the camera. See "Deleting Photos/Videos/ Audios" on and turn the Mode Dial to Macro mode. Using Macro Mode Macro mode is activated. Using Quick Review To delete a photo when using Quick Review: 1. The Macro icon displays on the LCD screen and press the Shutter button halfway. English Getting Started...

Owners Manual
Page 32
English 18 Getting Started Recording your First Video To record an audio file: 1. Press the Shutter button again to Video mode. 2. While recording, the selected image is used . 4. Turn the camera on and turn the Mode Dial to stop recording. If not, recording will continue until all free memory space is shown on to indicate recording is used . 4. Recording Audio Files You can add a 1-minute voice memo to stop recording. A counting up timer will continue until all free memory space is in Playback mode. Recording Voice...
English 18 Getting Started Recording your First Video To record an audio file: 1. Press the Shutter button again to Video mode. 2. While recording, the selected image is used . 4. Turn the camera on and turn the Mode Dial to stop recording. If not, recording will continue until all free memory space is shown on to indicate recording is used . 4. Recording Audio Files You can add a 1-minute voice memo to stop recording. A counting up timer will continue until all free memory space is in Playback mode. Recording Voice...

Owners Manual
Page 38
Video Capture Menu English 24 Capture Settings Setup See "The Setup Menu" on page 35 for more details on the setup menu options.
Video Capture Menu English 24 Capture Settings Setup See "The Setup Menu" on page 35 for more details on the setup menu options.

Owners Manual
Page 42
... the A/V port on the camera and make sure that the camera's video out format is displayed. Connect the USB/AV 3-in "Viewing Photos/Videos on the LCD Screen" on the TV screen. Use the Left/Right navigation buttons to previous/next image, press Left/Right navigation buttons. To skip to scroll through the files. 3. See "Video Out" on the camera. 3. The most recent photo or video 2. Press the OK button and press the Left...
... the A/V port on the camera and make sure that the camera's video out format is displayed. Connect the USB/AV 3-in "Viewing Photos/Videos on the LCD Screen" on the TV screen. Use the Left/Right navigation buttons to previous/next image, press Left/Right navigation buttons. To skip to scroll through the files. 3. See "Video Out" on the camera. 3. The most recent photo or video 2. Press the OK button and press the Left...

Owners Manual
Page 43
... LCD screen will display all images. Use the Up/Down navigation buttons to highlight an option and press the OK button to select Playback Mode. 2. Deleting Photos/Videos/Audios The Delete function allows you to crop the image. Turn the Mode Dial to confirm. button to view further informa- Zooming In During Playback English Photo, Video & Audio Playback 29 Zooming In During Playback The camera's zoom feature can also be used during Playback. Press the / menu. RESIZE ROTATE PROTECT 3. This allows you to remove...
... LCD screen will display all images. Use the Up/Down navigation buttons to highlight an option and press the OK button to select Playback Mode. 2. Deleting Photos/Videos/Audios The Delete function allows you to crop the image. Turn the Mode Dial to confirm. button to view further informa- Zooming In During Playback English Photo, Video & Audio Playback 29 Zooming In During Playback The camera's zoom feature can also be used during Playback. Press the / menu. RESIZE ROTATE PROTECT 3. This allows you to remove...
Owners Manual
Page 47
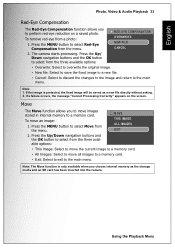
... into the camera. Move The Move function allows you to perform red-eye reduction on the screen. Press the MENU button to select Move from a photo: 1. Note: 1. MOVE THIS IMAGE ALL IMAGES EXIT 2. English Photo, Video & Audio Playback 33 Red-Eye Compensation The Red-Eye Compensation function allows you to move images stored in internal memory to a memory card. To remove red-eye from the menu. Using the Playback Menu If the image is only available when you choose internal memory as a new file directly without...
... into the camera. Move The Move function allows you to perform red-eye reduction on the screen. Press the MENU button to select Move from a photo: 1. Note: 1. MOVE THIS IMAGE ALL IMAGES EXIT 2. English Photo, Video & Audio Playback 33 Red-Eye Compensation The Red-Eye Compensation function allows you to move images stored in internal memory to a memory card. To remove red-eye from the menu. Using the Playback Menu If the image is only available when you choose internal memory as a new file directly without...

Owners Manual
Page 48
... camera's internal memory and/or SD/MMC card appear as removable drives in the file manager. Transferring Photos/Videos to a free USB port on the software CD) to install the camera driver. Connect the camera's USB port to your PC English 34 Photo, Video & Audio Playback Transferring Photos/Videos to your PC To transfer photos and videos to your PC: Use the software CD to view or edit the photos and videos respectively. Use ArcSoft PhotoImpression and ArcSoft VideoImpression (provided on your PC using the USB cable...
... camera's internal memory and/or SD/MMC card appear as removable drives in the file manager. Transferring Photos/Videos to a free USB port on the software CD) to install the camera driver. Connect the camera's USB port to your PC English 34 Photo, Video & Audio Playback Transferring Photos/Videos to your PC To transfer photos and videos to your PC: Use the software CD to view or edit the photos and videos respectively. Use ArcSoft PhotoImpression and ArcSoft VideoImpression (provided on your PC using the USB cable...
Owners Manual
Page 49
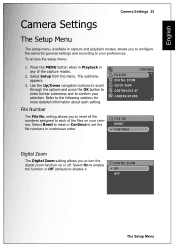
.... File Number The File No. Select Setup from the menu. The submenu appears. 3. Select On to enable the function or Off (default) to the following sections for more detailed information about each of the capture modes. 2. RESET CONTINUE Digital Zoom The Digital Zoom setting allows you to configure the camera's general settings and according to confirm your camera. To access the setup menu: 1. DIGITAL ZOOM QUICK VIEW CONTINUOUS AF CAMERA SOUND FILE NO. Use the Up/Down navigation buttons to...
.... File Number The File No. Select Setup from the menu. The submenu appears. 3. Select On to enable the function or Off (default) to the following sections for more detailed information about each of the capture modes. 2. RESET CONTINUE Digital Zoom The Digital Zoom setting allows you to configure the camera's general settings and according to confirm your camera. To access the setup menu: 1. DIGITAL ZOOM QUICK VIEW CONTINUOUS AF CAMERA SOUND FILE NO. Use the Up/Down navigation buttons to...

Owners Manual
Page 51
... buttons to adjust the length of time after which supports Pictbridge, it can directly print images stored on the media. The Setup Menu For details on PTP function, please See "PictBridge Print (PTP)" on the type of files between your camera and your camera and PC. English Auto Power Off The Auto Power Off setting allows you to select from the menu options. Use Up/Down navigation buttons to a printer by a USB cable which the camera will power...
... buttons to adjust the length of time after which supports Pictbridge, it can directly print images stored on the media. The Setup Menu For details on PTP function, please See "PictBridge Print (PTP)" on the type of files between your camera and your camera and PC. English Auto Power Off The Auto Power Off setting allows you to select from the menu options. Use Up/Down navigation buttons to a printer by a USB cable which the camera will power...

Owners Manual
Page 52
... photo when printed. LANGUAGE ENGLISH DEUTSCH FRANCAIS ITALIANO ESPANOL The Setup Menu Setting a date stamp allows for easy sorting and the date will appear on your language.Use Up/Down navigation buttons to select from the menu options. English 38 Camera Settings Date Stamp The Date Stamp setting allows you to adjust the format in which language the OSD menu uses. Use Up/Down navigation buttons to select from the menu options. You can also deactivate this function if you to set or adjust...
... photo when printed. LANGUAGE ENGLISH DEUTSCH FRANCAIS ITALIANO ESPANOL The Setup Menu Setting a date stamp allows for easy sorting and the date will appear on your language.Use Up/Down navigation buttons to select from the menu options. English 38 Camera Settings Date Stamp The Date Stamp setting allows you to adjust the format in which language the OSD menu uses. Use Up/Down navigation buttons to select from the menu options. You can also deactivate this function if you to set or adjust...
Owners Manual
Page 53
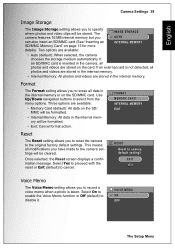
... Reset screen displays a confirmation message. Select On to enable the Voice Memo function or Off (default) to camera default setting? This means all data in the internal memory. If an SD/MMC card is not detected, all photos and videos are stored in the internal memory or on the SD/MMC card. The camera features 16 MB internal memory but you to reset the camera to the original factory default settings. Format The Format setting allows you to erase all...
... Reset screen displays a confirmation message. Select On to enable the Voice Memo function or Off (default) to camera default setting? This means all data in the internal memory. If an SD/MMC card is not detected, all photos and videos are stored in the internal memory or on the SD/MMC card. The camera features 16 MB internal memory but you to reset the camera to the original factory default settings. Format The Format setting allows you to erase all...

Owners Manual
Page 56
... cancel the action. DPOF Image See "DPOF" on page 30 for detailed information. After the number of copies is set the number of copies. Press Up/Down navigation buttons to print all images in index format. 1. Size:Default CONTINUE CANCEL PictBridge Print (PTP) English 42 Camera Settings Index Print Use this function to select the Paper size. • Default Size • Letter • A4 2/140 IMAGE STORAGE THIS IMAGE INDEX PRINT DPOF IMAGE ALL IMAGES INDEX PRINT DEFAULT SIZE LETTER A4 2. Copies:1 Prints:--
... cancel the action. DPOF Image See "DPOF" on page 30 for detailed information. After the number of copies is set the number of copies. Press Up/Down navigation buttons to print all images in index format. 1. Size:Default CONTINUE CANCEL PictBridge Print (PTP) English 42 Camera Settings Index Print Use this function to select the Paper size. • Default Size • Letter • A4 2/140 IMAGE STORAGE THIS IMAGE INDEX PRINT DPOF IMAGE ALL IMAGES INDEX PRINT DEFAULT SIZE LETTER A4 2. Copies:1 Prints:--
Owners Manual
Page 58
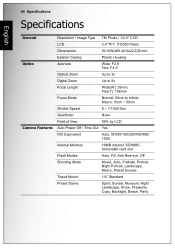
... Field of View 99% by LCD Auto Power Off / Time Out Yes ISO Equivalent Auto, ISO80/100/200/400/800/ 1000 Internal Memory 16MB internal, SD/MMC removable card slot Flash Modes Auto, Fill, Anti Red-eye, Off Shooting Mode Movie, Auto, P-Mode, Portrait, Night Portrait, Landscape, Macro, Preset Scenes Tripod Mount 1/4" Standard Preset Scene Sport, Sunset, Museum, Night Landscape, Snow, Fireworks, Copy, Backlight, Beach, Party 44 Specifications Specifications English General Optics Camera Features Resolution / Image Type 7M Pixels...
... Field of View 99% by LCD Auto Power Off / Time Out Yes ISO Equivalent Auto, ISO80/100/200/400/800/ 1000 Internal Memory 16MB internal, SD/MMC removable card slot Flash Modes Auto, Fill, Anti Red-eye, Off Shooting Mode Movie, Auto, P-Mode, Portrait, Night Portrait, Landscape, Macro, Preset Scenes Tripod Mount 1/4" Standard Preset Scene Sport, Sunset, Museum, Night Landscape, Snow, Fireworks, Copy, Backlight, Beach, Party 44 Specifications Specifications English General Optics Camera Features Resolution / Image Type 7M Pixels...
Owners Manual
Page 61
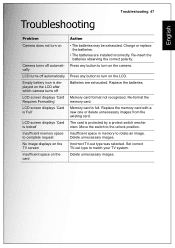
.... Delete unnecessary images. Replace the memory card with a new one or delete unnecessary images from the existing card. Memory card is protected by a protect switch mechanism. Move the switch to match your TV system. Press any button to turn on the LCD. Batteries are installed incorrectly. Press any button to turn on Camera turns off automatically LCD turns off automatically Empty battery icon is displayed on the LCD after which camera turns off LCD screen displays 'Card Requires Formatting' LCD screen displays 'Card is Full' LCD screen displays 'Card is locked...
.... Delete unnecessary images. Replace the memory card with a new one or delete unnecessary images from the existing card. Memory card is protected by a protect switch mechanism. Move the switch to match your TV system. Press any button to turn on the LCD. Batteries are installed incorrectly. Press any button to turn on Camera turns off automatically LCD turns off automatically Empty battery icon is displayed on the LCD after which camera turns off LCD screen displays 'Card Requires Formatting' LCD screen displays 'Card is Full' LCD screen displays 'Card is locked...


