
VPC-E1075 Owners Manual English
Page 3
... television reception, which the receiver is connected. • Consult the dealer or an experienced radio/TV technician for a Class B digital device, pursuant to Part 15 of the following conditions: • This device may cause harmful interference to radio communications. Declaration of.... About this equipment. All information presented is as accurate as possible but is no guarantee that may void your new digital camera. However, there is subject to change without prior written permission of the FCC rules. Copyright This manual contains proprietary information...
... television reception, which the receiver is connected. • Consult the dealer or an experienced radio/TV technician for a Class B digital device, pursuant to Part 15 of the following conditions: • This device may cause harmful interference to radio communications. Declaration of.... About this equipment. All information presented is as accurate as possible but is no guarantee that may void your new digital camera. However, there is subject to change without prior written permission of the FCC rules. Copyright This manual contains proprietary information...

VPC-E1075 Owners Manual English
Page 4
...the product and possibly start a fire. • Download all pictures and remove the battery from cold to warm temperatures. • Do not touch the camera lens. • Do not expose the lens to direct sunlight for long periods. All other countries. Safety and Handling Precautions ArcSoft is a trademark of .../or other companies or product names are going to the Microsoft Windows Operation System. Windows is an abbreviated term referring to store the camera for extended periods. • Do not use abrasive chemicals, cleaning solvents or strong detergents to clean the product.
...the product and possibly start a fire. • Download all pictures and remove the battery from cold to warm temperatures. • Do not touch the camera lens. • Do not expose the lens to direct sunlight for long periods. All other countries. Safety and Handling Precautions ArcSoft is a trademark of .../or other companies or product names are going to the Microsoft Windows Operation System. Windows is an abbreviated term referring to store the camera for extended periods. • Do not use abrasive chemicals, cleaning solvents or strong detergents to clean the product.

VPC-E1075 Owners Manual English
Page 5
... might cause fire or electric shock. For repair or internal inspection, ask the store of children. This might cause poisoning. Do not place the camera on the beach, or near water. This might cause the camera to fall or tilt over or result in areas near the shore. Do not use the... camera in traffic accident. If the battery is accidentally swallowed, immediately consult a physician. This might cause fire or electric shock. English Preface iii Safety Instructions Read ...
... might cause fire or electric shock. For repair or internal inspection, ask the store of children. This might cause poisoning. Do not place the camera on the beach, or near water. This might cause the camera to fall or tilt over or result in areas near the shore. Do not use the... camera in traffic accident. If the battery is accidentally swallowed, immediately consult a physician. This might cause fire or electric shock. English Preface iii Safety Instructions Read ...

VPC-E1075 Owners Manual English
Page 6
...injury, or damage to the surrounding areas due to the polarity (+ or -) of the terminals. Wash hands after long period of California to the camera. If the internal fluid enters your eyes or comes into contact with your eyes, consult a physician to the person's eyesight. Touching a hot ...battery might cause fire or electric shock. Do not leave the camera in places where the temperature may rise significantly, such as inside , resulting in fire. Do not subject the LCD monitor to do this might...
...injury, or damage to the surrounding areas due to the polarity (+ or -) of the terminals. Wash hands after long period of California to the camera. If the internal fluid enters your eyes or comes into contact with your eyes, consult a physician to the person's eyesight. Touching a hot ...battery might cause fire or electric shock. Do not leave the camera in places where the temperature may rise significantly, such as inside , resulting in fire. Do not subject the LCD monitor to do this might...

VPC-E1075 Owners Manual English
Page 8
...electronic equipment, batteries and accumulstors, at a certain concentration. Manufacturer and Address SANYO Electric Co., Ltd. 5-5, Keihan-hondori, 2-chome, Moriguchi City, Osaka, Japan Authorized Representative and Address SANYO FISHER Sales (Europe) GmbH Stahlgruberring 4, D-81829 Munich, Germany Symbols used ... and accumulators. Safety Instructions Your SANYO product is printed beneath the symbol mark, this manual Points giving some extended instructions or special points to pay attention to questions or problems concerning camera operation in the sections "Troubleshooting"....
...electronic equipment, batteries and accumulstors, at a certain concentration. Manufacturer and Address SANYO Electric Co., Ltd. 5-5, Keihan-hondori, 2-chome, Moriguchi City, Osaka, Japan Authorized Representative and Address SANYO FISHER Sales (Europe) GmbH Stahlgruberring 4, D-81829 Munich, Germany Symbols used ... and accumulators. Safety Instructions Your SANYO product is printed beneath the symbol mark, this manual Points giving some extended instructions or special points to pay attention to questions or problems concerning camera operation in the sections "Troubleshooting"....

VPC-E1075 Owners Manual English
Page 10
...trademarks of explanation and may differ from those described in this manual. Products very often vary between retailers especially with your camera. • The manufacturer assumes no liability for the product. • The product and accessories that different retailers often specify...registered trademarks of Microsoft Corporation. • Pentium® is a registered trademark of Intel Corporation. • Macintosh® is a trademark of your camera may be different from the actual design of Apple Computer, Inc. • SD™ is a trademark. • SDHC™ is a...
...trademarks of explanation and may differ from those described in this manual. Products very often vary between retailers especially with your camera. • The manufacturer assumes no liability for the product. • The product and accessories that different retailers often specify...registered trademarks of Microsoft Corporation. • Pentium® is a registered trademark of Intel Corporation. • Macintosh® is a trademark of your camera may be different from the actual design of Apple Computer, Inc. • SD™ is a trademark. • SDHC™ is a...

VPC-E1075 Owners Manual English
Page 11
... ...i Federal Communications Commission (FCC) Compliance i Declaration of Conformity i Trademark Recognition ...ii Safety and Handling Precautions ii Camera Information ...ii Battery Information ...ii Safety Instructions iii WARNING ...iii CAUTION ...iv FOR AMERICAN USERS iv FOR CANADIAN USERS...FIRST ...viii Introduction 1 System Requirements 1 Package Contents 1 Main Features ...1 Camera Views 2 Front View ...2 Back View ...2 Top View ...2 Bottom View ...3 Left / Right View ...3 LED Indicators 3 Camera Buttons 4 Navigation Buttons ...4 The Scene Button ...7 Function Buttons ...8 LCD ...
... ...i Federal Communications Commission (FCC) Compliance i Declaration of Conformity i Trademark Recognition ...ii Safety and Handling Precautions ii Camera Information ...ii Battery Information ...ii Safety Instructions iii WARNING ...iii CAUTION ...iv FOR AMERICAN USERS iv FOR CANADIAN USERS...FIRST ...viii Introduction 1 System Requirements 1 Package Contents 1 Main Features ...1 Camera Views 2 Front View ...2 Back View ...2 Top View ...2 Bottom View ...3 Left / Right View ...3 LED Indicators 3 Camera Buttons 4 Navigation Buttons ...4 The Scene Button ...7 Function Buttons ...8 LCD ...

VPC-E1075 Owners Manual English
Page 13
... Protect ...39 Red-Eye Removal ...40 Move ...40 Transferring Photos/Videos to your PC 41 Camera Settings 42 The Setup Menu 42 LCD Brightness ...42 File Number ...42 Digital Zoom ...43 Quick View ...43 Continuous AF ...43 Camera Sound ...43 Auto LCD Off ...44 Auto Power Off ...44 Video Out ...44 USB Mode...
... Protect ...39 Red-Eye Removal ...40 Move ...40 Transferring Photos/Videos to your PC 41 Camera Settings 42 The Setup Menu 42 LCD Brightness ...42 File Number ...42 Digital Zoom ...43 Quick View ...43 Continuous AF ...43 Camera Sound ...43 Auto LCD Off ...44 Auto Power Off ...44 Video Out ...44 USB Mode...

VPC-E1075 Owners Manual English
Page 15
... strap • One Li-ion battery • Battery charger and power cord • Camera pouch • Quick start guide for all regions) Main Features • 10.0 mega pixels resolution • 15x zoom (Up to 3x optical zoom and 5x digital zoom) • 1/2.33 inch CCD image sensor • 2.7 inch GPT TFT LCD monitor...
... strap • One Li-ion battery • Battery charger and power cord • Camera pouch • Quick start guide for all regions) Main Features • 10.0 mega pixels resolution • 15x zoom (Up to 3x optical zoom and 5x digital zoom) • 1/2.33 inch CCD image sensor • 2.7 inch GPT TFT LCD monitor...
VPC-E1075 Owners Manual English
Page 16
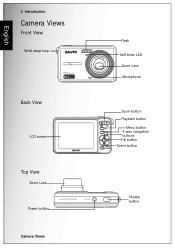
English 2 Introduction Camera Views Front View Wrist strap loop Back View LCD screen Top View Zoom Lens Power button 3X OPTICAL ZOOM ON / OFF Camera Views Flash Self-timer LED Zoom Lens Microphone Zoom button Playback button Menu button 4-way navigation buttons OK button Scene button Shutter button
English 2 Introduction Camera Views Front View Wrist strap loop Back View LCD screen Top View Zoom Lens Power button 3X OPTICAL ZOOM ON / OFF Camera Views Flash Self-timer LED Zoom Lens Microphone Zoom button Playback button Menu button 4-way navigation buttons OK button Scene button Shutter button

VPC-E1075 Owners Manual English
Page 17
Timer count down , flash after 10 seconds. Timer count down , flash after 2 seconds. Ready to take picture. Camera busy Self-timer off. LED Indicators English Bottom View Introduction 3 Tripod mount Left / Right View Wrist strap loop Battery/SD card compartment Speaker USB/AV port DC-in port LED Indicators LED Power/Flash LED LED Status Off Blue (steady) Blue (blinking) Off Self-timer LED Red (blinking) (10 sec) Red (blinking) (2 sec) Camera Status Power Off.
Timer count down , flash after 10 seconds. Timer count down , flash after 2 seconds. Ready to take picture. Camera busy Self-timer off. LED Indicators English Bottom View Introduction 3 Tripod mount Left / Right View Wrist strap loop Battery/SD card compartment Speaker USB/AV port DC-in port LED Indicators LED Power/Flash LED LED Status Off Blue (steady) Blue (blinking) Off Self-timer LED Red (blinking) (10 sec) Red (blinking) (2 sec) Camera Status Power Off.

VPC-E1075 Owners Manual English
Page 18
...maximum results from the On Screen Display (OSD) menu. You can configure a wide range of settings to enable/disable the anti-shake function Camera Buttons Icon OK/ Button OK/ Anti-shake Function 1. In Capture mode: • Press to enable/disable the Anti-Shake in Auto ...N/A • PTP: Press to enable Shutter Speed selection in Aperture Priority mode (Av) • Press to confirm the selection 5. English 4 Introduction Camera Buttons Navigation Buttons The 4-way navigation buttons and the OK button allow you to stop the voice memo playback 4. In Playback mode: • Press to...
...maximum results from the On Screen Display (OSD) menu. You can configure a wide range of settings to enable/disable the anti-shake function Camera Buttons Icon OK/ Button OK/ Anti-shake Function 1. In Capture mode: • Press to enable/disable the Anti-Shake in Auto ...N/A • PTP: Press to enable Shutter Speed selection in Aperture Priority mode (Av) • Press to confirm the selection 5. English 4 Introduction Camera Buttons Navigation Buttons The 4-way navigation buttons and the OK button allow you to stop the voice memo playback 4. In Playback mode: • Press to...

VPC-E1075 Owners Manual English
Page 19
... to scroll up in zoom in mode • Press to move right in the thumbnail display • Press to pan right in This Image submenu Camera Buttons In USB mode: • MSDC: N/A • PTP: Press to delete images 4. English Icon Introduction 5 Button Function Up/Flash/Delete 1. In Playback mode: • Press...
... to scroll up in zoom in mode • Press to move right in the thumbnail display • Press to pan right in This Image submenu Camera Buttons In USB mode: • MSDC: N/A • PTP: Press to delete images 4. English Icon Introduction 5 Button Function Up/Flash/Delete 1. In Playback mode: • Press...

VPC-E1075 Owners Manual English
Page 20
... thumbnail display • Press to fast rewind video playback during Pause mode 5. In Capture mode: • Press to the previous level in This Image submenu Camera Buttons Macro icon displays on the LCD screen • Press to select the previous image in the OSD menus 3. In USB mode: • MSDC: N/A •...
... thumbnail display • Press to fast rewind video playback during Pause mode 5. In Capture mode: • Press to the previous level in This Image submenu Camera Buttons Macro icon displays on the LCD screen • Press to select the previous image in the OSD menus 3. In USB mode: • MSDC: N/A •...
VPC-E1075 Owners Manual English
Page 21
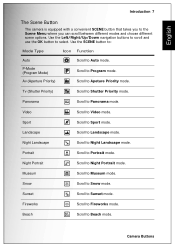
...Landscape mode. Scroll to Apeture Priority mode. Scroll to Program mode. Sport Scroll to Portrait mode. Portrait Scroll to Sport mode. Camera Buttons Use the Left/Right/Up/Down navigation buttons to scroll and use the OK button to Museum mode. Museum Scroll to select.... Tv (Shutter Priority) Scroll to Video mode. Video Scroll to Shutter Priority mode. English Introduction 7 The Scene Button The camera is equipped with a convenient SCENE button that takes you to Night Landscape mode. Night Landscape Scroll to the Scene Menu where you can...
...Landscape mode. Scroll to Apeture Priority mode. Scroll to Program mode. Sport Scroll to Portrait mode. Portrait Scroll to Sport mode. Camera Buttons Use the Left/Right/Up/Down navigation buttons to scroll and use the OK button to Museum mode. Museum Scroll to select.... Tv (Shutter Priority) Scroll to Video mode. Video Scroll to Shutter Priority mode. English Introduction 7 The Scene Button The camera is equipped with a convenient SCENE button that takes you to Night Landscape mode. Night Landscape Scroll to the Scene Menu where you can...
VPC-E1075 Owners Manual English
Page 22
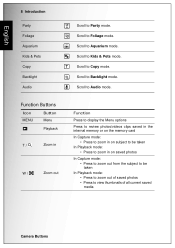
... subject to be taken In Playback mode: • Press to zoom out of saved photos • Press to view thumbnails of all current saved media Camera Buttons Scroll to Kids & Pets mode. Scroll to Aquarium mode. Function Press to display the Menu options Press to review photos/videos clips saved in...
... subject to be taken In Playback mode: • Press to zoom out of saved photos • Press to view thumbnails of all current saved media Camera Buttons Scroll to Kids & Pets mode. Scroll to Aquarium mode. Function Press to display the Menu options Press to review photos/videos clips saved in...
VPC-E1075 Owners Manual English
Page 23
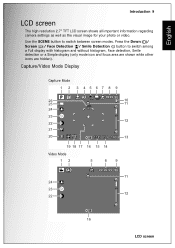
Capture/Video Mode Display Capture Mode 12 3 4567 8 9 8M 26 25 24 23 22 21 20 9999 10 11 12 1/125 F5.5 -1.0EV 13 19 18 17 16 15 14 Video Mode 12 5 89 640 24 23 22 00:00:00 11 12 ... / Face Detection / Smile Detection button to switch between screen modes. English Introduction 9 LCD screen The high resolution 2.7" TFT LCD screen shows all important information regarding camera settings as well as the visual image for your photo or video.
Capture/Video Mode Display Capture Mode 12 3 4567 8 9 8M 26 25 24 23 22 21 20 9999 10 11 12 1/125 F5.5 -1.0EV 13 19 18 17 16 15 14 Video Mode 12 5 89 640 24 23 22 00:00:00 11 12 ... / Face Detection / Smile Detection button to switch between screen modes. English Introduction 9 LCD screen The high resolution 2.7" TFT LCD screen shows all important information regarding camera settings as well as the visual image for your photo or video.
VPC-E1075 Owners Manual English
Page 29
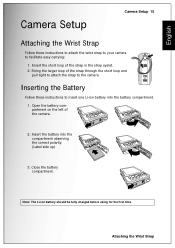
...strap eyelet. 2. Close the battery compartment. Attaching the Wrist Strap Insert the short loop of the camera. 2. Insert the battery into the battery compartment. 1. English Camera Setup Camera Setup 15 Attaching the Wrist Strap Follow these instructions to insert one Li-ion battery into the compartment... observing the correct polarity. (Label side up) 3. Inserting the Battery Follow these instructions to attach the wrist strap to your camera to the camera. Note: The Li-ion battery should be fully charged before using for the first time. String the larger loop of the...
...strap eyelet. 2. Close the battery compartment. Attaching the Wrist Strap Insert the short loop of the camera. 2. Insert the battery into the battery compartment. 1. English Camera Setup Camera Setup 15 Attaching the Wrist Strap Follow these instructions to insert one Li-ion battery into the compartment... observing the correct polarity. (Label side up) 3. Inserting the Battery Follow these instructions to attach the wrist strap to your camera to the camera. Note: The Li-ion battery should be fully charged before using for the first time. String the larger loop of the...

VPC-E1075 Owners Manual English
Page 30
... On Press and hold the Power button to turn off the camera, press the Power button again. Inserting an SD/MMC Memory Card English 16 Camera Setup Inserting an SD/MMC Memory Card The camera features 16 MB internal flash memory but you may also use an optional SD/MMC memory card for... card into the battery charger as shown. (Label side up) 3. Close the battery compartment. Note: Please don't take in and out the SD card while camera is processing. Charging the Battery Insert the battery into the memory card slot as shown (Label side down). Connect the power supply to insert the...
... On Press and hold the Power button to turn off the camera, press the Power button again. Inserting an SD/MMC Memory Card English 16 Camera Setup Inserting an SD/MMC Memory Card The camera features 16 MB internal flash memory but you may also use an optional SD/MMC memory card for... card into the battery charger as shown. (Label side up) 3. Close the battery compartment. Note: Please don't take in and out the SD card while camera is processing. Charging the Battery Insert the battery into the memory card slot as shown (Label side down). Connect the power supply to insert the...
VPC-E1075 Owners Manual English
Page 31
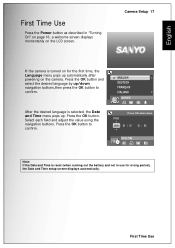
... ITALIANO LANGUAGE After the desired language is turned on for a long period), the Date and Time setup screen displays automatically. First Time Use Camera Setup 17 If the camera is selected, the Date and Time menu pops up /down navigation buttons,then press the OK button to confirm. (Year) Press OK when... the Date and Time is reset (when running out the battery and not in "Turning On" on page 16, a welcome screen displays momentarily on the camera. Press the OK button.
... ITALIANO LANGUAGE After the desired language is turned on for a long period), the Date and Time setup screen displays automatically. First Time Use Camera Setup 17 If the camera is selected, the Date and Time menu pops up /down navigation buttons,then press the OK button to confirm. (Year) Press OK when... the Date and Time is reset (when running out the battery and not in "Turning On" on page 16, a welcome screen displays momentarily on the camera. Press the OK button.


