
VPC-E1075 Owners Manual English
Page 3
... installation. This equipment generates, uses, and can be reproduced by any mechanical, electronic or other means, in any interference received, including interference that may cause undersired operation. Copyright This manual contains proprietary information protected by the manufacturer may void your new digital camera. English Preface Preface i About this manual may be determined by turning the equipment off and on, the user...
... installation. This equipment generates, uses, and can be reproduced by any mechanical, electronic or other means, in any interference received, including interference that may cause undersired operation. Copyright This manual contains proprietary information protected by the manufacturer may void your new digital camera. English Preface Preface i About this manual may be determined by turning the equipment off and on, the user...

VPC-E1075 Owners Manual English
Page 12
English Charging the Battery 16 Turning On ...16 First Time Use 17 Getting Started 18 Taking your First Photo 18 Anti-Shake Function ...18 Using Macro Mode ...18 Setting the Flash Mode ...18 Using the Zoom in/out Function 19 Using the Self-timer and Burst Photography 19 Using the Av Mode ...20 Using the Tv Mode ...20 Using the AEB (Auto Exposure Bracketing) Function 21 Setting the Scene Mode 22 Face and Smile Detection AF/AE Function 23 Taking Panoramic Pictures 23 Recording your First Video 24 Recording Audio...
English Charging the Battery 16 Turning On ...16 First Time Use 17 Getting Started 18 Taking your First Photo 18 Anti-Shake Function ...18 Using Macro Mode ...18 Setting the Flash Mode ...18 Using the Zoom in/out Function 19 Using the Self-timer and Burst Photography 19 Using the Av Mode ...20 Using the Tv Mode ...20 Using the AEB (Auto Exposure Bracketing) Function 21 Setting the Scene Mode 22 Face and Smile Detection AF/AE Function 23 Taking Panoramic Pictures 23 Recording your First Video 24 Recording Audio...

VPC-E1075 Owners Manual English
Page 13
... 35 Zooming In/Out During Playback 36 Deleting Photos/Videos 36 Using the Playback Menu 36 DPOF ...37 Slideshow ...38 Resize ...38 Rotate ...39 Protect ...39 Red-Eye Removal ...40 Move ...40 Transferring Photos/Videos to your PC 41 Camera Settings 42 The Setup Menu 42 LCD Brightness ...42 File Number ...42 Digital Zoom ...43 Quick View ...43 Continuous AF ...43 Camera Sound ...43 Auto LCD Off ...44 Auto Power Off ...44 Video Out ...44 USB Mode ...44 Date Stamp ...45 Date and Time ...45 Language ...45 Image Storage ...46 Format ...46 Reset ...46...
... 35 Zooming In/Out During Playback 36 Deleting Photos/Videos 36 Using the Playback Menu 36 DPOF ...37 Slideshow ...38 Resize ...38 Rotate ...39 Protect ...39 Red-Eye Removal ...40 Move ...40 Transferring Photos/Videos to your PC 41 Camera Settings 42 The Setup Menu 42 LCD Brightness ...42 File Number ...42 Digital Zoom ...43 Quick View ...43 Continuous AF ...43 Camera Sound ...43 Auto LCD Off ...44 Auto Power Off ...44 Video Out ...44 USB Mode ...44 Date Stamp ...45 Date and Time ...45 Language ...45 Image Storage ...46 Format ...46 Reset ...46...

VPC-E1075 Owners Manual English
Page 15
... optical zoom and 5x digital zoom) • 1/2.33 inch CCD image sensor • 2.7 inch GPT TFT LCD monitor • 16MB internal flash memory, support SD/MMC memory card from 32MB to 16GB. • Sleek and slim design • Easy-to-use button interface • PictBridge compatibility • Slideshow feature to review your pictures and movies • A/V output to view your pictures and movies on your TV • USB port to transfer photos and movies to...
... optical zoom and 5x digital zoom) • 1/2.33 inch CCD image sensor • 2.7 inch GPT TFT LCD monitor • 16MB internal flash memory, support SD/MMC memory card from 32MB to 16GB. • Sleek and slim design • Easy-to-use button interface • PictBridge compatibility • Slideshow feature to review your pictures and movies • A/V output to view your pictures and movies on your TV • USB port to transfer photos and movies to...

VPC-E1075 Owners Manual English
Page 17
English Bottom View Introduction 3 Tripod mount Left / Right View Wrist strap loop Battery/SD card compartment Speaker USB/AV port DC-in port LED Indicators LED Power/Flash LED LED Status Off Blue (steady) Blue (blinking) Off Self-timer LED Red (blinking) (10 sec) Red (blinking) (2 sec) Camera Status Power Off. Camera busy Self-timer off. LED Indicators Timer count down , flash after 10 seconds. Timer count down , flash after 2 seconds. Ready to take picture.
English Bottom View Introduction 3 Tripod mount Left / Right View Wrist strap loop Battery/SD card compartment Speaker USB/AV port DC-in port LED Indicators LED Power/Flash LED LED Status Off Blue (steady) Blue (blinking) Off Self-timer LED Red (blinking) (10 sec) Red (blinking) (2 sec) Camera Status Power Off. Camera busy Self-timer off. LED Indicators Timer count down , flash after 10 seconds. Timer count down , flash after 2 seconds. Ready to take picture.

VPC-E1075 Owners Manual English
Page 18
... to enable/disable the Anti-Shake in Auto mode • Press to enable Shutter Speed selection in Shutter Priority mode (Tv) 3. You can configure a wide range of settings to confirm the selection 5. Icon OK/ Button OK/ Anti-shake Function 1. In Video mode: • Press to stop the voice memo playback 4. In USB mode: • MSDC: N/A • PTP: Press to ensure maximum results from the On Screen Display (OSD) menu.
... to enable/disable the Anti-Shake in Auto mode • Press to enable Shutter Speed selection in Shutter Priority mode (Tv) 3. You can configure a wide range of settings to confirm the selection 5. Icon OK/ Button OK/ Anti-shake Function 1. In Video mode: • Press to stop the voice memo playback 4. In USB mode: • MSDC: N/A • PTP: Press to ensure maximum results from the On Screen Display (OSD) menu.
VPC-E1075 Owners Manual English
Page 26
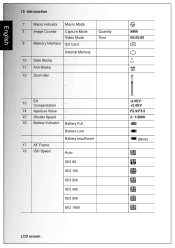
LCD screen English 12 Introduction 7 Macro indicator Macro Mode 8 Image Counter Capture Mode Video Mode 9 Memory Interface SD Card Internal Memory 10 Date Stamp - 11 Anti-Shake - 12 Zoom Bar Quantity Time - 13 EV Compensation - 14 Aperture Value - 15 Shutter Speed - 16 Battery Indicator Battery Full Battery Low 17 AF Frame 18 ISO Speed Battery Insufficient Auto ISO 80 ISO 100 ISO 200 ISO 400 ISO 800 ISO 1600 9999 00:00:00 -2.0EV~ +2.0EV F2.9/F5.5 2~1/2000 (Blink) -
LCD screen English 12 Introduction 7 Macro indicator Macro Mode 8 Image Counter Capture Mode Video Mode 9 Memory Interface SD Card Internal Memory 10 Date Stamp - 11 Anti-Shake - 12 Zoom Bar Quantity Time - 13 EV Compensation - 14 Aperture Value - 15 Shutter Speed - 16 Battery Indicator Battery Full Battery Low 17 AF Frame 18 ISO Speed Battery Insufficient Auto ISO 80 ISO 100 ISO 200 ISO 400 ISO 800 ISO 1600 9999 00:00:00 -2.0EV~ +2.0EV F2.9/F5.5 2~1/2000 (Blink) -

VPC-E1075 Owners Manual English
Page 32
... LCD screen. Taking your subject is required. Frame the shot on the LCD screen. The camera automatically adjusts the focus and exposure. Press the Left/Macro navigation button. The Macro icon displays on the LCD screen and press the Shutter button halfway. The flash setting remains the same for close to disable it as a longer exposure time (more than 1/30 second) is very close -up photography and can choose from four flash modes to capture the image...
... LCD screen. Taking your subject is required. Frame the shot on the LCD screen. The camera automatically adjusts the focus and exposure. Press the Left/Macro navigation button. The Macro icon displays on the LCD screen and press the Shutter button halfway. The flash setting remains the same for close to disable it as a longer exposure time (more than 1/30 second) is very close -up photography and can choose from four flash modes to capture the image...

VPC-E1075 Owners Manual English
Page 37
... Panorama mode,then press the OK button to indicate the number of 1 pictures overlap. The frame record icon will be set on the LCD screen. 1/125 F3.5 Then the camera automatically adjusts the focus point and exposure to the optimized value. Press the Shutter button all the way to take panoramic shots in most capture modes. Frame the first view on the LCD screen. 2. firm.The Panorama icon dispalys on the LCD screen and press the Shutter button. Taking Panoramic Pictures When the Shutter button...
... Panorama mode,then press the OK button to indicate the number of 1 pictures overlap. The frame record icon will be set on the LCD screen. 1/125 F3.5 Then the camera automatically adjusts the focus point and exposure to the optimized value. Press the Shutter button all the way to take panoramic shots in most capture modes. Frame the first view on the LCD screen. 2. firm.The Panorama icon dispalys on the LCD screen and press the Shutter button. Taking Panoramic Pictures When the Shutter button...
VPC-E1075 Owners Manual English
Page 38
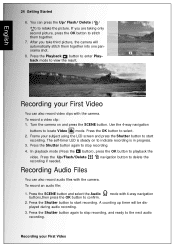
... Up/Flash/Delete recording if needed. After you are taking only second picture, press the OK button to start recording. To record a video clip: 1. Press the Playback button to enter Playback mode to playback the video. Use the 4-way navigation buttons to indicate recording is in progress. 3. mode with the camera. English 24 Getting Started 6. The self-timer LED is steady on and press the SCENE button. You can also record audio files with 4-way navigation 2. Recording your subject using the LCD screen and...
... Up/Flash/Delete recording if needed. After you are taking only second picture, press the OK button to start recording. To record a video clip: 1. Press the Playback button to enter Playback mode to playback the video. Use the 4-way navigation buttons to indicate recording is in progress. 3. mode with the camera. English 24 Getting Started 6. The self-timer LED is steady on and press the SCENE button. You can also record audio files with 4-way navigation 2. Recording your subject using the LCD screen and...
VPC-E1075 Owners Manual English
Page 49
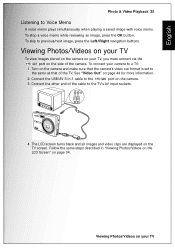
... camera. 3. The LCD screen turns black and all images and video clips are displayed on the side of the camera. To stop a voice memo while reviewing an image, press the OK button. To skip to Voice Memo A voice memo plays simultaneously when playing a saved image with voice memo. Viewing Photos/Videos on your TV To view images stored on the camera on your TV, you must connect via the port on the TV screen. English Photo & Video Playback...
... camera. 3. The LCD screen turns black and all images and video clips are displayed on the side of the camera. To stop a voice memo while reviewing an image, press the OK button. To skip to Voice Memo A voice memo plays simultaneously when playing a saved image with voice memo. Viewing Photos/Videos on your TV To view images stored on the camera on your TV, you must connect via the port on the TV screen. English Photo & Video Playback...
VPC-E1075 Owners Manual English
Page 50
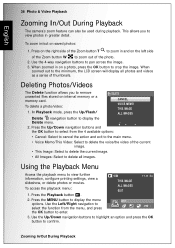
... Playback mode, press the Up/Flash/ DELETE CANCEL VOICE MEMO THIS IMAGE ALL IMAGES Delete navigation button to the minimum, the LCD screen will display all images. Press the MENU button to view further information, configure printing settings, view a slideshow, or delete photos or movies. To delete a photo/video: 1. Using the Playback Menu Access the playback menu to display the menu DPOF options. Use the 4-way navigation buttons to enter. 3. To zoom in and on internal memory or a memory card. Use the Left/Right navigation to select the function from...
... Playback mode, press the Up/Flash/ DELETE CANCEL VOICE MEMO THIS IMAGE ALL IMAGES Delete navigation button to the minimum, the LCD screen will display all images. Press the MENU button to view further information, configure printing settings, view a slideshow, or delete photos or movies. To delete a photo/video: 1. Using the Playback Menu Access the playback menu to display the menu DPOF options. Use the 4-way navigation buttons to enter. 3. To zoom in and on internal memory or a memory card. Use the Left/Right navigation to select the function from...
VPC-E1075 Owners Manual English
Page 54
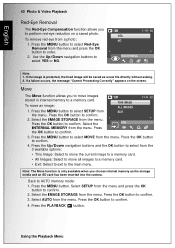
... AUTO memory mode: 1. Press the PLAYBACK button. If a failure occurs, the message "Cannot Processing Correctly" appears on a saved photo. Note: The Move function is protected, the fixed image will be saved as the storage media and an SD card has been inserted into the camera. Select AUTO from the menu and press the OK button to confirm. 2. English 40 Photo & Video Playback Red-Eye Removal The Red-Eye Compensation function allows you to move images stored in internal memory to a memory card. To remove red-eye...
... AUTO memory mode: 1. Press the PLAYBACK button. If a failure occurs, the message "Cannot Processing Correctly" appears on a saved photo. Note: The Move function is protected, the fixed image will be saved as the storage media and an SD card has been inserted into the camera. Select AUTO from the menu and press the OK button to confirm. 2. English 40 Photo & Video Playback Red-Eye Removal The Red-Eye Compensation function allows you to move images stored in internal memory to a memory card. To remove red-eye...
VPC-E1075 Owners Manual English
Page 55
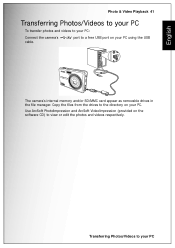
English Photo & Video Playback 41 Transferring Photos/Videos to your PC To transfer photos and videos to your PC Transferring Photos/Videos to your PC: Connect the camera's cable. Copy the files from the drives to the directory on the software CD) to a free USB port on your PC. Use ArcSoft PhotoImpression and ArcSoft VideoImpression (provided on your PC using the USB ON / OFF 3X OPTICAL ZOOM The camera's internal memory and/or SD/MMC card appear as removable drives in the file manager. port to view or edit the photos and videos respectively.
English Photo & Video Playback 41 Transferring Photos/Videos to your PC To transfer photos and videos to your PC Transferring Photos/Videos to your PC: Connect the camera's cable. Copy the files from the drives to the directory on the software CD) to a free USB port on your PC. Use ArcSoft PhotoImpression and ArcSoft VideoImpression (provided on your PC using the USB ON / OFF 3X OPTICAL ZOOM The camera's internal memory and/or SD/MMC card appear as removable drives in the file manager. port to view or edit the photos and videos respectively.

VPC-E1075 Owners Manual English
Page 57
... taken. Camera Settings 43 ON OFF Quick View The Quick View setting allows you to disable it . Select ON (default) to enable the function or OFF to turn the continuous auto focus function ON or OFF. Continuous AF The Continuous AF setting allows you to delete the photo immediately. Select ON to enable the ON function or OFF (default) to confirm. CONTINUOUS AF VOLUME LOW START-UP 3 SHUTTER 2 EXIT CAMERA SOUND The Setup Menu Press the OK button to disable it displays on...
... taken. Camera Settings 43 ON OFF Quick View The Quick View setting allows you to disable it . Select ON (default) to enable the function or OFF to turn the continuous auto focus function ON or OFF. Continuous AF The Continuous AF setting allows you to delete the photo immediately. Select ON to enable the ON function or OFF (default) to confirm. CONTINUOUS AF VOLUME LOW START-UP 3 SHUTTER 2 EXIT CAMERA SOUND The Setup Menu Press the OK button to disable it displays on...

VPC-E1075 Owners Manual English
Page 58
..., it can directly print images stored on page 47. English 44 Camera Settings Auto LCD Off The Auto LCD Off setting allows you to adjust the length of time that the LCD screen will power down when inactive. The Setup Menu For details on PTP function, please See "PictBridge Print (PTP)" on the media. Use the Up/Down navigation buttons to select from the menu options. 2 options are available: • NTSC (default) • PAL...
..., it can directly print images stored on page 47. English 44 Camera Settings Auto LCD Off The Auto LCD Off setting allows you to adjust the length of time that the LCD screen will power down when inactive. The Setup Menu For details on PTP function, please See "PictBridge Print (PTP)" on the media. Use the Up/Down navigation buttons to select from the menu options. 2 options are available: • NTSC (default) • PAL...
VPC-E1075 Owners Manual English
Page 59
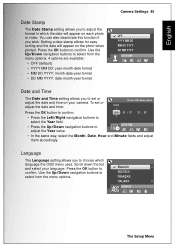
English Date Stamp The Date Stamp setting allows you to adjust the format in which language the OSD menu uses. Language The Language setting allows you to choose which the date will appear on your language. Press the OK button to confirm. Setting a date stamp allows for easy sorting and the date will appear on each photo or video. You can also deactivate this function if you to set or adjust the date and time: (Year) Press OK when done...
English Date Stamp The Date Stamp setting allows you to adjust the format in which language the OSD menu uses. Language The Language setting allows you to choose which the date will appear on your language. Press the OK button to confirm. Setting a date stamp allows for easy sorting and the date will appear on each photo or video. You can also deactivate this function if you to set or adjust the date and time: (Year) Press OK when done...
VPC-E1075 Owners Manual English
Page 64
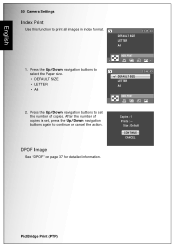
... number of copies is set the number of copies. Copies : 1 Prints : -- Size : Default CONTINUE CANCEL PictBridge Print (PTP) DPOF Image See "DPOF" on page 37 for detailed information. Press the Up/Down navigation buttons to set , press the Up/Down navigation buttons again to continue or cancel the action. Press the Up/Down navigation buttons to print all images in index format. 1. English 50 Camera Settings Index Print Use this function to select the Paper size. • DEFAULT SIZE...
... number of copies is set the number of copies. Copies : 1 Prints : -- Size : Default CONTINUE CANCEL PictBridge Print (PTP) DPOF Image See "DPOF" on page 37 for detailed information. Press the Up/Down navigation buttons to set , press the Up/Down navigation buttons again to continue or cancel the action. Press the Up/Down navigation buttons to print all images in index format. 1. English 50 Camera Settings Index Print Use this function to select the Paper size. • DEFAULT SIZE...
VPC-E1075 Owners Manual English
Page 67
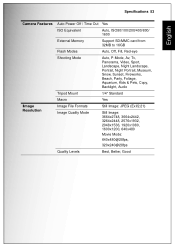
Specifications 53 English Camera Features Image Resolution Auto Power Off / Time Out Yes ISO Equivalent Auto, ISO80/100/200/400/800/ 1600 External Memory Support SD/MMC card from 32MB to 16GB Flash Modes Auto, Off, Fill, Red-eye Shooting Mode Auto, P-Mode, Av, Tv, Panorama, Video, Sport, Landscape, Night Landscape, Portrait, Night Portrait, Museum, Snow, Sunset, Fireworks, Beach, Party, Foliage, Aquarium, Kids & Pets, Copy, Backlight, Audio Tripod Mount 1/4" Standard Macro Yes Image File Formats Still Image: JPEG (Exif2.21...
Specifications 53 English Camera Features Image Resolution Auto Power Off / Time Out Yes ISO Equivalent Auto, ISO80/100/200/400/800/ 1600 External Memory Support SD/MMC card from 32MB to 16GB Flash Modes Auto, Off, Fill, Red-eye Shooting Mode Auto, P-Mode, Av, Tv, Panorama, Video, Sport, Landscape, Night Landscape, Portrait, Night Portrait, Museum, Snow, Sunset, Fireworks, Beach, Party, Foliage, Aquarium, Kids & Pets, Copy, Backlight, Audio Tripod Mount 1/4" Standard Macro Yes Image File Formats Still Image: JPEG (Exif2.21...

VPC-E1075 Owners Manual English
Page 70
... battery icon is displayed on the LCD then camera turns off LCD screen displays 'Card Requires Formatting' LCD screen displays 'Card is Full' LCD screen displays 'Card is locked' Insufficient memory space to complete request No image displays on the TV screen Insufficient space on the camera. Press any button to match your TV system. Set correct TV-out type to turn on the LCD, when AUTO LCD ON mode (30 SEC or 1 MIN) is full. Charge or replace the battery. • The battery is installed incorrectly. Delete...
... battery icon is displayed on the LCD then camera turns off LCD screen displays 'Card Requires Formatting' LCD screen displays 'Card is Full' LCD screen displays 'Card is locked' Insufficient memory space to complete request No image displays on the TV screen Insufficient space on the camera. Press any button to match your TV system. Set correct TV-out type to turn on the LCD, when AUTO LCD ON mode (30 SEC or 1 MIN) is full. Charge or replace the battery. • The battery is installed incorrectly. Delete...


