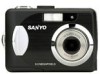

VPC-603 Owners Manual English
Page 2
... specifications, software, software drivers, and user's manual. Occasionally a retailer will specify a unique product color, appearance, and internal memory capacity. READ THIS FIRST Trademark Information „ Microsoft® and Windows® are subject to our website or contact your digital camera. „ The manufacturer assumes no liability for the purpose of your dealer. This User Manual is a trademark. „ Photo Explorer and Photo Express are for any errors...
... specifications, software, software drivers, and user's manual. Occasionally a retailer will specify a unique product color, appearance, and internal memory capacity. READ THIS FIRST Trademark Information „ Microsoft® and Windows® are subject to our website or contact your digital camera. „ The manufacturer assumes no liability for the purpose of your dealer. This User Manual is a trademark. „ Photo Explorer and Photo Express are for any errors...
VPC-603 Owners Manual English
Page 7
... Movie Menu 69 Playback Menu 70 Setup Menu 73 CONNECTING THE DIGITAL CAMERA TO OTHER DEVICES 77 SPECIFICATIONS 78 APPENDIX 80 EN-7 THE BASICS 39 Viewing Images 39 Magnifying Images 40 Thumbnail Display 41 Slideshow Display 42 Resizing an Image 43 MOVIE MODE 44 Recording Movie Clips 44 Playing Back Movie Clips 45 PLAYBACK MODE - ADVANCED FEATURES. 46 Playing Back Still Images/Movie Clips on TV...... 46 Deleting Images/Movie Clips 47 Protecting Images/Movie Clips 48 Setting the DPOF 49 Connecting to a PictBridge-Compatible Printer... 51 TRANSFERRING FILES...
... Movie Menu 69 Playback Menu 70 Setup Menu 73 CONNECTING THE DIGITAL CAMERA TO OTHER DEVICES 77 SPECIFICATIONS 78 APPENDIX 80 EN-7 THE BASICS 39 Viewing Images 39 Magnifying Images 40 Thumbnail Display 41 Slideshow Display 42 Resizing an Image 43 MOVIE MODE 44 Recording Movie Clips 44 Playing Back Movie Clips 45 PLAYBACK MODE - ADVANCED FEATURES. 46 Playing Back Still Images/Movie Clips on TV...... 46 Deleting Images/Movie Clips 47 Protecting Images/Movie Clips 48 Setting the DPOF 49 Connecting to a PictBridge-Compatible Printer... 51 TRANSFERRING FILES...
VPC-603 Owners Manual English
Page 13
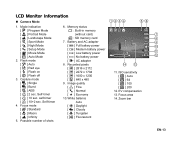
... [ ] Flash off 3. Memory status : Built-in memory (without card) : SD memory card 7. ISO sensitivity [ ] Auto [ ] 64 [ ] 100 [ ] 200 12. Zoom bar EN-13 Mode indication [ ] Program Mode [ ] Portrait Mode [ ] Landscape Mode [ ] Sport Mode [ ] Night Mode [ ] Setup Mode [ ] Movie Mode [ ] Auto Mode 2. self-timer [ ] 10+2 sec. Self-timer 4. Battery and AC adapter [ ] Full battery power [ ] Medium battery power [ ] Low battery power [ ] No battery power [ ] AC adapter 8. Image quality [ ] Fine [ ] Normal [ ] Economy 10. Capture mode [ ] Single [ ] Burst [ ] AEB [ ] 2 sec. White...
... [ ] Flash off 3. Memory status : Built-in memory (without card) : SD memory card 7. ISO sensitivity [ ] Auto [ ] 64 [ ] 100 [ ] 200 12. Zoom bar EN-13 Mode indication [ ] Program Mode [ ] Portrait Mode [ ] Landscape Mode [ ] Sport Mode [ ] Night Mode [ ] Setup Mode [ ] Movie Mode [ ] Auto Mode 2. self-timer [ ] 10+2 sec. Self-timer 4. Battery and AC adapter [ ] Full battery power [ ] Medium battery power [ ] Low battery power [ ] No battery power [ ] AC adapter 8. Image quality [ ] Fine [ ] Normal [ ] Economy 10. Capture mode [ ] Single [ ] Burst [ ] AEB [ ] 2 sec. White...
VPC-603 Owners Manual English
Page 18
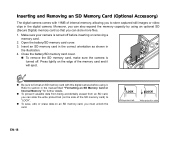
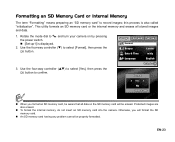
Open the battery/SD memory card cover. 3. Inserting and Removing an SD Memory Card (Optional Accessory) The digital camera comes with this digital camera before inserting or removing a memory card. 2. Moreover, you can store more files. 1. Make sure your camera is turned off before using an optional SD (Secure Digital) memory card so that you to "LOCK". „ To save, edit, or erase data on the edge of the memory card and it . Insert an SD memory card in the correct...
Open the battery/SD memory card cover. 3. Inserting and Removing an SD Memory Card (Optional Accessory) The digital camera comes with this digital camera before inserting or removing a memory card. 2. Moreover, you can store more files. 1. Make sure your camera is turned off before using an optional SD (Secure Digital) memory card so that you to "LOCK". „ To save, edit, or erase data on the edge of the memory card and it . Insert an SD memory card in the correct...
VPC-603 Owners Manual English
Page 23
... button to select [Format], then press the button. 3. Rotate the mode dial to record images; EN-23 this process is displayed. 2. Protected images are also erased. „ To format the internal memory, do not insert an SD memory card into the camera. This utility formats an SD memory card or the internal memory and erases all data on by pressing the power switch. „ [Set-up1] is also called "initialization". Set-up1 Set-up2 Set-up3 Format Beeper Louder Date & Time m/d/y Language English Select : Format...
... button to select [Format], then press the button. 3. Rotate the mode dial to record images; EN-23 this process is displayed. 2. Protected images are also erased. „ To format the internal memory, do not insert an SD memory card into the camera. This utility formats an SD memory card or the internal memory and erases all data on by pressing the power switch. „ [Set-up1] is also called "initialization". Set-up1 Set-up2 Set-up3 Format Beeper Louder Date & Time m/d/y Language English Select : Format...
VPC-603 Owners Manual English
Page 24
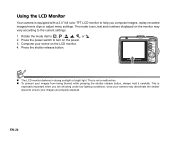
.... Rotate the mode dial to turn on the power. 3. Press the power switch to , , , , , or . 2. This is equipped with a 2.4" full color TFT LCD monitor to help you are shooting under low lighting conditions, since your camera may vary according to ensure your images are properly exposed. The mode icons, text and numbers displayed on the LCD monitor. 4. This is especially important when you compose images, replay recorded images/movie clips or adjust menu settings. EN...
.... Rotate the mode dial to turn on the power. 3. Press the power switch to , , , , , or . 2. This is equipped with a 2.4" full color TFT LCD monitor to help you are shooting under low lighting conditions, since your camera may vary according to ensure your images are properly exposed. The mode icons, text and numbers displayed on the LCD monitor. 4. This is especially important when you compose images, replay recorded images/movie clips or adjust menu settings. EN...
VPC-603 Owners Manual English
Page 26
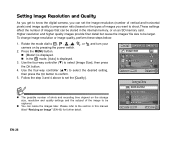
... resize the images later. Setting Image Resolution and Quality As you get to know the digital camera, you can set the [Quality]. „ The possible number of shots and recording time depend on by pressing the power switch. 2. Press the MENU button. „ [Mode1] is displayed. „ In the mode, [Auto] is displayed. 3. Use the four-way controller (T) to the section in the internal memory, or on an SD memory card. Balance ISO Return : Select : Image Size 2816...
... resize the images later. Setting Image Resolution and Quality As you get to know the digital camera, you can set the [Quality]. „ The possible number of shots and recording time depend on by pressing the power switch. 2. Press the MENU button. „ [Mode1] is displayed. „ In the mode, [Auto] is displayed. 3. Use the four-way controller (T) to the section in the internal memory, or on an SD memory card. Balance ISO Return : Select : Image Size 2816...
VPC-603 Owners Manual English
Page 27
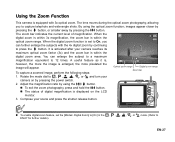
... image will appear. Adjust the magnification ratio by continuing to press the button. The zoom bar indicates the current level of digital magnification is enlarged, the more the image is displayed on by pressing the button. Digital Zoom] to capture telephoto and wide-angle shots. mode. (Refer to 12 times. images appear closer by pressing the button, or smaller away by pressing the power switch. 2. Compose your camera on the LCD...
... image will appear. Adjust the magnification ratio by continuing to press the button. The zoom bar indicates the current level of digital magnification is enlarged, the more the image is displayed on by pressing the button. Digital Zoom] to capture telephoto and wide-angle shots. mode. (Refer to 12 times. images appear closer by pressing the button, or smaller away by pressing the power switch. 2. Compose your camera on the LCD...

VPC-603 Owners Manual English
Page 28
... red-eye phenomenon when you to choose the appropriate flash mode: Flash mode Auto Red-eye Flash on and Flash off Description The flash fires automatically according to take an image using the four-way controller (ST). 4. EN-28 Press the power switch to be reduced by asking the subject (person) to look at the digital camera or get as possible. Press the button to the digital camera as close to confirm the setting...
... red-eye phenomenon when you to choose the appropriate flash mode: Flash mode Auto Red-eye Flash on and Flash off Description The flash fires automatically according to take an image using the four-way controller (ST). 4. EN-28 Press the power switch to be reduced by asking the subject (person) to look at the digital camera or get as possible. Press the button to the digital camera as close to confirm the setting...
VPC-603 Owners Manual English
Page 29
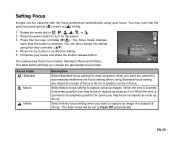
... the shutter release button. The flash mode will help you choose the appropriate focus mode: Focus Standard OK : Focus mode Standard Macro Infinity Description Select Standard-focus setting for most occasions when you want to its widest position you may over-ride the auto focus and specify [ ] macro or [ ] infinity. 1. Press the four-way controller (X/ ). The camera has three focus modes: Standard, Macro and Infinity. EN-29 The focus mode changes each time the button is zoomed...
... the shutter release button. The flash mode will help you choose the appropriate focus mode: Focus Standard OK : Focus mode Standard Macro Infinity Description Select Standard-focus setting for most occasions when you want to its widest position you may over-ride the auto focus and specify [ ] macro or [ ] infinity. 1. Press the four-way controller (X/ ). The camera has three focus modes: Standard, Macro and Infinity. EN-29 The focus mode changes each time the button is zoomed...
VPC-603 Owners Manual English
Page 30
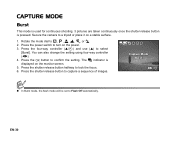
... images. Capture Mode Burst OK : „ In Burst mode, the flash mode will be set to lock the focus. 6. Press the shutter release button halfway to Flash Off automatically. Rotate the mode dial to select [Burst]. Press the four-way controller (S/ ) and use (S) to , , , , , or . 2. CAPTURE MODE Burst This mode is used for continuous shooting. 3 pictures are taken continuously once the shutter release button is displayed on the power. 3. Secure the camera to turn on the monitor screen...
... images. Capture Mode Burst OK : „ In Burst mode, the flash mode will be set to lock the focus. 6. Press the shutter release button halfway to Flash Off automatically. Rotate the mode dial to select [Burst]. Press the four-way controller (S/ ) and use (S) to , , , , , or . 2. CAPTURE MODE Burst This mode is used for continuous shooting. 3 pictures are taken continuously once the shutter release button is displayed on the power. 3. Secure the camera to turn on the monitor screen...
VPC-603 Owners Manual English
Page 31
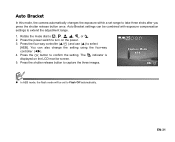
... controller (S/ ) and use (S) to , , , , , or . 2. Auto Bracket settings can also change the setting using the four-way controller (WX). 4. Rotate the mode dial to select [AEB]. Press the power switch to capture the three images. Press the shutter release button to turn on the LCD monitor screen. 5. EN-31 Auto Bracket In this mode, the camera automatically changes the exposure within a set to Flash Off automatically. The indicator is displayed on the power. 3. Press the button to take three shots...
... controller (S/ ) and use (S) to , , , , , or . 2. Auto Bracket settings can also change the setting using the four-way controller (WX). 4. Rotate the mode dial to select [AEB]. Press the power switch to capture the three images. Press the shutter release button to turn on the LCD monitor screen. 5. EN-31 Auto Bracket In this mode, the camera automatically changes the exposure within a set to Flash Off automatically. The indicator is displayed on the power. 3. Press the button to take three shots...
VPC-603 Owners Manual English
Page 32
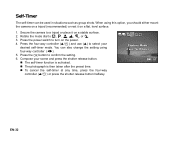
... is then taken after the preset time. „ To cancel the self-timer at any time, press the four-way controller (S/ ) or press the shutter release button halfway. You can be used in situations such as group shots. Self-Timer The self-timer can also change the setting using this option, you should either mount the camera on a tripod (recommended) or rest it on the power. 4. Capture Mode 2 sec.
... is then taken after the preset time. „ To cancel the self-timer at any time, press the four-way controller (S/ ) or press the shutter release button halfway. You can be used in situations such as group shots. Self-Timer The self-timer can also change the setting using this option, you should either mount the camera on a tripod (recommended) or rest it on the power. 4. Capture Mode 2 sec.
VPC-603 Owners Manual English
Page 36
... shutter release button down halfway to focus the image. „ When you to take still pictures without having to capture the image. You can adjust other functions, such as flash mode or continuous shooting mode. 1. Proper exposure is the simplest way which allows you press the shutter release button down to and turn your camera on by pressing the power switch. 2. The camera sets the optimal focusing and exposure. 1. Press the shutter release button to set special functions or manual adjustments...
... shutter release button down halfway to focus the image. „ When you to take still pictures without having to capture the image. You can adjust other functions, such as flash mode or continuous shooting mode. 1. Proper exposure is the simplest way which allows you press the shutter release button down to and turn your camera on by pressing the power switch. 2. The camera sets the optimal focusing and exposure. 1. Press the shutter release button to set special functions or manual adjustments...
VPC-603 Owners Manual English
Page 55
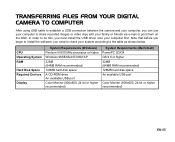
... share recorded images or video clips with your computer first. In order to the table as shown below. TRANSFERRING FILES FROM YOUR DIGITAL CAMERA TO COMPUTER After using USB cable to establish a USB connection between the camera and your computer, you must install the USB driver onto your family or friends via e-mail or post them on the Web. CPU Operating System RAM Hard Disk Space Required Devices Display...
... share recorded images or video clips with your computer first. In order to the table as shown below. TRANSFERRING FILES FROM YOUR DIGITAL CAMERA TO COMPUTER After using USB cable to establish a USB connection between the camera and your computer, you must install the USB driver onto your family or friends via e-mail or post them on the Web. CPU Operating System RAM Hard Disk Space Required Devices Display...
VPC-603 Owners Manual English
Page 57
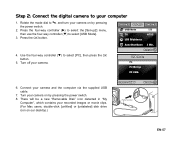
... the [Set-up2] menu, then use the four-way controller (T) to select [PC], then press the button. 5. Set-up1 Set-up2 Set-up3 USB Mode PC TV NTSC LCD Brightness Auto Shut Down 3 Min. There will be a new "Removable Disk" icon detected in "My Computer", which contains your camera and the computer via the supplied USB cable. 7. Connect your recorded images or movie clips. (For Mac users, double-click [untitled] or [unlabeled] disk drive icon on...
... the [Set-up2] menu, then use the four-way controller (T) to select [PC], then press the button. 5. Set-up1 Set-up2 Set-up3 USB Mode PC TV NTSC LCD Brightness Auto Shut Down 3 Min. There will be a new "Removable Disk" icon detected in "My Computer", which contains your camera and the computer via the supplied USB cable. 7. Connect your recorded images or movie clips. (For Mac users, double-click [untitled] or [unlabeled] disk drive icon on...
VPC-603 Owners Manual English
Page 58
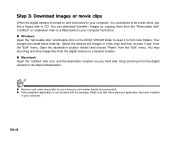
.... „ Windows Open the "removable disk" and double click on your hard disk. You can download (transfer) images by copying them from the digital camera to the desired destination. „ Memory card users may also drag and drop image files from the digital camera to find more folders. Step 3: Download images or movie clips When the digital camera is turned on and connected to your computer, it to a desired location. „ Macintosh Open the "untitled" disk icon, and the...
.... „ Windows Open the "removable disk" and double click on your hard disk. You can download (transfer) images by copying them from the digital camera to the desired destination. „ Memory card users may also drag and drop image files from the digital camera to find more folders. Step 3: Download images or movie clips When the digital camera is turned on and connected to your computer, it to a desired location. „ Macintosh Open the "untitled" disk icon, and the...
VPC-603 Owners Manual English
Page 62
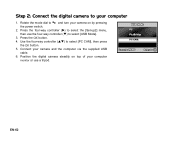
... controller (ST) to select [USB Mode]. 3. Press the four-way controller (X) to select the [Set-up2] menu, then use a tripod. Cancel : MENU Select : EN-62 Position the digital camera steadily on by pressing the power switch. 2. Step 2: Connect the digital camera to your camera and the computer via the supplied USB cable. 6. Rotate the mode dial to and turn your camera on top of your computer monitor or use the four-way controller...
... controller (ST) to select [USB Mode]. 3. Press the four-way controller (X) to select the [Set-up2] menu, then use a tripod. Cancel : MENU Select : EN-62 Position the digital camera steadily on by pressing the power switch. 2. Step 2: Connect the digital camera to your camera and the computer via the supplied USB cable. 6. Rotate the mode dial to and turn your camera on top of your computer monitor or use the four-way controller...
VPC-603 Owners Manual English
Page 76
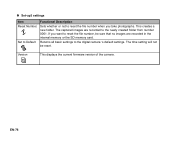
The captured images are recorded in the internal memory or the SD memory card. Set to Default Returns all basic settings to reset the file number, be reset. The time setting will not be sure that no images are recorded to the newly created folder from number 0001. This creates a new folder. If you take photographs. EN-76 „ Set-up3 settings Item Functional Description Reset Number. Version This displays the current firmware version of the camera. Sets whether or not to reset the file number when you want to the digital camera's default settings.
The captured images are recorded in the internal memory or the SD memory card. Set to Default Returns all basic settings to reset the file number, be reset. The time setting will not be sure that no images are recorded to the newly created folder from number 0001. This creates a new folder. If you take photographs. EN-76 „ Set-up3 settings Item Functional Description Reset Number. Version This displays the current firmware version of the camera. Sets whether or not to reset the file number when you want to the digital camera's default settings.
VPC-603 Owners Manual English
Page 81
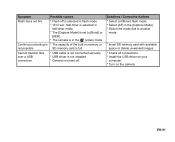
Continuous shooting is * The capacity of the built-in self-timer mode. * The [Capture Mode] is set to another mode. * Insert SD memory card with available space or delete unwanted images. * Check all connections. * Install the USB driver on your computer. * Turn on the camera. EN-81 SD memory card is selected in memory or not possible. Symptom Possible causes Flash does not fire. * Flash off . Solutions / Corrective Actions * Select a different flash mode. * Select [AF] in the...
Continuous shooting is * The capacity of the built-in self-timer mode. * The [Capture Mode] is set to another mode. * Insert SD memory card with available space or delete unwanted images. * Check all connections. * Install the USB driver on your computer. * Turn on the camera. EN-81 SD memory card is selected in memory or not possible. Symptom Possible causes Flash does not fire. * Flash off . Solutions / Corrective Actions * Select a different flash mode. * Select [AF] in the...


