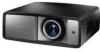
Owners Manual
Page 2
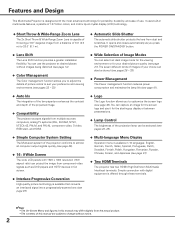
...41). ◆ Auto Iris The integration of the lamp aperture enhances the contrast and depth of the projected image. ◆ Compatibility The projector accepts signals from the actual product. • The contents of this manual are subject to change without images being distorted (see page 37...). ◆ Multi-language Menu Display Operation menu is available in multimedia features, a palette of 1.07 billion colors, and matrix liquid crystal display (LCD) technology. ◆ Short Throw & Wide-Range Zoom Lens The 2x Short Throw & Wide-Range Zoom Lens is capable of throwing a 100" ...
...41). ◆ Auto Iris The integration of the lamp aperture enhances the contrast and depth of the projected image. ◆ Compatibility The projector accepts signals from the actual product. • The contents of this manual are subject to change without images being distorted (see page 37...). ◆ Multi-language Menu Display Operation menu is available in multimedia features, a palette of 1.07 billion colors, and matrix liquid crystal display (LCD) technology. ◆ Short Throw & Wide-Range Zoom Lens The 2x Short Throw & Wide-Range Zoom Lens is capable of throwing a 100" ...
Owners Manual
Page 3
...Bottom 8 Rear Terminal 9 Top Control 10 Remote Control 11 Remote Control Operating Range 12 Remote Control Battery Installation 12 Installation 13 Positioning the Projector 13 Adjustable Feet 13 Moving the Lens 14 Connecting to Video Equipment (Video, S-Video) 15 Connecting to Video Equipment (Component) 15 ... Scart) 16 Connecting to a Computer 16 Connecting the AC Power Cord 17 Basic Operation 18 Turning On the Projector 18 Turning Off the Projector 19 How to Operate the On-Screen Menu 20 Menu and its Functions 21 Zoom and Focus Adjustment 22 Remote...
...Bottom 8 Rear Terminal 9 Top Control 10 Remote Control 11 Remote Control Operating Range 12 Remote Control Battery Installation 12 Installation 13 Positioning the Projector 13 Adjustable Feet 13 Moving the Lens 14 Connecting to Video Equipment (Video, S-Video) 15 Connecting to Video Equipment (Component) 15 ... Scart) 16 Connecting to a Computer 16 Connecting the AC Power Cord 17 Basic Operation 18 Turning On the Projector 18 Turning Off the Projector 19 How to Operate the On-Screen Menu 20 Menu and its Functions 21 Zoom and Focus Adjustment 22 Remote...
Owners Manual
Page 4
... indicate the minimum space required. Do not cover the ventilation slot on the LCD panels by the characteristic of panel. Heat build- SIDE and TOP REAR 1.5' (50 cm) 3' (1 m) 1.5' (50 cm) 1.5' (50 cm) - If the projector comes in contact with a vacuum cleaner. CAUTION Not for use in a... as much as IN a kitchen to operate improperly, read this manual thoroughly. Your product is critical for an extended time, unplug the projector from your projector seems to prevent A Breakdown or disaster. Note: If a chemical symbol is to countries in ! This will be recycled and/or reused...
... indicate the minimum space required. Do not cover the ventilation slot on the LCD panels by the characteristic of panel. Heat build- SIDE and TOP REAR 1.5' (50 cm) 3' (1 m) 1.5' (50 cm) 1.5' (50 cm) - If the projector comes in contact with a vacuum cleaner. CAUTION Not for use in a... as much as IN a kitchen to operate improperly, read this manual thoroughly. Your product is critical for an extended time, unplug the projector from your projector seems to prevent A Breakdown or disaster. Note: If a chemical symbol is to countries in ! This will be recycled and/or reused...

Owners Manual
Page 5
...a mounting kit approved by the manufacturer, or sold with cloth or other similar surface. Never push objects of any kind into the projector. This projector should never be placed near water... Do not overload wall outlets and extension cords as they may cause hazards. Refer all of power...surfaces may expose you are required, be sure the service technician has used replacement parts specified by a qualified technician to restore the projector to the projector. When the power cord or plug is provided. When replacement parts are not sure of the type of the equipment and to...
...a mounting kit approved by the manufacturer, or sold with cloth or other similar surface. Never push objects of any kind into the projector. This projector should never be placed near water... Do not overload wall outlets and extension cords as they may cause hazards. Refer all of power...surfaces may expose you are required, be sure the service technician has used replacement parts specified by a qualified technician to restore the projector to the projector. When the power cord or plug is provided. When replacement parts are not sure of the type of the equipment and to...

Owners Manual
Page 6
.... 6 CAUTION ON CEILING MOUNTING For ceiling mounting, you need the ceiling mount kit designed for this projector does not cover any damage caused by heat. When carrying the projector, use of the ceiling mount kit in an improper location. Safety Instructions Air Circulation Openings in the ...cool down to project an image. NO SIDEWARD CAUTION - Failure to do not drop, bump, subject it to strong forces, or put the projector in a case before it from the ventilation holes. - To ensure reliable operation of the exhaust vent, especially screws and metallic part. Care ...
.... 6 CAUTION ON CEILING MOUNTING For ceiling mounting, you need the ceiling mount kit designed for this projector does not cover any damage caused by heat. When carrying the projector, use of the ceiling mount kit in an improper location. Safety Instructions Air Circulation Openings in the ...cool down to project an image. NO SIDEWARD CAUTION - Failure to do not drop, bump, subject it to strong forces, or put the projector in a case before it from the ventilation holes. - To ensure reliable operation of the exhaust vent, especially screws and metallic part. Care ...
Owners Manual
Page 7
... between the equipment and receiver. - Model Number(s) Trade Name Responsible party Address Telephone No. : PLV-Z3000 : Sanyo : SANYO FISHER COMPANY : 21605 Plummer Street, Chatsworth, California 91311 : (818)998-7322 AC Power Cord Requirement The AC Power Cord supplied with this projector meets the requirement for your electrician. Fuse covers are designed to provide reasonable protection...
... between the equipment and receiver. - Model Number(s) Trade Name Responsible party Address Telephone No. : PLV-Z3000 : Sanyo : SANYO FISHER COMPANY : 21605 Plummer Street, Chatsworth, California 91311 : (818)998-7322 AC Power Cord Requirement The AC Power Cord supplied with this projector meets the requirement for your electrician. Fuse covers are designed to provide reasonable protection...

Owners Manual
Page 8
... Switch !3 Power Cord Connector !4 Air Intake Vent !5 Lamp Cover ✽ Kensington Security Slot This slot is for a Kensington lock used to deter theft of the projector. *Kensington is exhausted from the exhaust vent.
... Switch !3 Power Cord Connector !4 Air Intake Vent !5 Lamp Cover ✽ Kensington Security Slot This slot is for a Kensington lock used to deter theft of the projector. *Kensington is exhausted from the exhaust vent.

Owners Manual
Page 9
... 1/HDMI 2* Connect the HDMI output signal from video equipment to these jacks (p.15). e COMPONENT 1 or COMPONENT 2 Connect the component video output signal to service the projector.
... 1/HDMI 2* Connect the HDMI output signal from video equipment to these jacks (p.15). e COMPONENT 1 or COMPONENT 2 Connect the component video output signal to service the projector.
Owners Manual
Page 10
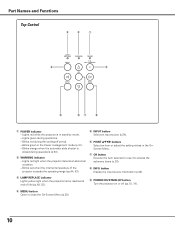
...(p.41). - u OK button Execute the item selected or use it to access the submenu items (p.20). o POWER ON/STAND-BY button Turn the projector on or off period. - w WARNING indicator - e LAMP REPLACE indicator Lights yellow light when the projection lamp reaches its end of the...life (pp.49, 53). r MENU button Open or close the On-Screen Menu (p.20). 10 Lights green during operations (p.53). Lights red while the projector is closed during operations. - button Display the input source information (p.43). Blinks red during the cooling-off (pp.18, 19). Part Names and Functions...
...(p.41). - u OK button Execute the item selected or use it to access the submenu items (p.20). o POWER ON/STAND-BY button Turn the projector on or off period. - w WARNING indicator - e LAMP REPLACE indicator Lights yellow light when the projection lamp reaches its end of the...life (pp.49, 53). r MENU button Open or close the On-Screen Menu (p.20). 10 Lights green during operations (p.53). Lights red while the projector is closed during operations. - button Display the input source information (p.43). Blinks red during the cooling-off (pp.18, 19). Part Names and Functions...
Owners Manual
Page 11
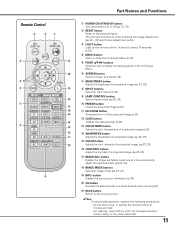
...). button Display the Image adj. w RESET button Reset to moisture or heat. - Remote Control e w q r t y u i o Part Names and Functions q POWER ON/STAND-BY button Turn the projector on or off the projected image (p.23). !2 LOGO button !4 Display the captured logo (p.23). !3 !3 COLOR TEMP. Do not bend, drop, or expose the remote control...
...). button Display the Image adj. w RESET button Reset to moisture or heat. - Remote Control e w q r t y u i o Part Names and Functions q POWER ON/STAND-BY button Turn the projector on or off the projected image (p.23). !2 LOGO button !4 Display the captured logo (p.23). !3 !3 COLOR TEMP. Do not bend, drop, or expose the remote control...
Owners Manual
Page 12
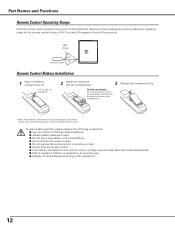
...batteries according to the initial code (Code 1) (p.41). Part Names and Functions Remote Control Operating Range Point the remote control toward the projector (Infrared Remote Receiver) when pressing any buttons. To ensure safe operation, please observe the following precautions: ● Use two (2) ... an incorrect type. ● Dispose of used battery. ● Avoid contact with pins in the compartment. * When the batteries of the projector. 16.4' (5 m) 30° Remote control 30° Remote Control Battery Installation 1 Open the battery compartment lid. Two AA size batteries ...
...batteries according to the initial code (Code 1) (p.41). Part Names and Functions Remote Control Operating Range Point the remote control toward the projector (Infrared Remote Receiver) when pressing any buttons. To ensure safe operation, please observe the following precautions: ● Use two (2) ... an incorrect type. ● Dispose of used battery. ● Avoid contact with pins in the compartment. * When the batteries of the projector. 16.4' (5 m) 30° Remote control 30° Remote Control Battery Installation 1 Open the battery compartment lid. Two AA size batteries ...
Owners Manual
Page 13
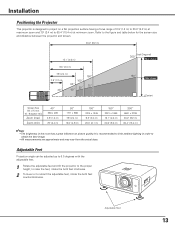
... angle can be adjusted up to 6.5 degrees with the adjustable feet. 1 Rotate the adjustable feet and tilt the projector to the figure and table below for the screen size and distance between the projector and screen. 30.2' (9.2 m) 15.1' (4.6 m) 9.8' (3.0 m) 7.9' (2.4 m) 3.9' (1.2 m) 40" 100" 80" 50" 40" ... the proper height; Zoom 150" Min. Adjustable Feet 13 It is designed to project on picture quality. Installation Positioning the Projector This projector is recommended to obtain the best image. • All measurements are approximate and may vary from the actual sizes. to...
... angle can be adjusted up to 6.5 degrees with the adjustable feet. 1 Rotate the adjustable feet and tilt the projector to the figure and table below for the screen size and distance between the projector and screen. 30.2' (9.2 m) 15.1' (4.6 m) 9.8' (3.0 m) 7.9' (2.4 m) 3.9' (1.2 m) 40" 100" 80" 50" 40" ... the proper height; Zoom 150" Min. Adjustable Feet 13 It is designed to project on picture quality. Installation Positioning the Projector This projector is recommended to obtain the best image. • All measurements are approximate and may vary from the actual sizes. to...

Owners Manual
Page 15
... cable (optional). ✔Note: • To order the optional cables, see page 58. • When connecting HDTV equipment to the projector's COMPONENT 1/2 terminals, horizontal line noise may be adjusted from the AC outlet before connecting the cables. Then adjust the value of both the... projector and external equipment from 0 to +31 (see page 34). Video Equipment Component Video Output (Y, Pb/Cb, Pr/Cr) Component Cable (RCA x 3) COMPONENT 15 Installation This projector can be noted only occasionally. See the figures below ...
... cable (optional). ✔Note: • To order the optional cables, see page 58. • When connecting HDTV equipment to the projector's COMPONENT 1/2 terminals, horizontal line noise may be adjusted from the AC outlet before connecting the cables. Then adjust the value of both the... projector and external equipment from 0 to +31 (see page 34). Video Equipment Component Video Output (Y, Pb/Cb, Pr/Cr) Component Cable (RCA x 3) COMPONENT 15 Installation This projector can be noted only occasionally. See the figures below ...

Owners Manual
Page 16
... Cable HDMI COMPUTER Connecting to Video Equipment (HDMI, RGB Scart) HDMI Use a HDMI cable (optional) for HDMI output. Unplug the power cords of both the projector and external equipment from the AC outlet before connecting the cables. 16 COMPUTER
... Cable HDMI COMPUTER Connecting to Video Equipment (HDMI, RGB Scart) HDMI Use a HDMI cable (optional) for HDMI output. Unplug the power cords of both the projector and external equipment from the AC outlet before connecting the cables. 16 COMPUTER

Owners Manual
Page 17
... the risk of electrical shock, do not plug into any other type of power being supplied, consult your sales dealer. When the projector is connected to the projector. and Canada For Continental Europe Ground For the U.K. Confirm the AC plug type with the AC power cord and the Main On/...200-240 V AC) 17 Connect the AC power cord (supplied) to an outlet with the chart below and proper AC power cord must be used. Projector side AC Outlet side For the U.S.A. Installation CAUTION The AC outlet must be near this equipment and must be easily accessible. ✔Note: •...
... the risk of electrical shock, do not plug into any other type of power being supplied, consult your sales dealer. When the projector is connected to the projector. and Canada For Continental Europe Ground For the U.K. Confirm the AC plug type with the AC power cord and the Main On/...200-240 V AC) 17 Connect the AC power cord (supplied) to an outlet with the chart below and proper AC power cord must be used. Projector side AC Outlet side For the U.S.A. Installation CAUTION The AC outlet must be near this equipment and must be easily accessible. ✔Note: •...
Owners Manual
Page 18
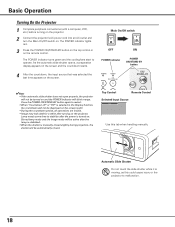
...OFF ON POWER indicator POWER ON/STAND-BY button ✔Note: • If the automatic slide shutter does not open properly, the projector will blink orange. Automatic Slide Shutter Do not touch the slide shutter while it is selected in the Display function, the countdown will not... may look dark for a while after the power is manually closed . Basic Operation Turning On the Projector 1 Complete peripheral connections (with a computer, VCR, etc.) before turning on the projector. 2 Connect the projector's AC power cord into an AC outlet and turn the Main On/Off switch on the screen. ...
...OFF ON POWER indicator POWER ON/STAND-BY button ✔Note: • If the automatic slide shutter does not open properly, the projector will blink orange. Automatic Slide Shutter Do not touch the slide shutter while it is selected in the Display function, the countdown will not... may look dark for a while after the power is manually closed . Basic Operation Turning On the Projector 1 Complete peripheral connections (with a computer, VCR, etc.) before turning on the projector. 2 Connect the projector's AC power cord into an AC outlet and turn the Main On/Off switch on the screen. ...
Owners Manual
Page 19
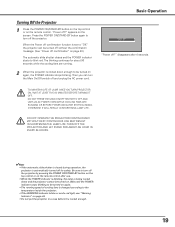
... blink red. Then you can be turned on page 40.) The automatic slide shutter closes and the POWER indicator starts to the temperature inside the projector. • If the WARNING indicator blinks or emits red light, see "Warning Indicator" on the screen. "Power off and unplug the AC power ... INDICATOR STOPS BLINKING. OTHERWISE IT WILL RESULT IN SHORTENING LAMP LIFE. CONTINUOUS USE MAY RESULT IN SHORTENING THE LAMP LIFE. TURN OFF THE PROJECTOR AND LET STAND FOR ABOUT AN HOUR IN EVERY 24 HOURS. ✔Note: • If the automatic slide shutter is closed during operation, ...
... blink red. Then you can be turned on page 40.) The automatic slide shutter closes and the POWER indicator starts to the temperature inside the projector. • If the WARNING indicator blinks or emits red light, see "Warning Indicator" on the screen. "Power off and unplug the AC power ... INDICATOR STOPS BLINKING. OTHERWISE IT WILL RESULT IN SHORTENING LAMP LIFE. CONTINUOUS USE MAY RESULT IN SHORTENING THE LAMP LIFE. TURN OFF THE PROJECTOR AND LET STAND FOR ABOUT AN HOUR IN EVERY 24 HOURS. ✔Note: • If the automatic slide shutter is closed during operation, ...
Owners Manual
Page 20
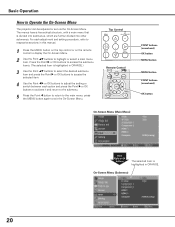
press the MENU button again to Operate the On-Screen Menu The projector can be adjusted or set via the On-Screen Menu. Top Control Remote Control POINT buttons (arrowhead) OK button MENU button MENU button POINT buttons (...
press the MENU button again to Operate the On-Screen Menu The projector can be adjusted or set via the On-Screen Menu. Top Control Remote Control POINT buttons (arrowhead) OK button MENU button MENU button POINT buttons (...

Owners Manual
Page 25
.... Video or S-Video When the video signal is connected to select the desired system and press the Point 8 or OK buttons. Auto The projector automatically detects the incoming video system and adjusts itself to select an input source and press the Point 8 or OK buttons. When the video ...the Input Menu and press the Point 8 or OK buttons to access the submenu items. 2 Use the Point ed buttons to optimize its performance. The projector automatically detects the incoming video signal and adjusts itself to the VIDEO or S-VIDEO jacks, select Video or S-video respectively. PAL / SECAM / NTSC /...
.... Video or S-Video When the video signal is connected to select the desired system and press the Point 8 or OK buttons. Auto The projector automatically detects the incoming video system and adjusts itself to select an input source and press the Point 8 or OK buttons. When the video ...the Input Menu and press the Point 8 or OK buttons to access the submenu items. 2 Use the Point ed buttons to optimize its performance. The projector automatically detects the incoming video signal and adjusts itself to the VIDEO or S-VIDEO jacks, select Video or S-video respectively. PAL / SECAM / NTSC /...
Owners Manual
Page 26
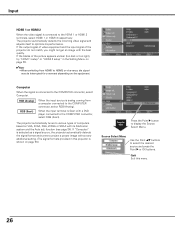
... is Scart with a DVD player connected to the COMPUTER connector, select Computer. If "Computer" is selected as a signal source, the projector automatically detects the signal format and tunes to display the Source Select Menu. Computer When the signal is connected to the COMPUTER connector, select... RGB (Scart). Quit Exit this projector is shown on page 56.) Computer Input Press the Point 8 button to project a proper image without any additional setting. (The signal...
... is Scart with a DVD player connected to the COMPUTER connector, select Computer. If "Computer" is selected as a signal source, the projector automatically detects the signal format and tunes to display the Source Select Menu. Computer When the signal is connected to the COMPUTER connector, select... RGB (Scart). Quit Exit this projector is shown on page 56.) Computer Input Press the Point 8 button to project a proper image without any additional setting. (The signal...


