
Owners Manual
Page 2
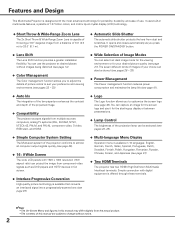
... the POWER ON/STAND-BY button. ◆ Lens Shift The Lens Shift function provides a greater installation flexibility. Simple connection with 1920 x 1080 resolution (16:9 aspect ratio) can project the image from dust and scratches. Features and Design This Multimedia Projector is designed with the most advanced technology for portability, durability, and ease of use it for the starting-up display or between presentations. ◆ Lamp Control...
... the POWER ON/STAND-BY button. ◆ Lens Shift The Lens Shift function provides a greater installation flexibility. Simple connection with 1920 x 1080 resolution (16:9 aspect ratio) can project the image from dust and scratches. Features and Design This Multimedia Projector is designed with the most advanced technology for portability, durability, and ease of use it for the starting-up display or between presentations. ◆ Lamp Control...
Owners Manual
Page 3
... 22 Remote Control Operation 22 Input 24 Input Source and System Selection 24 Image 27 Image Mode Selection 27 Image Adjustment 28 Image Mode Adjustment 28 Picture Adjustment 34 Picture Position and Screen Adjustment 34 Screen 35 Screen Size Adjustment 35 Setting 37 Setting 37 Information 43 Input Source Information Display 43 Maintenance and Cleaning 44 Warning Indicator 44 Cleaning the RGB panels 45 Cleaning the Air Filter 47 Resetting the Filter Counter 48 Cleaning the Projection Lens 48 Cleaning the Projector Cabinet 48 Lamp Replacement 49...
... 22 Remote Control Operation 22 Input 24 Input Source and System Selection 24 Image 27 Image Mode Selection 27 Image Adjustment 28 Image Mode Adjustment 28 Picture Adjustment 34 Picture Position and Screen Adjustment 34 Screen 35 Screen Size Adjustment 35 Setting 37 Setting 37 Information 43 Input Source Information Display 43 Maintenance and Cleaning 44 Warning Indicator 44 Cleaning the RGB panels 45 Cleaning the Air Filter 47 Resetting the Filter Counter 48 Cleaning the Projection Lens 48 Cleaning the Projector Cabinet 48 Lamp Replacement 49...
Owners Manual
Page 4
...- Do not project the same image for an extended time, unplug the projector from the ceiling, clean the air intake vents, air filters, and the top of your projector seems to be built into a compartment or similarly enclosed, these minimum distances must be disposed of Electronic Computer/Data Processing Equipment. To the Owner Before installing and operating the projector, read this manual again, check operations and cable connections and try the...
...- Do not project the same image for an extended time, unplug the projector from the ceiling, clean the air intake vents, air filters, and the top of your projector seems to be built into a compartment or similarly enclosed, these minimum distances must be disposed of Electronic Computer/Data Processing Equipment. To the Owner Before installing and operating the projector, read this manual again, check operations and cable connections and try the...

Owners Manual
Page 5
... other hazards. When the projector exhibits a distinct change in a wet basement, near water... Safety Instructions All the safety and operating instructions should be read before cleaning. for service. Use only with a cart or stand recommended by the manufacturer that have the same characteristics as opening should use near a swimming pool, etc... Never push objects of power source indicated on the marking label. Do...
... other hazards. When the projector exhibits a distinct change in a wet basement, near water... Safety Instructions All the safety and operating instructions should be read before cleaning. for service. Use only with a cart or stand recommended by the manufacturer that have the same characteristics as opening should use near a swimming pool, etc... Never push objects of power source indicated on the marking label. Do...

Owners Manual
Page 6
... it from the ventilation holes. - When not mounted properly, the projector may affect the projector life. Hot air is cooled enough. CAUTION IN CARRYING OR TRANSPORTING THE PROJECTOR - To ensure reliable operation of the exhaust vent, especially screws and metallic part. Safety Instructions Air Circulation Openings in the cabinet are provided to cool down to project an image. Do not drop or bump the...
... it from the ventilation holes. - When not mounted properly, the projector may affect the projector life. Hot air is cooled enough. CAUTION IN CARRYING OR TRANSPORTING THE PROJECTOR - To ensure reliable operation of the exhaust vent, especially screws and metallic part. Safety Instructions Air Circulation Openings in the cabinet are provided to cool down to project an image. Do not drop or bump the...
Owners Manual
Page 7
...Model Number(s) Trade Name Responsible party Address Telephone No. : PLV-Z3000 : Sanyo : SANYO FISHER COMPANY : 21605 Plummer Street, Chatsworth, California 91311 : (818)998-7322 AC Power Cord Requirement The AC Power Cord supplied with the instructions, it is coloured green-and-yellow must be suitably prepared and the correct plug fitted. Should the fuse need to be replaced... circuit different from the Parts Department indicated in a residential installation. The wire which is of the same colour as follows: The wire which is not installed and used in this equipment does ...
...Model Number(s) Trade Name Responsible party Address Telephone No. : PLV-Z3000 : Sanyo : SANYO FISHER COMPANY : 21605 Plummer Street, Chatsworth, California 91311 : (818)998-7322 AC Power Cord Requirement The AC Power Cord supplied with the instructions, it is coloured green-and-yellow must be suitably prepared and the correct plug fitted. Should the fuse need to be replaced... circuit different from the Parts Department indicated in a residential installation. The wire which is of the same colour as follows: The wire which is not installed and used in this equipment does ...
Owners Manual
Page 10
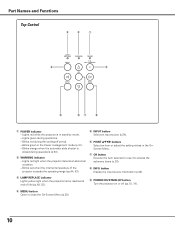
...e LAMP REPLACE indicator Lights yellow light when the projection lamp reaches its end of the projector exceeds the operating range (pp.44, 53). w WARNING indicator - t INPUT button Select an input source (p.24). button Display the input source information (p.43). Part Names and Functions Top Control e w q r o t yu i q POWER indicator - o POWER ON/STAND-BY button Turn the projector on or off period. - Lights green during the cooling-off (pp.18, 19). Blinks red during operations. - r MENU button Open or close the On-Screen Menu (p.20). 10 Blinks orange when...
...e LAMP REPLACE indicator Lights yellow light when the projection lamp reaches its end of the projector exceeds the operating range (pp.44, 53). w WARNING indicator - t INPUT button Select an input source (p.24). button Display the input source information (p.43). Part Names and Functions Top Control e w q r o t yu i q POWER indicator - o POWER ON/STAND-BY button Turn the projector on or off period. - Lights green during the cooling-off (pp.18, 19). Blinks red during operations. - r MENU button Open or close the On-Screen Menu (p.20). 10 Blinks orange when...
Owners Manual
Page 11
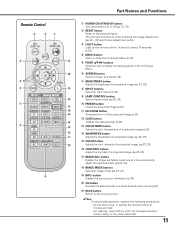
... Image Adjustment (pp.28 - 33) and Picture Adjustment (p.34). Remote Control e w q r t y u i o Part Names and Functions q POWER ON/STAND-BY button Turn the projector on or off the projected image (p.23). !2 LOGO button !4 Display the captured logo (p.23). !3 !3 COLOR TEMP. r MENU button Open or close the On-Screen Menu (p.20). @1 t POINT ed7 8 buttons Select an item or adjust the setting values in the On-Screen Menu. @0 y SCREEN button Select a screen size (pp.22, 35). o LAMP CONTROL button !8 Select a lamp mode (pp.23, 29). !0 FREEZE button !7 Freeze the projected...
... Image Adjustment (pp.28 - 33) and Picture Adjustment (p.34). Remote Control e w q r t y u i o Part Names and Functions q POWER ON/STAND-BY button Turn the projector on or off the projected image (p.23). !2 LOGO button !4 Display the captured logo (p.23). !3 !3 COLOR TEMP. r MENU button Open or close the On-Screen Menu (p.20). @1 t POINT ed7 8 buttons Select an item or adjust the setting values in the On-Screen Menu. @0 y SCREEN button Select a screen size (pp.22, 35). o LAMP CONTROL button !8 Select a lamp mode (pp.23, 29). !0 FREEZE button !7 Freeze the projected...
Owners Manual
Page 18
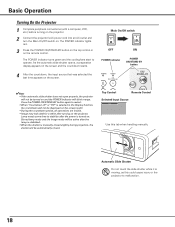
... tab when handling manually. As the automatic slide shutter opens, a preparation display appears on the screen and the countdown starts. 4 After the countdown, the input source that was selected the last time appears on . Stored lamp mode and the image mode will be active after turning on and the POWER indicator will be turned on the projector. Main On/Off switch OFF ON POWER indicator POWER ON/STAND-BY button ✔Note...
... tab when handling manually. As the automatic slide shutter opens, a preparation display appears on the screen and the countdown starts. 4 After the countdown, the input source that was selected the last time appears on . Stored lamp mode and the image mode will be active after turning on and the POWER indicator will be turned on the projector. Main On/Off switch OFF ON POWER indicator POWER ON/STAND-BY button ✔Note...
Owners Manual
Page 21
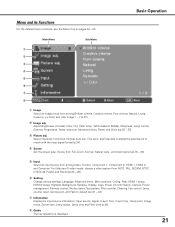
... color, Image mode, Screen size, Lamp status, Lamp time and Filter time (p.43). y Setting Change various settings; r Screen Set the screen size; i Guide The key operation is displayed. 21 t Input Select an input source from among Video, S-video, Component 1, Component 2, HDMI 1, HDMI 2 , and Computer. Language, Advanced menu, Menu position, Ceiling, Rear, HDMI 1 setup, HDMI 2 setup, Highland, Background, Rename, Display, Logo, Power off confirmation, Capture, Power management, Remote control, Shutter demo, Test pattern, Filter counter, Cleaning, Fan control, Lamp counter...
... color, Image mode, Screen size, Lamp status, Lamp time and Filter time (p.43). y Setting Change various settings; r Screen Set the screen size; i Guide The key operation is displayed. 21 t Input Select an input source from among Video, S-video, Component 1, Component 2, HDMI 1, HDMI 2 , and Computer. Language, Advanced menu, Menu position, Ceiling, Rear, HDMI 1 setup, HDMI 2 setup, Highland, Background, Rename, Display, Logo, Power off confirmation, Capture, Power management, Remote control, Shutter demo, Test pattern, Filter counter, Cleaning, Fan control, Lamp counter...

Owners Manual
Page 27
... change the Image mode by the projector in a dark room. Press the PRESET button to select the desired image mode. When the USER button is check marked. Menu Operation 1 Press the Point ed buttons to select the Image Menu and press the Point 8 or OK buttons to access the submenu items. 2 Use the Point ed buttons to the next items. ✽ "x.v.Color" is HDMI 1 or HDMI 2 (p.26). • Brightness, Contrast, Color, Tint, Color temp., Red, Green, Blue...
... change the Image mode by the projector in a dark room. Press the PRESET button to select the desired image mode. When the USER button is check marked. Menu Operation 1 Press the Point ed buttons to select the Image Menu and press the Point 8 or OK buttons to access the submenu items. 2 Use the Point ed buttons to the next items. ✽ "x.v.Color" is HDMI 1 or HDMI 2 (p.26). • Brightness, Contrast, Color, Tint, Color temp., Red, Green, Blue...
Owners Manual
Page 41
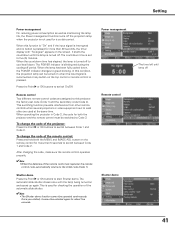
... as maintaining the lamp life, the Power management function turns off period. The POWER indicator is blinking red during the cooling-off the projection lamp when the projector is set code (Code 1) and the secondary code (Code 2). Press the Point 8 or OK buttons to each other are used for a certain period. Remote control Two different remote control codes are replaced, the remote control code automatically returns to Code 2. The countdown time is not used for checking the operation of the remote control are assigned...
... as maintaining the lamp life, the Power management function turns off period. The POWER indicator is blinking red during the cooling-off the projection lamp when the projector is set code (Code 1) and the secondary code (Code 2). Press the Point 8 or OK buttons to each other are used for a certain period. Remote control Two different remote control codes are replaced, the remote control code automatically returns to Code 2. The countdown time is not used for checking the operation of the remote control are assigned...
Owners Manual
Page 42
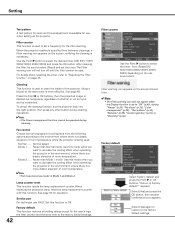
... zoom and focus adjustment is used to set a frequency for the filter cleaning. Use the Point 8 button to Factory default?" appears. Select [Yes] again to restore to Off. Filter counter This function is available for the user's logo, the filter counter and the lamp time to the factory default settings. Normal Normal speed. See page 46. When replacing the projection lamp, reset the lamp replacement counter with this function to the factory default settings. Cleaning This function is a drastic elevation of the projector...
... zoom and focus adjustment is used to set a frequency for the filter cleaning. Use the Point 8 button to Factory default?" appears. Select [Yes] again to restore to Off. Filter counter This function is available for the user's logo, the filter counter and the lamp time to the factory default settings. Normal Normal speed. See page 46. When replacing the projection lamp, reset the lamp replacement counter with this function to the factory default settings. Cleaning This function is a drastic elevation of the projector...
Owners Manual
Page 48
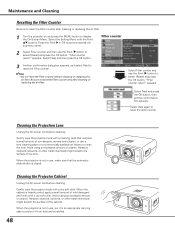
... camera lens cleaner, or use , put it from dust and scratches. 48 "Filter counter reset?" Select [Yes] again to display the On-Screen Menu. Cleaning the Projector Cabinet Unplug the AC power cord before cleaning. Cleaning the Projection Lens Unplug the AC power cord before cleaning. When the cabinet is closed. Maintenance and Cleaning Resetting the Filter Counter Be sure to reset the Filter counter after cleaning or replacing the air filter. appears. Select [Yes] and then press the OK button.
... camera lens cleaner, or use , put it from dust and scratches. 48 "Filter counter reset?" Select [Yes] again to display the On-Screen Menu. Cleaning the Projector Cabinet Unplug the AC power cord before cleaning. Cleaning the Projection Lens Unplug the AC power cord before cleaning. When the cabinet is closed. Maintenance and Cleaning Resetting the Filter Counter Be sure to reset the Filter counter after cleaning or replacing the air filter. appears. Select [Yes] and then press the OK button.
Owners Manual
Page 49
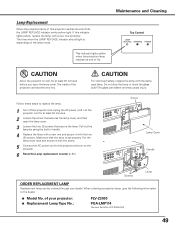
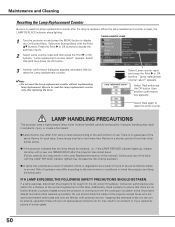
... lamp cover. 3 Loosen the two (2) screws that the lamp is depending on the projector. 6 Reset the Lamp replacement counter (p.50). If this projector reaches its end of your dealer. The glass can be ordered through your projector: ● Replacement Lamp Type No.: PLV-Z3000 POA-LMP114 (Service Parts No. 610 336 5404) 49 of life. CAUTION For continued safety, replace the lamp with the screw. 5 Connect the AC power cord to replace the lamp. 1 Turn off the projector...
... lamp cover. 3 Loosen the two (2) screws that the lamp is depending on the projector. 6 Reset the Lamp replacement counter (p.50). If this projector reaches its end of your dealer. The glass can be ordered through your projector: ● Replacement Lamp Type No.: PLV-Z3000 POA-LMP114 (Service Parts No. 610 336 5404) 49 of life. CAUTION For continued safety, replace the lamp with the screw. 5 Connect the AC power cord to replace the lamp. 1 Turn off the projector...
Owners Manual
Page 50
... display the On-Screen Menu. Contact an authorized service station for each lamp. Lamp counter reset 1 Turn the projector on and press the MENU button to reset the lamp counter. Select [Yes] and then press the OK button. 3 Another confirmation dialog box appears, and select [Yes] to access the submenu items. 2 Select Lamp counter reset and then press the Point 8 or OK buttons. Be sure to reset the Lamp replacement counter only after the lamp...
... display the On-Screen Menu. Contact an authorized service station for each lamp. Lamp counter reset 1 Turn the projector on and press the MENU button to reset the lamp counter. Select [Yes] and then press the OK button. 3 Another confirmation dialog box appears, and select [Yes] to access the submenu items. 2 Select Lamp counter reset and then press the Point 8 or OK buttons. Be sure to reset the Lamp replacement counter only after the lamp...
Owners Manual
Page 51
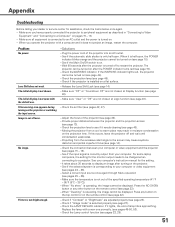
... the WARNING indicator lights red, the projector cannot be displayed. Check the connection between the projector and the projection screen (see page 49). - When "Cleaning" is approaching. If it is on . - Replace the lamp with the default one promptly. (see pages 49-50, 53). - Problem: No power. Lens Shift does not work. See if the Main On/Off switch is half-open . Release the Lens Shift Lock (see pages 23, 29). 51 Check the projection lens...
... the WARNING indicator lights red, the projector cannot be displayed. Check the connection between the projector and the projection screen (see page 49). - When "Cleaning" is approaching. If it is on . - Replace the lamp with the default one promptly. (see pages 49-50, 53). - Problem: No power. Lens Shift does not work. See if the Main On/Off switch is half-open . Release the Lens Shift Lock (see pages 23, 29). 51 Check the projection lens...
Owners Manual
Page 52
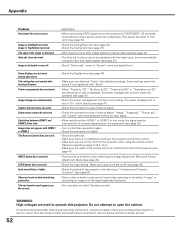
... set to "Indicators and Projector Condition" (see page 34). - WARNING: High voltages are not too far from HDMI 1 to obtain service. 52 Appendix Problem: Horizontal line noise occurs. Then adjust the value of cables. - Check the Ceiling/Rear item (see page 37). - Some displays are operating or Logo is signal. Capture function does not work . Switching between the projector and remote control. - RESET button does not work . When "Freeze (p. 23)," "No show (p.23)," "Cleaning...
... set to "Indicators and Projector Condition" (see page 34). - WARNING: High voltages are not too far from HDMI 1 to obtain service. 52 Appendix Problem: Horizontal line noise occurs. Then adjust the value of cables. - Check the Ceiling/Rear item (see page 37). - Some displays are operating or Logo is signal. Capture function does not work . Switching between the projector and remote control. - RESET button does not work . When "Freeze (p. 23)," "No show (p.23)," "Cleaning...
Owners Manual
Page 53
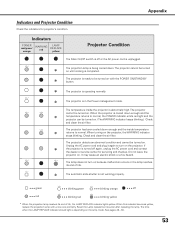
...; blinking yellow * When the projection lamp reaches its end of life. ✽ The automatic slide shutter is depending on . (The WARNING indicator keeps blinking.) Check and clean the air filter. When this indicator becomes yellow, replace the projection lamp with the POWER ON/STAND-BY ✽ button. ✽ The projector is operating normally. ✽ The projector is cooled down enough and the ✽ temperature returns to normal. When the projector is in the Power management mode. Do...
...; blinking yellow * When the projection lamp reaches its end of life. ✽ The automatic slide shutter is depending on . (The WARNING indicator keeps blinking.) Check and clean the air filter. When this indicator becomes yellow, replace the projection lamp with the POWER ON/STAND-BY ✽ button. ✽ The projector is operating normally. ✽ The projector is cooled down enough and the ✽ temperature returns to normal. When the projector is in the Power management mode. Do...
Owners Manual
Page 55
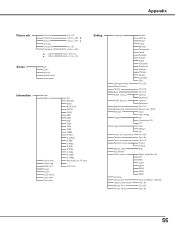
... 575p 720p 1080i 1080p D-VGA D-WXGA D-480i D-480p D-575i D-575p D-720p D-1080i D-1080p Resolution for PC input - - - - V-sync freq. Full Zoom Normal Natural wide Anamorphic Setting Input Signal H-sync freq. Screen Information Overscan Horizontal Vertical Auto adj. Unknown Language Advanced menu Menu Position Ceiling Rear HDMI 1 setup HDMI 2 setup Highland Background Rename Display Logo Power off confirmation Capture Power management Remote control Shutter demo Test pattern Filter counter Cleaning Fan control Lamp counter reset Service Port Factory default English German French...
... 575p 720p 1080i 1080p D-VGA D-WXGA D-480i D-480p D-575i D-575p D-720p D-1080i D-1080p Resolution for PC input - - - - V-sync freq. Full Zoom Normal Natural wide Anamorphic Setting Input Signal H-sync freq. Screen Information Overscan Horizontal Vertical Auto adj. Unknown Language Advanced menu Menu Position Ceiling Rear HDMI 1 setup HDMI 2 setup Highland Background Rename Display Logo Power off confirmation Capture Power management Remote control Shutter demo Test pattern Filter counter Cleaning Fan control Lamp counter reset Service Port Factory default English German French...


