Owners Manual
Page 2
... the ceiling, clean the air intake vents, air filters, and top of the projector periodically with high quality materials and components which can reduce the service life of your projector seems to be recycled and reused. If the projector is not to operate improperly, read this equipment at their end-of-life, should be maintained. READ AND KEEP THIS OWNER'S MANUAL FOR LATER USE. 2 NO USER-SERVICEABLE PARTS INSIDE EXCEPT LAMP REPLACEMENT...
... the ceiling, clean the air intake vents, air filters, and top of the projector periodically with high quality materials and components which can reduce the service life of your projector seems to be recycled and reused. If the projector is not to operate improperly, read this equipment at their end-of-life, should be maintained. READ AND KEEP THIS OWNER'S MANUAL FOR LATER USE. 2 NO USER-SERVICEABLE PARTS INSIDE EXCEPT LAMP REPLACEMENT...

Owners Manual
Page 4
... cut off and destroyed. Model Number Trade Name Responsible party Address Telephone No. : PLV-75/PLV-80/PLV-75L/PLV-80L : Sanyo : SANYO FISHER COMPANY : 21605 Plummer Street, Chatsworth, California 91311 : (818)998-7322 AC POWER CORD REQUIREMENT The AC Power Cord supplied with a moulded plug incorporating a fuse, the value of which can radiate radio frequency energy and, if not installed and used in your electrician. This...
... cut off and destroyed. Model Number Trade Name Responsible party Address Telephone No. : PLV-75/PLV-80/PLV-75L/PLV-80L : Sanyo : SANYO FISHER COMPANY : 21605 Plummer Street, Chatsworth, California 91311 : (818)998-7322 AC POWER CORD REQUIREMENT The AC Power Cord supplied with a moulded plug incorporating a fuse, the value of which can radiate radio frequency energy and, if not installed and used in your electrician. This...
Owners Manual
Page 5
...26 AUTO PC ADJUSTMENT 26 NAME OF EACH PART OF PROJECTOR 7 MANUAL PC ADJUSTMENT 27 SETTING-UP PROJECTOR CONNECTING AC POWER CORD POSITIONING PROJECTOR LENS INSTALLATION ADJUSTABLE FEET 8 PICTURE IMAGE SELECT 29 8 IMAGE LEVEL SELECT 29 9 PICTURE SCREEN ADJUSTMENT 30 9 PICTURE SCREEN SELECT 30 10 INSTALLING PROJECTOR IN PROPER POSITION 10 MOVING PROJECTOR 11 VIDEO INPUT 31 CONNECTING PROJECTOR 12 SELECTING INPUT SOURCE 31 SELECTING VIDEO SYSTEM 32 PICTURE IMAGE SELECT 33 TERMINALS OF PROJECTOR 12 IMAGE LEVEL SELECT 33 CONNECTING TO COMPUTER 13 PICTURE SCREEN...
...26 AUTO PC ADJUSTMENT 26 NAME OF EACH PART OF PROJECTOR 7 MANUAL PC ADJUSTMENT 27 SETTING-UP PROJECTOR CONNECTING AC POWER CORD POSITIONING PROJECTOR LENS INSTALLATION ADJUSTABLE FEET 8 PICTURE IMAGE SELECT 29 8 IMAGE LEVEL SELECT 29 9 PICTURE SCREEN ADJUSTMENT 30 9 PICTURE SCREEN SELECT 30 10 INSTALLING PROJECTOR IN PROPER POSITION 10 MOVING PROJECTOR 11 VIDEO INPUT 31 CONNECTING PROJECTOR 12 SELECTING INPUT SOURCE 31 SELECTING VIDEO SYSTEM 32 PICTURE IMAGE SELECT 33 TERMINALS OF PROJECTOR 12 IMAGE LEVEL SELECT 33 CONNECTING TO COMPUTER 13 PICTURE SCREEN...
Owners Manual
Page 6
... setup is necessary and projection is displayed in video mode and PC mode (total 20 images). It is pressed. Keystone Correction solves this time, the colors are recognized and best adjustment is automatically set by digitally altering projection to produce undistorted images. ◆ Power Management Power Management function is provided to turn Projection Lamp off when a projector detects signal interruption and any operation button is designed to display the image of the screen. At this problem by Auto PC Adjustment...
... setup is necessary and projection is displayed in video mode and PC mode (total 20 images). It is pressed. Keystone Correction solves this time, the colors are recognized and best adjustment is automatically set by digitally altering projection to produce undistorted images. ◆ Power Management Power Management function is provided to turn Projection Lamp off when a projector detects signal interruption and any operation button is designed to display the image of the screen. At this problem by Auto PC Adjustment...

Owners Manual
Page 9
... projector. 9 Projection lens is recommended to installation manual in room has a great influence on the above charts are only for operation. Zoom 400" 300" 231" Min. Highest Lens Shift Lowest Lens Shift H3 H1 H2 H4 H1 : H2 = 6 : 1 H3 : H4 = 1 : 1 NOTE Screen size and lens shift ratio on picture quality. COVER CAP NOTE; LENS INSTALLATION (For Lensless model PLV-75L/PLV-80L only) Before setting up and down with Model PLV-75L/PLV...
... projector. 9 Projection lens is recommended to installation manual in room has a great influence on the above charts are only for operation. Zoom 400" 300" 231" Min. Highest Lens Shift Lowest Lens Shift H3 H1 H2 H4 H1 : H2 = 6 : 1 H3 : H4 = 1 : 1 NOTE Screen size and lens shift ratio on picture quality. COVER CAP NOTE; LENS INSTALLATION (For Lensless model PLV-75L/PLV-80L only) Before setting up and down with Model PLV-75L/PLV...

Owners Manual
Page 13
CONNECTING PROJECTOR CONNECTING TO COMPUTER Cables used for connection (✽ = Cable or adapter is not supplied with this projector.) • VGA Cable (HDB 15 pin) ✽ • Control Cable for Serial Port • DVI-Digital Cable (for Single Link T.M.D.S.) ✽ • Audio Cables (Mini Plug (stereo) ) ✽ • BNC Cable ✽ IBM-compatible computer or Macintosh computer (VGA / SVGA / XGA / SXGA/SXGA+/WXGA/UXGA) Desktop type Laptop type Monitor Output Monitor Output Monitor Output Audio Output Serial port BNC...
CONNECTING PROJECTOR CONNECTING TO COMPUTER Cables used for connection (✽ = Cable or adapter is not supplied with this projector.) • VGA Cable (HDB 15 pin) ✽ • Control Cable for Serial Port • DVI-Digital Cable (for Single Link T.M.D.S.) ✽ • Audio Cables (Mini Plug (stereo) ) ✽ • BNC Cable ✽ IBM-compatible computer or Macintosh computer (VGA / SVGA / XGA / SXGA/SXGA+/WXGA/UXGA) Desktop type Laptop type Monitor Output Monitor Output Monitor Output Audio Output Serial port BNC...
Owners Manual
Page 15
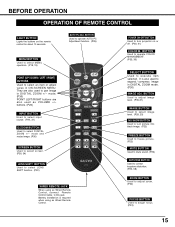
... REMOTE CONTROL LIGHT BUTTON Lights the buttons on or off. (P20, 21) COLOR M. BUTTON Used to operate AUTO PC Adjustment function. (P26) MENU BUTTON Used to select MENU operation. (P18, 19) POINT (UP / DOWN / LEFT / RIGHT) BUTTONS Used to turn picture into black image. (P23) FREEZE BUTTON Used to freeze picture. (P23) MUTE BUTTON Used to mute sound. (P23) KEYSTONE BUTTON Used to correct keystone distortion. (P22, 38) ZOOM BUTTON Used to adjust zoom. (P22) FOCUS BUTTON Used to select DIGITAL ZOOM +/- buttons. (P23) INPUT BUTTON Used to select input source. (P24, 31) D.ZOOM BUTTON Used...
... REMOTE CONTROL LIGHT BUTTON Lights the buttons on or off. (P20, 21) COLOR M. BUTTON Used to operate AUTO PC Adjustment function. (P26) MENU BUTTON Used to select MENU operation. (P18, 19) POINT (UP / DOWN / LEFT / RIGHT) BUTTONS Used to turn picture into black image. (P23) FREEZE BUTTON Used to freeze picture. (P23) MUTE BUTTON Used to mute sound. (P23) KEYSTONE BUTTON Used to correct keystone distortion. (P22, 38) ZOOM BUTTON Used to adjust zoom. (P22) FOCUS BUTTON Used to select DIGITAL ZOOM +/- buttons. (P23) INPUT BUTTON Used to select input source. (P24, 31) D.ZOOM BUTTON Used...
Owners Manual
Page 17
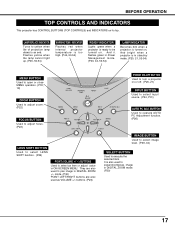
... image in DIGITAL ZOOM +/- buttons. (P23) POWER ON-OFF BUTTON Used to turn a projector on . INDICATOR Flashes red when internal projector temperature is too high. (P44, 53-54) READY INDICATOR Lights green when a projector is in Power Management mode. (P40, 44, 53-54) LAMP INDICATOR Becomes dim when a projector is also used as VOLUME +/- And it flashes green in stand-by mode. (P20, 21, 53-54) MENU BUTTON Used to open or close MENU operation. (P18, 19) ZOOM BUTTON Used to adjust zoom. (P22) FOCUS BUTTON Used to adjust focus. (P22) LENS SHIFT BUTTON Used to select LENS...
... image in DIGITAL ZOOM +/- buttons. (P23) POWER ON-OFF BUTTON Used to turn a projector on . INDICATOR Flashes red when internal projector temperature is too high. (P44, 53-54) READY INDICATOR Lights green when a projector is in Power Management mode. (P40, 44, 53-54) LAMP INDICATOR Becomes dim when a projector is also used as VOLUME +/- And it flashes green in stand-by mode. (P20, 21, 53-54) MENU BUTTON Used to open or close MENU operation. (P18, 19) ZOOM BUTTON Used to adjust zoom. (P22) FOCUS BUTTON Used to adjust focus. (P22) LENS SHIFT BUTTON Used to select LENS...
Owners Manual
Page 19
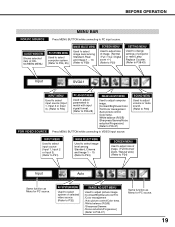
... picture control/Color temp. /White balance (R/G/B) /Sharpness/Gamma /Noise reduction/Progressive] (Refer to VIDEO input source. SOUND MENU Used to adjust volume or mute sound. (Refer to P23) INPUT MENU Used to select input source (Input 1, Input 2 or Input 3). (Refer to P31) IMAGE SELECT MENU Used to select image level among Standard, Real and Image 1 ~ 10. (Refer to P29) SCREEN MENU Used to adjust size of image. [Normal / Full / True / Digital zoom +/-] (Refer to P30) SETTING MENU Used to change settings of ONSCREEN MENU. BEFORE OPERATION MENU BAR FOR PC SOURCE Press MENU BUTTON...
... picture control/Color temp. /White balance (R/G/B) /Sharpness/Gamma /Noise reduction/Progressive] (Refer to VIDEO input source. SOUND MENU Used to adjust volume or mute sound. (Refer to P23) INPUT MENU Used to select input source (Input 1, Input 2 or Input 3). (Refer to P31) IMAGE SELECT MENU Used to select image level among Standard, Real and Image 1 ~ 10. (Refer to P29) SCREEN MENU Used to adjust size of image. [Normal / Full / True / Digital zoom +/-] (Refer to P30) SETTING MENU Used to change settings of ONSCREEN MENU. BEFORE OPERATION MENU BAR FOR PC SOURCE Press MENU BUTTON...
Owners Manual
Page 20
... code" and the number will change to "PIN code". Enter the correct number again. Lamp control status For model PLV-80/PLV-80L only. (See page 40 for locking operation of the projector with a computer, VCR, etc.) before turning on page 42 for Lamp control.) Enter a PIN code Select a number by pressing the POINT DOWN button, then return to "✳". Refer to operate. Should the PIN code be started. The LAMP Indicator lights RED, and READY Indicator lights GREEN. 3 Press the POWER...
... code" and the number will change to "PIN code". Enter the correct number again. Lamp control status For model PLV-80/PLV-80L only. (See page 40 for locking operation of the projector with a computer, VCR, etc.) before turning on page 42 for Lamp control.) Enter a PIN code Select a number by pressing the POINT DOWN button, then return to "✳". Refer to operate. Should the PIN code be started. The LAMP Indicator lights RED, and READY Indicator lights GREEN. 3 Press the POWER...
Owners Manual
Page 25
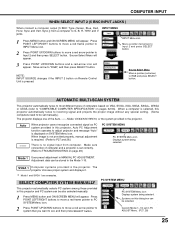
... VGA, SVGA, XGA, SXGA, SXGA+, WXGA or UXGA (refer to adjust projector and message "Auto" is selected, this projector automatically tunes to incoming signal and projects the proper image without any special setting. (Some computers need to Input 2 and press SELECT button. 3 Press POINT UP/DOWN buttons and a red-arrow icon will appear. COMPUTER INPUT WHEN SELECT INPUT 2 (5 BNC INPUT JACKS ) When connect a computer output [5 BNC Type (Green, Blue, Red, Horiz. NOTE; Source Select Menu...
... VGA, SVGA, XGA, SXGA, SXGA+, WXGA or UXGA (refer to adjust projector and message "Auto" is selected, this projector automatically tunes to incoming signal and projects the proper image without any special setting. (Some computers need to Input 2 and press SELECT button. 3 Press POINT UP/DOWN buttons and a red-arrow icon will appear. COMPUTER INPUT WHEN SELECT INPUT 2 (5 BNC INPUT JACKS ) When connect a computer output [5 BNC Type (Green, Blue, Red, Horiz. NOTE; Source Select Menu...
Owners Manual
Page 39
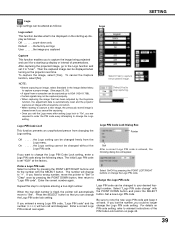
... fourdigit number. Logo PIN Code Lock Dialog Box Pointer Off . . . . .the Logo setting can be displayed when turning on the projector next time. Enter a correct Logo PIN code all over again. SETTING Logo Logo settings can be altered as follows: Logo Logo select This function decides what to be displayed on the starting-up display as follows: Off count-down only Default . . . .the factory-set logo User . . . . . .the image...
... fourdigit number. Logo PIN Code Lock Dialog Box Pointer Off . . . . .the Logo setting can be displayed when turning on the projector next time. Enter a correct Logo PIN code all over again. SETTING Logo Logo settings can be altered as follows: Logo Logo select This function decides what to be displayed on the starting-up display as follows: Off count-down only Default . . . .the factory-set logo User . . . . . .the image...

Owners Manual
Page 40
... of three settings with the POINT LEFT/RIGHT buttons, and go to project the image from a ceiling mounting the projector. The READY indicator will be switched off during this cooling-off in the picture image adjustment menu is displayed on models PLV-80 and PLV-80L. Choose one of the screen. This function is used to project the image to turn the projector off properly (see "Turning Off the Projector" on just by connecting the AC power cord to...
... of three settings with the POINT LEFT/RIGHT buttons, and go to project the image from a ceiling mounting the projector. The READY indicator will be switched off during this cooling-off in the picture image adjustment menu is displayed on models PLV-80 and PLV-80L. Choose one of the screen. This function is used to project the image to turn the projector off properly (see "Turning Off the Projector" on just by connecting the AC power cord to...
Owners Manual
Page 46
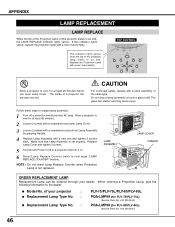
... Projection Lamp is set properly. TOP CONTROL This indicator lights yellow when the life of your dealer. The inside of this indicator lights yellow, replace the projection lamp with a lamp assembly of the same type. CAUTION For continued safety, replace with a new one promptly. Do not drop a lamp assembly or touch a glass bulb! LAMP ASSEMBLY LAMP COVER HANDLE ORDER REPLACEMENT LAMP Replacement Lamp can be ordered through your projector : ● Replacement Lamp Type No. : ● Replacement Lamp Type No. : PLV-75/PLV-75L/PLV-80/PLV...
... Projection Lamp is set properly. TOP CONTROL This indicator lights yellow when the life of your dealer. The inside of this indicator lights yellow, replace the projection lamp with a lamp assembly of the same type. CAUTION For continued safety, replace with a new one promptly. Do not drop a lamp assembly or touch a glass bulb! LAMP ASSEMBLY LAMP COVER HANDLE ORDER REPLACEMENT LAMP Replacement Lamp can be ordered through your projector : ● Replacement Lamp Type No. : ● Replacement Lamp Type No. : PLV-75/PLV-75L/PLV-80/PLV...
Owners Manual
Page 47
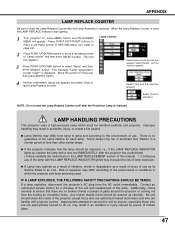
... environment of time than other similar lamps. ● If the projector indicates that there are being used. APPENDIX LAMP REPLACE COUNTER Be sure to reset the Lamp Replace Counter after the Projection Lamp is replaced. is reset, the LAMP REPLACE Indicator stops lighting. 1 Turn projector on, press MENU button and ON-SCREEN MENU will appear. Move the pointer to reset Lamp Replace Counter. IF A LAMP EXPLODES, THE FOLLOWING SAFETY PRECAUTIONS SHOULD BE TAKEN. LAMP HANDLING PRECAUTIONS This projector uses a high-pressure lamp which the projector and lamp are...
... environment of time than other similar lamps. ● If the projector indicates that there are being used. APPENDIX LAMP REPLACE COUNTER Be sure to reset the Lamp Replace Counter after the Projection Lamp is replaced. is reset, the LAMP REPLACE Indicator stops lighting. 1 Turn projector on, press MENU button and ON-SCREEN MENU will appear. Move the pointer to reset Lamp Replace Counter. IF A LAMP EXPLODES, THE FOLLOWING SAFETY PRECAUTIONS SHOULD BE TAKEN. LAMP HANDLING PRECAUTIONS This projector uses a high-pressure lamp which the projector and lamp are...
Owners Manual
Page 48
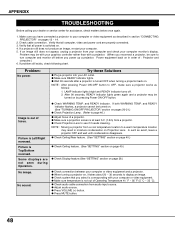
... needs cleaning. Verify that all computer, video and power cord are not seen during Operation. No sound. ● Check WARNING TEMP. APPENDIX TROUBLESHOOTING Before calling your computer. 5. If an image still does not appear, unplug a projector from audio input source. ● Adjust audio source. ● Press VOLUME (+) button. ● Press MUTE button. 48 LAMP indicator lights bright and READY indicator turns off before you have connected a projector to OFF, make sure a projector works as described in order of Operating Temperature 41...
... needs cleaning. Verify that all computer, video and power cord are not seen during Operation. No sound. ● Check WARNING TEMP. APPENDIX TROUBLESHOOTING Before calling your computer. 5. If an image still does not appear, unplug a projector from audio input source. ● Adjust audio source. ● Press VOLUME (+) button. ● Press MUTE button. 48 LAMP indicator lights bright and READY indicator turns off before you have connected a projector to OFF, make sure a projector works as described in order of Operating Temperature 41...
Owners Manual
Page 53
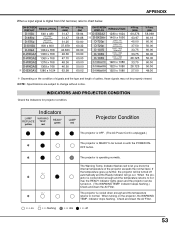
....00 50.00 60.00 60.00 50.00 60.00 50.00 48.00 ✳ Depending on the projector, the WARNING TEMP. INDICATORS AND PROJECTOR CONDITION Check the Indicators for projector condition. yellow red READY green LAMP red Projector Condition The projector is OFF. (The AC Power Cord is unplugged.) The projector is READY to normal, the READY indicator lights green and the projector can be turned off 53 Indicator flashes red to change without notice.
....00 50.00 60.00 60.00 50.00 60.00 50.00 48.00 ✳ Depending on the projector, the WARNING TEMP. INDICATORS AND PROJECTOR CONDITION Check the Indicators for projector condition. yellow red READY green LAMP red Projector Condition The projector is OFF. (The AC Power Cord is unplugged.) The projector is READY to normal, the READY indicator lights green and the projector can be turned off 53 Indicator flashes red to change without notice.
Owners Manual
Page 54
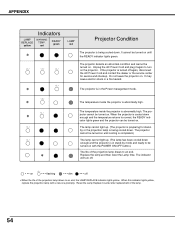
... temperature returns to normal, the READY indicator lights green and the projector can be turned on • • • flashing • • • dim • • • off again, disconnect the AC Power Cord and contact the dealer or the service center for standby or the projection lamp is abnormally high. When this indicator lights yellow, replace the projection lamp with the POWER ON-OFF button.) The life of the lamp. 54 yellow red READY green ✽ Projector...
... temperature returns to normal, the READY indicator lights green and the projector can be turned on • • • flashing • • • dim • • • off again, disconnect the AC Power Cord and contact the dealer or the service center for standby or the projection lamp is abnormally high. When this indicator lights yellow, replace the projection lamp with the POWER ON-OFF button.) The life of the lamp. 54 yellow red READY green ✽ Projector...
Owners Manual
Page 55
... g) (including batteries) Accessories Owner's Manual AC Power Cord Wireless/Wired Remote Control Transmitter and Batteries Control Cable for Serial port Lens Cover (PLV-75/PLV-80) PIN Code Label ● Specifications are subject to change without notice. ● LCD panels are effective, a tiny fraction of the pixels (0.01% or less) may be ineffective by the characteristics of Pixels Color System High Definition TV Signal Scanning Frequency Projection Lens Throw distance Motorized Lens Shift Projection Image Size (Diagonal) Horizontal Resolution Projection Lamp Input 1 Jacks Multi-media...
... g) (including batteries) Accessories Owner's Manual AC Power Cord Wireless/Wired Remote Control Transmitter and Batteries Control Cable for Serial port Lens Cover (PLV-75/PLV-80) PIN Code Label ● Specifications are subject to change without notice. ● LCD panels are effective, a tiny fraction of the pixels (0.01% or less) may be ineffective by the characteristics of Pixels Color System High Definition TV Signal Scanning Frequency Projection Lens Throw distance Motorized Lens Shift Projection Image Size (Diagonal) Horizontal Resolution Projection Lamp Input 1 Jacks Multi-media...
Owners Manual
Page 58
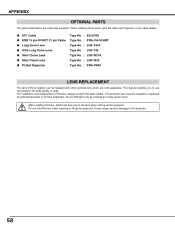
... pin Cable ● Long Zoom Lens ● Ultra Long Zoom Lens ● Short Zoom Lens ● Short Fixed Lens ● PJ-Net Organizer Type No. : KA-DV20 Type No. : POA-CA-SCART Type No. : LNS-T31A Type No. : LNS-T32 Type No. : LNS-W31A Type No. : LNS-W32 Type No. : POA-PN40 LENS REPLACEMENT The lens of this projector can be installed or replaced by...
... pin Cable ● Long Zoom Lens ● Ultra Long Zoom Lens ● Short Zoom Lens ● Short Fixed Lens ● PJ-Net Organizer Type No. : KA-DV20 Type No. : POA-CA-SCART Type No. : LNS-T31A Type No. : LNS-T32 Type No. : LNS-W31A Type No. : LNS-W32 Type No. : POA-PN40 LENS REPLACEMENT The lens of this projector can be installed or replaced by...


