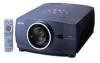
Owners Manual
Page 2
... THERE ARE IMPORTANT OPERATING AND MAINTENANCE INSTRUCTIONS IN THE OWNER'S MANUAL WITH THIS UNIT. 2 q This projector produces intense light from the power outlet. Do not cover the ventilation slot on the top, sides and rear of the projector cabinet for allowing air circulation and cooling the projector. 20cm Minimum distance should be set in a fire hazard. READ AND KEEP THIS OWNER'S MANUAL FOR LATER USE. Do not...
... THERE ARE IMPORTANT OPERATING AND MAINTENANCE INSTRUCTIONS IN THE OWNER'S MANUAL WITH THIS UNIT. 2 q This projector produces intense light from the power outlet. Do not cover the ventilation slot on the top, sides and rear of the projector cabinet for allowing air circulation and cooling the projector. 20cm Minimum distance should be set in a fire hazard. READ AND KEEP THIS OWNER'S MANUAL FOR LATER USE. Do not...
Owners Manual
Page 3
... reliable operation of any service or repairs to dangerous voltage or other materials, and the bottom opening or removing covers may touch dangerous voltage points or short out parts that the projector is in safe operating condition. If the projector has been exposed to persons. e. Follow all servicing to protect it is operated. Wall or shelf mounting should follow the manufacturer's instructions, and should use...
... reliable operation of any service or repairs to dangerous voltage or other materials, and the bottom opening or removing covers may touch dangerous voltage points or short out parts that the projector is in safe operating condition. If the projector has been exposed to persons. e. Follow all servicing to protect it is operated. Wall or shelf mounting should follow the manufacturer's instructions, and should use...
Owners Manual
Page 4
... fitted. (See Over) WARNING : A PLUG WITH BARED FLEXIBLE CORD IS HAZARDOUS IF ENGAGED IN A LIVE SOCKET OUTLET. Model Number Trade Name Responsible party Address Telephone No. : PLV-70 : Sanyo : SANYO FISHER COMPANY : 21605 Plummer Street, Chatsworth, California 91311 : (818)998-7322 AC POWER CORD REQUIREMENT The AC Power Cord supplied with the instructions, may not correspond with the following code: Green-and-yellow Earth Blue Neutral Brown Live As...
... fitted. (See Over) WARNING : A PLUG WITH BARED FLEXIBLE CORD IS HAZARDOUS IF ENGAGED IN A LIVE SOCKET OUTLET. Model Number Trade Name Responsible party Address Telephone No. : PLV-70 : Sanyo : SANYO FISHER COMPANY : 21605 Plummer Street, Chatsworth, California 91311 : (818)998-7322 AC POWER CORD REQUIREMENT The AC Power Cord supplied with the instructions, may not correspond with the following code: Green-and-yellow Earth Blue Neutral Brown Live As...
Owners Manual
Page 5
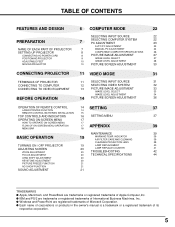
INDICATOR 39 AIR FILTER CARE AND CLEANING 39 CLEANING PROJECTION LENS 39 TURNING ON / OFF PROJECTOR 19 LAMP REPLACEMENT 40 ADJUSTING SCREEN 20 LAMP REPLACE COUNTER 41 ZOOM ADJUSTMENT 20 TROUBLESHOOTING 42 FOCUS ADJUSTMENT 20 TECHNICAL SPECIFICATIONS 44 LENS SHIFT ADJUSTMENT 20 KEYSTONE ADJUSTMENT 20 PICTURE FREEZE FUNCTION 21 NO SHOW FUNCTION 21 SOUND ADJUSTMENT 21 TRADEMARKS q Apple, Macintosh, and PowerBook are trademarks or registered trademarks of Apple Computer,Inc. q Each name of corporations or products in the owner's manual is a trademark...
INDICATOR 39 AIR FILTER CARE AND CLEANING 39 CLEANING PROJECTION LENS 39 TURNING ON / OFF PROJECTOR 19 LAMP REPLACEMENT 40 ADJUSTING SCREEN 20 LAMP REPLACE COUNTER 41 ZOOM ADJUSTMENT 20 TROUBLESHOOTING 42 FOCUS ADJUSTMENT 20 TECHNICAL SPECIFICATIONS 44 LENS SHIFT ADJUSTMENT 20 KEYSTONE ADJUSTMENT 20 PICTURE FREEZE FUNCTION 21 NO SHOW FUNCTION 21 SOUND ADJUSTMENT 21 TRADEMARKS q Apple, Macintosh, and PowerBook are trademarks or registered trademarks of Apple Computer,Inc. q Each name of corporations or products in the owner's manual is a trademark...
Owners Manual
Page 6
... Digital Sharpness Control which effectively matches colors to be adjusted to focus on -screen images in real time. PJ-Net Organizer is pressed. By accessing to the connected projector using the web browser on the screen to change them to the colors on your computer is not pressed over 5 minutes. This projector is not in use . x Digital Visual Interface This projector is displayed in; q S-Video S-Video signal, such as a DVD player output high...
... Digital Sharpness Control which effectively matches colors to be adjusted to focus on -screen images in real time. PJ-Net Organizer is pressed. By accessing to the connected projector using the web browser on the screen to change them to the colors on your computer is not pressed over 5 minutes. This projector is not in use . x Digital Visual Interface This projector is displayed in; q S-Video S-Video signal, such as a DVD player output high...
Owners Manual
Page 7
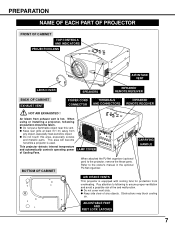
... using or installing a projector, following to ensure proper ventilation and avoid a possible risk of Cooling Fans. Refer to the projector, remove the these parts. Air blown from overheating. ADJUSTABLE FEET AND FEET LOCK LATCHES 7 PREPARATION NAME OF EACH PART OF PROJECTOR FRONT OF CABINET TOP CONTROLS AND INDICATORS PROJECTION LENS AIR INTAKE VENT LENS COVER SPEAKERS INFRARED REMOTE RECEIVER BACK OF CABINET EXHAUST VENT POWER CORD CONNECTOR TERMINALS AND CONNECTORS INFRARED REMOTE RECEIVER HOT AIR...
... using or installing a projector, following to ensure proper ventilation and avoid a possible risk of Cooling Fans. Refer to the projector, remove the these parts. Air blown from overheating. ADJUSTABLE FEET AND FEET LOCK LATCHES 7 PREPARATION NAME OF EACH PART OF PROJECTOR FRONT OF CABINET TOP CONTROLS AND INDICATORS PROJECTION LENS AIR INTAKE VENT LENS COVER SPEAKERS INFRARED REMOTE RECEIVER BACK OF CABINET EXHAUST VENT POWER CORD CONNECTOR TERMINALS AND CONNECTORS INFRARED REMOTE RECEIVER HOT AIR...
Owners Manual
Page 10
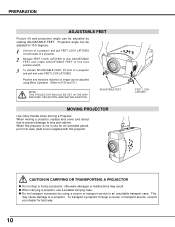
... rotate ADJUSTABLE FEET to fine tune position and tilt. 3 To shorten ADJUSTABLE FEET, lift front of image can be adjusted by using Menu Operation. (Refer to P 20 and 37.) NOTE : THIS PROJECTOR SHOULD BE SET IN THE WAY INDICATED. FEET LOCK LATCHES CAUTION IN CARRYING OR TRANSPORTING A PROJECTOR q Do not drop or bump a projector, otherwise damages or malfunctions may cause damage to lens and cabinet. PROJECTION LAMP...
... rotate ADJUSTABLE FEET to fine tune position and tilt. 3 To shorten ADJUSTABLE FEET, lift front of image can be adjusted by using Menu Operation. (Refer to P 20 and 37.) NOTE : THIS PROJECTOR SHOULD BE SET IN THE WAY INDICATED. FEET LOCK LATCHES CAUTION IN CARRYING OR TRANSPORTING A PROJECTOR q Do not drop or bump a projector, otherwise damages or malfunctions may cause damage to lens and cabinet. PROJECTION LAMP...
Owners Manual
Page 12
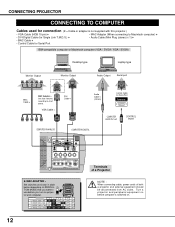
... connecting cable, power cords of a Projector x MAC ADAPTER ✽ Set switches as shown in table below . Turn a projector and peripheral equipment on before you want to chart below depending on RESOLU- CONNECTING PROJECTOR CONNECTING TO COMPUTER Cables used for connection (✽ = Cable or adapter is switched on. 12 VGA Cable ✽ DVI Cable ✽ Audio Cable ✽ (stereo) Control Cable for Serial Port IBM-compatible computer or Macintosh computer (VGA / SVGA / XGA / SXGA) Desktop type Laptop type Monitor Output Monitor Output Audio Output Serial port...
... connecting cable, power cords of a Projector x MAC ADAPTER ✽ Set switches as shown in table below . Turn a projector and peripheral equipment on before you want to chart below depending on RESOLU- CONNECTING PROJECTOR CONNECTING TO COMPUTER Cables used for connection (✽ = Cable or adapter is switched on. 12 VGA Cable ✽ DVI Cable ✽ Audio Cable ✽ (stereo) Control Cable for Serial Port IBM-compatible computer or Macintosh computer (VGA / SVGA / XGA / SXGA) Desktop type Laptop type Monitor Output Monitor Output Audio Output Serial port...

Owners Manual
Page 14
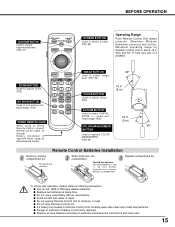
AUTO COLOR.M D D.ZOOM D POWER ON-OFF BUTTON Used to turn projector on remote control unit for 10 seconds. mode. (P30) POINT LEFT/RIGHT buttons are also used to pan image in DIGITAL ZOOM +/- SELECT BUTTON Used to mute sound. (P21) AUTO PC ADJ. BEFORE OPERATION OPERATION OF REMOTE CONTROL Left Side LENS SHIFT BUTTON Used to select LENS SHIFT function. (P20) MENU BUTTON Used to select MENU operation. (P17, 18) LENS SHIFT ON-OFF LENS KEYSTONE KEYS MENU SCREEN SELECT VOLUME LIGHT VOLUME INPUT BUTTON Used to select input source. (P22) LIGHT SWITCH Slide this button, it works ...
AUTO COLOR.M D D.ZOOM D POWER ON-OFF BUTTON Used to turn projector on remote control unit for 10 seconds. mode. (P30) POINT LEFT/RIGHT buttons are also used to pan image in DIGITAL ZOOM +/- SELECT BUTTON Used to mute sound. (P21) AUTO PC ADJ. BEFORE OPERATION OPERATION OF REMOTE CONTROL Left Side LENS SHIFT BUTTON Used to select LENS SHIFT function. (P20) MENU BUTTON Used to select MENU operation. (P17, 18) LENS SHIFT ON-OFF LENS KEYSTONE KEYS MENU SCREEN SELECT VOLUME LIGHT VOLUME INPUT BUTTON Used to select input source. (P22) LIGHT SWITCH Slide this button, it works ...
Owners Manual
Page 15
... expose Remote Control Unit to select DIGITAL ZOOM +/- BEFORE OPERATION KEYSTONE BUTTON Used to correct keystone distortion. (P20, 37) LENS SHIFT ON-OFF LENS KEYSTONE KEYS MENU SCREEN SELECT SCREEN BUTTON Used to operate COLOR MANAGEMENT. (P28, 34) Remote Control Batteries Installation 1 Remove battery compartment lid. q Do not drop Remote Control Unit. q If a battery has leaked on Remote Control Unit, carefully wipe case clean and install new batteries. q Dispose of explosion if battery is required when using as Wired Remote Control. mode and resize image...
... expose Remote Control Unit to select DIGITAL ZOOM +/- BEFORE OPERATION KEYSTONE BUTTON Used to correct keystone distortion. (P20, 37) LENS SHIFT ON-OFF LENS KEYSTONE KEYS MENU SCREEN SELECT SCREEN BUTTON Used to operate COLOR MANAGEMENT. (P28, 34) Remote Control Batteries Installation 1 Remove battery compartment lid. q Do not drop Remote Control Unit. q If a battery has leaked on Remote Control Unit, carefully wipe case clean and install new batteries. q Dispose of explosion if battery is required when using as Wired Remote Control. mode and resize image...
Owners Manual
Page 16
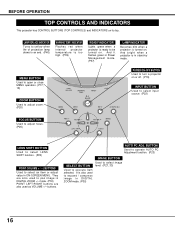
...) WARNING TEMP. And bright when a projector is turned on or off. (P19) INPUT BUTTON Used to select input source. (P22) FOCUS BUTTON Used to adjust focus. (P20) LENS SHIFT BUTTON Used to select LENS SHIFT function. (P20) POINT (VOLUME + / - ) BUTTONS Used to select an item or adjust value in DIGITAL ZOOM +/- It is ready to expand / compress image in stand-by mode. LAMP REPLACE INDICATOR Turns to yellow when life of projection lamp draws to execute item selected. INDICATOR Flashes red when internal projector temperature is too high. (P39...
...) WARNING TEMP. And bright when a projector is turned on or off. (P19) INPUT BUTTON Used to select input source. (P22) FOCUS BUTTON Used to adjust focus. (P20) LENS SHIFT BUTTON Used to select LENS SHIFT function. (P20) POINT (VOLUME + / - ) BUTTONS Used to select an item or adjust value in DIGITAL ZOOM +/- It is ready to expand / compress image in stand-by mode. LAMP REPLACE INDICATOR Turns to yellow when life of projection lamp draws to execute item selected. INDICATOR Flashes red when internal projector temperature is too high. (P39...
Owners Manual
Page 18
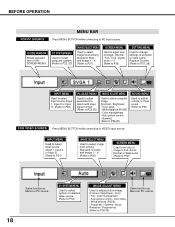
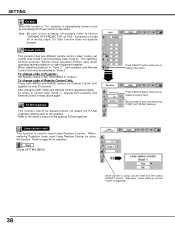
...SCREEN MENU Used to adjust size of image. [Normal / Full / True / Digital zoom +/-] (Refer to P30) SETTING MENU Used to change settings of selected video source. (Refer to P32) IMAGE ADJUST MENU Used to adjust picture image. [Contrast / Brightness / Color / Tint / Color management / Auto picture control / Color temp. / White balance (R/G/B) / Sharpness / Gamma / Noise Reduction / Progressive] (Refer to VIDEO input source. AV SYSTEM MENU Used to select system of projector or reset Lamp Replace Counter. (Refer to P37, 38) INPUT MENU Used to select input source (Input 1, Input 2 or Input...
...SCREEN MENU Used to adjust size of image. [Normal / Full / True / Digital zoom +/-] (Refer to P30) SETTING MENU Used to change settings of selected video source. (Refer to P32) IMAGE ADJUST MENU Used to adjust picture image. [Contrast / Brightness / Color / Tint / Color management / Auto picture control / Color temp. / White balance (R/G/B) / Sharpness / Gamma / Noise Reduction / Progressive] (Refer to VIDEO input source. AV SYSTEM MENU Used to select system of projector or reset Lamp Replace Counter. (Refer to P37, 38) INPUT MENU Used to select input source (Input 1, Input 2 or Input...
Owners Manual
Page 19
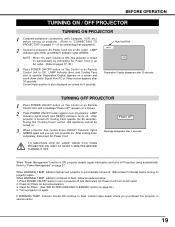
... also displayed on page 39.) 4. When WARNING TEMP. When WARNING TEMP. Turn a projector on a screen and count-down completely, disconnect AC Power Cord. appears on a screen. 2 Press POWER ON-OFF button again to turn a projector off , Cooling Fans operate (for dust accumulation. 3. When "Power Management" function is automatically turned off Projection Lamp automatically. Check Air Filters for 90 seconds). LAMP Indicator dims, and Cooling Fans start " function is ON, this projector or service center. 19 Refer to "Power Management" on Remote Control Unit...
... also displayed on page 39.) 4. When WARNING TEMP. When WARNING TEMP. Turn a projector on a screen and count-down completely, disconnect AC Power Cord. appears on a screen. 2 Press POWER ON-OFF button again to turn a projector off , Cooling Fans operate (for dust accumulation. 3. When "Power Management" function is automatically turned off Projection Lamp automatically. Check Air Filters for 90 seconds). LAMP Indicator dims, and Cooling Fans start " function is ON, this projector or service center. 19 Refer to "Power Management" on Remote Control Unit...
Owners Manual
Page 23
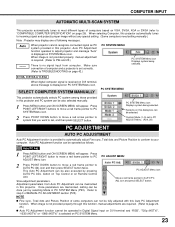
... and press SELECT button. SELECT COMPUTER SYSTEM MANUALLY PC SYSTEM MENU This projector automatically selects PC system among those provided in this Auto PC Adjustment function. Custom Mode (1~5) set correctly. (Refer to adjust projector and message "Auto" is set in PC SYSTEM Menu (P23). D-VGA, D-SVGA or D-XGA When digital computer signal is received on DVI terminal, above message is provided to automatically adjust Fine sync, Total dots and Picture Position to conform...
... and press SELECT button. SELECT COMPUTER SYSTEM MANUALLY PC SYSTEM MENU This projector automatically selects PC system among those provided in this Auto PC Adjustment function. Custom Mode (1~5) set correctly. (Refer to adjust projector and message "Auto" is set in PC SYSTEM Menu (P23). D-VGA, D-SVGA or D-XGA When digital computer signal is received on DVI terminal, above message is provided to automatically adjust Fine sync, Total dots and Picture Position to conform...
Owners Manual
Page 37
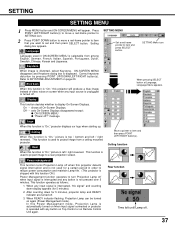
SETTING SETTING MENU 1 Press MENU button and ON-SCREEN MENU will produce a blue image instead of video noise on Remote Control Unit again. Keystone When image is interrupted, "No signal" and counting down for 5 minutes, projector lamp and READY indicator are turned off. 3. Blue back When this function is "On," this Power Management mode, Projection Lamp is automatically turned on when input signal connected or projector is operated with this function is not pressed over 5 minutes. SETTING Menu icon When pressing SELECT button at...
SETTING SETTING MENU 1 Press MENU button and ON-SCREEN MENU will produce a blue image instead of video noise on Remote Control Unit again. Keystone When image is interrupted, "No signal" and counting down for 5 minutes, projector lamp and READY indicator are turned off. 3. Blue back When this function is "On," this Power Management mode, Projection Lamp is automatically turned on when input signal connected or projector is operated with this function is not pressed over 5 minutes. SETTING Menu icon When pressing SELECT button at...
Owners Manual
Page 38
... button(s). On start When this function is "On," projector is automatically turned on just by using this icon to display previous items. Move pointer to normal code (Code 1), operate both projector and Remote Control in ways above again. When replacing Projection Lamp, reset Lamp Replace Counter by connecting AC Power cord to reset Lamp Replace Counter. This switching function prevents remote control operation mixture (jam) when operating several projectors or video equipment together. Remote control This projector has two different remote control codes; To change code...
... button(s). On start When this function is "On," projector is automatically turned on just by using this icon to display previous items. Move pointer to normal code (Code 1), operate both projector and Remote Control in ways above again. When replacing Projection Lamp, reset Lamp Replace Counter by connecting AC Power cord to reset Lamp Replace Counter. This switching function prevents remote control operation mixture (jam) when operating several projectors or video equipment together. Remote control This projector has two different remote control codes; To change code...
Owners Manual
Page 40
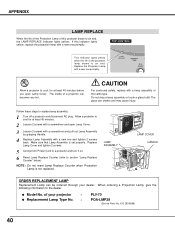
... Handle. 4 Replace Lamp Assembly with a new one and tighten 2 screws back. NOTE : Do not reset Lamp Replace Counter when Projection Lamp is set properly. Replace Lamp Cover and tighten 2 screws. 5 Connect AC Power Cord to a projector and turn it on. 6 Reset Lamp Replace Counter (refer to cool for at least 45 minutes. 2 Loosen 2 screws with a screwdriver and open Lamp Cover. Allow a projector to section "Lamp Replace Counter" below). TOP CONTROL This indicator lights yellow when the life of this indicator lights yellow, replace the projection lamp with a new one promptly.
... Handle. 4 Replace Lamp Assembly with a new one and tighten 2 screws back. NOTE : Do not reset Lamp Replace Counter when Projection Lamp is set properly. Replace Lamp Cover and tighten 2 screws. 5 Connect AC Power Cord to a projector and turn it on. 6 Reset Lamp Replace Counter (refer to cool for at least 45 minutes. 2 Loosen 2 screws with a screwdriver and open Lamp Cover. Allow a projector to section "Lamp Replace Counter" below). TOP CONTROL This indicator lights yellow when the life of this indicator lights yellow, replace the projection lamp with a new one promptly.

Owners Manual
Page 41
... Lamp Replace Counter until after the Lamp Assembly is replaced. There is reset, LAMP REPLACE Indicator stops lighting. 1 Turn projector on, press MENU button and ON-SCREEN MENU will appear. Risk of explosion may increase the risk of broken glass. 41 Contact an authorized service station for each lamp. Additionally, check carefully to service the unit by anyone, especially those who are authorized trained technicians and who are familiar with a new...
... Lamp Replace Counter until after the Lamp Assembly is replaced. There is reset, LAMP REPLACE Indicator stops lighting. 1 Turn projector on, press MENU button and ON-SCREEN MENU will appear. Risk of explosion may increase the risk of broken glass. 41 Contact an authorized service station for each lamp. Additionally, check carefully to service the unit by anyone, especially those who are authorized trained technicians and who are familiar with a new...
Owners Manual
Page 42
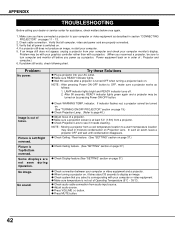
... 19.) q Check Projection Lamp. (Refer to page 40.) q Adjust focus of : Projector and computer.) 6. q Adjust audio source. q Press VOLUME (+) button. Problem: No power. Picture is turned OFF when turning a projector back on . 4. indicator. q Press MUTE button. 42 Check cable connection. If an image still does not appear, unplug a projector from audio input source. Try these Solutions q Plug a projector into your dealer or service center for assistance, check matters below once again. 1. q Make sure READY Indicator lights. q Check WARNING TEMP. NOTE...
... 19.) q Check Projection Lamp. (Refer to page 40.) q Adjust focus of : Projector and computer.) 6. q Adjust audio source. q Press VOLUME (+) button. Problem: No power. Picture is turned OFF when turning a projector back on . 4. indicator. q Press MUTE button. 42 Check cable connection. If an image still does not appear, unplug a projector from audio input source. Try these Solutions q Plug a projector into your dealer or service center for assistance, check matters below once again. 1. q Make sure READY Indicator lights. q Check WARNING TEMP. NOTE...
Owners Manual
Page 44
...730;C) Owner's Manual AC Power Cord Wireless/Wired Remote Control Transmitter and Batteries Remote Control Cable Video Cable (RCA x 1) Audio Cable (RCA x 2) S-Video Cable Control (Serial) port Cable Protective Dust Cover Lens Cover q Specifications are effective, however a tiny fraction of the pixels (0.01% or less) may be ineffective by the characteristics of the LCD panels. 44 APPENDIX TECHNICAL SPECIFICATIONS Projector Type Dimensions (W x H x D) Net Weight LCD Panel System Panel Resolution Number of Pixels Color System High Definition TV Signal Scanning Frequency Projection Lens Throw...
...730;C) Owner's Manual AC Power Cord Wireless/Wired Remote Control Transmitter and Batteries Remote Control Cable Video Cable (RCA x 1) Audio Cable (RCA x 2) S-Video Cable Control (Serial) port Cable Protective Dust Cover Lens Cover q Specifications are effective, however a tiny fraction of the pixels (0.01% or less) may be ineffective by the characteristics of the LCD panels. 44 APPENDIX TECHNICAL SPECIFICATIONS Projector Type Dimensions (W x H x D) Net Weight LCD Panel System Panel Resolution Number of Pixels Color System High Definition TV Signal Scanning Frequency Projection Lens Throw...


