Owners Manual
Page 2
... improperly, read this booklet. G Take appropriate space on the top, sides and rear of this manual thoroughly and operate the projector properly. G If the projector is exhausted from the power outlet. REFER SERVICING TO QUALIFIED SERVICE PERSONNEL. G This projector produces intense light from Laser Light Window while pressing LASER button (for an extended time...
... improperly, read this booklet. G Take appropriate space on the top, sides and rear of this manual thoroughly and operate the projector properly. G If the projector is exhausted from the power outlet. REFER SERVICING TO QUALIFIED SERVICE PERSONNEL. G This projector produces intense light from Laser Light Window while pressing LASER button (for an extended time...
Owners Manual
Page 5
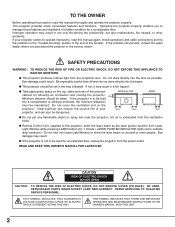
... 7 SELECTING COMPUTER SYSTEM PC ADJUSTMENT 23 25 AUTO PC ADJUSTMENT 25 NAME OF EACH PART OF PROJECTOR 7 MANUAL PC ADJUSTMENT 26 SETTING-UP PROJECTOR CONNECTING AC POWER CORD POSITIONING PROJECTOR ADJUSTABLE FEET 8 PICTURE IMAGE SELECT 28 8 IMAGE LEVEL SELECT 28 9 PICTURE SCREEN ADJUSTMENT 29 ...21 CLEANING PROJECTION LENS 43 21 LAMP REPLACEMENT 44 21 LAMP REPLACE COUNTER 45 21 TROUBLESHOOTING 46 21 INDICATORS AND PROJECTOR CONDITION 48 22 22 COMPATIBLE COMPUTER SPECIFICATION 49 22 MENU TREE 50 22 TECHNICAL SPECIFICATIONS 52 CONFIGURATIONS OF TERMINALS ...
... 7 SELECTING COMPUTER SYSTEM PC ADJUSTMENT 23 25 AUTO PC ADJUSTMENT 25 NAME OF EACH PART OF PROJECTOR 7 MANUAL PC ADJUSTMENT 26 SETTING-UP PROJECTOR CONNECTING AC POWER CORD POSITIONING PROJECTOR ADJUSTABLE FEET 8 PICTURE IMAGE SELECT 28 8 IMAGE LEVEL SELECT 28 9 PICTURE SCREEN ADJUSTMENT 29 ...21 CLEANING PROJECTION LENS 43 21 LAMP REPLACEMENT 44 21 LAMP REPLACE COUNTER 45 21 TROUBLESHOOTING 46 21 INDICATORS AND PROJECTOR CONDITION 48 22 22 COMPATIBLE COMPUTER SPECIFICATION 49 22 MENU TREE 50 22 TECHNICAL SPECIFICATIONS 52 CONFIGURATIONS OF TERMINALS ...
Owners Manual
Page 6
... The projector can be also controlled and maintained through a web browser. 6 G Computers IBM-compatible or Macintosh computer up and down with DVI 24-pin terminal for troublesome manual adjustment ... Lamp is automatically turned on again when a projector detects signal or any button is no need for connecting DVI output from a computer between XGA (1024 x 768) and SXGA (1280 ...LCD) technology. N Digital Visual Interface This projector is over 1280 x 1024 dots. N PJ-Net Organizer (Optional) PJ-Net Organizer enables the projector to turn Projection Lamp off when a projector...
... The projector can be also controlled and maintained through a web browser. 6 G Computers IBM-compatible or Macintosh computer up and down with DVI 24-pin terminal for troublesome manual adjustment ... Lamp is automatically turned on again when a projector detects signal or any button is no need for connecting DVI output from a computer between XGA (1024 x 768) and SXGA (1280 ...LCD) technology. N Digital Visual Interface This projector is over 1280 x 1024 dots. N PJ-Net Organizer (Optional) PJ-Net Organizer enables the projector to turn Projection Lamp off when a projector...

Owners Manual
Page 7
...not cover vent slots. G Keep side clear of Cooling Fans. When using or installing a projector, following to the owner's manual in the optional PJ-Net organizer. This projector detects internal temperature and automatically controls operating power of any object, especially heat-sensitive object. Obstructions...Refer to ensure proper ventilation and avoid a possible risk of fire and malfunction. PREPARATION NAME OF EACH PART OF PROJECTOR FRONT OF CABINET TOP CONTROLS AND INDICATORS PROJECTION LENS AIR INTAKE VENT LENS COVER SPEAKERS INFRARED REMOTE RECEIVER BACK OF CABINET...
...not cover vent slots. G Keep side clear of Cooling Fans. When using or installing a projector, following to the owner's manual in the optional PJ-Net organizer. This projector detects internal temperature and automatically controls operating power of any object, especially heat-sensitive object. Obstructions...Refer to ensure proper ventilation and avoid a possible risk of fire and malfunction. PREPARATION NAME OF EACH PART OF PROJECTOR FRONT OF CABINET TOP CONTROLS AND INDICATORS PROJECTION LENS AIR INTAKE VENT LENS COVER SPEAKERS INFRARED REMOTE RECEIVER BACK OF CABINET...

Owners Manual
Page 24
... MENU button and ON-SCREEN MENU will appear. When image is not provided properly, manual adjustment is required. (Refer to P26 and 27.) There is set manually.) The projector displays one of computers based on VGA, SVGA, XGA or SXGA (refer to TROUBLESHOOTING on SYSTEM Menu icon. Mode 1 User preset adjustment in PC ADJUST...
... MENU button and ON-SCREEN MENU will appear. When image is not provided properly, manual adjustment is required. (Refer to P26 and 27.) There is set manually.) The projector displays one of computers based on VGA, SVGA, XGA or SXGA (refer to TROUBLESHOOTING on SYSTEM Menu icon. Mode 1 User preset adjustment in PC ADJUST...

Owners Manual
Page 25
...adjusted with this Auto PC Adjustment function. icon and press SELECT button. Adjustment parameters from Auto PC Adjustment can be memorized in this function, manual adjustments are memorized, setting can not be done just by pressing AUTO PC ADJ. When image is selected on Remote Control Unit. Once parameters...Signal input on DVI terminal and "480p", "575p", "480i", "575i" "720p (HDTV)", "1035i (HDTV)" or "1080i (HDTV)" is not provided properly through this projector. Store adjustment parameters. Refer to your computer. Auto PC Adjustment function can be operated as follows.
...adjusted with this Auto PC Adjustment function. icon and press SELECT button. Adjustment parameters from Auto PC Adjustment can be memorized in this function, manual adjustments are memorized, setting can not be done just by pressing AUTO PC ADJ. When image is selected on Remote Control Unit. Once parameters...Signal input on DVI terminal and "480p", "575p", "480i", "575i" "720p (HDTV)", "1035i (HDTV)" or "1080i (HDTV)" is not provided properly through this projector. Store adjustment parameters. Refer to your computer. Auto PC Adjustment function can be operated as follows.

Owners Manual
Page 26
.... Selected Mode Shows status (Stored / Free) of this adjustment. This projector has a Manual PC Adjustment to enable you to precisely adjust several parameters to match with those parameters manually adjusted. Press POINT LEFT/RIGHT button to adjust value. Fine sync Adjusts... image as a flickering picture, a non-synchronized picture, a non-centered picture or a skewed picture. COMPUTER INPUT MANUAL PC ADJUSTMENT This projector can automatically tune to display signals from display. Adjustment dialog box will appear. Vertical Adjusts vertical picture position. Press ...
.... Selected Mode Shows status (Stored / Free) of this adjustment. This projector has a Manual PC Adjustment to enable you to precisely adjust several parameters to match with those parameters manually adjusted. Press POINT LEFT/RIGHT button to adjust value. Fine sync Adjusts... image as a flickering picture, a non-synchronized picture, a non-centered picture or a skewed picture. COMPUTER INPUT MANUAL PC ADJUSTMENT This projector can automatically tune to display signals from display. Adjustment dialog box will appear. Vertical Adjusts vertical picture position. Press ...

Owners Manual
Page 31
... and 1080i. When Video System is 1035i or 1080i, select system manually first. AV SYSTEM MENU (VIDEO OR S-VIDEO) AV SYSTEM Menu icon This box indicates system being selected. COMPONENT VIDEO SIGNAL FORMAT If projector cannot reproduce proper video image, it is necessary to system and press...Press MENU button and ON-SCREEN MENU will appear. Move pointer to optimize its performance. Y, Pb/Cb, Pr/Cr JACKS Auto Projector automatically detects incoming Video signal, and adjusts itself to select and then press SELECT button. When Video System is PAL-M or PAL-N, select...
... and 1080i. When Video System is 1035i or 1080i, select system manually first. AV SYSTEM MENU (VIDEO OR S-VIDEO) AV SYSTEM Menu icon This box indicates system being selected. COMPONENT VIDEO SIGNAL FORMAT If projector cannot reproduce proper video image, it is necessary to system and press...Press MENU button and ON-SCREEN MENU will appear. Move pointer to optimize its performance. Y, Pb/Cb, Pr/Cr JACKS Auto Projector automatically detects incoming Video signal, and adjusts itself to select and then press SELECT button. When Video System is PAL-M or PAL-N, select...
Owners Manual
Page 45
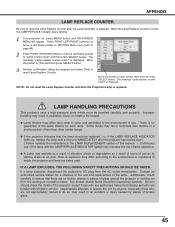
...an authorized service station for each lamp. When the Lamp Replace Counter is displayed. is reset, the LAMP REPLACE Indicator stops lighting. 1 Turn projector on, press MENU button and ON-SCREEN MENU will appear. is replaced. IF A LAMP EXPLODES, THE FOLLOWING SAFETY PRECAUTIONS SHOULD BE TAKEN.... shards found should be replaced, i.e., if the LAMP REPLACE INDICATOR lights up carefully. Inappropriate attempts to service the unit by pieces of this manual. ) Continuous use as its lifetime draws to an end. Press POINT LEFT/RIGHT button(s) to move a red frame pointer to SETTING Menu...
...an authorized service station for each lamp. When the Lamp Replace Counter is displayed. is reset, the LAMP REPLACE Indicator stops lighting. 1 Turn projector on, press MENU button and ON-SCREEN MENU will appear. is replaced. IF A LAMP EXPLODES, THE FOLLOWING SAFETY PRECAUTIONS SHOULD BE TAKEN.... shards found should be replaced, i.e., if the LAMP REPLACE INDICATOR lights up carefully. Inappropriate attempts to service the unit by pieces of this manual. ) Continuous use as its lifetime draws to an end. Press POINT LEFT/RIGHT button(s) to move a red frame pointer to SETTING Menu...

Owners Manual
Page 52
...) Owner's Manual AC Power Cord Wireless/Wired Remote Control Transmitter and Batteries Remote Control Cable VGA Cable USB Cable Control Cable for Serial port Protective Dust Cover Lens Cover (PLC-XP55) Lens Attachment (PLC-XP55L) G Specifications are subject to 10.5˚ AC 100 ~ 120 V (5.0 A Max. APPENDIX TECHNICAL SPECIFICATIONS Projector Type Dimensions (W x H x D) Net Weight LCD Panel System...
...) Owner's Manual AC Power Cord Wireless/Wired Remote Control Transmitter and Batteries Remote Control Cable VGA Cable USB Cable Control Cable for Serial port Protective Dust Cover Lens Cover (PLC-XP55) Lens Attachment (PLC-XP55L) G Specifications are subject to 10.5˚ AC 100 ~ 120 V (5.0 A Max. APPENDIX TECHNICAL SPECIFICATIONS Projector Type Dimensions (W x H x D) Net Weight LCD Panel System...

Owners Manual
Page 54
...not attempt to use the projector for wide variety of the lens, always contact the sales dealer. Referring to the lens when setting up the projector. After installing the lens, attach the lens cap to the attached lens replacement and installation manual, replace or install the ...lens properly. to the projector. 54 For installation and replacement of uses. This feature enables...
...not attempt to use the projector for wide variety of the lens, always contact the sales dealer. Referring to the lens when setting up the projector. After installing the lens, attach the lens cap to the attached lens replacement and installation manual, replace or install the ...lens properly. to the projector. 54 For installation and replacement of uses. This feature enables...


