Owners Manual
Page 2
... minimum distances must be taken. NO USERSERVICEABLE PARTS INSIDE EXCEPT LAMP REPLACEMENT. G This projector produces intense light from the ventilation holes. READ AND KEEP THIS OWNER'S MANUAL FOR LATER USE. Be especially careful that children do not stare directly into the lens as the laser pointer function from the power outlet. G This projector should be maintained. If your projector, and can also be set in...
... minimum distances must be taken. NO USERSERVICEABLE PARTS INSIDE EXCEPT LAMP REPLACEMENT. G This projector produces intense light from the ventilation holes. READ AND KEEP THIS OWNER'S MANUAL FOR LATER USE. Be especially careful that children do not stare directly into the lens as the laser pointer function from the power outlet. G This projector should be maintained. If your projector, and can also be set in...
Owners Manual
Page 4
... as that the plug will not occur in a particular installation. Use of the same rating, marked thus . AC Power Cord for help. Should the fuse need to which is indicated on a circuit different from the Parts Department indicated in your User Instructions. ASA If the fuse cover is no guarantee that to be replaced, an ASTA approved BS 1362 fuse must be...
... as that the plug will not occur in a particular installation. Use of the same rating, marked thus . AC Power Cord for help. Should the fuse need to which is indicated on a circuit different from the Parts Department indicated in your User Instructions. ASA If the fuse cover is no guarantee that to be replaced, an ASTA approved BS 1362 fuse must be...
Owners Manual
Page 5
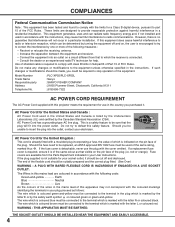
... IMAGE ADJUSTMENTS 34 OPERATION OF REMOTE CONTROL 15 LASER POINTER FUNCTION 15 REMOTE CONTROL BATTERIES INSTALLATION 16 SETTING 37 TOP CONTROLS AND INDICATORS 17 OPERATING ON-SCREEN MENU 18 SETTING MENU 37 HOW TO OPERATE ON-SCREEN MENU 18 FLOW OF ON-SCREEN MENU OPERATION 18 MENU BAR 19 APPENDIX 41 BASIC OPERATION TURNING ON / OFF PROJECTOR ADJUSTING SCREEN ZOOM ADJUSTMENT FOCUS ADJUSTMENT LENS SHIFT ADJUSTMENT KEYSTONE ADJUSTMENT PICTURE FREEZE FUNCTION NO SHOW FUNCTION P-TIMER FUNCTION SOUND ADJUSTMENT 20 OPERATING WIRELESS MOUSE 41 MAINTENANCE 42 WARNING TEMP...
... IMAGE ADJUSTMENTS 34 OPERATION OF REMOTE CONTROL 15 LASER POINTER FUNCTION 15 REMOTE CONTROL BATTERIES INSTALLATION 16 SETTING 37 TOP CONTROLS AND INDICATORS 17 OPERATING ON-SCREEN MENU 18 SETTING MENU 37 HOW TO OPERATE ON-SCREEN MENU 18 FLOW OF ON-SCREEN MENU OPERATION 18 MENU BAR 19 APPENDIX 41 BASIC OPERATION TURNING ON / OFF PROJECTOR ADJUSTING SCREEN ZOOM ADJUSTMENT FOCUS ADJUSTMENT LENS SHIFT ADJUSTMENT KEYSTONE ADJUSTMENT PICTURE FREEZE FUNCTION NO SHOW FUNCTION P-TIMER FUNCTION SOUND ADJUSTMENT 20 OPERATING WIRELESS MOUSE 41 MAINTENANCE 42 WARNING TEMP...
Owners Manual
Page 6
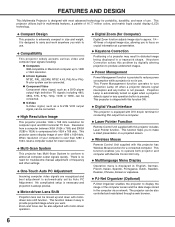
... projector is automatically set by digitally altering projection to turn Projection Lamp off when a projector detects signal interruption and any operation button is displayed in size and weight. N High Resolution Image This projector provides 1024 x 768 dots resolution for Computer) Digital Zoom function adjusts image size to approx. 1/4 ~ 49 times of use. N Wireless Mouse Remote Control Unit supplied with this projector has Wireless Mouse function for portability, durability, and ease of original image size, allowing you wish to 1280 x 1024 resolution. G S-Video S-Video signal...
... projector is automatically set by digitally altering projection to turn Projection Lamp off when a projector detects signal interruption and any operation button is displayed in size and weight. N High Resolution Image This projector provides 1024 x 768 dots resolution for Computer) Digital Zoom function adjusts image size to approx. 1/4 ~ 49 times of use. N Wireless Mouse Remote Control Unit supplied with this projector has Wireless Mouse function for portability, durability, and ease of original image size, allowing you wish to 1280 x 1024 resolution. G S-Video S-Video signal...
Owners Manual
Page 13
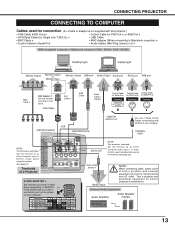
... switchable. VGA Cable DVI Cable ✽ USB Cable Audio Cable ✽ (stereo) Control Cable for Serial Port Terminal Control Cable Control Cable for PS/2 Port ✽ for Serial Port • Audio Cables (Mini Plug (stereo) x 2) ✽ IBM-compatible computer or Macintosh computer (VGA / SVGA / XGA / SXGA) Desktop type Laptop type Monitor Output Monitor Output or Monitor Input Monitor Output USB port Audio Output Serial port PS/2 port ADB port BNC Cable ✽ MAC Adapter ✽ Set slide switches according to ON DIP use before computer is switched on...
... switchable. VGA Cable DVI Cable ✽ USB Cable Audio Cable ✽ (stereo) Control Cable for Serial Port Terminal Control Cable Control Cable for PS/2 Port ✽ for Serial Port • Audio Cables (Mini Plug (stereo) x 2) ✽ IBM-compatible computer or Macintosh computer (VGA / SVGA / XGA / SXGA) Desktop type Laptop type Monitor Output Monitor Output or Monitor Input Monitor Output USB port Audio Output Serial port PS/2 port ADB port BNC Cable ✽ MAC Adapter ✽ Set slide switches according to ON DIP use before computer is switched on...
Owners Manual
Page 15
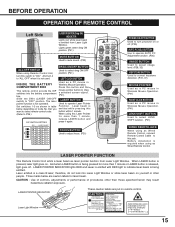
... light goes on Code No. And turn it to turn this button within 1 minute. SELECT VOLUME+ MENU KEYSTONE LASER P-TIMER INPUT 1 ZOOM COLOR.M INPUT 2 INPUT 3 FOCUS LENS NETWORK POWER ON-OFF BUTTON Used to "ALL OFF" when it again. When LASER button is emitted with RED light to operate Laser Pointer Function. therefore, do not look into the battery compartment box. INSIDE THE BATTERY COMPARTMENT BOX This remote control provide the DIP switches into Laser Light Window or...
... light goes on Code No. And turn it to turn this button within 1 minute. SELECT VOLUME+ MENU KEYSTONE LASER P-TIMER INPUT 1 ZOOM COLOR.M INPUT 2 INPUT 3 FOCUS LENS NETWORK POWER ON-OFF BUTTON Used to "ALL OFF" when it again. When LASER button is emitted with RED light to operate Laser Pointer Function. therefore, do not look into the battery compartment box. INSIDE THE BATTERY COMPARTMENT BOX This remote control provide the DIP switches into Laser Light Window or...
Owners Manual
Page 16
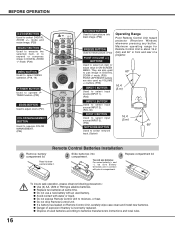
... 1 ZOOM COLOR.M INPUT 2 INPUT 3 FOCUS LENS NETWORK NO SHOW BUTTON Used to turn picture into compartment. 3 Replace compartment lid. buttons. (P22) INPUT 1 BUTTON Used to select an item or adjust value in ON-SCREEN MENU. G Do not expose Remote Control Unit to pan image in DIGITAL ZOOM +/- G Dispose of a projector. 60° 16.4' (5 m) INPUT 2 BUTTON Used to select input source (INPUT 2). (P24, 30) INPUT 3 BUTTON Used to select input source (INPUT 3). 16.4' (5 m) (P30) 60° NETWORK BUTTON Used to select network input. (Option) Remote Control Batteries Installation 1 Remove...
... 1 ZOOM COLOR.M INPUT 2 INPUT 3 FOCUS LENS NETWORK NO SHOW BUTTON Used to turn picture into compartment. 3 Replace compartment lid. buttons. (P22) INPUT 1 BUTTON Used to select an item or adjust value in ON-SCREEN MENU. G Do not expose Remote Control Unit to pan image in DIGITAL ZOOM +/- G Dispose of a projector. 60° 16.4' (5 m) INPUT 2 BUTTON Used to select input source (INPUT 2). (P24, 30) INPUT 3 BUTTON Used to select input source (INPUT 3). 16.4' (5 m) (P30) 60° NETWORK BUTTON Used to select network input. (Option) Remote Control Batteries Installation 1 Remove...
Owners Manual
Page 17
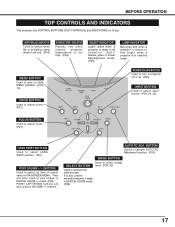
... pan image in DIGITAL ZOOM mode. (P29) 17 And it flashes green in Power Management mode. (P39) LAMP INDICATOR Becomes dim when a projector is in ON-SCREEN MENU. BEFORE OPERATION TOP CONTROLS AND INDICATORS This projector has CONTROL BUTTONS (TOP CONTROLS) and INDICATORS on or off. (P20) INPUT BUTTON Used to select input source. (P23, 24, 30) FOCUS BUTTON Used to adjust focus. (P21) LENS SHIFT BUTTON Used to select LENS SHIFT function. (P21) POINT (VOLUME + / - ) BUTTONS Used to an end. (P44) WARNING TEMP. LAMP REPLACE INDICATOR Turns to yellow when life of projection lamp draws...
... pan image in DIGITAL ZOOM mode. (P29) 17 And it flashes green in Power Management mode. (P39) LAMP INDICATOR Becomes dim when a projector is in ON-SCREEN MENU. BEFORE OPERATION TOP CONTROLS AND INDICATORS This projector has CONTROL BUTTONS (TOP CONTROLS) and INDICATORS on or off. (P20) INPUT BUTTON Used to select input source. (P23, 24, 30) FOCUS BUTTON Used to adjust focus. (P21) LENS SHIFT BUTTON Used to select LENS SHIFT function. (P21) POINT (VOLUME + / - ) BUTTONS Used to an end. (P44) WARNING TEMP. LAMP REPLACE INDICATOR Turns to yellow when life of projection lamp draws...
Owners Manual
Page 18
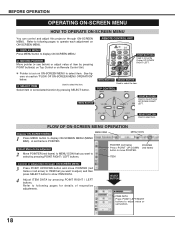
... Control or adjust item through ON-SCREEN MENU. SELECT VOLUME+ MENU KEYSTONE POINT BUTTONS Used to select the item. LOCK MENU BUTTON SELECT BUTTON Used to move the Pointer UP/ DOWN/ RIGHT/ LEFT. Select item or set function. 18 P-TIMERCOMPUTER 1 ZOOM COMPUTER 2 VIDEO SELECT BUTTON Used to display ON-SCREEN MENU (MENU BAR). Refer to following pages to operate each adjustment on ON-SCREEN MENU to select item. FOCUS LENS FLOW OF ON-SCREEN MENU OPERATION Display ON-SCREEN MENU MENU BAR MENU ICON 1 Press MENU button to...
... Control or adjust item through ON-SCREEN MENU. SELECT VOLUME+ MENU KEYSTONE POINT BUTTONS Used to select the item. LOCK MENU BUTTON SELECT BUTTON Used to move the Pointer UP/ DOWN/ RIGHT/ LEFT. Select item or set function. 18 P-TIMERCOMPUTER 1 ZOOM COMPUTER 2 VIDEO SELECT BUTTON Used to display ON-SCREEN MENU (MENU BAR). Refer to following pages to operate each adjustment on ON-SCREEN MENU to select item. FOCUS LENS FLOW OF ON-SCREEN MENU OPERATION Display ON-SCREEN MENU MENU BAR MENU ICON 1 Press MENU button to...
Owners Manual
Page 19
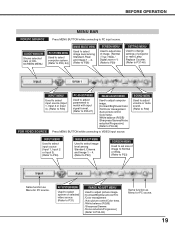
... P32) SCREEN MENU Used to set size of selected video source. (Refer to P31) IMAGE ADJUST MENU Used to adjust picture image. [Contrast/Brightness/Color/Tint /Color management /Auto picture control/Color temp. /White balance (R/G/B) /Sharpness/Gamma /Noise reduction/Progressive] (Refer to P34-36) Same function as Menu for PC source. 19 GUIDE WINDOW Shows selected item of projector or reset Lamp Replace Counter. (Refer to P37-40) INPUT MENU Used to select input source (Input 1, Input 2 or Input 3). (Refer to P23) PC ADJUST MENU Used to adjust parameters to match with input signal format...
... P32) SCREEN MENU Used to set size of selected video source. (Refer to P31) IMAGE ADJUST MENU Used to adjust picture image. [Contrast/Brightness/Color/Tint /Color management /Auto picture control/Color temp. /White balance (R/G/B) /Sharpness/Gamma /Noise reduction/Progressive] (Refer to P34-36) Same function as Menu for PC source. 19 GUIDE WINDOW Shows selected item of projector or reset Lamp Replace Counter. (Refer to P37-40) INPUT MENU Used to select input source (Input 1, Input 2 or Input 3). (Refer to P23) PC ADJUST MENU Used to adjust parameters to match with input signal format...
Owners Manual
Page 20
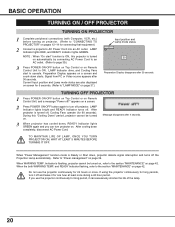
... Fans operate (for 24 hours or more. LAMP Indicator lights bright and READY Indicator turns off ?" After cooling down , projector detects signal interruption and turns off and leave it can turn projector on. Preparation Display appears on , refer to turn it off the Projection Lamp automatically. Refer to "LAMP MODE" on Remote Control Unit, and a message "Power off . LAMP Indicator lights RED, and READY Indicator lights GREEN. TURNING OFF PROJECTOR 1 Press POWER ON-OFF button on Top Control or on page 37.) Input position and Lamp mode status 30...
... Fans operate (for 24 hours or more. LAMP Indicator lights bright and READY Indicator turns off ?" After cooling down , projector detects signal interruption and turns off and leave it can turn projector on. Preparation Display appears on , refer to turn it off the Projection Lamp automatically. Refer to "LAMP MODE" on Remote Control Unit, and a message "Power off . LAMP Indicator lights RED, and READY Indicator lights GREEN. TURNING OFF PROJECTOR 1 Press POWER ON-OFF button on Top Control or on page 37.) Input position and Lamp mode status 30...

Owners Manual
Page 39
... projected if a signal starts being set the DIP switches 1-3 inside the battery compartment box of the Remote Control Unit; If projector is automatically turned on and images will turn projector off and lamp cooling starts. To change the code of the projector used in order to section "TURNING OFF PROJECTOR" on the screen. The factory default settings for 30 seconds or more , the power management function operates in ONSCREEN MENU is selected 2) When the set the time (1 minute to Code...
... projected if a signal starts being set the DIP switches 1-3 inside the battery compartment box of the Remote Control Unit; If projector is automatically turned on and images will turn projector off and lamp cooling starts. To change the code of the projector used in order to section "TURNING OFF PROJECTOR" on the screen. The factory default settings for 30 seconds or more , the power management function operates in ONSCREEN MENU is selected 2) When the set the time (1 minute to Code...
Owners Manual
Page 41
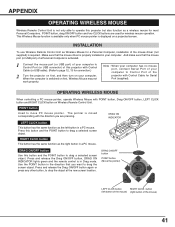
... turn on Wireless Remote Control Unit. The pointer is properly installed in Drag mode. Press and release the Drag ON/OFF button again or press any other button, to drag a selected screen object. POINT button, drag ON/OFF button and two CLICK buttons are pressing. Note : When your computer has no mouse port, connect Serial Port of the mouse) P-TIMERCOMPUTER 1 ZOOM COMPUTER 2 VIDEO FOCUS LENS 41 MENU KEYSTONE DRAG ON/OFF button Use this projector...
... turn on Wireless Remote Control Unit. The pointer is properly installed in Drag mode. Press and release the Drag ON/OFF button again or press any other button, to drag a selected screen object. POINT button, drag ON/OFF button and two CLICK buttons are pressing. Note : When your computer has no mouse port, connect Serial Port of the mouse) P-TIMERCOMPUTER 1 ZOOM COMPUTER 2 VIDEO FOCUS LENS 41 MENU KEYSTONE DRAG ON/OFF button Use this projector...
Owners Manual
Page 44
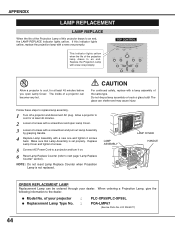
... indicator lights yellow, replace the projection lamp with a new one promptly. NOTE : Do not reset Lamp Replace Counter when Projection Lamp is set properly. Do not drop a lamp assembly or touch a glass bulb! Replace the Projection Lamp with a new one promptly. APPENDIX LAMP REPLACEMENT LAMP REPLACE When the life of the Projection Lamp of the projection lamp draws to an end. If this projector draws to the dealer. The glass can be ordered through your projector : G Replacement Lamp Type No. : PLC-XP55/PLC-XP55L POA-LMP67 (Service Parts...
... indicator lights yellow, replace the projection lamp with a new one promptly. NOTE : Do not reset Lamp Replace Counter when Projection Lamp is set properly. Do not drop a lamp assembly or touch a glass bulb! Replace the Projection Lamp with a new one promptly. APPENDIX LAMP REPLACEMENT LAMP REPLACE When the life of the Projection Lamp of the projection lamp draws to an end. If this projector draws to the dealer. The glass can be ordered through your projector : G Replacement Lamp Type No. : PLC-XP55/PLC-XP55L POA-LMP67 (Service Parts...
Owners Manual
Page 45
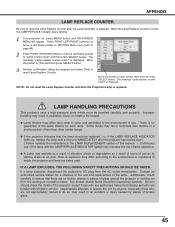
... service station for each lamp. The message "Lamp replace counter reset?" is reset, the LAMP REPLACE Indicator stops lighting. 1 Turn projector on, press MENU button and ON-SCREEN MENU will appear. G Lamp lifetime may differ according to the environment of broken glass. 45 When the Lamp Replace Counter is displayed. Improper handling may result in the LAMP REPLACEMENT section of this manual. ) Continuous use as a result of hours of time than other similar lamps. Additionally, check carefully to ensure that the lamp...
... service station for each lamp. The message "Lamp replace counter reset?" is reset, the LAMP REPLACE Indicator stops lighting. 1 Turn projector on, press MENU button and ON-SCREEN MENU will appear. G Lamp lifetime may differ according to the environment of broken glass. 45 When the Lamp Replace Counter is displayed. Improper handling may result in the LAMP REPLACEMENT section of this manual. ) Continuous use as a result of hours of time than other similar lamps. Additionally, check carefully to ensure that the lamp...
Owners Manual
Page 46
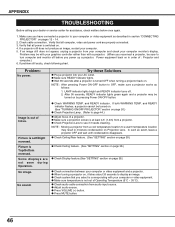
...Picture is at least 4.6' (1.4m) from audio input source. No sound. Check cable connection. Verify that all computer, video and power cord are not seen during Operation. G Check Projection Lens to see if it takes about 30 seconds to OFF, make sure a projector works as described in order of Operating Temperature (5°C ~ 35°C). G Adjust audio source. G Make sure a projection screen is Top/Bottom reversed. G Check audio cable connection from a projector. LAMP indicator lights bright and READY indicator turns off before you power up a projector. If a projector...
...Picture is at least 4.6' (1.4m) from audio input source. No sound. Check cable connection. Verify that all computer, video and power cord are not seen during Operation. G Check Projection Lens to see if it takes about 30 seconds to OFF, make sure a projector works as described in order of Operating Temperature (5°C ~ 35°C). G Adjust audio source. G Make sure a projection screen is Top/Bottom reversed. G Check audio cable connection from a projector. LAMP indicator lights bright and READY indicator turns off before you power up a projector. If a projector...
Owners Manual
Page 48
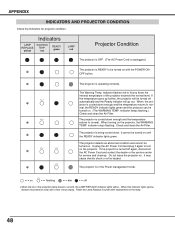
...Power management mode. • • • on with a new one promptly. Indicator flashes red to nor- The projector is operating normally. indicator stops flashing. Reset the Lamp Replace Counter after replacement of the projection lamp draws to be turned on the projector. When this indicator lights yellow, replace the projection lamp with the POWER ONOFF button. ✽ The projector is cooled down . The Warning Temp. If the projector is being cooled down enough and the temperature ✽ returns to turn ✽ on . Indicators LAMP WARNING REPLACE TEMP...
...Power management mode. • • • on with a new one promptly. Indicator flashes red to nor- The projector is operating normally. indicator stops flashing. Reset the Lamp Replace Counter after replacement of the projection lamp draws to be turned on the projector. When this indicator lights yellow, replace the projection lamp with the POWER ONOFF button. ✽ The projector is cooled down . The Warning Temp. If the projector is being cooled down enough and the temperature ✽ returns to turn ✽ on . Indicators LAMP WARNING REPLACE TEMP...

Owners Manual
Page 51
...On/Off Image adjust Scale Position Scale Position On/Off On/Off On/Off Off/Ready/Shut down On/Off Code 1 Code 2 Code 3 Code 4 Code 5 Code 6 Code 7 Code 8 Quit Mouse Projector Off Control panel Remote control Yes/No Yes/No Contrast 0 - 63 Brightness 0 - 63 Color 0 - 63 Tint 0 - 63 Color management 0 - 63 Auto picture control Off/L1/L2 Color temp. System Setting Sound Language Lamp mode Keystone Aspect V Aspect H Anamorphic Blue back Display Menu position Logo Ceiling Rear Power management On start Remote control code USB Key lock Lamp counter reset Factory default Volume...
...On/Off Image adjust Scale Position Scale Position On/Off On/Off On/Off Off/Ready/Shut down On/Off Code 1 Code 2 Code 3 Code 4 Code 5 Code 6 Code 7 Code 8 Quit Mouse Projector Off Control panel Remote control Yes/No Yes/No Contrast 0 - 63 Brightness 0 - 63 Color 0 - 63 Tint 0 - 63 Color management 0 - 63 Auto picture control Off/L1/L2 Color temp. System Setting Sound Language Lamp mode Keystone Aspect V Aspect H Anamorphic Blue back Display Menu position Logo Ceiling Rear Power management On start Remote control code USB Key lock Lamp counter reset Factory default Volume...

Owners Manual
Page 52
... (The U.S.A and Canada) AC 200 ~ 240 V (2.5 A Max. G LCD panels are subject to 10.5˚ AC 100 ~ 120 V (5.0 A Max. Stereo (R and L), 2 watt RMS (T.H.D. 10%) 0˚ to change without notice. Output : 1mW / Wave length : 650±20nm) Owner's Manual AC Power Cord Wireless/Wired Remote Control Transmitter and Batteries Remote Control Cable VGA Cable USB Cable Control Cable for Serial port Protective Dust Cover Lens Cover (PLC-XP55) Lens Attachment (PLC-XP55L) G Specifications are manufactured to 400" 800 TV lines (HDTV...
... (The U.S.A and Canada) AC 200 ~ 240 V (2.5 A Max. G LCD panels are subject to 10.5˚ AC 100 ~ 120 V (5.0 A Max. Stereo (R and L), 2 watt RMS (T.H.D. 10%) 0˚ to change without notice. Output : 1mW / Wave length : 650±20nm) Owner's Manual AC Power Cord Wireless/Wired Remote Control Transmitter and Batteries Remote Control Cable VGA Cable USB Cable Control Cable for Serial port Protective Dust Cover Lens Cover (PLC-XP55) Lens Attachment (PLC-XP55L) G Specifications are manufactured to 400" 800 TV lines (HDTV...

Owners Manual
Page 54
... attached lens replacement and installation manual, replace or install the lens properly. to use the projector for wide variety of the lens, always contact the sales dealer. Do not hold the lens when carrying or lifting the projector. When ordering those parts, give the name and Type No. To the sales and service engineer; G Control Cable (PS2 Port) G Control Cable (ADB Port) G MAC Adapter G DVI Cable G HDB 15 pin-SCART 21 pin Cable G Long Zoom Lens...
... attached lens replacement and installation manual, replace or install the lens properly. to use the projector for wide variety of the lens, always contact the sales dealer. Do not hold the lens when carrying or lifting the projector. When ordering those parts, give the name and Type No. To the sales and service engineer; G Control Cable (PS2 Port) G Control Cable (ADB Port) G MAC Adapter G DVI Cable G HDB 15 pin-SCART 21 pin Cable G Long Zoom Lens...


