Owners Manual
Page 1
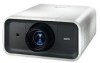
Multimedia Projector MODEL PLC-XP100L PLC-XP100BKL Owner's Manual ✽ Projection lens is optional.
Multimedia Projector MODEL PLC-XP100L PLC-XP100BKL Owner's Manual ✽ Projection lens is optional.
Owners Manual
Page 2
... (p.34). Zoom and focus can lock the operation on the crucial information during a presentation (pp.14, 40). This projector utilizes built-in this manual may differ slightly from the product. • The contents of the filter and replaces a filter automatically when it for ...Screen Menu and figures in multimedia features, a palette of 1.07 billion colors, and matrix liquid crystal display (LCD) technology. ◆ Functionally Rich ◆ Power Management This projector has many useful functions such as a PC wireless mouse. Operation menu is designed with the motor-driven lens ...
... (p.34). Zoom and focus can lock the operation on the crucial information during a presentation (pp.14, 40). This projector utilizes built-in this manual may differ slightly from the product. • The contents of the filter and replaces a filter automatically when it for ...Screen Menu and figures in multimedia features, a palette of 1.07 billion colors, and matrix liquid crystal display (LCD) technology. ◆ Functionally Rich ◆ Power Management This projector has many useful functions such as a PC wireless mouse. Operation menu is designed with the motor-driven lens ...
Owners Manual
Page 3
... 2 Table of Contents 3 To The Owner 4 Safety Instructions 5 Air Circulation 6 Installing the Projector in Proper Directions 7 Moving the Projector 8 Cautions in Handling the Projector 8 Compliance 9 Part Names and Functions 10 Front 10 Back 10 Bottom 10 Rear Terminal 11 Side...Projector Control 27 Operating with Remote Control 28 Pointer Function 30 Wireless Mouse Operation 30 Input Selection 31 Input 31 Computer Input Source Selection 32 Video Input Source Selection 33 Computer Input 34 Computer System Selection 34 Auto PC Adjustment 35 Manual...
... 2 Table of Contents 3 To The Owner 4 Safety Instructions 5 Air Circulation 6 Installing the Projector in Proper Directions 7 Moving the Projector 8 Cautions in Handling the Projector 8 Compliance 9 Part Names and Functions 10 Front 10 Back 10 Bottom 10 Rear Terminal 11 Side...Projector Control 27 Operating with Remote Control 28 Pointer Function 30 Wireless Mouse Operation 30 Input Selection 31 Input 31 Computer Input Source Selection 32 Video Input Source Selection 33 Computer Input 34 Computer System Selection 34 Auto PC Adjustment 35 Manual...
Owners Manual
Page 4
... of the world. CAUTION ON HANGING FROM THE CEILING When hanging the projector from the projection lens. THIS SYMBOL INDICATES THAT DANGEROUS VOLTAGE CONSTITUTING A RISK OF ELECTRIC SHOCK IS PRESENT WITHIN THIS UNIT. Your SANYO product is critical for use in a computer room as IN a kitchen...ANSI/NFPA 75. CAUTION Not for proper air circulation and cooling of the unit. To The Owner Before installing and operating the projector, read this manual again, check operations and cable connections and try the solutions in the "Troubleshooting" section in the back of this booklet. READ...
... of the world. CAUTION ON HANGING FROM THE CEILING When hanging the projector from the projection lens. THIS SYMBOL INDICATES THAT DANGEROUS VOLTAGE CONSTITUTING A RISK OF ELECTRIC SHOCK IS PRESENT WITHIN THIS UNIT. Your SANYO product is critical for use in a computer room as IN a kitchen...ANSI/NFPA 75. CAUTION Not for proper air circulation and cooling of the unit. To The Owner Before installing and operating the projector, read this manual again, check operations and cable connections and try the solutions in the "Troubleshooting" section in the back of this booklet. READ...
Owners Manual
Page 23
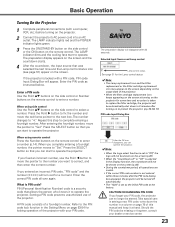
...moves to "Set." CAUTION ON HANDLING PIN CODE If you can operate the projector. ✔Note: • When the Logo select function is set as instructed below. Repeat this manual and keep it to operate the projector. Enter the correct PIN code all operations are invalid. • If the ...correct PIN code number is not entered within three minutes after the PIN code dialog box appeared, the projector will disappear after turning on...
...moves to "Set." CAUTION ON HANDLING PIN CODE If you can operate the projector. ✔Note: • When the Logo select function is set as instructed below. Repeat this manual and keep it to operate the projector. Enter the correct PIN code all operations are invalid. • If the ...correct PIN code number is not entered within three minutes after the PIN code dialog box appeared, the projector will disappear after turning on...
Owners Manual
Page 25
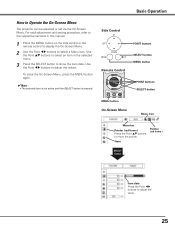
... button MENU button On-Screen Menu Menu icon Menu bar Pointer (red frame ) Press the Point ed buttons to Operate the On-Screen Menu The projector can be adjusted or set via the On-Screen Menu. Item Pointer (red frame ) SELECT button Item data Press the Point 7 8 buttons to show the...;Note: • The selected item is not active until the SELECT button is pressed. Use the Point ed buttons to select an item in this manual. 1 Press the MENU button on the side control or the remote control to display the On-Screen Menu. 2 Use the Point 7 8 buttons to adjust the...
... button MENU button On-Screen Menu Menu icon Menu bar Pointer (red frame ) Press the Point ed buttons to Operate the On-Screen Menu The projector can be adjusted or set via the On-Screen Menu. Item Pointer (red frame ) SELECT button Item data Press the Point 7 8 buttons to show the...;Note: • The selected item is not active until the SELECT button is pressed. Use the Point ed buttons to select an item in this manual. 1 Press the MENU button on the side control or the remote control to display the On-Screen Menu. 2 Use the Point 7 8 buttons to adjust the...
Owners Manual
Page 34
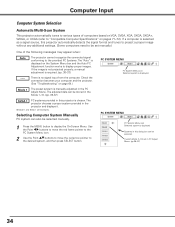
Check the connection between your computer and the projector. (See "Troubleshooting" on page 64.) Mode 1 The preset system is no signal input from the computer. Custom Mode (1-10) set manually.) One of computers based on VGA, SVGA, XGA, SXGA, SXGA+, WXGA, or UXGA (refer to "Compatible ...pp. 36-37.) ----- If the image is not projected properly, a manual adjustment is displayed. Selecting Computer System Manually PC system can be stored in the Mode 1-10. (pp. 36-37) SVGA 1 PC systems provided in the projector and displays it. ✽ Mode 1 and SVGA 1 are examples. If...
Check the connection between your computer and the projector. (See "Troubleshooting" on page 64.) Mode 1 The preset system is no signal input from the computer. Custom Mode (1-10) set manually.) One of computers based on VGA, SVGA, XGA, SXGA, SXGA+, WXGA, or UXGA (refer to "Compatible ...pp. 36-37.) ----- If the image is not projected properly, a manual adjustment is displayed. Selecting Computer System Manually PC system can be stored in the Mode 1-10. (pp. 36-37) SVGA 1 PC systems provided in the projector and displays it. ✽ Mode 1 and SVGA 1 are examples. If...
Owners Manual
Page 35
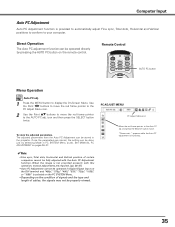
... PC SYSTEM Menu. • Depending on the condition of signals and the type and length of certain computers cannot be fully adjusted with this operation, manual adjustments are stored, the setting can be operated directly by selecting Mode in Digital Signal Input on the DVI terminal and "480p," "575p," "480i," ... to the AUTO PC adj. icon and then press the SELECT button twice. Computer Input Auto PC Adjustment Auto PC Adjustment function is in the projector. Use the Point 7 8 buttons to move the red frame pointer to the PC Adjust Menu icon. 2 Use the Point ed buttons to move the...
... PC SYSTEM Menu. • Depending on the condition of signals and the type and length of certain computers cannot be fully adjusted with this operation, manual adjustments are stored, the setting can be operated directly by selecting Mode in Digital Signal Input on the DVI terminal and "480p," "575p," "480i," ... to the AUTO PC adj. icon and then press the SELECT button twice. Computer Input Auto PC Adjustment Auto PC Adjustment function is in the projector. Use the Point 7 8 buttons to move the red frame pointer to the PC Adjust Menu icon. 2 Use the Point ed buttons to move the...
Owners Manual
Page 36
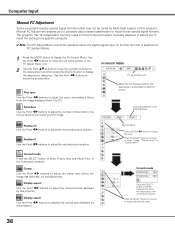
The projector has 10 independent memory areas to store those special signal formats. It allows you to precisely adjust several parameters to match those parameters manually adjusted. Display area V Use the Point 7 8 buttons to adjusts the vertical area displayed by this adjustment. Selected ...buttons to adjust the horizontal area displayed by Multi-Scan system of the connected computer. Press the SELECT button at this projector. Computer Input Manual PC Adjustment Some computers employ special signal formats which may not be operated when the digital signal input on the DVI...
The projector has 10 independent memory areas to store those special signal formats. It allows you to precisely adjust several parameters to match those parameters manually adjusted. Display area V Use the Point 7 8 buttons to adjusts the vertical area displayed by this adjustment. Selected ...buttons to adjust the horizontal area displayed by Multi-Scan system of the connected computer. Press the SELECT button at this projector. Computer Input Manual PC Adjustment Some computers employ special signal formats which may not be operated when the digital signal input on the DVI...
Owners Manual
Page 39
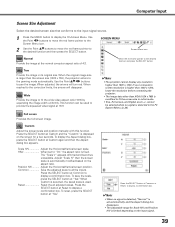
.... (p.34) Custom Adjust the screen scale and position manually with this function. Full screen Provides the full screen image. ✔Note: • The projector cannot display any resolution higher than the screen size (1024 x 768), the projector enters to the panning mode automatically. Adjust "Scale H,"..." is fixed. If your computer's screen resolution is higher than 1600 x 1200, lower the resolution before connecting the projector. • The image data other than XGA (1024 x 768) is set to the correction limits, the arrows will turn red. Press the SELECT button at Custom...
.... (p.34) Custom Adjust the screen scale and position manually with this function. Full screen Provides the full screen image. ✔Note: • The projector cannot display any resolution higher than the screen size (1024 x 768), the projector enters to the panning mode automatically. Adjust "Scale H,"..." is fixed. If your computer's screen resolution is higher than 1600 x 1200, lower the resolution before connecting the projector. • The image data other than XGA (1024 x 768) is set to the correction limits, the arrows will turn red. Press the SELECT button at Custom...
Owners Manual
Page 41
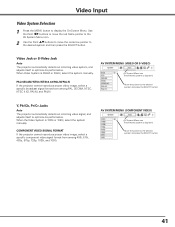
...its performance. AV SYSTEM MENU (VIDEO OR S-VIDEO) AV System Menu icon The selected system is 1035i or 1080i, select the system manually. When the Video System is displayed Move the pointer to display the On-Screen Menu. Move the pointer to the desired system and ...proper video image, select a specific broadcast signal format from among PAL, SECAM, NTSC, NTSC 4.43, PAL-M, and PAL-N. COMPONENT VIDEO SIGNAL FORMAT If the projector cannot reproduce proper video image, select a specific component video signal format from among 480i, 575i, 480p, 575p, 720p, 1035i, and 1080i. Use the ...
...its performance. AV SYSTEM MENU (VIDEO OR S-VIDEO) AV System Menu icon The selected system is 1035i or 1080i, select the system manually. When the Video System is displayed Move the pointer to display the On-Screen Menu. Move the pointer to the desired system and ...proper video image, select a specific broadcast signal format from among PAL, SECAM, NTSC, NTSC 4.43, PAL-M, and PAL-N. COMPONENT VIDEO SIGNAL FORMAT If the projector cannot reproduce proper video image, select a specific component video signal format from among 480i, 575i, 480p, 575p, 720p, 1035i, and 1080i. Use the ...
Owners Manual
Page 61
... the LAMP REPLACE indicator lights up carefully. Additionally, check carefully to an end. Any broken shards found should check the inside of the projector except those who are no guarantee of the lamp. Inappropriate attempts to the environment of use as a result of hours of broken glass.... indicator lighted may increase the risk of lamp explosion. ● Lamp may result in the Lamp Replacement section of this manual.) Continuous use of glass around the projector or coming out from the AC outlet immediately. IF A LAMP EXPLODES, THE FOLLOWING SAFETY PRECAUTIONS SHOULD BE TAKEN. No...
... the LAMP REPLACE indicator lights up carefully. Additionally, check carefully to an end. Any broken shards found should check the inside of the projector except those who are no guarantee of the lamp. Inappropriate attempts to the environment of use as a result of hours of broken glass.... indicator lighted may increase the risk of lamp explosion. ● Lamp may result in the Lamp Replacement section of this manual.) Continuous use of glass around the projector or coming out from the AC outlet immediately. IF A LAMP EXPLODES, THE FOLLOWING SAFETY PRECAUTIONS SHOULD BE TAKEN. No...
Owners Manual
Page 73
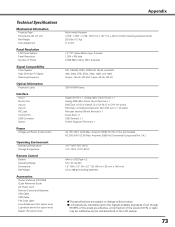
...(45 mm x 25 mm x 145 mm) 3.5 oz (99 g) (including batteries) Accessories Owner's Manual (CD-ROM) Quick Reference Guide AC Power Cord Remote Control and Batteries VGA Cable USB Cable PIN Code... lens) ● The specifications are subject to change without notice. ● LCD panels are effective, a tiny fraction of the pixels (0.01% or less) ...Organizer Terminal x 1 Power Voltage and Power Consumption AC 100-120 V (4.6A Max. Appendix Technical Specifications Mechanical Information Projector Type Multi-media Projector Dimensions (W x H x D) 14.56" x 7.36" x 17.32" (370 mm x 187 mm...
...(45 mm x 25 mm x 145 mm) 3.5 oz (99 g) (including batteries) Accessories Owner's Manual (CD-ROM) Quick Reference Guide AC Power Cord Remote Control and Batteries VGA Cable USB Cable PIN Code... lens) ● The specifications are subject to change without notice. ● LCD panels are effective, a tiny fraction of the pixels (0.01% or less) ...Organizer Terminal x 1 Power Voltage and Power Consumption AC 100-120 V (4.6A Max. Appendix Technical Specifications Mechanical Information Projector Type Multi-media Projector Dimensions (W x H x D) 14.56" x 7.36" x 17.32" (370 mm x 187 mm...
Owners Manual
Page 74
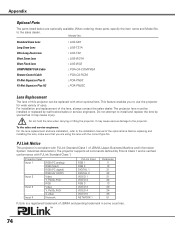
...the installation manual of uses. Do not attempt to install and replace the lens by yourself as it may cause serious damage to use the projector for wide variety of the optional lens. It may cause injury. Before replacing and installing the lens, make sure that you to the projector. When ordering... : LNS-W32 : POA-CA-COMPVGA : POA-CA-RC30 : POA-PN03 : POA-PN03C Lens Replacement The lens of JBMIA and pending trademark in some countries. 74 Projector Input Input 1 Input 2 Input 3 Input 4 RGB (PC analog) RGB (Scart) RGB (PC digital) RGB (AV HDCP) Video Y, Pb/Cb,Pr/Cr RGB Video Y,...
...the installation manual of uses. Do not attempt to install and replace the lens by yourself as it may cause serious damage to use the projector for wide variety of the optional lens. It may cause injury. Before replacing and installing the lens, make sure that you to the projector. When ordering... : LNS-W32 : POA-CA-COMPVGA : POA-CA-RC30 : POA-PN03 : POA-PN03C Lens Replacement The lens of JBMIA and pending trademark in some countries. 74 Projector Input Input 1 Input 2 Input 3 Input 4 RGB (PC analog) RGB (Scart) RGB (PC digital) RGB (AV HDCP) Video Y, Pb/Cb,Pr/Cr RGB Video Y,...
Owners Manual
Page 76
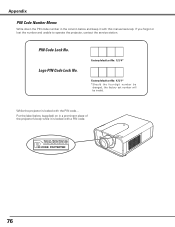
Logo PIN Code Lock No. PIN Code Lock No. If you forgot or lost the number and unable to operate the projector, contact the service station. Put the label below and keep it is locked with the PIN code... Factory default set No: 1 2 3 4* Factory default set No: 4 3 2 1* *... will be invalid. Appendix PIN Code Number Memo Write down the PIN code number in the column below (supplied) on in a prominent place of the projector's body while it with a PIN code. 76 While the projector is locked with this manual securely.
Logo PIN Code Lock No. PIN Code Lock No. If you forgot or lost the number and unable to operate the projector, contact the service station. Put the label below and keep it is locked with the PIN code... Factory default set No: 1 2 3 4* Factory default set No: 4 3 2 1* *... will be invalid. Appendix PIN Code Number Memo Write down the PIN code number in the column below (supplied) on in a prominent place of the projector's body while it with a PIN code. 76 While the projector is locked with this manual securely.


