

Owners Manual
Page 2
... is limited to minimize the risk of this manual may differ slightly from short distance. (p. 14) ◆ Antitheft Alarm Function This projector is equipped with the most advanced technology for security. - Make sure not to lose the remote control. ✔Note: • ...Component video, S-Video and RGB scart. ◆ Switchable Interface Terminal The projector provides a switchable interface terminal. The Logo page identifies the owner of 16.77 million colors, and matrix liquid crystal display (LCD) technology. ◆ Large Screen in this manual are subject to customize the...
... is limited to minimize the risk of this manual may differ slightly from short distance. (p. 14) ◆ Antitheft Alarm Function This projector is equipped with the most advanced technology for security. - Make sure not to lose the remote control. ✔Note: • ...Component video, S-Video and RGB scart. ◆ Switchable Interface Terminal The projector provides a switchable interface terminal. The Logo page identifies the owner of 16.77 million colors, and matrix liquid crystal display (LCD) technology. ◆ Large Screen in this manual are subject to customize the...

Owners Manual
Page 3
... Control 10 Antitheft Alarm Setting Buttons 11 Remote Control 12 Remote Control Battery Installation 13 Operating Range 13 Installation 14 Positioning the Projector 14 Adjustable Feet 14 Connecting the AC Power Cord 15 Connecting to a Computer 16 Connecting to Video Equipment 17 Connecting to ...Component Video Equipment 18 Basic Operation 19 Turning On the Projector 19 Turning Off the Projector 20 How to Operate the On-Screen Menu 21 Menu Bar 22 Focus Adjustment 23 Keystone Correction 23 Sound ...
... Control 10 Antitheft Alarm Setting Buttons 11 Remote Control 12 Remote Control Battery Installation 13 Operating Range 13 Installation 14 Positioning the Projector 14 Adjustable Feet 14 Connecting the AC Power Cord 15 Connecting to a Computer 16 Connecting to Video Equipment 17 Connecting to ...Component Video Equipment 18 Basic Operation 19 Turning On the Projector 19 Turning Off the Projector 20 How to Operate the On-Screen Menu 21 Menu Bar 22 Focus Adjustment 23 Keystone Correction 23 Sound ...
Owners Manual
Page 4
... you purchased the projector or the service center. CAUTION RISK OF ELECTRIC SHOCK DO NOT OPEN CAUTION : TO REDUCE THE RISK OF ELECTRIC SHOCK, DO NOT REMOVE COVER (OR BACK). Your SANYO product is to operate improperly, read this equipment at their end-oflife, should be used ...electrical and electronic products. CAUTION ON HANGING FROM THE CEILING When hanging the projector from the projection lens. If not, it may result in...
... you purchased the projector or the service center. CAUTION RISK OF ELECTRIC SHOCK DO NOT OPEN CAUTION : TO REDUCE THE RISK OF ELECTRIC SHOCK, DO NOT REMOVE COVER (OR BACK). Your SANYO product is to operate improperly, read this equipment at their end-oflife, should be used ...electrical and electronic products. CAUTION ON HANGING FROM THE CEILING When hanging the projector from the projection lens. If not, it may result in...

Owners Manual
Page 5
...of the type of power supplied, consult your authorized dealer or local power company. The openings should never be covered with the projector. This projector should not be blocked by the manufacturer, or sold with cloth or other similar surface. Never spill liquid of any service ...liquid or aerosol cleaners. Do not overload wall outlets and extension cords as a book case unless proper ventilation is in performance-this projector, ask the service technician to perform routine safety checks to overturn. Safety Instructions All the safety and operating instructions should be operated...
...of the type of power supplied, consult your authorized dealer or local power company. The openings should never be covered with the projector. This projector should not be blocked by the manufacturer, or sold with cloth or other similar surface. Never spill liquid of any service ...liquid or aerosol cleaners. Do not overload wall outlets and extension cords as a book case unless proper ventilation is in performance-this projector, ask the service technician to perform routine safety checks to overturn. Safety Instructions All the safety and operating instructions should be operated...

Owners Manual
Page 6
... The fans' running speed is changed according to project an image. Do not point the projector down the projector. Cooling fans are provided for ventilation and to protect the projector. To transport the projector through a courier or transport service, consult your dealer for an extended period, put other ...to ensure reliable operation of the exhaust vent, especially screws and metallic part. Do not put any flammable object or spray can near the projector, hot air is exhausted from the ventilation holes. -Keep the exhaust vent at least 3'(1m) away from any objects. -Do not touch...
... The fans' running speed is changed according to project an image. Do not point the projector down the projector. Cooling fans are provided for ventilation and to protect the projector. To transport the projector through a courier or transport service, consult your dealer for an extended period, put other ...to ensure reliable operation of the exhaust vent, especially screws and metallic part. Do not put any flammable object or spray can near the projector, hot air is exhausted from the ventilation holes. -Keep the exhaust vent at least 3'(1m) away from any objects. -Do not touch...

Owners Manual
Page 7
red or orange). The wire which is coloured brown must be connected to the terminal which is of this projector meets the requirement for use the plug with the cover omitted. If a replacement fuse cover is required, ensure it is marked with the letter L or ...
red or orange). The wire which is coloured brown must be connected to the terminal which is of this projector meets the requirement for use the plug with the cover omitted. If a replacement fuse cover is required, ensure it is marked with the letter L or ...

Owners Manual
Page 8
... for a Kensington lock used to avoid scratching the lens surface. Attach the lens cover while the projector is a registered trademark of the projector. t Exhaust Vents CAUTION Hot air is for attaching) CAUTION Do not turn on the projector with putting the lens cover on. For more information, visit http://www.kensington.com. *Kensington...
... for a Kensington lock used to avoid scratching the lens surface. Attach the lens cover while the projector is a registered trademark of the projector. t Exhaust Vents CAUTION Hot air is for attaching) CAUTION Do not turn on the projector with putting the lens cover on. For more information, visit http://www.kensington.com. *Kensington...
Owners Manual
Page 9
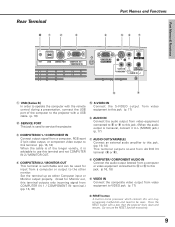
...17) ✽ RESET button A built-in micro processor which controls this terminal. (pp. 16, 18) When the cable is of the computer to service the projector. Do not use this terminal and not COMPUTER IN 2 / MONITOR OUT. i COMPUTER/ COMPONENT AUDIO IN Connect the audio output (stereo) from a computer or ... scart 21-pin video output, or component video output to this unit may occasionally malfunction and need to be used to the projector with a pen, then the projector shuts down and restarts. Set the terminal up as either Computer input or Monitor output properly. (Used for input from a ...
...17) ✽ RESET button A built-in micro processor which controls this terminal. (pp. 16, 18) When the cable is of the computer to service the projector. Do not use this terminal and not COMPUTER IN 2 / MONITOR OUT. i COMPUTER/ COMPONENT AUDIO IN Connect the audio output (stereo) from a computer or ... scart 21-pin video output, or component video output to this unit may occasionally malfunction and need to be used to the projector with a pen, then the projector shuts down and restarts. Set the terminal up as either Computer input or Monitor output properly. (Used for input from a ...
Owners Manual
Page 10
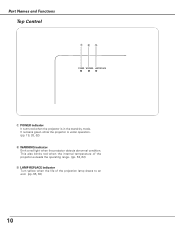
Part Names and Functions Top Control q we POWER WARNING LAMP REPLACE q POWER indicator It turns red when the projector is under operation. (pp. 19, 20, 62) w WARNING indicator Emit a red light when the projector detects abnormal condition. This also blinks red when the internal temperature of the projector exceeds the operating range. (pp. 53, 62) e LAMP REPLACE indicator Turn yellow when the life of the projection lamp draws to an end. (pp. 56, 62) 10 It remains green while the projector is in the stand-by mode.
Part Names and Functions Top Control q we POWER WARNING LAMP REPLACE q POWER indicator It turns red when the projector is under operation. (pp. 19, 20, 62) w WARNING indicator Emit a red light when the projector detects abnormal condition. This also blinks red when the internal temperature of the projector exceeds the operating range. (pp. 53, 62) e LAMP REPLACE indicator Turn yellow when the life of the projection lamp draws to an end. (pp. 56, 62) 10 It remains green while the projector is in the stand-by mode.
Owners Manual
Page 12
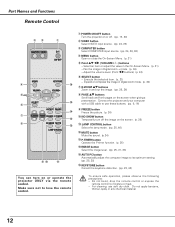
... item or adjust the value in and out the image. (pp. 25, 34) t i PAGE ed buttons Scroll back and forth pages on or operate the projector ONLY via the remote control. Adjust the volume level. (Point 7 8 buttons) (p. 24) y SELECT button - Execute the selected item. (p. 21) - Expand or ...the On-Screen Menu. (p. 21) t Point ed 7 8 ( VOLUME + / - ) buttons - Do not apply benzene, thinner, splay or any chemical material. 12 Connect the projector and your computer with a USB cable to use soft dry cloth. Part Names and Functions Remote Control ew q q POWER ON-OFF button Turn the...
... item or adjust the value in and out the image. (pp. 25, 34) t i PAGE ed buttons Scroll back and forth pages on or operate the projector ONLY via the remote control. Adjust the volume level. (Point 7 8 buttons) (p. 24) y SELECT button - Execute the selected item. (p. 21) - Expand or ...the On-Screen Menu. (p. 21) t Point ed 7 8 ( VOLUME + / - ) buttons - Do not apply benzene, thinner, splay or any chemical material. 12 Connect the projector and your computer with a USB cable to use soft dry cloth. Part Names and Functions Remote Control ew q q POWER ON-OFF button Turn the...

Owners Manual
Page 13
... leaked on the remote control, carefully wipe the case clean and install new batteries. ● Risk of the projector. 30° 30° 16.4' (5 m) 13 Operating Range Point the remote control toward the projector (Infrared Remote Receiver) when pressing any button. Part Names & Functions Remote Control Battery Installation Part Names and Functions...
... leaked on the remote control, carefully wipe the case clean and install new batteries. ● Risk of the projector. 30° 30° 16.4' (5 m) 13 Operating Range Point the remote control toward the projector (Infrared Remote Receiver) when pressing any button. Part Names & Functions Remote Control Battery Installation Part Names and Functions...
Owners Manual
Page 14
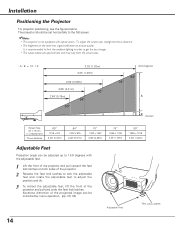
... the figures below are approximate and may vary from the actual sizes. It is not equipped with the adjustable feet. 1 Lift the front of the projector and pull upward the feet lock latches on picture quality. A : B = 10 : 1.2 3.38' (1.03m) 3.28' (1.00m) 2.92' (0.89m) 2.66' (0.81m) 70" 2.49' (0.76m) 64" 60...14 To adjust the screen size, change the throw distance. • The brightness in the room has a great influence on both sides of the projector. 2 Release the feet lock latches to lock the adjustable feet and rotate the adjustable feet to adjust the position and tilt. 3 To retract the...
... the figures below are approximate and may vary from the actual sizes. It is not equipped with the adjustable feet. 1 Lift the front of the projector and pull upward the feet lock latches on picture quality. A : B = 10 : 1.2 3.38' (1.03m) 3.28' (1.00m) 2.92' (0.89m) 2.66' (0.81m) 70" 2.49' (0.76m) 64" 60...14 To adjust the screen size, change the throw distance. • The brightness in the room has a great influence on both sides of the projector. 2 Release the feet lock latches to lock the adjustable feet and rotate the adjustable feet to adjust the position and tilt. 3 To retract the...

Owners Manual
Page 15
... the chart below and proper AC power cord must be used. Confirm the AC plug type with singlephase power systems having a grounded neutral conductor. Projector side For the U.S.A. When this equipment and must meet requirement of the country where you are not sure of the type of power being supplied... accessible. To power cord connector on . (See pp. 16-18 for connection) CAUTION For safety, unplug the AC power cord when the projector is connected to the projector. To reduce the risk of electrical shock, do not plug into any other type of 100-120 V or 200-240 V AC. Connect ...
... the chart below and proper AC power cord must be used. Confirm the AC plug type with singlephase power systems having a grounded neutral conductor. Projector side For the U.S.A. When this equipment and must meet requirement of the country where you are not sure of the type of power being supplied... accessible. To power cord connector on . (See pp. 16-18 for connection) CAUTION For safety, unplug the AC power cord when the projector is connected to the projector. To reduce the risk of electrical shock, do not plug into any other type of 100-120 V or 200-240 V AC. Connect ...

Owners Manual
Page 16
...and not the COMPUTER IN 2 / MONITOR OUT. • See p. 65 for ordering optional parts. 16 Unplug the power cords of both the projector and external equipment from the AC outlet before connecting the cables. Installation Connecting to a Computer Cables used for connection • VGA Cables (Mini D-sub...one cable is supplied.) •USB Cable • Audio Cables (Mini Plug: stereo) (Not all the cables are suppled with this projector.) Audio Output USB port Monitor Output Monitor Output or Monitor Input USB cable VGA cable VGA cable External Audio Equipment Audio Input Audio cable (...
...and not the COMPUTER IN 2 / MONITOR OUT. • See p. 65 for ordering optional parts. 16 Unplug the power cords of both the projector and external equipment from the AC outlet before connecting the cables. Installation Connecting to a Computer Cables used for connection • VGA Cables (Mini D-sub...one cable is supplied.) •USB Cable • Audio Cables (Mini Plug: stereo) (Not all the cables are suppled with this projector.) Audio Output USB port Monitor Output Monitor Output or Monitor Input USB cable VGA cable VGA cable External Audio Equipment Audio Input Audio cable (...

Owners Manual
Page 17
... • Video and Audio Cable (RCA x 3) • S-VIDEO Cable • Audio Cable (Mini Plug: stereo) (Not all the cables are suppled with this projector.) Installation Installation S-Video Output Composite Video and Audio Output (R) (L) (Video) S-Video cable External Audio Equipment Video and audio cable S-VIDEO (R) (L) (Video) AUDIO IN ... IN AUDIO IN Audio Input Audio cable (stereo) AUDIO OUT (stereo) ✔Note: • When connecting AUDIO OUT to external audio equipment, the projector's built-in speaker is disconnected. • See p. 65 for ordering optional parts.
... • Video and Audio Cable (RCA x 3) • S-VIDEO Cable • Audio Cable (Mini Plug: stereo) (Not all the cables are suppled with this projector.) Installation Installation S-Video Output Composite Video and Audio Output (R) (L) (Video) S-Video cable External Audio Equipment Video and audio cable S-VIDEO (R) (L) (Video) AUDIO IN ... IN AUDIO IN Audio Input Audio cable (stereo) AUDIO OUT (stereo) ✔Note: • When connecting AUDIO OUT to external audio equipment, the projector's built-in speaker is disconnected. • See p. 65 for ordering optional parts.

Owners Manual
Page 18
Unplug the power cords of both the projector and external equipment from the AC outlet before connecting the cables. Component Video Output pin Output (Y, Pb/Cb, Pr/Cr) Audio cable (stereo) Scart-VGA ... OUT to Component Video Equipment Cables used for ordering optional parts. AUDIO OUT (stereo) 18 Audio cable (stereo) Installation Connecting to external audio equipment, the projector's built-in speaker is disconnected. • See p. 65 for connection • Audio Cables (Mini Plug :stereo) • Scart-VGA Cable • Component Cable • Component...
Unplug the power cords of both the projector and external equipment from the AC outlet before connecting the cables. Component Video Output pin Output (Y, Pb/Cb, Pr/Cr) Audio cable (stereo) Scart-VGA ... OUT to Component Video Equipment Cables used for ordering optional parts. AUDIO OUT (stereo) 18 Audio cable (stereo) Installation Connecting to external audio equipment, the projector's built-in speaker is disconnected. • See p. 65 for connection • Audio Cables (Mini Plug :stereo) • Scart-VGA Cable • Component Cable • Component...

Owners Manual
Page 19
...Number that was selected last and the Lamp mode status icon (see p. 46) appear on the remote control. If you can operate the projector. ✔Note: • When the Logo select function is "Off", the logo is set as instructed below. Setting PIN code prevents ...p. 46 for locking operation of a four-digit number. What is automatically move the pointer to "PIN code". Installation Basic Operation Turning On the Projector 1 Complete peripheral connections (with the SELECT button. The POWER indicator becomes red. 3 Press the POWER ON-OFF button on the screen. The ...
...Number that was selected last and the Lamp mode status icon (see p. 46) appear on the remote control. If you can operate the projector. ✔Note: • When the Logo select function is "Off", the logo is set as instructed below. Setting PIN code prevents ...p. 46 for locking operation of a four-digit number. What is automatically move the pointer to "PIN code". Installation Basic Operation Turning On the Projector 1 Complete peripheral connections (with the SELECT button. The POWER indicator becomes red. 3 Press the POWER ON-OFF button on the screen. The ...
Owners Manual
Page 20
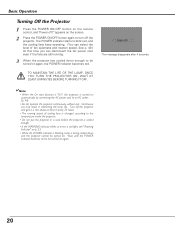
...start function is "On", this time you can select the level of cooling fans is changed according to the temperature inside the projector. • Do not put the projector in shortening the lamp life. Wait until the POWER indicator becomes red to be turned on the screen. 2 Press the POWER... about an hour in every 24 hours. • The running speed of fan quietness and rotation speed. Continuous use may result in a case before the projector is cooled enough. • If the WARNING indicator blinks or emits a red light, see "Warning Indicator" on p. 53. • While the POWER ...
...start function is "On", this time you can select the level of cooling fans is changed according to the temperature inside the projector. • Do not put the projector in shortening the lamp life. Wait until the POWER indicator becomes red to be turned on the screen. 2 Press the POWER... about an hour in every 24 hours. • The running speed of fan quietness and rotation speed. Continuous use may result in a case before the projector is cooled enough. • If the WARNING indicator blinks or emits a red light, see "Warning Indicator" on p. 53. • While the POWER ...
Owners Manual
Page 21
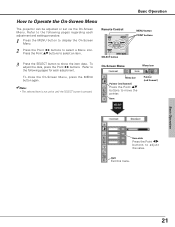
... buttons to show the item data. Item Pointer (red framed ) SELECT button Item data Press the Point 7 8 buttons to Operate the On-Screen Menu The projector can be adjusted or set via the On-Screen Menu. Quit Exit this menu. Basic Operation How to adjust the value. Refer to the following...
... buttons to show the item data. Item Pointer (red framed ) SELECT button Item data Press the Point 7 8 buttons to Operate the On-Screen Menu The projector can be adjusted or set via the On-Screen Menu. Quit Exit this menu. Basic Operation How to adjust the value. Refer to the following...

Owners Manual
Page 22
... Tree on pp. 60, 61. For computer source Guide Window PC System Menu Show the selected Used to select Menu of image to set the projector's operating configurations. (pp. 42-49) Input Menu Used to select input source either Computer or Video. (p. 26) For video source PC Adjust Menu Used to...
... Tree on pp. 60, 61. For computer source Guide Window PC System Menu Show the selected Used to select Menu of image to set the projector's operating configurations. (pp. 42-49) Input Menu Used to select input source either Computer or Video. (p. 26) For video source PC Adjust Menu Used to...


