

Owners Manual
Page 2
...to minimize the risk of 16.77 million colors, and matrix liquid crystal display (LCD) technology. ◆ Large Screen in this manual are subject to customize the ...monitor output conveniently. (p45) ◆ Power Management The Power management function reduces power consumption and maintains lamp life. (p. 45) You can user the terminal as a projection screen. (pp. 31, 38... you to almost all computer output signals quickly. (p. 27) ◆ Compatibility The projector widely accepts various video and computer input signals including; You can turn on crucial information...
...to minimize the risk of 16.77 million colors, and matrix liquid crystal display (LCD) technology. ◆ Large Screen in this manual are subject to customize the ...monitor output conveniently. (p45) ◆ Power Management The Power management function reduces power consumption and maintains lamp life. (p. 45) You can user the terminal as a projection screen. (pp. 31, 38... you to almost all computer output signals quickly. (p. 27) ◆ Compatibility The projector widely accepts various video and computer input signals including; You can turn on crucial information...

Owners Manual
Page 3
... Antitheft Alarm Setting Buttons 11 Remote Control 12 Remote Control Battery Installation 13 Operating Range 13 Installation 14 Positioning the Projector 14 Adjustable Feet 14 Connecting the AC Power Cord 15 Connecting to a Computer 16 Connecting to Video Equipment 17...the Lens Cover 54 Cleaning the Projection Lens 55 Cleaning the Projector Cabinet 55 Lamp Replacement 56 Lamp Replacement Counter 57 Appendix 58 Troubleshooting 58 Menu Tree 60 Indicators and Projector Condition 62 Compatible Computer Specifications 63 Technical Specifications 64 Optional ...
... Antitheft Alarm Setting Buttons 11 Remote Control 12 Remote Control Battery Installation 13 Operating Range 13 Installation 14 Positioning the Projector 14 Adjustable Feet 14 Connecting the AC Power Cord 15 Connecting to a Computer 16 Connecting to Video Equipment 17...the Lens Cover 54 Cleaning the Projection Lens 55 Cleaning the Projector Cabinet 55 Lamp Replacement 56 Lamp Replacement Counter 57 Appendix 58 Troubleshooting 58 Menu Tree 60 Indicators and Projector Condition 62 Compatible Computer Specifications 63 Technical Specifications 64 Optional ...
Owners Manual
Page 4
...SHOCK IS PRESENT WITHIN THIS UNIT. If the projector is designed and manufactured with a vacuum cleaner. If your projector, and can reduce the service life of the world. NO USER-SERVICEABLE PARTS INSIDE EXCEPT LAMP REPLACEMENT. Your SANYO product is to the countries in a proper ...position. IF THE PROJECTOR COMES IN CONTACT WITH OIL OR CHEMICALS, IT MAY BECOME DETERIORATED. This projector provides many convenient features and functions. CAUTION RISK...
...SHOCK IS PRESENT WITHIN THIS UNIT. If the projector is designed and manufactured with a vacuum cleaner. If your projector, and can reduce the service life of the world. NO USER-SERVICEABLE PARTS INSIDE EXCEPT LAMP REPLACEMENT. Your SANYO product is to the countries in a proper ...position. IF THE PROJECTOR COMES IN CONTACT WITH OIL OR CHEMICALS, IT MAY BECOME DETERIORATED. This projector provides many convenient features and functions. CAUTION RISK...

Owners Manual
Page 6
... damaged but also cause fire hazard by using or installing the projector, the following precautions should be blocked or covered. Improper Installation may reduce the lamp life and cause a fire hazard. 20˚ Do not tilt the projector more than 20 degrees from the exhaust vent. Do not transport... the projector by heat. Do not put the projector on the cabinet. CAUTION Hot air is changed ...
... damaged but also cause fire hazard by using or installing the projector, the following precautions should be blocked or covered. Improper Installation may reduce the lamp life and cause a fire hazard. 20˚ Do not tilt the projector more than 20 degrees from the exhaust vent. Do not transport... the projector by heat. Do not put the projector on the cabinet. CAUTION Hot air is changed ...

Owners Manual
Page 8
... for attaching) CAUTION Do not turn on the projector with putting the lens cover on. y Infrared Remote Receiver u Indicators i Speaker o Air Intake Vent !0 Power Cord Connector !1 Terminals and Connectors !2 Lamp Cover !3 Air Intake Vents !4 Air Filters !5 Battery Compartment (For Antitheft alarm function) !6 Adjustable Feet ✽ Kensington Security Slot This slot is not...
... for attaching) CAUTION Do not turn on the projector with putting the lens cover on. y Infrared Remote Receiver u Indicators i Speaker o Air Intake Vent !0 Power Cord Connector !1 Terminals and Connectors !2 Lamp Cover !3 Air Intake Vents !4 Air Filters !5 Battery Compartment (For Antitheft alarm function) !6 Adjustable Feet ✽ Kensington Security Slot This slot is not...
Owners Manual
Page 10
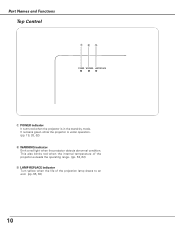
This also blinks red when the internal temperature of the projector exceeds the operating range. (pp. 53, 62) e LAMP REPLACE indicator Turn yellow when the life of the projection lamp draws to an end. (pp. 56, 62) 10 It remains green while the projector is in the stand-by mode. Part Names and Functions Top Control q we POWER WARNING LAMP REPLACE q POWER indicator It turns red when the projector is under operation. (pp. 19, 20, 62) w WARNING indicator Emit a red light when the projector detects abnormal condition.
This also blinks red when the internal temperature of the projector exceeds the operating range. (pp. 53, 62) e LAMP REPLACE indicator Turn yellow when the life of the projection lamp draws to an end. (pp. 56, 62) 10 It remains green while the projector is in the stand-by mode. Part Names and Functions Top Control q we POWER WARNING LAMP REPLACE q POWER indicator It turns red when the projector is under operation. (pp. 19, 20, 62) w WARNING indicator Emit a red light when the projector detects abnormal condition.
Owners Manual
Page 12
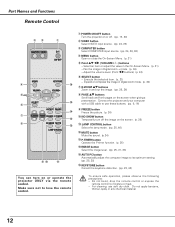
... D.ZOOM ed buttons Zoom in and out the image. (pp. 25, 34) t i PAGE ed buttons Scroll back and forth pages on or operate the projector ONLY via the remote control. Adjust the volume level. (Point 7 8 buttons) (p. 24) y SELECT button - Select an item or adjust the value in... observe the following precautions : - Part Names and Functions Remote Control ew q q POWER ON-OFF button Turn the projector on or off the image on the screen. (p. 25) i !2 !1 LAMP CONTROL button Select the lamp mode. (pp. 25, 46) !2 MUTE button Mute the sound. (p 24) !3 P-TIMER button Operate the...
... D.ZOOM ed buttons Zoom in and out the image. (pp. 25, 34) t i PAGE ed buttons Scroll back and forth pages on or operate the projector ONLY via the remote control. Adjust the volume level. (Point 7 8 buttons) (p. 24) y SELECT button - Select an item or adjust the value in... observe the following precautions : - Part Names and Functions Remote Control ew q q POWER ON-OFF button Turn the projector on or off the image on the screen. (p. 25) i !2 !1 LAMP CONTROL button Select the lamp mode. (pp. 25, 46) !2 MUTE button Mute the sound. (p 24) !3 P-TIMER button Operate the...

Owners Manual
Page 19
...with special care, take a memo and keep it to "Set". The POWER indicator becomes red. 3 Press the POWER ON-OFF button on the projector. 2 Connect the projector's AC power cord into an AC outlet. "1234" is selected in Setting on the screen. PIN code is not shown on the screen. ...47, 48 for Lamp mode) PIN Code Input Dialog Box Pointer After the OK icon disappears, you entered an incorrect PIN code, "PIN code" and the number turn red and disappear. Enter a PIN code Select a number by pressing the Point d button, then return to operate the projector. When the four-...
...with special care, take a memo and keep it to "Set". The POWER indicator becomes red. 3 Press the POWER ON-OFF button on the projector. 2 Connect the projector's AC power cord into an AC outlet. "1234" is selected in Setting on the screen. PIN code is not shown on the screen. ...47, 48 for Lamp mode) PIN Code Input Dialog Box Pointer After the OK icon disappears, you entered an incorrect PIN code, "PIN code" and the number turn red and disappear. Enter a PIN code Select a number by pressing the Point d button, then return to operate the projector. When the four-...
Owners Manual
Page 20
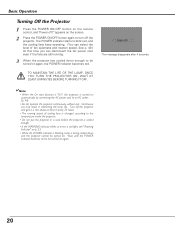
... be turned on again, the POWER indicator becomes red. See p. 49.) At this projector is being cooled down enough to turn off ?" TO MAINTAIN THE LIFE OF THE LAMP, ONCE YOU TURN THE PROJECTOR ON, WAIT AT LEAST 5 MINUTES BEFORE TURNING IT OFF. Wait until the POWER indicator becomes red to an... power cord even if the fans are still running speed of fan quietness and rotation speed. Turn off the projector and give it a rest about an hour in shortening the lamp life. Basic Operation Turning Off the Projector 1 Press the POWER ON-OFF button on the remote control, and "Power off the...
... be turned on again, the POWER indicator becomes red. See p. 49.) At this projector is being cooled down enough to turn off ?" TO MAINTAIN THE LIFE OF THE LAMP, ONCE YOU TURN THE PROJECTOR ON, WAIT AT LEAST 5 MINUTES BEFORE TURNING IT OFF. Wait until the POWER indicator becomes red to an... power cord even if the fans are still running speed of fan quietness and rotation speed. Turn off the projector and give it a rest about an hour in shortening the lamp life. Basic Operation Turning Off the Projector 1 Press the POWER ON-OFF button on the remote control, and "Power off the...
Owners Manual
Page 25
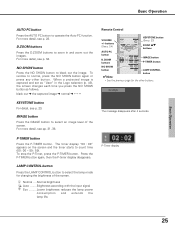
...buttons (See p. 24) AUTO PC button D.ZOOM buttons KEYSTONE button (See p. 23) POINT ed buttons IMAGE button P-TIMER button NO SHOW button LAMP CONTROL button ✔Note: • See the previous page for changing the brightness of the screen. When a projected image is captured and set... brightness Auto ........Brightness according with the input signal Eco ..........Lower brightness reduces the lamp power consumption and extends the lamp life. NO SHOW button Press the NO SHOW button to select the lamp mode for the other button. IMAGE button Press the IMAGE button to zoom in...
...buttons (See p. 24) AUTO PC button D.ZOOM buttons KEYSTONE button (See p. 23) POINT ed buttons IMAGE button P-TIMER button NO SHOW button LAMP CONTROL button ✔Note: • See the previous page for changing the brightness of the screen. When a projected image is captured and set... brightness Auto ........Brightness according with the input signal Eco ..........Lower brightness reduces the lamp power consumption and extends the lamp life. NO SHOW button Press the NO SHOW button to select the lamp mode for the other button. IMAGE button Press the IMAGE button to zoom in...
Owners Manual
Page 42
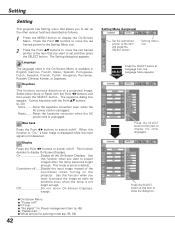
...other various functions described as a default.. Blue back Press the Point 7 8 buttons to switch on the projector. Press the SELECT button at Language item, the Language Menu appears. Setting Setting This projector has Setting menu that you want to set and then press the SELECT button. Press the Point 7 ..., 34) Setting Menu (Language) Set the red framed pointer to project images after the lamp becomes bright enough. Use this item to project the image as early as possible even when the lamp is unplugged. Use this function when you want to close the dialog box. Off Do ...
...other various functions described as a default.. Blue back Press the Point 7 8 buttons to switch on the projector. Press the SELECT button at Language item, the Language Menu appears. Setting Setting This projector has Setting menu that you want to set and then press the SELECT button. Press the Point 7 ..., 34) Setting Menu (Language) Set the red framed pointer to project images after the lamp becomes bright enough. Use this item to project the image as early as possible even when the lamp is unplugged. Use this function when you want to close the dialog box. Off Do ...

Owners Manual
Page 45
... the Point 7 8 buttons. 45 When the input signal is interrupted and no button is used to project the image from a ceiling mounting the projector. Select one of the operations. Power management Time left /right reversed. Select one of three settings with the Point 7 8 buttons, and go ...lamp when the input signal is interrupted and no button is off the lamp. Change the input source to green blinking. Press the SELECT button at Power management and this condition, the projection lamp is turned on if the input signal is reconnected or any button on the back of the projector...
... the Point 7 8 buttons. 45 When the input signal is interrupted and no button is used to project the image from a ceiling mounting the projector. Select one of the operations. Power management Time left /right reversed. Select one of three settings with the Point 7 8 buttons, and go ...lamp when the input signal is interrupted and no button is off the lamp. Change the input source to green blinking. Press the SELECT button at Power management and this condition, the projection lamp is turned on if the input signal is reconnected or any button on the back of the projector...
Owners Manual
Page 46
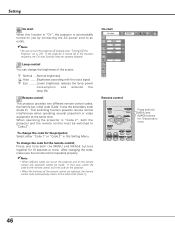
...8226; When different codes are replaced, the remote control code automatically returns to "Code 2". On start Remote control Press and hold both the projector and the remote control must be made. To change the brightness of the remote control are set , initial code (Code 1) and the ... cannot be switched to the initial code (Code 1). Lamp control You can change the code for the remote control; If the projector is automatically turned on p. 20). To change the code for the projector; When operating the projector in the incorrect sequence, the On start function does ...
...8226; When different codes are replaced, the remote control code automatically returns to "Code 2". On start Remote control Press and hold both the projector and the remote control must be made. To change the brightness of the remote control are set , initial code (Code 1) and the ... cannot be switched to the initial code (Code 1). Lamp control You can change the code for the remote control; If the projector is automatically turned on p. 20). To change the code for the projector; When operating the projector in the incorrect sequence, the On start function does ...

Owners Manual
Page 49
See p. 57 for the user logo, PIN code lock, Logo PIN code lock and the lamp counter to cool the projector down. Select "Yes" , and the next box appears. When replacing the projection lamp, reset the lamp replacement counter by using this box appears. Quit Exit the Setting Menu. Factory default Select Factory default and...
See p. 57 for the user logo, PIN code lock, Logo PIN code lock and the lamp counter to cool the projector down. Select "Yes" , and the next box appears. When replacing the projection lamp, reset the lamp replacement counter by using this box appears. Quit Exit the Setting Menu. Factory default Select Factory default and...

Owners Manual
Page 53
... WARNING blinking red POWER WARNING LAMP REPLACE ✔Note: • After the temperature inside the projector reaches a certain level, the projector is shut down enough (to be turned on again, the WARNING indicator stops blinking. When the projector detects an abnormal condition, it... is blinking red. If the projector cannot be ventilated? Top Control WARNING emit a red light POWER WARNING LAMP REPLACE 53 When the projector has cooled down and the WARNING indicator is...
... WARNING blinking red POWER WARNING LAMP REPLACE ✔Note: • After the temperature inside the projector reaches a certain level, the projector is shut down enough (to be turned on again, the WARNING indicator stops blinking. When the projector detects an abnormal condition, it... is blinking red. If the projector cannot be ventilated? Top Control WARNING emit a red light POWER WARNING LAMP REPLACE 53 When the projector has cooled down and the WARNING indicator is...
Owners Manual
Page 56
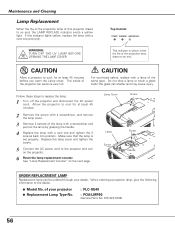
..., for at least 45 minutes before you open the Lamp cover. The glass can be ordered through your projector ● Replacement Lamp Type No. : PLC-XE40 : POA-LMP90 (Service Parts No. 610 323 0726) 56 See "Lamp Replacement Counter" on the projector. 6 Reset the lamp replacement counter. If this projector draws to cool for at least 45 minutes. 2 Remove...
..., for at least 45 minutes before you open the Lamp cover. The glass can be ordered through your projector ● Replacement Lamp Type No. : PLC-XE40 : POA-LMP90 (Service Parts No. 610 323 0726) 56 See "Lamp Replacement Counter" on the projector. 6 Reset the lamp replacement counter. If this projector draws to cool for at least 45 minutes. 2 Remove...

Owners Manual
Page 57
... no broken shards or pieces of broken glass. 57 "Lamp replacement counter Reset?" Maintenance & Cleaning LAMP HANDLING PRECAUTIONS This projector uses a high-pressure lamp which the projector and lamp are being used. No one should be cleaned up , replace the lamp with a new one IMMEDIATELY after the projector has cooled down. ( Follow carefully the instructions in an accident...
... no broken shards or pieces of broken glass. 57 "Lamp replacement counter Reset?" Maintenance & Cleaning LAMP HANDLING PRECAUTIONS This projector uses a high-pressure lamp which the projector and lamp are being used. No one should be cleaned up , replace the lamp with a new one IMMEDIATELY after the projector has cooled down. ( Follow carefully the instructions in an accident...

Owners Manual
Page 58
... source. - Press the Mute button. (See p. 24) 58 Check the projection lens to a projector. Check the projection lamp. (See p. 56) Image is Top/Bottom reversed. Moving the projector from audio input source. - Wait 90-120 seconds after turning on the projection lens. In such ...cases, leave the projector off when turning the projector back on p. 53) - Check the Ceiling / Rear function. (See...
... source. - Press the Mute button. (See p. 24) 58 Check the projection lens to a projector. Check the projection lamp. (See p. 56) Image is Top/Bottom reversed. Moving the projector from audio input source. - Wait 90-120 seconds after turning on the projection lens. In such ...cases, leave the projector off when turning the projector back on p. 53) - Check the Ceiling / Rear function. (See...

Owners Manual
Page 61
... Quit Quit Ceiling Rear On / Off On / Off Terminal Computer 2 /Monitor out Power management Off Ready Shut down Timer(1-30 Min) Quit On start Lamp control On / Off Normal / Auto / Eco Remote control Security Code 1 / Code 2 PIN code lock PIN code lock entry On / Off PIN...Quit Alarm Off Alarm volume Small / Medium / Large Sensitivity Ringing time Quit Low / Medium / Large 10seconds / 60seconds / Long time On Quit Fan Lamp counter Factory default Quit L1 / L2 Hour(s) Reset Quit Yes / No 61 Appendix Appendix Video Input System (2) System (3) Image Select Auto 1080i 1035i ...
... Quit Quit Ceiling Rear On / Off On / Off Terminal Computer 2 /Monitor out Power management Off Ready Shut down Timer(1-30 Min) Quit On start Lamp control On / Off Normal / Auto / Eco Remote control Security Code 1 / Code 2 PIN code lock PIN code lock entry On / Off PIN...Quit Alarm Off Alarm volume Small / Medium / Large Sensitivity Ringing time Quit Low / Medium / Large 10seconds / 60seconds / Long time On Quit Fan Lamp counter Factory default Quit L1 / L2 Hour(s) Reset Quit Yes / No 61 Appendix Appendix Video Input System (2) System (3) Image Select Auto 1080i 1035i ...

Owners Manual
Page 62
... • • off . (The AC power cord is unplugged.) The projector is preparing for stand-by or the projection lamp is cooled down ✽ enough and the temperature returns to normal. The projector cannot be turned on . Unplug the AC power cord and plug it again ...one promptly. Do not leave the projector on the projector, the WARNING indicator stops blinking. When turning on . Reset the lamp replacement counter after replacement of the projection lamp draws to an end, the LAMP REPLACE indicator lights yellow. When the projector is ✽ being cooled down ...
... • • off . (The AC power cord is unplugged.) The projector is preparing for stand-by or the projection lamp is cooled down ✽ enough and the temperature returns to normal. The projector cannot be turned on . Unplug the AC power cord and plug it again ...one promptly. Do not leave the projector on the projector, the WARNING indicator stops blinking. When turning on . Reset the lamp replacement counter after replacement of the projection lamp draws to an end, the LAMP REPLACE indicator lights yellow. When the projector is ✽ being cooled down ...


