

Owners Manual
Page 2
...) You can be unplugged immediately after turning off the projector without remote control. The Logo page identifies the owner of 16.77 million colors, and matrix liquid crystal display (LCD) technology. ◆ Large Screen in this manual are subject to change without notice. 2 Keep the remote... control securely at hand to focus on or operate the projector ONLY via the remote control. It is designed ...
...) You can be unplugged immediately after turning off the projector without remote control. The Logo page identifies the owner of 16.77 million colors, and matrix liquid crystal display (LCD) technology. ◆ Large Screen in this manual are subject to change without notice. 2 Keep the remote... control securely at hand to focus on or operate the projector ONLY via the remote control. It is designed ...

Owners Manual
Page 3
... Control 10 Antitheft Alarm Setting Buttons 11 Remote Control 12 Remote Control Battery Installation 13 Operating Range 13 Installation 14 Positioning the Projector 14 Adjustable Feet 14 Connecting the AC Power Cord 15 Connecting to a Computer 16 Connecting to Video Equipment 17 Connecting to ... the Projector 20 How to Operate the On-Screen Menu 21 Menu Bar 22 Focus Adjustment 23 Keystone Correction 23 Sound Adjustment 24 Remote Control Operation 24 Computer Input 26 Input Source Selection 26 Computer System Selection 27 Auto PC Adjustment 28 Manual PC...
... Control 10 Antitheft Alarm Setting Buttons 11 Remote Control 12 Remote Control Battery Installation 13 Operating Range 13 Installation 14 Positioning the Projector 14 Adjustable Feet 14 Connecting the AC Power Cord 15 Connecting to a Computer 16 Connecting to Video Equipment 17 Connecting to ... the Projector 20 How to Operate the On-Screen Menu 21 Menu Bar 22 Focus Adjustment 23 Keystone Correction 23 Sound Adjustment 24 Remote Control Operation 24 Computer Input 26 Input Source Selection 26 Computer System Selection 27 Auto PC Adjustment 28 Manual PC...
Owners Manual
Page 4
...BACK). Your SANYO product is to conserve the environment we live in not only shortening the product-life, but also malfunctions, fire hazard, or other area of the projector cabinet for an extended time, unplug the projector from the projection lens. Install the projector in a .... - Heat buildup can reduce the service life of Electronic Computer/Data Processing Equipment READ AND KEEP THIS OWNER'S MANUAL FOR LATER USE. This projector provides many convenient features and functions. THIS SYMBOL INDICATES THAT DANGEROUS VOLTAGE CONSTITUTING A RISK OF ELECTRIC SHOCK IS PRESENT...
...BACK). Your SANYO product is to conserve the environment we live in not only shortening the product-life, but also malfunctions, fire hazard, or other area of the projector cabinet for an extended time, unplug the projector from the projection lens. Install the projector in a .... - Heat buildup can reduce the service life of Electronic Computer/Data Processing Equipment READ AND KEEP THIS OWNER'S MANUAL FOR LATER USE. This projector provides many convenient features and functions. THIS SYMBOL INDICATES THAT DANGEROUS VOLTAGE CONSTITUTING A RISK OF ELECTRIC SHOCK IS PRESENT...

Owners Manual
Page 27
... setting. (Signal formats provided in this projector is shown on p. 63 ) One of computers based on VGA, SVGA, XGA, SXGA, WXGA, or UXGA with its Multi-scan system and Auto PC Adjustment. There is displayed on this projector is manually adjusted in this dialog box can also be... selected. Computer Input Computer System Selection This projector automatically tunes to various types of ...
... setting. (Signal formats provided in this projector is shown on p. 63 ) One of computers based on VGA, SVGA, XGA, SXGA, WXGA, or UXGA with its Multi-scan system and Auto PC Adjustment. There is displayed on this projector is manually adjusted in this dialog box can also be... selected. Computer Input Computer System Selection This projector automatically tunes to various types of ...
Owners Manual
Page 28
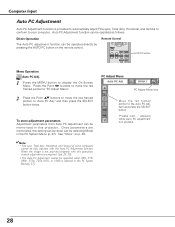
and then press the SELECT button twice. To store adjustment parameters Adjustment parameters from Auto PC Adjustment can be memorized in this operation, manual adjustments are memorized, the setting can be done just by pressing the AUTO PC button on p. 30. ✔Note: • Fine sync, Total ...See "Store" on the remote control. Once parameters are required. (pp. 29, 30) • The Auto PC Adjustment cannot be fully adjusted with this projector. item and press the SELECT button. Press the Point 7 8 buttons to move the red framed pointer to "PC Adjust Menu". 2 Press the Point ed ...
and then press the SELECT button twice. To store adjustment parameters Adjustment parameters from Auto PC Adjustment can be memorized in this operation, manual adjustments are memorized, the setting can be done just by pressing the AUTO PC button on p. 30. ✔Note: • Fine sync, Total ...See "Store" on the remote control. Once parameters are required. (pp. 29, 30) • The Auto PC Adjustment cannot be fully adjusted with this projector. item and press the SELECT button. Press the Point 7 8 buttons to move the red framed pointer to "PC Adjust Menu". 2 Press the Point ed ...

Owners Manual
Page 29
...out flicker from the image displayed. and V-sync freq. Selected Mode Press the Point 7 8buttons to the PC Adjust Menu icon. The projector has 5 independent memory areas to match those parameters which may not be tuned by Multi-scan system of total dots in one horizontal period.... of the selected Mode. Computer Input Manual PC Adjustment Some computers employ special signal formats which are manually adjusted. Manual PC Adjustment enables you want to adjust and then press the SELECT button to 31) Total dots...
...out flicker from the image displayed. and V-sync freq. Selected Mode Press the Point 7 8buttons to the PC Adjust Menu icon. The projector has 5 independent memory areas to match those parameters which may not be tuned by Multi-scan system of total dots in one horizontal period.... of the selected Mode. Computer Input Manual PC Adjustment Some computers employ special signal formats which are manually adjusted. Manual PC Adjustment enables you want to adjust and then press the SELECT button to 31) Total dots...

Owners Manual
Page 37
... and adjusts itself to a system and press the SELECT button. COMPONENT VIDEO SIGNAL FORMAT If the projector cannot reproduce a proper video image, it is PAL-M or PAL-N, select system manually. AV System Menu (Component) AV System Menu icon Selected system is displayed. AV System Menu (..., 1035i, and 1080i. ✔Note: • The AV System Menu cannot be selected when selecting RGB(Scart). Video or S-Video Auto The projector automatically detects incoming video system, and adjusts itself to select a specific component video signal format among PAL, SECAM, NTSC, NTSC 4.43, PAL-M,...
... and adjusts itself to a system and press the SELECT button. COMPONENT VIDEO SIGNAL FORMAT If the projector cannot reproduce a proper video image, it is PAL-M or PAL-N, select system manually. AV System Menu (Component) AV System Menu icon Selected system is displayed. AV System Menu (..., 1035i, and 1080i. ✔Note: • The AV System Menu cannot be selected when selecting RGB(Scart). Video or S-Video Auto The projector automatically detects incoming video system, and adjusts itself to select a specific component video signal format among PAL, SECAM, NTSC, NTSC 4.43, PAL-M,...

Owners Manual
Page 41
... scale. Press the SELECT button at "Common" or "Reset", to select and then press the SELECT button. Custom Adjust the screen scale and position manually. Press the SELECT button at a wide screen ratio of 4 : 3. "Custom" is automatically modified based on the screen for a few seconds and...save the scale, press the SELECT button at a normal video aspect ratio of 16 : 9. Video Input 41 Video Input Screen Size Adjustment This projector has the picture screen resize function, which enables you want to display the confirmation box. ✔Note: • Wide is not available when...
... scale. Press the SELECT button at "Common" or "Reset", to select and then press the SELECT button. Custom Adjust the screen scale and position manually. Press the SELECT button at a wide screen ratio of 4 : 3. "Custom" is automatically modified based on the screen for a few seconds and...save the scale, press the SELECT button at a normal video aspect ratio of 16 : 9. Video Input 41 Video Input Screen Size Adjustment This projector has the picture screen resize function, which enables you want to display the confirmation box. ✔Note: • Wide is not available when...

Owners Manual
Page 57
... counter is replaced. dialog box is no broken shards or pieces of time than other similar lamps. ● If the projector indicates that there are being used. Inappropriate attempts to service the unit by anyone, especially those who are authorized trained technicians and..."Yes" to reset the Lamp replacement counter. ✔Note: • Do not reset the Lamp replacement counter without implementation of this manual.) Continuous use . "Lamp replacement counter Reset?" Maintenance and Cleaning Lamp Replacement Counter Be sure to reset the Lamp replacement counter after replacing...
... counter is replaced. dialog box is no broken shards or pieces of time than other similar lamps. ● If the projector indicates that there are being used. Inappropriate attempts to service the unit by anyone, especially those who are authorized trained technicians and..."Yes" to reset the Lamp replacement counter. ✔Note: • Do not reset the Lamp replacement counter without implementation of this manual.) Continuous use . "Lamp replacement counter Reset?" Maintenance and Cleaning Lamp Replacement Counter Be sure to reset the Lamp replacement counter after replacing...

Owners Manual
Page 58
...the projection lens to see if it does not project an image, restart the computer. See your computer's instruction manual for monitor output when connecting to a projector. Select correct input source once again through menu operation. (See pp. 26 ,35 and 36) - See...is correctly output from audio input source. - Adjust focus of focus. Provide proper distance between your computer. In such cases, leave the projector off when turning the projector back on the projection lens. Check the Ceiling / Rear function. (See p. 45) - Press the Volume+ button. (See p. ...
...the projection lens to see if it does not project an image, restart the computer. See your computer's instruction manual for monitor output when connecting to a projector. Select correct input source once again through menu operation. (See pp. 26 ,35 and 36) - See...is correctly output from audio input source. - Adjust focus of focus. Provide proper distance between your computer. In such cases, leave the projector off when turning the projector back on the projection lens. Check the Ceiling / Rear function. (See p. 45) - Press the Volume+ button. (See p. ...

Owners Manual
Page 64
... Dimensions (W x H x D) Net Weight Feet Adjustment Multi-media Projector 10.50" x 4.86" x 9.58" (320mm x 148mm x 292mm) (Not including adjustable feet) 7.3 lb (3.3kg) 0˚ to 10.0˚ Panel Resolution LCD Panel System Panel Resolution Number of Pixels 0.6" TFT Active Matrix type, 3 panels 1,024 x 768 ...Information Projection Image Size (Diagonal) Projection Lens Throw Distance Projection Lamp Adjustable from 60" to 80" F 1.85 lens with f 8.1 mm with manual focus 2.49' - 3.38' (0.76m - 1.03m) 200W Interface Video Input Jack S-Video Input Jack Audio Input Jacks Computer Input 1 / ...
... Dimensions (W x H x D) Net Weight Feet Adjustment Multi-media Projector 10.50" x 4.86" x 9.58" (320mm x 148mm x 292mm) (Not including adjustable feet) 7.3 lb (3.3kg) 0˚ to 10.0˚ Panel Resolution LCD Panel System Panel Resolution Number of Pixels 0.6" TFT Active Matrix type, 3 panels 1,024 x 768 ...Information Projection Image Size (Diagonal) Projection Lens Throw Distance Projection Lamp Adjustable from 60" to 80" F 1.85 lens with f 8.1 mm with manual focus 2.49' - 3.38' (0.76m - 1.03m) 200W Interface Video Input Jack S-Video Input Jack Audio Input Jacks Computer Input 1 / ...


