

Owners Manual
Page 2
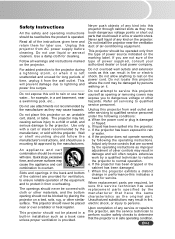
... persists, contact the dealer where you to be maintained. Do not stare directly into the beam. - Provide appropriate space on the projector. If the projector is not to manage those features and maintains it may result in not only shortening the product-life, but also malfunctions, fire hazard..., or other accidents. READ AND KEEP THIS OWNER'S MANUAL FOR LATER USE. EN-1 To the Owner Before operating this projector, read this manual again, check operations and cable connections and try the solutions in the "Troubleshooting" section in the end of this manual ...
... persists, contact the dealer where you to be maintained. Do not stare directly into the beam. - Provide appropriate space on the projector. If the projector is not to manage those features and maintains it may result in not only shortening the product-life, but also malfunctions, fire hazard..., or other accidents. READ AND KEEP THIS OWNER'S MANUAL FOR LATER USE. EN-1 To the Owner Before operating this projector, read this manual again, check operations and cable connections and try the solutions in the "Troubleshooting" section in the end of this manual ...
Owners Manual
Page 4
.... Never push objects of power supplied, consult your authorized dealer or local power company. Do not attempt to service this projector, ask the service technician to perform routine safety checks to determine that have the same characteristics as they may fall, causing...injury to qualified service personnel under the following the operating instructions. Unauthorized substitutions may cause the appliance and cart combination to the projector during a lightning storm, or when it from wall outlet and refer servicing to persons. For added protection to overturn. ...
.... Never push objects of power supplied, consult your authorized dealer or local power company. Do not attempt to service this projector, ask the service technician to perform routine safety checks to determine that have the same characteristics as they may fall, causing...injury to qualified service personnel under the following the operating instructions. Unauthorized substitutions may cause the appliance and cart combination to the projector during a lightning storm, or when it from wall outlet and refer servicing to persons. For added protection to overturn. ...
Owners Manual
Page 5
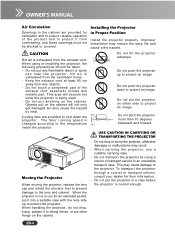
...' running speed is exhausted from overheating, and these openings must not be taken. - Installing the Projector in Proper Position Install the projector properly. Do not transport the projector by heat. When handling the projector, do not drop, bump, subject it into a suitable case with the lens side up to the... temperature inside the projector. Do not point the projector down the projector. Do not put any objects. - CAUTION Hot air is cooled enough. Do not touch a peripheral part of the product and...
...' running speed is exhausted from overheating, and these openings must not be taken. - Installing the Projector in Proper Position Install the projector properly. Do not transport the projector by heat. When handling the projector, do not drop, bump, subject it into a suitable case with the lens side up to the... temperature inside the projector. Do not point the projector down the projector. Do not put any objects. - CAUTION Hot air is cooled enough. Do not touch a peripheral part of the product and...

Owners Manual
Page 6
... plug into the power outlet. accordance with this projector meets the requirement for the United Kingdom: The Wires in this apparatus may cause harmful interference to radio or television reception, which is detachable, never use in a particular installation. Model Number : PLC-WXU10N Trade Name : Sanyo Responsible party : SANYO FISHER COMPANY Address : 21605 Plummer Street, Chatsworth...
... plug into the power outlet. accordance with this projector meets the requirement for the United Kingdom: The Wires in this apparatus may cause harmful interference to radio or television reception, which is detachable, never use in a particular installation. Model Number : PLC-WXU10N Trade Name : Sanyo Responsible party : SANYO FISHER COMPANY Address : 21605 Plummer Street, Chatsworth...
Owners Manual
Page 7
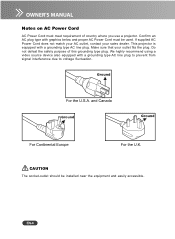
... graphics below and proper AC Power Cord must meet requirement of this grounding type plug. Make sure that your sales dealer. EN-6 This projector is equipped with a grounding type AC line plug to prevent from signal interference due to voltage fluctuation. Do not defeat the safety purpose ...of country where you use a projector. We highly recommend using a video source device also equipped with a grounding type AC line plug. Notes on AC Power Cord AC Power Cord...
... graphics below and proper AC Power Cord must meet requirement of this grounding type plug. Make sure that your sales dealer. EN-6 This projector is equipped with a grounding type AC line plug to prevent from signal interference due to voltage fluctuation. Do not defeat the safety purpose ...of country where you use a projector. We highly recommend using a video source device also equipped with a grounding type AC line plug. Notes on AC Power Cord AC Power Cord...
Owners Manual
Page 8
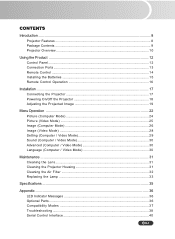
...12 Connection Ports ...13 Remote Control ...14 Installing the Batteries 15 Remote Control Operation 16 Installation ...17 Connecting the Projector 17 Powering On/Off the Projector 18 Adjusting the Projected Image 19 Menu Operation ...22 Picture (Computer Mode 24 Picture (Video Mode) ...25 Image... Mode 30 Advanced (Computer / Video Mode 30 Language (Computer / Video Mode 30 Maintenance ...31 Cleaning the Lens ...31 Cleaning the Projector Housing 31 Cleaning the Air Filter 32 Replacing the Lamp ...33 Specifications ...35 Appendix ...36 LED Indicator Messages 36 Optional Parts ...36 ...
...12 Connection Ports ...13 Remote Control ...14 Installing the Batteries 15 Remote Control Operation 16 Installation ...17 Connecting the Projector 17 Powering On/Off the Projector 18 Adjusting the Projected Image 19 Menu Operation ...22 Picture (Computer Mode 24 Picture (Video Mode) ...25 Image... Mode 30 Advanced (Computer / Video Mode 30 Language (Computer / Video Mode 30 Maintenance ...31 Cleaning the Lens ...31 Cleaning the Projector Housing 31 Cleaning the Air Filter 32 Replacing the Lamp ...33 Specifications ...35 Appendix ...36 LED Indicator Messages 36 Optional Parts ...36 ...

Owners Manual
Page 9
... the following features: 3 panel 0.56 inch LCD projector WXGA (1280 x 800 pixels) 1.2X manual zoom lens Auto image re-sizing (Auto-Sync.) to deliver high reliability and ease of use. Introduction Projector Features The projector integrates high-performance optical engine projection and a user-friendly design to 1280 x 800 full screen with scaling compression compatibility for...
... the following features: 3 panel 0.56 inch LCD projector WXGA (1280 x 800 pixels) 1.2X manual zoom lens Auto image re-sizing (Auto-Sync.) to deliver high reliability and ease of use. Introduction Projector Features The projector integrates high-performance optical engine projection and a user-friendly design to 1280 x 800 full screen with scaling compression compatibility for...
Owners Manual
Page 10
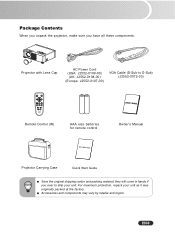
EN-9 Package Contents When you unpack the projector, make sure you ever to D-Sub) (J2552-0072-03) Remote Control (IR) AAA size batteries for remote control Owner's Manual Projector Carrying Case Quick Start Guide Save the original shipping carton and packing material; For maximum protection, repack your... unit. they will come in handy if you have all these components: Projector with Lens Cap AC Power Cord (USA: J2552-0109-00) (UK: J2552-0108-00) (Europe: J2552-0107-00) VGA Cable (D-...
EN-9 Package Contents When you unpack the projector, make sure you ever to D-Sub) (J2552-0072-03) Remote Control (IR) AAA size batteries for remote control Owner's Manual Projector Carrying Case Quick Start Guide Save the original shipping carton and packing material; For maximum protection, repack your... unit. they will come in handy if you have all these components: Projector with Lens Cap AC Power Cord (USA: J2552-0109-00) (UK: J2552-0108-00) (Europe: J2552-0107-00) VGA Cable (D-...
Owners Manual
Page 11
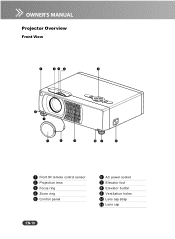
Projector Overview Front View 1 23 4 5 8 7 11 10 9 87 6 1 Front IR remote control sensor 2 Projection lens 3 Focus ring 4 Zoom ring 5 Control panel 6 AC power socket 7 Elevator foot 8 Elevator button 9 Ventilation holes 10 Lens cap strap 11 Lens cap EN-10
Projector Overview Front View 1 23 4 5 8 7 11 10 9 87 6 1 Front IR remote control sensor 2 Projection lens 3 Focus ring 4 Zoom ring 5 Control panel 6 AC power socket 7 Elevator foot 8 Elevator button 9 Ventilation holes 10 Lens cap strap 11 Lens cap EN-10

Owners Manual
Page 12
Rear View 1 Ventilation holes 2 Connection ports 3 Kensington lock 4 Rear IR remote control sensor 5 Speaker 1 2 Bottom View 1 Air filter cover 2 Lamp cover 3 Ceiling mount (3-M4*6) 1 3 3 5 43 2 3 This projector can be used with a ceiling mount for support. EN-11 The ceiling mount is not included in the package.
Rear View 1 Ventilation holes 2 Connection ports 3 Kensington lock 4 Rear IR remote control sensor 5 Speaker 1 2 Bottom View 1 Air filter cover 2 Lamp cover 3 Ceiling mount (3-M4*6) 1 3 3 5 43 2 3 This projector can be used with a ceiling mount for support. EN-11 The ceiling mount is not included in the package.

Owners Manual
Page 13
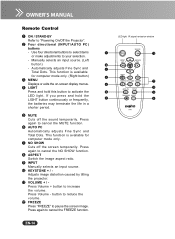
... button) 5 MENU Displays or exits the on-screen display menus. Use four directional buttons to select items or make adjustments to "Powering On/Off the Projector". 4 Four directional (INPUT/AUTO PC ) buttons - Manually selects an input source. (Left button) -
... button) 5 MENU Displays or exits the on-screen display menus. Use four directional buttons to select items or make adjustments to "Powering On/Off the Projector". 4 Four directional (INPUT/AUTO PC ) buttons - Manually selects an input source. (Left button) -
Owners Manual
Page 14
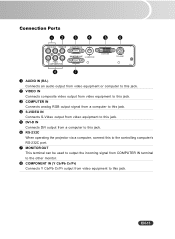
... IN Connects S-Video output from video equipment to this jack. 5 DVI-D IN Connects DVI output from a computer to this jack. 6 RS-232C When operating the projector via a computer, connect this to the controlling computer's RS-232C port. 7 MONITOR OUT This terminal can be used to output the incoming signal from COMPUTER...
... IN Connects S-Video output from video equipment to this jack. 5 DVI-D IN Connects DVI output from a computer to this jack. 6 RS-232C When operating the projector via a computer, connect this to the controlling computer's RS-232C port. 7 MONITOR OUT This terminal can be used to output the incoming signal from COMPUTER...
Owners Manual
Page 15
... 1 ON / STAND-BY Refer to your selection. - Use four directional buttons to select items or make adjustments to "Powering On/Off the Projector". 2 Four directional (INPUT/AUTO PC) buttons - Automatically adjusts Fine Sync and Total Dots. If you press and hold this button to activate ...SHOW function. 8 ASPECT Switch the image aspect ratio. 9 INPUT Manually selects an input source. 10 KEYSTONE + / Adjusts image distortion caused by tilting the projector. 11 VOLUME + / Press Volume + button to pause the screen image. This function is available for computer mode only. 7 NO SHOW Cuts off the...
... 1 ON / STAND-BY Refer to your selection. - Use four directional buttons to select items or make adjustments to "Powering On/Off the Projector". 2 Four directional (INPUT/AUTO PC) buttons - Automatically adjusts Fine Sync and Total Dots. If you press and hold this button to activate ...SHOW function. 8 ASPECT Switch the image aspect ratio. 9 INPUT Manually selects an input source. 10 KEYSTONE + / Adjusts image distortion caused by tilting the projector. 11 VOLUME + / Press Volume + button to pause the screen image. This function is available for computer mode only. 7 NO SHOW Cuts off the...
Owners Manual
Page 17
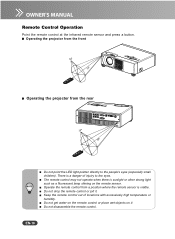
... wet objects on the remote sensor. Keep the remote control out of injuiry to the people's eyes (especially small children). Operating the projector from the front 30 Operating the projector from a position where the remote sensor is sunlight or other strong light such as a fluorescent lamp shining on it . Operate the remote...
... wet objects on the remote sensor. Keep the remote control out of injuiry to the people's eyes (especially small children). Operating the projector from the front 30 Operating the projector from a position where the remote sensor is sunlight or other strong light such as a fluorescent lamp shining on it . Operate the remote...
Owners Manual
Page 18
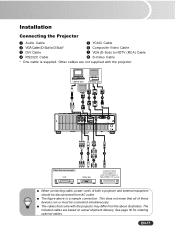
... external equipment should be connected simultaneously. See page 36 for ordering optional cables. The figure above illustration. EN-17 Installation Connecting the Projector 1 Audio Cable 5 YCbCr Cable 2 VGA Cable (D-Sub to D-Sub)* 6 Composite Video Cable 3 DVI Cable 7 VGA (D-Sub) to HDTV (RCA) Cable 4 RS232C Cable 8 S-Video Cable * One ... connecting cable, power cords of these devices can or must be disconnected from the above is supplied. This does not mean that come with the projector. The included cables are not supplied with the...
... external equipment should be connected simultaneously. See page 36 for ordering optional cables. The figure above illustration. EN-17 Installation Connecting the Projector 1 Audio Cable 5 YCbCr Cable 2 VGA Cable (D-Sub to D-Sub)* 6 Composite Video Cable 3 DVI Cable 7 VGA (D-Sub) to HDTV (RCA) Cable 4 RS232C Cable 8 S-Video Cable * One ... connecting cable, power cords of these devices can or must be disconnected from the above is supplied. This does not mean that come with the projector. The included cables are not supplied with the...
Owners Manual
Page 19
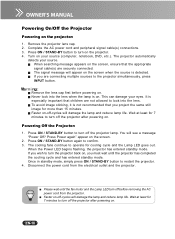
...peripheral signal cable(s) connections. 3. J Never look into the lens when the lamp is not recommended that you are connecting multiple sources to turn the projector back on -off-cycles will damage the lamp and reduce lamp life. This can damage your source. Wait at least for 7 minutes to operate for...If you must wait until the fan motor and the Lamp LED turn on the screen when the source is detected. Please wait until the projector has completed the cooling cycle and has entered standby mode. Press ON / STAND-BY button to look into the lens. It is especially important...
...peripheral signal cable(s) connections. 3. J Never look into the lens when the lamp is not recommended that you are connecting multiple sources to turn the projector back on -off-cycles will damage the lamp and reduce lamp life. This can damage your source. Wait at least for 7 minutes to operate for...If you must wait until the fan motor and the Lamp LED turn on the screen when the source is detected. Please wait until the projector has completed the cooling cycle and has entered standby mode. Press ON / STAND-BY button to look into the lens. It is especially important...
Owners Manual
Page 20
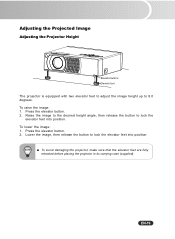
... image, then release the button to lock the elevator feet into position. Press the elevator button. 2. Adjusting the Projected Image Adjusting the Projector Height Elevator button Elevator foot The projector is equipped with two elevator feet to adjust the image height up to 9.0 degrees. To raise the image: 1. To avoid damaging the...
... image, then release the button to lock the elevator feet into position. Press the elevator button. 2. Adjusting the Projected Image Adjusting the Projector Height Elevator button Elevator foot The projector is equipped with two elevator feet to adjust the image height up to 9.0 degrees. To raise the image: 1. To avoid damaging the...
Owners Manual
Page 21
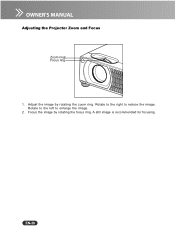
A still image is recommended for focusing. EN-20 Rotate to the left to reduce the image. Focus the image by rotating the zoom ring. Adjusting the Projector Zoom and Focus Zoom ring Focus ring 1. Rotate to the right to enlarge the image. 2. Adjust the image by rotating the focus ring.
A still image is recommended for focusing. EN-20 Rotate to the left to reduce the image. Focus the image by rotating the zoom ring. Adjusting the Projector Zoom and Focus Zoom ring Focus ring 1. Rotate to the right to enlarge the image. 2. Adjust the image by rotating the focus ring.
Owners Manual
Page 22
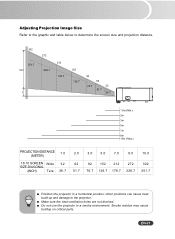
... a horizontal position; EN-21 Adjusting Projection Image Size Refer to the graphic and table below to the projector. Smoke residue may cause buildup on critical parts. other positions can cause heat build-up and damage to determine the screen size and projection distance. ...) 1.0 16:10 SCREEN Wide SIZE-DIAGONAL (INCH) Te l e 32 26.7 2.0 62 51.7 3.0 5.0 7.0 9.0 10.0 92 76.7 152 126.7 212 176.7 272 226.7 302 251.7 Position the projector in a smoky environment.
... a horizontal position; EN-21 Adjusting Projection Image Size Refer to the graphic and table below to the projector. Smoke residue may cause buildup on critical parts. other positions can cause heat build-up and damage to determine the screen size and projection distance. ...) 1.0 16:10 SCREEN Wide SIZE-DIAGONAL (INCH) Te l e 32 26.7 2.0 62 51.7 3.0 5.0 7.0 9.0 10.0 92 76.7 152 126.7 212 176.7 272 226.7 302 251.7 Position the projector in a smoky environment.
Owners Manual
Page 23
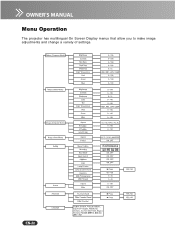
EN-22 Menu Operation The projector has multilingual On Screen Display menus that allow you to make image adjustments and change a variety of settings.
EN-22 Menu Operation The projector has multilingual On Screen Display menus that allow you to make image adjustments and change a variety of settings.


