User Manual Ver.1.3 (English)
Page 7
...; See the example below. for all scenes or modes. Indicators used in this manual Shooting mode Smart Auto Program Aperture Priority, Shutter Priority, Manual Scene Magic Plus Wi-Fi (WB150F/WB152F only) Live Panorama (WB150/WB151/WB152 only) Settings Movie Indicator T p G s g ...w R n v Shooting mode icons These icons appear in the text when a function is available in this manual Icon [] () “ * Function Additional information Safety warnings and precautions Camera buttons....
...; See the example below. for all scenes or modes. Indicators used in this manual Shooting mode Smart Auto Program Aperture Priority, Shutter Priority, Manual Scene Magic Plus Wi-Fi (WB150F/WB152F only) Live Panorama (WB150/WB151/WB152 only) Settings Movie Indicator T p G s g ...w R n v Shooting mode icons These icons appear in the text when a function is available in this manual Icon [] () “ * Function Additional information Safety warnings and precautions Camera buttons....
User Manual Ver.1.3 (English)
Page 10
...or Saturation) f 74 Applying effects to videos • g mode > Movie Filter f 50 Reducing camera shake • Optical Image Stabilization (OIS) f 31 • Viewing files by category in Smart Album f 79 • Viewing files as thumbnails f 80 • Deleting all files... on the memory f 82 • Viewing files as a slide show f 84 • Viewing files on a TV f 91 • Connecting your camera to a computer f 92 • Using photo or video sharing websites (WB150F...
...or Saturation) f 74 Applying effects to videos • g mode > Movie Filter f 50 Reducing camera shake • Optical Image Stabilization (OIS) f 31 • Viewing files by category in Smart Album f 79 • Viewing files as thumbnails f 80 • Deleting all files... on the memory f 82 • Viewing files as a slide show f 84 • Viewing files on a TV f 91 • Connecting your camera to a computer f 92 • Using photo or video sharing websites (WB150F...
User Manual Ver.1.3 (English)
Page 11
... 16 Inserting the battery and memory card 19 Charging the battery and turning on your camera ...... 20 Charging the battery 20 Turning on your camera 20 Performing the initial setup 21 Learning icons 23 Selecting options or menus 24 Setting the display and sound 26 Setting the display type 26... Setting the sound 27 Capturing photos 28 Zooming 29 Reducing camera shake (OIS 31 Tips for getting a clearer photo 32 Extended functions 34 Using the Smart Auto mode 35 Using the Scene mode 37 Using the Beauty Shot mode 38 Using the Program mode...
... 16 Inserting the battery and memory card 19 Charging the battery and turning on your camera ...... 20 Charging the battery 20 Turning on your camera 20 Performing the initial setup 21 Learning icons 23 Selecting options or menus 24 Setting the display and sound 26 Setting the display type 26... Setting the sound 27 Capturing photos 28 Zooming 29 Reducing camera shake (OIS 31 Tips for getting a clearer photo 32 Extended functions 34 Using the Smart Auto mode 35 Using the Scene mode 37 Using the Beauty Shot mode 38 Using the Program mode...

User Manual Ver.1.3 (English)
Page 12
... the timer 56 Shooting in the dark 57 Preventing red-eye 57 Using the flash 57 Adjusting the ISO sensitivity 59 Changing the camera's focus 60 Using macro 60 Using auto focus 60 Focusing on a selected area 62 Using tracking auto focus 62 Adjusting the focus area ...63 Using Face Detection 64 Detecting faces 64 Capturing a self portrait shot 65 Capturing a smile shot 65 Detecting eye blinking 66 Using Smart Face Recognition 66 Registering faces as your favorites (My Star 67 Adjusting brightness and color 69 Adjusting the exposure manually (EV 69 Compensating for ...
... the timer 56 Shooting in the dark 57 Preventing red-eye 57 Using the flash 57 Adjusting the ISO sensitivity 59 Changing the camera's focus 60 Using macro 60 Using auto focus 60 Focusing on a selected area 62 Using tracking auto focus 62 Adjusting the focus area ...63 Using Face Detection 64 Detecting faces 64 Capturing a self portrait shot 65 Capturing a smile shot 65 Detecting eye blinking 66 Using Smart Face Recognition 66 Registering faces as your favorites (My Star 67 Adjusting brightness and color 69 Adjusting the exposure manually (EV 69 Compensating for ...
User Manual Ver.1.3 (English)
Page 13
...mode 77 Starting Playback mode 77 Viewing photos 83 Playing a video 85 Editing a photo 87 Resizing photos 87 Rotating a photo 87 Applying Smart Filter effects 88 Adjusting your photos 89 Creating a print order (DPOF 90 Viewing files on a TV 91 Transferring files to... a removable disk 95 Disconnecting the camera (for Windows XP 96 Transferring files to your Mac computer 97 Printing photos with a PictBridge photo printer ......... 98 Wireless network (WB150F/WB152F only 99 Connecting to a WLAN and configuring network settings 100 Connecting to a WLAN 100 ...
...mode 77 Starting Playback mode 77 Viewing photos 83 Playing a video 85 Editing a photo 87 Resizing photos 87 Rotating a photo 87 Applying Smart Filter effects 88 Adjusting your photos 89 Creating a print order (DPOF 90 Viewing files on a TV 91 Transferring files to... a removable disk 95 Disconnecting the camera (for Windows XP 96 Transferring files to your Mac computer 97 Printing photos with a PictBridge photo printer ......... 98 Wireless network (WB150F/WB152F only 99 Connecting to a WLAN and configuring network settings 100 Connecting to a WLAN 100 ...
User Manual Ver.1.3 (English)
Page 19
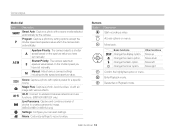
... Basic functions 18 Shutter Priority: The camera selects an h aperture value based on the aperture value you have set manually. Wi-Fi: Connect to wireless local area networks and use functions. (WB150F/WB152F only) Live Panorama: Capture and ...combine a series of photos to record a video. Buttons Button Description Start recording a video. Move back. Program: Capture a photo by the camera. s g w R n v Scene: Capture a photo with various effects. c Change the macro option. Camera layout Mode dial Icon Description T Smart...
... Basic functions 18 Shutter Priority: The camera selects an h aperture value based on the aperture value you have set manually. Wi-Fi: Connect to wireless local area networks and use functions. (WB150F/WB152F only) Live Panorama: Capture and ...combine a series of photos to record a video. Buttons Button Description Start recording a video. Move back. Program: Capture a photo by the camera. s g w R n v Scene: Capture a photo with various effects. c Change the macro option. Camera layout Mode dial Icon Description T Smart...
User Manual Ver.1.3 (English)
Page 36
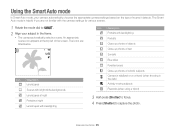
... mode is stabilized or on a tripod (when shooting in the frame. • The camera automatically selects a scene. Using the Smart Auto mode In Smart Auto mode, your camera automatically chooses the appropriate camera settings based on the type of colorful subjects Camera is helpful if you are listed below. An appropriate scene icon appears at night...
... mode is stabilized or on a tripod (when shooting in the frame. • The camera automatically selects a scene. Using the Smart Auto mode In Smart Auto mode, your camera automatically chooses the appropriate camera settings based on the type of colorful subjects Camera is helpful if you are listed below. An appropriate scene icon appears at night...
User Manual Ver.1.3 (English)
Page 37
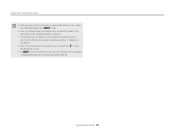
...36 Using the Smart Auto mode • If the camera does not recognize an appropriate scene mode, it uses the default settings for the T mode. • Even if it detects a face, the camera may not select a portrait mode depending on the subject's position or lighting. • The camera may not ...select the correct scene depending on the shooting conditions, such as camera shake, lighting, or distance to the subject. • Even if...
...36 Using the Smart Auto mode • If the camera does not recognize an appropriate scene mode, it uses the default settings for the T mode. • Even if it detects a face, the camera may not select a portrait mode depending on the subject's position or lighting. • The camera may not ...select the correct scene depending on the shooting conditions, such as camera shake, lighting, or distance to the subject. • Even if...
User Manual Ver.1.3 (English)
Page 53
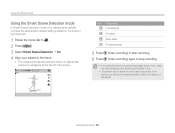
...recording. (Video recording) again to stop recording. • If the camera does not recognize an appropriate scene mode, it uses the default settings for the Smart Scene Detection mode. • The camera may not select the correct scene depending on the scene it has detected....functions 52 Using the Movie mode Using the Smart Scene Detection mode In Smart Scene Detection mode, your camera automatically chooses the appropriate camera settings based on the shooting conditions, such as camera shake, lighting, and distance to v. 2 Press [m]. 3 Select Smart Scene Detection “ On. 4 Align ...
...recording. (Video recording) again to stop recording. • If the camera does not recognize an appropriate scene mode, it uses the default settings for the Smart Scene Detection mode. • The camera may not select the correct scene depending on the scene it has detected....functions 52 Using the Movie mode Using the Smart Scene Detection mode In Smart Scene Detection mode, your camera automatically chooses the appropriate camera settings based on the shooting conditions, such as camera shake, lighting, and distance to v. 2 Press [m]. 3 Select Smart Scene Detection “ On. 4 Align ...

User Manual Ver.1.3 (English)
Page 54
...to set the options in the dark 57 Preventing red-eye 57 Using the flash 57 Adjusting the ISO sensitivity 59 Changing the camera's focus 60 Using macro 60 Using auto focus 60 Focusing on a selected area 62 Using tracking auto focus 62 Adjusting the focus area... 63 Using Face Detection 64 Detecting faces 64 Capturing a self portrait shot 65 Capturing a smile shot 65 Detecting eye blinking 66 Using Smart Face Recognition 66 Registering faces as your favorites (My Star 67 Adjusting brightness and color 69 Adjusting the exposure manually (EV) ...... 69 Compensating...
...to set the options in the dark 57 Preventing red-eye 57 Using the flash 57 Adjusting the ISO sensitivity 59 Changing the camera's focus 60 Using macro 60 Using auto focus 60 Focusing on a selected area 62 Using tracking auto focus 62 Adjusting the focus area... 63 Using Face Detection 64 Detecting faces 64 Capturing a self portrait shot 65 Capturing a smile shot 65 Detecting eye blinking 66 Using Smart Face Recognition 66 Registering faces as your favorites (My Star 67 Adjusting brightness and color 69 Adjusting the exposure manually (EV) ...... 69 Compensating...
User Manual Ver.1.3 (English)
Page 65
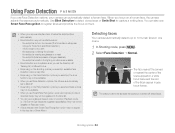
....) - the subject is wearing sunglasses or a mask - Detecting faces Your camera automatically detects up to 10 human faces in gray focus frames. Shooting options 64 Using Face Detection p A h M s If you use Smart Face Recognition to register faces and prioritize the focus on them. • ...When your camera detects a face, it is too bright or too dark - When you focus on a human face, the camera adjusts the exposure automatically. it tracks the detected face...
....) - the subject is wearing sunglasses or a mask - Detecting faces Your camera automatically detects up to 10 human faces in gray focus frames. Shooting options 64 Using Face Detection p A h M s If you use Smart Face Recognition to register faces and prioritize the focus on them. • ...When your camera detects a face, it is too bright or too dark - When you focus on a human face, the camera adjusts the exposure automatically. it tracks the detected face...
User Manual Ver.1.3 (English)
Page 67
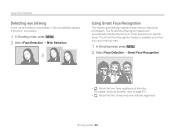
... that you frequently photograph. The Smart Face Recognition feature will automatically capture 2 photos in succession. 1 In Shooting mode, press [m]. 2 Select Face Detection “ Blink Detection. Shooting options 66 Using Face Detection Detecting eye blinking If your camera detects closed eyes, it will ...automatically prioritize the focus on those faces and on favorite faces. The Smart Face Recognition feature is available only when you use a memory card. 1 In ...
... that you frequently photograph. The Smart Face Recognition feature will automatically capture 2 photos in succession. 1 In Shooting mode, press [m]. 2 Select Face Detection “ Blink Detection. Shooting options 66 Using Face Detection Detecting eye blinking If your camera detects closed eyes, it will ...automatically prioritize the focus on those faces and on favorite faces. The Smart Face Recognition feature is available only when you use a memory card. 1 In ...

User Manual Ver.1.3 (English)
Page 68
... pose or face, and whether or not the subject is available only when you capture only one . Using Face Detection • The camera may recognize and register faces incorrectly depending on those faces. Shooting options 67 Registering faces as your favorites (My Star) You can register a...face even if you use a memory card. 1 In Shooting mode, press [m]. 2 Select Smart FR Edit “ My Star. 3 Align your favorite faces to register the face. This feature is wearing glasses. • The camera can automatically register up to turn his or her face more than 30 degrees. •...
... pose or face, and whether or not the subject is available only when you capture only one . Using Face Detection • The camera may recognize and register faces incorrectly depending on those faces. Shooting options 67 Registering faces as your favorites (My Star) You can register a...face even if you use a memory card. 1 In Shooting mode, press [m]. 2 Select Smart FR Edit “ My Star. 3 Align your favorite faces to register the face. This feature is wearing glasses. • The camera can automatically register up to turn his or her face more than 30 degrees. •...

User Manual Ver.1.3 (English)
Page 71
...1 In Shooting mode, press [m]. 2 Select ACB. 3 Select an option. The brightness and lighting of your photos will vary depending on in Smart Auto mode. • The ACB feature is deactivated. Icon Description Off: ACB (Auto Contrast Balance) is not available when you select. 1 In... an option. Changing the metering option p A h M v The metering mode refers to appear dark in the photo. Icon Description Multi: • Your camera divides the frame into several areas, and then measures the light intensity of each area. • Suitable for general photos. In this case, set Burst...
...1 In Shooting mode, press [m]. 2 Select ACB. 3 Select an option. The brightness and lighting of your photos will vary depending on in Smart Auto mode. • The ACB feature is deactivated. Icon Description Off: ACB (Auto Contrast Balance) is not available when you select. 1 In... an option. Changing the metering option p A h M v The metering mode refers to appear dark in the photo. Icon Description Multi: • Your camera divides the frame into several areas, and then measures the light intensity of each area. • Suitable for general photos. In this case, set Burst...
User Manual Ver.1.3 (English)
Page 77
...Playback mode 77 Starting Playback mode 77 Viewing photos 83 Playing a video 85 Editing a photo 87 Resizing photos 87 Rotating a photo 87 Applying Smart Filter effects 88 Adjusting your photos 89 Creating a print order (DPOF 90 Viewing files on a TV 91 Transferring files to... your Windows computer 92 Transferring files with Intelli-studio 93 Transferring files by connecting the camera as a removable disk 95 Disconnecting the camera (for Windows XP 96 Transferring files to your computer, photo printer, or TV. Also, learn how to connect...
...Playback mode 77 Starting Playback mode 77 Viewing photos 83 Playing a video 85 Editing a photo 87 Resizing photos 87 Rotating a photo 87 Applying Smart Filter effects 88 Adjusting your photos 89 Creating a print order (DPOF 90 Viewing files on a TV 91 Transferring files to... your Windows computer 92 Transferring files with Intelli-studio 93 Transferring files by connecting the camera as a removable disk 95 Disconnecting the camera (for Windows XP 96 Transferring files to your computer, photo printer, or TV. Also, learn how to connect...
User Manual Ver.1.3 (English)
Page 80
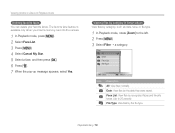
The favorite face feature is available only when you insert a memory card into the camera. 1 In Playback mode, press [m]. 2 Select Face List. 3 Press [m]. 4 Select Cancel My Star. 5 Select a face, and then press [o]. 6 Press [f]. 7 When the pop-up message appears, select ... File Type Back Select Icon Description All: View files normally. Date: View files by the file type. Viewing photos or videos in Smart Album View files by category, such as date, face, or file type. 1 In Playback mode, rotate [Zoom] to 20 people) File Type: View...
The favorite face feature is available only when you insert a memory card into the camera. 1 In Playback mode, press [m]. 2 Select Face List. 3 Press [m]. 4 Select Cancel My Star. 5 Select a face, and then press [o]. 6 Press [f]. 7 When the pop-up message appears, select ... File Type Back Select Icon Description All: View files normally. Date: View files by the file type. Viewing photos or videos in Smart Album View files by category, such as date, face, or file type. 1 In Playback mode, rotate [Zoom] to 20 people) File Type: View...
User Manual Ver.1.3 (English)
Page 81
... the right to return to scroll through files. Menu Press [D/c/F/t] to the previous view. Playback/Editing 80 It may take some time for the camera to open the list. 5 Scroll to a desired file, and then press [o] to view the file. 6 Rotate [Zoom] to the left once more to... display more thumbnails (24 at a time). Viewing photos or videos in Playback mode 4 Scroll to a desired list, and then press [o] to open Smart Album, change the category, or reorganize files. Rotate [Zoom] to the left to return to the previous view.
... the right to return to scroll through files. Menu Press [D/c/F/t] to the previous view. Playback/Editing 80 It may take some time for the camera to open the list. 5 Scroll to a desired file, and then press [o] to view the file. 6 Rotate [Zoom] to the left once more to... display more thumbnails (24 at a time). Viewing photos or videos in Playback mode 4 Scroll to a desired list, and then press [o] to open Smart Album, change the category, or reorganize files. Rotate [Zoom] to the left to return to the previous view.
User Manual Ver.1.3 (English)
Page 89
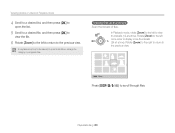
.... Cross Filter Add lines that radiate outward from bright objects to the left, and then select a photo. 4 Select Smart Filter “ an option. Editing a photo Applying Smart Filter effects Apply special effects to your photos. 1 Rotate the mode dial to g. 2 Select . 3 Rotate [Zoom...visual effect of a cross filter. Apply the retro-looking colors, high contrast, and strong vignette effect of a fisheye lens. Smart Filter : Miniature Back Option Normal Miniature Vignetting Set Description No effect Apply a tilt-shift effect to make the subject appear in the center. ...
.... Cross Filter Add lines that radiate outward from bright objects to the left, and then select a photo. 4 Select Smart Filter “ an option. Editing a photo Applying Smart Filter effects Apply special effects to your photos. 1 Rotate the mode dial to g. 2 Select . 3 Rotate [Zoom...visual effect of a cross filter. Apply the retro-looking colors, high contrast, and strong vignette effect of a fisheye lens. Smart Filter : Miniature Back Option Normal Miniature Vignetting Set Description No effect Apply a tilt-shift effect to make the subject appear in the center. ...
User Manual Ver.1.3 (English)
Page 90
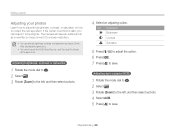
The camera will save an edited photo as a new file, but may convert it to save . Adjusting brightness, contrast, or saturation 1 Rotate the mode dial to g. 2 ... photos Learn how to adjust the brightness, contrast, or saturation or how to a lower resolution. • You can adjust brightness, contrast, and saturation and apply Smart Filter effects at the same time. • You cannot apply the ACB, Face Retouch, and Red-eye Fix effects at the same time. Playback/Editing...
The camera will save an edited photo as a new file, but may convert it to save . Adjusting brightness, contrast, or saturation 1 Rotate the mode dial to g. 2 ... photos Learn how to adjust the brightness, contrast, or saturation or how to a lower resolution. • You can adjust brightness, contrast, and saturation and apply Smart Filter effects at the same time. • You cannot apply the ACB, Face Retouch, and Red-eye Fix effects at the same time. Playback/Editing...
User Manual Ver.1.3 (English)
Page 110
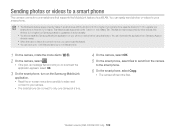
..., select OK. 3 On the smart phone, turn on the Samsung MobileLink application. • Read the on your camera. • The smart phone can easily send photos or videos to Android 2.2 or higher. Wireless network (WB150F/WB152F only) 109 If your smart phone uses the Android 2.1 OS, upgrade your smart phone to your smart phone. • The MobileLink feature...
..., select OK. 3 On the smart phone, turn on the Samsung MobileLink application. • Read the on your camera. • The smart phone can easily send photos or videos to Android 2.2 or higher. Wireless network (WB150F/WB152F only) 109 If your smart phone uses the Android 2.1 OS, upgrade your smart phone to your smart phone. • The MobileLink feature...


