User Manual Ver.1.3 (English)
Page 10
... the memory f 82 • Viewing files as a slide show f 84 • Viewing files on a TV f 91 • Connecting your camera to a computer f 92 • Using photo or video sharing websites (WB150F/WB152F only) f 104 • Sending photos or videos via email (WB150F/WB152F only) f 107 • Adjusting sound and volume f 122 • Adjusting the brightness of the display f 123 • Changing the display language f 124 • Setting the date and time...
... the memory f 82 • Viewing files as a slide show f 84 • Viewing files on a TV f 91 • Connecting your camera to a computer f 92 • Using photo or video sharing websites (WB150F/WB152F only) f 104 • Sending photos or videos via email (WB150F/WB152F only) f 107 • Adjusting sound and volume f 122 • Adjusting the brightness of the display f 123 • Changing the display language f 124 • Setting the date and time...
User Manual Ver.1.3 (English)
Page 11
... battery and turning on your camera ...... 20 Charging the battery 20 Turning on your camera 20 Performing the initial setup 21 Learning icons 23 Selecting options or menus 24 Setting the display and sound 26 Setting the display type 26 Setting the sound 27 Capturing photos 28 Zooming 29 Reducing camera shake (OIS 31 Tips for getting a clearer photo 32 Extended functions 34 Using the Smart Auto mode 35 Using the Scene mode 37 Using the Beauty Shot mode...
... battery and turning on your camera ...... 20 Charging the battery 20 Turning on your camera 20 Performing the initial setup 21 Learning icons 23 Selecting options or menus 24 Setting the display and sound 26 Setting the display type 26 Setting the sound 27 Capturing photos 28 Zooming 29 Reducing camera shake (OIS 31 Tips for getting a clearer photo 32 Extended functions 34 Using the Smart Auto mode 35 Using the Scene mode 37 Using the Beauty Shot mode...

User Manual Ver.1.3 (English)
Page 12
... Using Face Detection 64 Detecting faces 64 Capturing a self portrait shot 65 Capturing a smile shot 65 Detecting eye blinking 66 Using Smart Face Recognition 66 Registering faces as your favorites (My Star 67 Adjusting brightness and color 69 Adjusting the exposure manually (EV 69 Compensating for backlighting (ACB 70 Changing the metering option 70 Selecting a White Balance setting 71 Using burst modes 73 Adjusting images 74 Reducing the sound of the zoom...
... Using Face Detection 64 Detecting faces 64 Capturing a self portrait shot 65 Capturing a smile shot 65 Detecting eye blinking 66 Using Smart Face Recognition 66 Registering faces as your favorites (My Star 67 Adjusting brightness and color 69 Adjusting the exposure manually (EV 69 Compensating for backlighting (ACB 70 Changing the metering option 70 Selecting a White Balance setting 71 Using burst modes 73 Adjusting images 74 Reducing the sound of the zoom...
User Manual Ver.1.3 (English)
Page 13
... Playback/Editing 76 Viewing photos or videos in Playback mode 77 Starting Playback mode 77 Viewing photos 83 Playing a video 85 Editing a photo 87 Resizing photos 87 Rotating a photo 87 Applying Smart Filter effects 88 Adjusting your photos 89 Creating a print order (DPOF 90 Viewing files on a TV 91 Transferring files to your Windows computer 92 Transferring files with Intelli-studio 93 Transferring files by connecting the camera as a removable disk 95 Disconnecting the camera...
... Playback/Editing 76 Viewing photos or videos in Playback mode 77 Starting Playback mode 77 Viewing photos 83 Playing a video 85 Editing a photo 87 Resizing photos 87 Rotating a photo 87 Applying Smart Filter effects 88 Adjusting your photos 89 Creating a print order (DPOF 90 Viewing files on a TV 91 Transferring files to your Windows computer 92 Transferring files with Intelli-studio 93 Transferring files by connecting the camera as a removable disk 95 Disconnecting the camera...

User Manual Ver.1.3 (English)
Page 15
Unpacking 15 Camera layout 16 Inserting the battery and memory card ... 19 Charging the battery and turning on your camera 20 Charging the battery 20 Turning on your camera's layout, icons, and basic functions for getting a clearer photo 32 Basic functions Learn about your camera 20 Performing the initial setup 21 Learning icons 23 Selecting options or menus 24 Setting the display and sound 26 Setting the display type 26 Setting the sound 27 Capturing photos 28 Zooming 29 Reducing camera shake (OIS 31 Tips for shooting.
Unpacking 15 Camera layout 16 Inserting the battery and memory card ... 19 Charging the battery and turning on your camera 20 Charging the battery 20 Turning on your camera's layout, icons, and basic functions for getting a clearer photo 32 Basic functions Learn about your camera 20 Performing the initial setup 21 Learning icons 23 Selecting options or menus 24 Setting the display and sound 26 Setting the display type 26 Setting the sound 27 Capturing photos 28 Zooming 29 Reducing camera shake (OIS 31 Tips for shooting.
User Manual Ver.1.3 (English)
Page 19
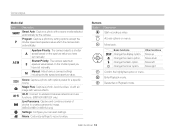
...set manually. Buttons Button Description Start recording a video. c Change the macro option. t Change the timer option. Basic functions D Change the display option. Delete files in Playback mode. Magic Plus: Capture a photo, record a video, or edit an image with options preset for a specific scene. Wi-Fi: Connect to wireless local area networks and use functions. (WB150F/WB152F only) Live Panorama: Capture and combine a series of photos to record a video. Enter Playback mode. F Change the flash option. G Aperture Priority: The camera...
...set manually. Buttons Button Description Start recording a video. c Change the macro option. t Change the timer option. Basic functions D Change the display option. Delete files in Playback mode. Magic Plus: Capture a photo, record a video, or edit an image with options preset for a specific scene. Wi-Fi: Connect to wireless local area networks and use functions. (WB150F/WB152F only) Live Panorama: Capture and combine a series of photos to record a video. Enter Playback mode. F Change the flash option. G Aperture Priority: The camera...

User Manual Ver.1.3 (English)
Page 33
...; Set ISO sensitivity options. (p. 59) Basic functions 32 Reducing camera shake Set the Optical Image Stabilization option to Fill in red. The aperture remains open longer and it may be harder to hold the camera steady long enough to capture a clear photo. • Use a tripod or set the flash option to reduce camera shake optically. (p. 31) Half-pressing the shutter button Half-press [Shutter] and adjust the focus...
...; Set ISO sensitivity options. (p. 59) Basic functions 32 Reducing camera shake Set the Optical Image Stabilization option to Fill in red. The aperture remains open longer and it may be harder to hold the camera steady long enough to capture a clear photo. • Use a tripod or set the flash option to reduce camera shake optically. (p. 31) Half-pressing the shutter button Half-press [Shutter] and adjust the focus...
User Manual Ver.1.3 (English)
Page 46
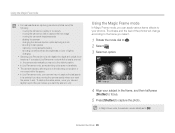
... in its entirety if you want the scene to capture the next image - moving the camera too quickly or too slowly - shooting conditions where the brightness or color of the photos will disable the digital and optical zoom functions. moving the camera at irregular speeds - changing the camera direction while capturing a photo - Extended functions 45 Using the Magic Plus mode • For best results when capturing panoramic photos, avoid the following: -
... in its entirety if you want the scene to capture the next image - moving the camera too quickly or too slowly - shooting conditions where the brightness or color of the photos will disable the digital and optical zoom functions. moving the camera at irregular speeds - changing the camera direction while capturing a photo - Extended functions 45 Using the Magic Plus mode • For best results when capturing panoramic photos, avoid the following: -

User Manual Ver.1.3 (English)
Page 47
... the rest of the shot. Panel off 4 Align your subject in the frame, and then half-press [Shutter] to focus. 5 Press [Shutter] to capture a photo. • Repeat steps 4 and 5 to each part of the photos. • To recapture a photo, press [b]. • In Split Shot mode, the resolution is automatically set the final video size when inserting a video, press [m], and then select Movie Size “ a desired video size.
... the rest of the shot. Panel off 4 Align your subject in the frame, and then half-press [Shutter] to focus. 5 Press [Shutter] to capture a photo. • Repeat steps 4 and 5 to each part of the photos. • To recapture a photo, press [b]. • In Split Shot mode, the resolution is automatically set the final video size when inserting a video, press [m], and then select Movie Size “ a desired video size.

User Manual Ver.1.3 (English)
Page 48
... in -picture photos or videos are saved as the background image. • To recapture a background photo, press [b]. Using the Magic Plus mode 3 Half-press [Shutter] to focus, and then press [Shutter] to capture a background photo. • To select a background photo from your saved photos, press [m], and then select Open Image “ a desired photo. Extended functions 47 You cannot select a video file or a photo captured in Live Panorama mode. 4 Press [o] to set the photo as...
... in -picture photos or videos are saved as the background image. • To recapture a background photo, press [b]. Using the Magic Plus mode 3 Half-press [Shutter] to focus, and then press [Shutter] to capture a background photo. • To select a background photo from your saved photos, press [m], and then select Open Image “ a desired photo. Extended functions 47 You cannot select a video file or a photo captured in Live Panorama mode. 4 Press [o] to set the photo as...

User Manual Ver.1.3 (English)
Page 54
... image quality 55 Using the timer 56 Shooting in Shooting mode. Shooting options Learn how to set the options in the dark 57 Preventing red-eye 57 Using the flash 57 Adjusting the ISO sensitivity 59 Changing the camera's focus 60 Using macro 60 Using auto focus 60 Focusing on a selected area 62 Using tracking auto focus 62 Adjusting the focus area 63 Using Face Detection 64 Detecting faces 64 Capturing a self portrait shot 65 Capturing a smile shot 65 Detecting eye blinking...
... image quality 55 Using the timer 56 Shooting in Shooting mode. Shooting options Learn how to set the options in the dark 57 Preventing red-eye 57 Using the flash 57 Adjusting the ISO sensitivity 59 Changing the camera's focus 60 Using macro 60 Using auto focus 60 Focusing on a selected area 62 Using tracking auto focus 62 Adjusting the focus area 63 Using Face Detection 64 Detecting faces 64 Capturing a self portrait shot 65 Capturing a smile shot 65 Detecting eye blinking...

User Manual Ver.1.3 (English)
Page 63
... are moving. 1 In Shooting mode, press [m]. 2 Select Focus Area “ Tracking AF. 3 Focus on the subject you want to change the focus area. If you use this function, you cannot set Face Detection options, Timer options, and Intelli zoom. • The white frame means that your camera is in focus. 4 Press [Shutter] to a desired area. Move Select 4 Press [o]. 5 Press [Shutter] to capture the photo. • Press [o] to...
... are moving. 1 In Shooting mode, press [m]. 2 Select Focus Area “ Tracking AF. 3 Focus on the subject you want to change the focus area. If you use this function, you cannot set Face Detection options, Timer options, and Intelli zoom. • The white frame means that your camera is in focus. 4 Press [Shutter] to a desired area. Move Select 4 Press [o]. 5 Press [Shutter] to capture the photo. • Press [o] to...

User Manual Ver.1.3 (English)
Page 100
... photos or videos via email ...... 106 Changing email settings 106 Sending photos or videos via email ...... 107 Sending photos or videos to a smart phone 109 Using a smart phone as a remote shutter release 110 Uploading photos to a cloud server ...... 112 Using Auto Backup to send photos or videos 113 Installing the program for Auto Backup on your PC 113 Sending photos or videos to wireless local area networks (WLANs) and use functions. Wireless network (WB150F...
... photos or videos via email ...... 106 Changing email settings 106 Sending photos or videos via email ...... 107 Sending photos or videos to a smart phone 109 Using a smart phone as a remote shutter release 110 Uploading photos to a cloud server ...... 112 Using Auto Backup to send photos or videos 113 Installing the program for Auto Backup on your PC 113 Sending photos or videos to wireless local area networks (WLANs) and use functions. Wireless network (WB150F...
User Manual Ver.1.3 (English)
Page 103
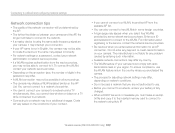
... charges. txt file and copy it to the inserted memory card to connect to the network using the same radio frequency signal as your camera, it may interrupt your connection. • If your AP name is not in English, the camera may not be able to locate the device or the name may appear incorrectly. • For network settings or a password...
... charges. txt file and copy it to the inserted memory card to connect to the network using the same radio frequency signal as your camera, it may interrupt your connection. • If your AP name is not in English, the camera may not be able to locate the device or the name may appear incorrectly. • For network settings or a password...
User Manual Ver.1.3 (English)
Page 120
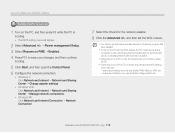
... indicating that the LAN connection is booting. • The BIOS setting menu will appear. 2 Select Advanced tab “ Power management Setup. 3 Select Resume on PME “ Enabled. 4 Press F10 to save your changes, and then continue booting. 5 Click Start, and then open the Control Panel. 6 Configure the network connection. • Windows 7: Click Network and Internet “ Network and Sharing Center “ Change adapter settings. • Windows...
... indicating that the LAN connection is booting. • The BIOS setting menu will appear. 2 Select Advanced tab “ Power management Setup. 3 Select Resume on PME “ Enabled. 4 Press F10 to save your changes, and then continue booting. 5 Click Start, and then open the Control Panel. 6 Configure the network connection. • Windows 7: Click Network and Internet “ Network and Sharing Center “ Change adapter settings. • Windows...
User Manual Ver.1.3 (English)
Page 124
... operations for printing files. • Select Mode: Manually select the USB mode when you connect your computer. (Off, On*) Settings 123 Settings menu Item Display Brightness Quick View Power Save * Default Description Adjust the brightness of the screen. (Auto*, Dark, Normal, Bright) Normal is fixed in Playback mode even if you do not set the Power save mode, the screen will dim 30 seconds after the last operation to save mode, press any button other than [POWER] to resume using...
... operations for printing files. • Select Mode: Manually select the USB mode when you connect your computer. (Off, On*) Settings 123 Settings menu Item Display Brightness Quick View Power Save * Default Description Adjust the brightness of the screen. (Auto*, Dark, Normal, Bright) Normal is fixed in Playback mode even if you do not set the Power save mode, the screen will dim 30 seconds after the last operation to save mode, press any button other than [POWER] to resume using...
User Manual Ver.1.3 (English)
Page 128
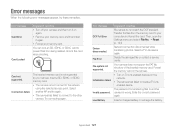
..., open the Settings menu and select File No. “ Reset. (p. 124) Device disconnected. Enter the correct password again. Error message Suggested remedies DCF Full Error File names do not match the DCF standard. Low Battery Insert a charged battery or recharge the battery. Error message Card Error Card Locked Suggested remedies • Turn off your camera, and then turn it on again. • Remove your memory card, and then insert it again. • Format your camera. Connection failed. The inserted memory card...
..., open the Settings menu and select File No. “ Reset. (p. 124) Device disconnected. Enter the correct password again. Error message Suggested remedies DCF Full Error File names do not match the DCF standard. Low Battery Insert a charged battery or recharge the battery. Error message Card Error Card Locked Suggested remedies • Turn off your camera, and then turn it on again. • Remove your memory card, and then insert it again. • Format your camera. Connection failed. The inserted memory card...

User Manual Ver.1.3 (English)
Page 143
..., Zooming Shot • Image Adjust: Sharpness, Contrast, Saturation Video Shooting mode White Balance Movie Filter (Smart Filter): Miniature, Vignetting, Half Tone Dot, Sketch, Fish-eye, Classic, Retro, Palette Effect 1, Palette Effect 2, Palette Effect 3, Palette Effect 4 Auto WB, Daylight, Cloudy, Fluorescent_H, Fluorescent_L, Tungsten, Custom Set, Color Temp. Date Imprinting Date & Time, Date, Off Shooting Photos • Modes: Smart Auto (Portrait, Night Portrait, Backlight Portrait, Night, Backlight, Landscape, White, Natural Green, Blue Sky, Sunset, Macro, Macro text, Macro Color...
..., Zooming Shot • Image Adjust: Sharpness, Contrast, Saturation Video Shooting mode White Balance Movie Filter (Smart Filter): Miniature, Vignetting, Half Tone Dot, Sketch, Fish-eye, Classic, Retro, Palette Effect 1, Palette Effect 2, Palette Effect 3, Palette Effect 4 Auto WB, Daylight, Cloudy, Fluorescent_H, Fluorescent_L, Tungsten, Custom Set, Color Temp. Date Imprinting Date & Time, Date, Off Shooting Photos • Modes: Smart Auto (Portrait, Night Portrait, Backlight Portrait, Night, Backlight, Landscape, White, Natural Green, Blue Sky, Sunset, Macro, Macro text, Macro Color...

User Manual Ver.1.3 (English)
Page 156
... Shot mode 38 Blink Detection 66 Brightness Playback mode 89 Shooting mode 69 Burst modes Auto Exposure Bracket (AEB) 73 Continuous 73 Motion Capture 73 C Camera maintenance 129 Camera specifications 141 Capturing an image from video 86 Charging 20 Cleaning Camera body 129 Display 129 Lens 129 Connecting to a computer Mac 97 Windows 92 Contrast Playback mode 89 Shooting mode 74 D Date/Time Set 124 Deleting files 81 Digital Print Order Format (DPOF) 90 Digital zoom 29 Disconnecting the camera 96 Display brightness 123 Display...
... Shot mode 38 Blink Detection 66 Brightness Playback mode 89 Shooting mode 69 Burst modes Auto Exposure Bracket (AEB) 73 Continuous 73 Motion Capture 73 C Camera maintenance 129 Camera specifications 141 Capturing an image from video 86 Charging 20 Cleaning Camera body 129 Display 129 Lens 129 Connecting to a computer Mac 97 Windows 92 Contrast Playback mode 89 Shooting mode 74 D Date/Time Set 124 Deleting files 81 Digital Print Order Format (DPOF) 90 Digital zoom 29 Disconnecting the camera 96 Display brightness 123 Display...
User Manual Ver.1.3 (English)
Page 158
... Image Stabilization (OIS) 31 Optional accessories 15 P PictBridge 98 Playback button 18 Playback mode 77 Power button 16 Power save mode 123 Printing photos 98 Program mode 39 Protecting files 81 Q Quick view 123 R Red-eye Playback mode 90 Shooting mode 57 Remote Viewfinder 110 Reset 125 Resolution Playback mode 87 Shooting mode 54 Retouching faces Playback mode 90 Shooting mode 38 Rotating 87 S Saturation Playback mode 89 Shooting mode 74 Scene mode 37 Self portrait 65 Service center 138 Settings 124 Sharpness 74 Appendixes 157 Shooting portraits Beauty Shot mode...
... Image Stabilization (OIS) 31 Optional accessories 15 P PictBridge 98 Playback button 18 Playback mode 77 Power button 16 Power save mode 123 Printing photos 98 Program mode 39 Protecting files 81 Q Quick view 123 R Red-eye Playback mode 90 Shooting mode 57 Remote Viewfinder 110 Reset 125 Resolution Playback mode 87 Shooting mode 54 Retouching faces Playback mode 90 Shooting mode 38 Rotating 87 S Saturation Playback mode 89 Shooting mode 74 Scene mode 37 Self portrait 65 Service center 138 Settings 124 Sharpness 74 Appendixes 157 Shooting portraits Beauty Shot mode...


