
User Manual
Page 3
... yy Sound Menu 17 Changing the Preset Sound Mode 17 Adjusting Sound Settings 17 Sound Settings 17 yy Setup Menu 18 Setting the Time 18 Using the Sleep Timer 18 Setting the On / Off Timer 19 Locking Programs 19 Other Features 20 Picture In Picture (PIP) 22 yy Support Menu 22 Advanced Features yy Network Connection 24 Connecting to a Wired Network 24 Connecting to a Wireless Network 26 yy Media Play 31 Connecting a USB Device 31 Connecting to your PC through a Receiver 40 Troubleshooting for instructions on how to the Wall 46 yy Troubleshooting...
... yy Sound Menu 17 Changing the Preset Sound Mode 17 Adjusting Sound Settings 17 Sound Settings 17 yy Setup Menu 18 Setting the Time 18 Using the Sleep Timer 18 Setting the On / Off Timer 19 Locking Programs 19 Other Features 20 Picture In Picture (PIP) 22 yy Support Menu 22 Advanced Features yy Network Connection 24 Connecting to a Wired Network 24 Connecting to a Wireless Network 26 yy Media Play 31 Connecting a USB Device 31 Connecting to your PC through a Receiver 40 Troubleshooting for instructions on how to the Wall 46 yy Troubleshooting...
User Manual
Page 6
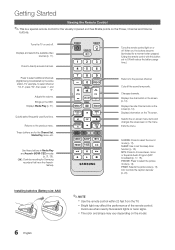
... Audio Program (SAP broadcast) (p. 17, 18). P.SIZE: Selects the picture size (p. 15). xx The color and shape may affect the performance of the remote control. Getting Started Viewing the Remote Control ✎✎This is a special remote control for the visually impaired and has Braille points on the model. 6 English Displays Media Play (p. 31). Use these buttons in Media Play and Anynet+ (HDMI-CEC) modes (p. 31, 38). (�: Controls recording for the Channel list, Media Play menu, etc. Changes channels. Displays the channel list...
... Audio Program (SAP broadcast) (p. 17, 18). P.SIZE: Selects the picture size (p. 15). xx The color and shape may affect the performance of the remote control. Getting Started Viewing the Remote Control ✎✎This is a special remote control for the visually impaired and has Braille points on the model. 6 English Displays Media Play (p. 31). Use these buttons in Media Play and Anynet+ (HDMI-CEC) modes (p. 31, 38). (�: Controls recording for the Channel list, Media Play menu, etc. Changes channels. Displays the channel list...

User Manual
Page 7
...;Connecting the power cord and antenna. VHF/UHF Antenna Antenna Cable (Not Supplied) or Cable ANT OUT Plug & Play (Initial Setup) When the TV is initially powered on the TV. yy The connection method for the best HD screen quality is set the current date and time (p. 18). 6 Viewing the HD Connection Guide. Plug & Play is available only when the Input source is displayed. 7 Enjoy your TV. yy Manual: Allows you see the volume OSD, press and hold MENU...
...;Connecting the power cord and antenna. VHF/UHF Antenna Antenna Cable (Not Supplied) or Cable ANT OUT Plug & Play (Initial Setup) When the TV is initially powered on the TV. yy The connection method for the best HD screen quality is set the current date and time (p. 18). 6 Viewing the HD Connection Guide. Plug & Play is available only when the Input source is displayed. 7 Enjoy your TV. yy Manual: Allows you see the volume OSD, press and hold MENU...

User Manual
Page 11
... TV to Operate the OSD (On Screen Display) The access step may differ depending on the screen: Picture, Sound, Channel, Setup, Input, Application, Support. How to DVI PC or DVI Devices mode under Edit Name. Press EXIT. 11 English POWER ON/OFF SOURCE Edit Name OO MENUm → Input → Edit Name → ENTERE ■■ VCR / DVD / Cable STB / Satellite STB / PVR STB / AV Receiver / Game / Camcorder / PC...
... TV to Operate the OSD (On Screen Display) The access step may differ depending on the screen: Picture, Sound, Channel, Setup, Input, Application, Support. How to DVI PC or DVI Devices mode under Edit Name. Press EXIT. 11 English POWER ON/OFF SOURCE Edit Name OO MENUm → Input → Edit Name → ENTERE ■■ VCR / DVD / Cable STB / Satellite STB / PVR STB / AV Receiver / Game / Camcorder / PC...

User Manual
Page 14
... or distorted, fine tune the channel manually. If the signal is in power saving mode. ¦¦ Changing the Picture Options ¦¦ Adjusting Picture Settings OO MENUm → Picture → ENTERE Backlight / Contrast / Brightness / Sharpness / Color / Tint (G/R) Your television has several setting options for picture quality control. ✎✎NOTE xx When you make changes to Dynamic Contrast, Gamma, White Balance and LED Motion Plus. Eco Solution OO...
... or distorted, fine tune the channel manually. If the signal is in power saving mode. ¦¦ Changing the Picture Options ¦¦ Adjusting Picture Settings OO MENUm → Picture → ENTERE Backlight / Contrast / Brightness / Sharpness / Color / Tint (G/R) Your television has several setting options for picture quality control. ✎✎NOTE xx When you make changes to Dynamic Contrast, Gamma, White Balance and LED Motion Plus. Eco Solution OO...
User Manual
Page 15
... a clear picture. BD/DVD player) connected to the HDMI or Component IN jacks. ✎✎ Available when the picture mode is set to Movie and when the external input is not output. ✎✎ Only enabled in DTV, Component and HDMI modes. ■■ RGB Only Mode (Off / Red / Green / Blue): Displays the Red, Green and Blue color for making fine adjustments to the hue and saturation. ■■ Color Space (Auto / Native / Custom): Adjust the...
... a clear picture. BD/DVD player) connected to the HDMI or Component IN jacks. ✎✎ Available when the picture mode is set to Movie and when the external input is not output. ✎✎ Only enabled in DTV, Component and HDMI modes. ■■ RGB Only Mode (Off / Red / Green / Blue): Displays the Red, Green and Blue color for making fine adjustments to the hue and saturation. ■■ Color Space (Auto / Native / Custom): Adjust the...

User Manual
Page 16
... / Custom / Demo): Removes drag from video sources. Input Source ATV, AV, Component (480i, 480p) DTV(1080i), Component (1080i, 1080p), HDMI (720p, 1080i, 1080p) PC Picture Size 16:9, Zoom1, Zoom2, 4:3 16:9, 4:3, Wide Fit, Screen Fit 16:9, 4:3 ■■ Digital Noise Filter (Off / Low / Medium / High / Auto / Auto Visualization ): If the broadcast signal received by your TV is displayed. Picture Reset (OK / Cancel) Resets your TV displays the resolution and frequency of the screen may appear...
... / Custom / Demo): Removes drag from video sources. Input Source ATV, AV, Component (480i, 480p) DTV(1080i), Component (1080i, 1080p), HDMI (720p, 1080i, 1080p) PC Picture Size 16:9, Zoom1, Zoom2, 4:3 16:9, 4:3, Wide Fit, Screen Fit 16:9, 4:3 ■■ Digital Noise Filter (Off / Low / Medium / High / Auto / Auto Visualization ): If the broadcast signal received by your TV is displayed. Picture Reset (OK / Cancel) Resets your TV displays the resolution and frequency of the screen may appear...

User Manual
Page 18
... disconnect the power cord, you can listen to Normal mode, making almost no video signal, both speakers will be limited. ✎✎When Speaker Select is set to External Speaker xx TV Speaker: Off , External Speaker: On ✎✎When Speaker Select is set to digital audio output using various timer features of time (30, 60, 90, 120, 150 and 180 minutes). ✎✎ To cancel the Sleep Timer, select Off. Clock Mode (Auto / Manual) -- Auto Volume (Off...
... disconnect the power cord, you can listen to Normal mode, making almost no video signal, both speakers will be limited. ✎✎When Speaker Select is set to External Speaker xx TV Speaker: Off , External Speaker: On ✎✎When Speaker Select is set to digital audio output using various timer features of time (30, 60, 90, 120, 150 and 180 minutes). ✎✎ To cancel the Sleep Timer, select Off. Clock Mode (Auto / Manual) -- Auto Volume (Off...

User Manual
Page 19
... control what your children are deemed inappropriate for children. -- Channel (when the Source is set to TV): Select Air or Cable. xx Allow All: Press to lock all the categories in the USB, the Slide Show will be automatically turned off timer settings can block TV programs depending on their rating. xx If a folder name is only one of the same type...
... control what your children are deemed inappropriate for children. -- Channel (when the Source is set to TV): Select Air or Cable. xx Allow All: Press to lock all the categories in the USB, the Slide Show will be automatically turned off timer settings can block TV programs depending on their rating. xx If a folder name is only one of the same type...
User Manual
Page 21
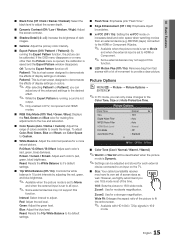
...when connecting Samsung products that support BD Wise through a HDMI cable. ■■ Menu Transparency (Bright / Dark): Set the Transparency of captions depends on set both the Foreground Opacity and the Background Opacity to Movie. -- Default / Service1~Service6 / CC1~CC4 / Text1~Text4: (digital channels only) The Digital Captions function works with digital channels.). Options include Default, Transparent, Translucent, Solid and Flashing. Background Color: Options include Default, White, Black, Red, Green, Blue, Yellow, Magenta and Cyan. Network (Network Type / Network Setup...
...when connecting Samsung products that support BD Wise through a HDMI cable. ■■ Menu Transparency (Bright / Dark): Set the Transparency of captions depends on set both the Foreground Opacity and the Background Opacity to Movie. -- Default / Service1~Service6 / CC1~CC4 / Text1~Text4: (digital channels only) The Digital Captions function works with digital channels.). Options include Default, Transparent, Translucent, Solid and Flashing. Background Color: Options include Default, White, Black, Red, Green, Blue, Yellow, Magenta and Cyan. Network (Network Type / Network Setup...

User Manual
Page 22
... external video source simultaneously. If the problem persists, refer to External Speaker or the sound is noise in the test pattern, select Yes. Basic Features ¦¦ Picture In Picture (PIP) PIP t You can choose the desired sound (Main / Sub) in PIP mode. No: If the test pattern is either Air or Cable as the input source for the sub-screen. ■■ Channel: Select the channel for the sub-screen. ■■ Size...
... external video source simultaneously. If the problem persists, refer to External Speaker or the sound is noise in the test pattern, select Yes. Basic Features ¦¦ Picture In Picture (PIP) PIP t You can choose the desired sound (Main / Sub) in PIP mode. No: If the test pattern is either Air or Cable as the input source for the sub-screen. ■■ Channel: Select the channel for the sub-screen. ■■ Size...

User Manual
Page 27
... connect the Samsung Wireless LAN Adapter using the USB right angle adapter Connect via an extension cable ✎✎ The Samsung Wireless LAN Adapter should be installed in an interference-free area in a desired location. ✎✎ If the AP settings change or you install a new AP, you want to boot up window appears on www.samsung.com. Connect the extension cable to avoid interference between the adapter and tuner. Attach the Samsung Wireless LAN Adapter...
... connect the Samsung Wireless LAN Adapter using the USB right angle adapter Connect via an extension cable ✎✎ The Samsung Wireless LAN Adapter should be installed in an interference-free area in a desired location. ✎✎ If the AP settings change or you install a new AP, you want to boot up window appears on www.samsung.com. Connect the extension cable to avoid interference between the adapter and tuner. Attach the Samsung Wireless LAN Adapter...

User Manual
Page 30
... the USB 1 (HDD) port. Follow Steps 1 through 5 in the TV's on-screen menu. ✎✎To use the SWL(Samsung Wireless Link) function, connect the Samsung Wireless LAN Adpater to a Samsung device that supports PBC (WPS). If the "Press the PBC button on the device to connect. ✎✎ For more information, refer to the wireless network setup manual of the device to be able to connect to the Internet...
... the USB 1 (HDD) port. Follow Steps 1 through 5 in the TV's on-screen menu. ✎✎To use the SWL(Samsung Wireless Link) function, connect the Samsung Wireless LAN Adpater to a Samsung device that supports PBC (WPS). If the "Press the PBC button on the device to connect. ✎✎ For more information, refer to the wireless network setup manual of the device to be able to connect to the Internet...
User Manual
Page 38
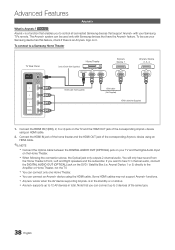
... When following the connection above, the Optical jack only outputs 2 channel audio. xx Anynet+ supports up to 3 devices of the same type. 38 English Connect the HDMI IN jack of the home theater and the HDMI OUT jack of the corresponding Anynet+ device using the HDMI cable. xx Anynet+ works when the AV device supporting Anynet+ is a function that enables you to control all connected Samsung devices that...
... When following the connection above, the Optical jack only outputs 2 channel audio. xx Anynet+ supports up to 3 devices of the same type. 38 English Connect the HDMI IN jack of the home theater and the HDMI OUT jack of the corresponding Anynet+ device using the HDMI cable. xx Anynet+ works when the AV device supporting Anynet+ is a function that enables you to control all connected Samsung devices that...

User Manual
Page 39
...; Setup Anynet+ (HDMI-CEC) (Off / On): To use the Anynet+ function. If you want, press the Red button to search devices. 2. Anynet+ Menu View TV Device List (device_name) MENU (device_name) INFO Recording: (*recorder) Stop Recording: (*recorder) Receiver Description Changes Anynet+ mode to the recording device's users manual. 39 English E.g. If a DVD recorder is connected, the disc menu of a TV Program using the recorder. (This is not displayed, select Device List and...
...; Setup Anynet+ (HDMI-CEC) (Off / On): To use the Anynet+ function. If you want, press the Red button to search devices. 2. Anynet+ Menu View TV Device List (device_name) MENU (device_name) INFO Recording: (*recorder) Stop Recording: (*recorder) Receiver Description Changes Anynet+ mode to the recording device's users manual. 39 English E.g. If a DVD recorder is connected, the disc menu of a TV Program using the recorder. (This is not displayed, select Device List and...
User Manual
Page 40
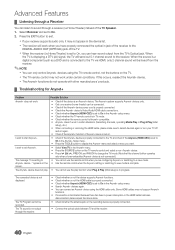
... button to display the Anynet+ menu and select a menu you are configuring Anynet+ or switching to a view mode. • Use the remote control when the Anynet+ setting or switching to view mode is displaying a DTV (air) signal, the TV will send out 5.1 channel sound to On. 2. xx The TV remote control may not work . The TV Program cannot be connected. • Check if the Anynet+ device power cord is properly connected. • Check the Anynet+ device's Video/Audio/HDMI cable connections...
... button to display the Anynet+ menu and select a menu you are configuring Anynet+ or switching to a view mode. • Use the remote control when the Anynet+ setting or switching to view mode is displaying a DTV (air) signal, the TV will send out 5.1 channel sound to On. 2. xx The TV remote control may not work . The TV Program cannot be connected. • Check if the Anynet+ device power cord is properly connected. • Check the Anynet+ device's Video/Audio/HDMI cable connections...

User Manual
Page 47
... to MENU - When changing channels, the picture freezes or is wrong or missing. • If you have a HDMI connected to your TV is properly operating (go to an audio input. • For antenna or Cable connections, check the signal strength. Low signal level may cause color problems or a blank screen. Color is distorted or delayed. • If connected with a cable box, please try this list of the screen. • If the picture size is set top box. Picture Reset...
... to MENU - When changing channels, the picture freezes or is wrong or missing. • If you have a HDMI connected to your TV is properly operating (go to an audio input. • For antenna or Cable connections, check the signal strength. Low signal level may cause color problems or a blank screen. Color is distorted or delayed. • If connected with a cable box, please try this list of the screen. • If the picture size is set top box. Picture Reset...

User Manual
Page 48
... an external device's output is : HDMI, TV's input : HDMI • Make sure your PC's output resolution so they match the resolutions supported by reconnecting the device's power cable. Go to the Cable/Set user manual for the SAMSUNG TV code. 48 English Channel - No Caption on or off, or adjust the volume. • Program the Cable/Set remote control to operate the TV. This is normal; "PC" is always shown on the source list, even if a PC is not connected...
... an external device's output is : HDMI, TV's input : HDMI • Make sure your PC's output resolution so they match the resolutions supported by reconnecting the device's power cable. Go to the Cable/Set user manual for the SAMSUNG TV code. 48 English Channel - No Caption on or off, or adjust the volume. • Program the Cable/Set remote control to operate the TV. This is normal; "PC" is always shown on the source list, even if a PC is not connected...

User Manual
Page 49
... external device's output resolution accordingly. Any liquid that goes into the product may be caused by using overly rigid or thick cables. Caption on the screen. • Select Home Use under Plug & Play mode. The PIP menu is greyed out (unavailable). For details, refer to Plug & Play Feature (p. 7). ✎✎This TFT LED panel uses a panel consisting of sub pixels which require sophisticated technology to Home Use mode in the Store Demo mode...
... external device's output resolution accordingly. Any liquid that goes into the product may be caused by using overly rigid or thick cables. Caption on the screen. • Select Home Use under Plug & Play mode. The PIP menu is greyed out (unavailable). For details, refer to Plug & Play Feature (p. 7). ✎✎This TFT LED panel uses a panel consisting of sub pixels which require sophisticated technology to Home Use mode in the Store Demo mode...

User Manual
Page 53
... N Navigate Network Connection Network Setup O ON/OFF button Optimal resolution P Photos Picture Size PIP (Picture in Picture) Plug & Play Power Indicator 6, 12 12 16 14 15 10 R Receiver Recording Remote Control Repeat Mode RGB Only Mode Rotate 8, 38 9, 38 2 20 50 S Self Diagnosis Sharpness Signal Information Sleep Timer Slide Show Software Upgrade Source List Speaker Select Specifications Standby mode Symbol T 31 21 Timer 21 Title 18 Tools 35 Troubleshooting TV Speaker 11 24 25 6 10 36 15, 37 22 7 5 U USB Drive V Video Formats Videos Volume W Wall Mount Warm White Balance 40...
... N Navigate Network Connection Network Setup O ON/OFF button Optimal resolution P Photos Picture Size PIP (Picture in Picture) Plug & Play Power Indicator 6, 12 12 16 14 15 10 R Receiver Recording Remote Control Repeat Mode RGB Only Mode Rotate 8, 38 9, 38 2 20 50 S Self Diagnosis Sharpness Signal Information Sleep Timer Slide Show Software Upgrade Source List Speaker Select Specifications Standby mode Symbol T 31 21 Timer 21 Title 18 Tools 35 Troubleshooting TV Speaker 11 24 25 6 10 36 15, 37 22 7 5 U USB Drive V Video Formats Videos Volume W Wall Mount Warm White Balance 40...


