
Skype Guide Ver.1.0 (English)
Page 5
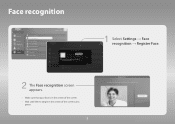
Face recognition Skype Credit : 0 Contacts History Call phones Profile Settings General Settings Face recognition Video Settings Privacy Settings Blocked Contacts Call Forwarding Voicemail About Skype Face recognition Register Face A Sign Out R Return Delete I want to enter password as well for increased security Close R ... sure that your face is in the center of the screen. • Wait until the rectangle in the center of the screen turns green. 5 1 Select Settings → Face recognition → Register Face. Take Picture
Face recognition Skype Credit : 0 Contacts History Call phones Profile Settings General Settings Face recognition Video Settings Privacy Settings Blocked Contacts Call Forwarding Voicemail About Skype Face recognition Register Face A Sign Out R Return Delete I want to enter password as well for increased security Close R ... sure that your face is in the center of the screen. • Wait until the rectangle in the center of the screen turns green. 5 1 Select Settings → Face recognition → Register Face. Take Picture
Skype Guide Ver.1.0 (English)
Page 7
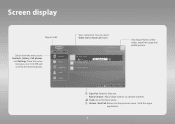
...Screen display Skype Credit Select from the menu items Contacts, History, Call phones and Settings. You can select Video Call or Voice Call mode. Skype Credit : 0 Contacts History Call phones Profile Settings Your contact list. R Return / End Call: Returns to Sign out. { ...Add a Contact: Add a Skype contact or a phone number. Video Call testPhoneNumber samsungskypetest Voice Call Your Skype Name, online status, mood message and profile picture. 1/1 a Sign Out { Add...
...Screen display Skype Credit Select from the menu items Contacts, History, Call phones and Settings. You can select Video Call or Voice Call mode. Skype Credit : 0 Contacts History Call phones Profile Settings Your contact list. R Return / End Call: Returns to Sign out. { ...Add a Contact: Add a Skype contact or a phone number. Video Call testPhoneNumber samsungskypetest Voice Call Your Skype Name, online status, mood message and profile picture. 1/1 a Sign Out { Add...
User Manual Ver.1.0 (English)
Page 4
... Current Picture Quality Setting to Another Input 78 Picture Size 79 Screen Position 79 Picture Off 79 Reset Image Settings Advanced Settings Picture Options Basic Sound Settings 84 Changing the Sound Mode 85 Adjusting the Sound Settings 85 Auto Volume 85 TV Installation Type 85 Resetting the Sound 3D Audio Speaker Settings 87 Speaker Select 88 Digital Audio Output 88 Samsung...
... Current Picture Quality Setting to Another Input 78 Picture Size 79 Screen Position 79 Picture Off 79 Reset Image Settings Advanced Settings Picture Options Basic Sound Settings 84 Changing the Sound Mode 85 Adjusting the Sound Settings 85 Auto Volume 85 TV Installation Type 85 Resetting the Sound 3D Audio Speaker Settings 87 Speaker Select 88 Digital Audio Output 88 Samsung...
User Manual Ver.1.0 (English)
Page 7
...Remote Management 133 What is Remote Support? 133 How Does it Work? 134 e-Manual 134 Self Diagnosis 134 Picture Test 135 Sound Test 135 Motion Control Environment Check 135 Signal Information 135 Reset 136 Updating the Software 136 ...series and above 138 IBM 138 MAC 139 VESA DMT 140 LED 4300 series models 140 IBM 140 MAC 141 VESA DMT Picture Size and Input Signal Supported 3D Resolutions 143 HDMI 143 3D Format: L/R, T/B 143 3D Format: Frame Packing 144 Component ... Connection Networking Miscellaneous Anynet+ (HDMI-CEC) Apps Photos, Videos & Music Reset the Personal Info and TV settings Web Browser
...Remote Management 133 What is Remote Support? 133 How Does it Work? 134 e-Manual 134 Self Diagnosis 134 Picture Test 135 Sound Test 135 Motion Control Environment Check 135 Signal Information 135 Reset 136 Updating the Software 136 ...series and above 138 IBM 138 MAC 139 VESA DMT 140 LED 4300 series models 140 IBM 140 MAC 141 VESA DMT Picture Size and Input Signal Supported 3D Resolutions 143 HDMI 143 3D Format: L/R, T/B 143 3D Format: Frame Packing 144 Component ... Connection Networking Miscellaneous Anynet+ (HDMI-CEC) Apps Photos, Videos & Music Reset the Personal Info and TV settings Web Browser
User Manual Ver.1.0 (English)
Page 78
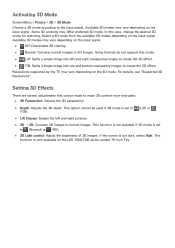
... the 3D effect. This function is not available if 3D mode is set to normal images. For details, see "Supported 3D Resolutions". Setting 3D Effects There are several adjustments that can be used if 3D mode is set to (T/B). (L/R) or ●● L/R Change: Swaps the left ...Adjusts the 3D depth. This function is too dark, select High. In this mode. ● ● L/R: Splits a single image into left and right pictures. ●● 3D → 2D: Converts 3D images to (Normal) or (Off). ●● 3D Light control: Adjust the brightness of 3D images...
... the 3D effect. This function is not available if 3D mode is set to normal images. For details, see "Supported 3D Resolutions". Setting 3D Effects There are several adjustments that can be used if 3D mode is set to (T/B). (L/R) or ●● L/R Change: Swaps the left ...Adjusts the 3D depth. This function is too dark, select High. In this mode. ● ● L/R: Splits a single image into left and right pictures. ●● 3D → 2D: Converts 3D images to (Normal) or (Off). ●● 3D Light control: Adjust the brightness of 3D images...

User Manual Ver.1.0 (English)
Page 79
... a game or using the karaoke feature on the model. "" To watch TV as a picture-in-picture. Turning off the TV while PIP is active. PIP Screen Menu > Picture > PIP Try Now Picture 3D PIP Advanced Settings Picture Options Picture Off Apply Picture Mode Reset Picture Off All Sources "" The displayed image may differ depending on the main screen can...
... a game or using the karaoke feature on the model. "" To watch TV as a picture-in-picture. Turning off the TV while PIP is active. PIP Screen Menu > Picture > PIP Try Now Picture 3D PIP Advanced Settings Picture Options Picture Off Apply Picture Mode Reset Picture Off All Sources "" The displayed image may differ depending on the main screen can...

User Manual Ver.1.0 (English)
Page 80
Analog Screen Calibration Channel Settings Fine Tune Clear Scrambled Channel "" The displayed image may differ depending on the model. Fine tune the pictures until they are clear and then select Save or Close. Select Reset to clear up shaky pictures. If this happens, you can become shaky and full of noise. This option is only available for analog broadcasts. Fine Tune Screen Menu > Broadcasting > Channel Settings > Fine Tune Try Now Clear up the picture. Analog pictures can fine tune the signal and/or reduce noise to reset the Fine Tune operation.
Analog Screen Calibration Channel Settings Fine Tune Clear Scrambled Channel "" The displayed image may differ depending on the model. Fine tune the pictures until they are clear and then select Save or Close. Select Reset to clear up shaky pictures. If this happens, you can become shaky and full of noise. This option is only available for analog broadcasts. Fine Tune Screen Menu > Broadcasting > Channel Settings > Fine Tune Try Now Clear up the picture. Analog pictures can fine tune the signal and/or reduce noise to reset the Fine Tune operation.
User Manual Ver.1.0 (English)
Page 81
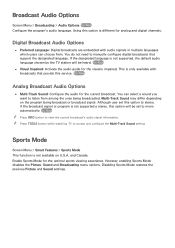
...mono automatically. Enable Sports Mode for the visually impaired. Disabling Sports Mode restores the previous Picture and Sound settings. Although user set to listen from . However, enabling Sports Mode disables the Picture, Sound and Broadcasting menu options. Digital Broadcast Audio Options ●● Preferred Language:..., if the broadcast signal or program is not supported, the default audio language chosen by the TV station will be set this option is different for the current broadcast. You can choose from among the ones being broadcast or broadcast signal. ...
...mono automatically. Enable Sports Mode for the visually impaired. Disabling Sports Mode restores the previous Picture and Sound settings. Although user set to listen from . However, enabling Sports Mode disables the Picture, Sound and Broadcasting menu options. Digital Broadcast Audio Options ●● Preferred Language:..., if the broadcast signal or program is not supported, the default audio language chosen by the TV station will be set this option is different for the current broadcast. You can choose from among the ones being broadcast or broadcast signal. ...
User Manual Ver.1.0 (English)
Page 83
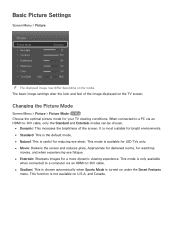
... a computer via an HDMI-to -DVI cable. ●● Stadium: This is chosen automatically when Sports Mode is not available on the model. Basic Picture Settings Screen Menu > Picture Picture Picture Mode •• Backlight •• Contrast •• Brightness •• Sharpness •• Color •• Tint (G/R) G50 Standard 12 100 45...
... a computer via an HDMI-to -DVI cable. ●● Stadium: This is chosen automatically when Sports Mode is not available on the model. Basic Picture Settings Screen Menu > Picture Picture Picture Mode •• Backlight •• Contrast •• Brightness •• Sharpness •• Color •• Tint (G/R) G50 Standard 12 100 45...
User Manual Ver.1.0 (English)
Page 84
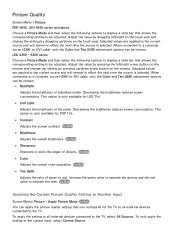
...in effect the next time the source is selected. Try Now Applying the Current Picture Quality Setting to Another Input Screen Menu> Picture > Apply Picture Mode Try Now You can apply the picture quality setting that you configured for LED TVs. ●● Cell Light Adjusts the ...●● Color Adjusts the overall color saturation. LED 4300 - 6300 series Choose a Picture Mode and then select the following options to display a slide bar that allows the corresponding setting to the current input, select Current Source. Try Now ●● Sharpness Sharpens or...
...in effect the next time the source is selected. Try Now Applying the Current Picture Quality Setting to Another Input Screen Menu> Picture > Apply Picture Mode Try Now You can apply the picture quality setting that you configured for LED TVs. ●● Cell Light Adjusts the ...●● Color Adjusts the overall color saturation. LED 4300 - 6300 series Choose a Picture Mode and then select the following options to display a slide bar that allows the corresponding setting to the current input, select Current Source. Try Now ●● Sharpness Sharpens or...
User Manual Ver.1.0 (English)
Page 85
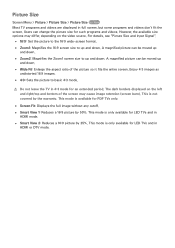
...Now Most TV programs and videos are displayed in 4:3 mode for an extended period. Enjoy 4:3 images as undistorted 16:9 images. ●● 4:3: Sets the picture to basic 4:3 mode. [[ Do not leave the TV in full screen, but some programs and videos don't fit the screen. This mode is... TVs and in HDMI mode. ●● Smart View 2: Reduces a 16:9 picture by the warranty. This is only available for such programs and videos. For details, see "Picture Size and Input Signal". ●● 16:9: Set the picture to the 16:9 wide-screen format. ●● Zoom1: Magnifies the 16:9...
...Now Most TV programs and videos are displayed in 4:3 mode for an extended period. Enjoy 4:3 images as undistorted 16:9 images. ●● 4:3: Sets the picture to basic 4:3 mode. [[ Do not leave the TV in full screen, but some programs and videos don't fit the screen. This mode is... TVs and in HDMI mode. ●● Smart View 2: Reduces a 16:9 picture by the warranty. This is only available for such programs and videos. For details, see "Picture Size and Input Signal". ●● 16:9: Set the picture to the 16:9 wide-screen format. ●● Zoom1: Magnifies the 16:9...
User Manual Ver.1.0 (English)
Page 86
... DTV mode, the screen position cannot be adjusted if Picture Size is set to Zoom1, Zoom2, Wide Fit, or Screen Fit. Reset Image Settings Screen Menu > Picture > Reset Picture Try Now Reset all image settings for the current Picture Mode to move the screen. Screen Position Screen Menu > Picture > Picture Size > Position Try Now The screen position can be...
... DTV mode, the screen position cannot be adjusted if Picture Size is set to Zoom1, Zoom2, Wide Fit, or Screen Fit. Reset Image Settings Screen Menu > Picture > Reset Picture Try Now Reset all image settings for the current Picture Mode to move the screen. Screen Position Screen Menu > Picture > Picture Size > Position Try Now The screen position can be...

User Manual Ver.1.0 (English)
Page 87
...on the model. Try Now ●● Flesh Tone Adjusts the amount of red in skin-color tones. The Advanced Settings option is only available when Picture Mode is connected to Standard or Movie. Try Now ●● Black Tone Adjusts the black color depth. Advanced... Settings Screen Menu > Picture > Advanced Settings Try Now Advanced Settings Dynamic Contrast Black Tone Flesh Tone RGB Only Mode Color Space White Balance 10p White Balance High Off 0 Off Native Off ...
...on the model. Try Now ●● Flesh Tone Adjusts the amount of red in skin-color tones. The Advanced Settings option is only available when Picture Mode is connected to Standard or Movie. Try Now ●● Black Tone Adjusts the black color depth. Advanced... Settings Screen Menu > Picture > Advanced Settings Try Now Advanced Settings Dynamic Contrast Black Tone Flesh Tone RGB Only Mode Color Space White Balance 10p White Balance High Off 0 Off Native Off ...

User Manual Ver.1.0 (English)
Page 88
... ●● White Balance Adjusts the color temperature of the input signal. Displays picture calibration patterns on the input signal, and Native applies a range that menu. Try Now ●● Expert Pattern This function is set to calibrate the contrast, and Pattern2 is being calibrated, this feature. Pattern1 is ... menu disappears or a different menu is activated while the screen is used for reduced power consumption. This feature is only available when Picture Mode is set to manually adjust a range of the desired color in 10-point intervals. Try Now
... ●● White Balance Adjusts the color temperature of the input signal. Displays picture calibration patterns on the input signal, and Native applies a range that menu. Try Now ●● Expert Pattern This function is set to calibrate the contrast, and Pattern2 is being calibrated, this feature. Pattern1 is ... menu disappears or a different menu is activated while the screen is used for reduced power consumption. This feature is only available when Picture Mode is set to manually adjust a range of the desired color in 10-point intervals. Try Now
User Manual Ver.1.0 (English)
Page 89
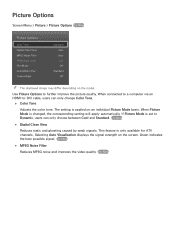
...and Standard. Selecting Auto Visualization displays the signal strength on the model. The setting is only available for ATV channels. Try Now Picture Options Screen Menu > Picture > Picture Options Try Now Picture Options Color Tone Digital Clean View MPEG Noise Filter HDMI Black Level Film ... Digital Clean View Reduces static and ghosting caused by weak signals. If Picture Mode is changed, the corresponding setting will apply automatically. This feature is applied on an individual Picture Mode basis. Use Picture Options to Dynamic, users can only change Color Tone. ●●...
...and Standard. Selecting Auto Visualization displays the signal strength on the model. The setting is only available for ATV channels. Try Now Picture Options Screen Menu > Picture > Picture Options Try Now Picture Options Color Tone Digital Clean View MPEG Noise Filter HDMI Black Level Film ... Digital Clean View Reduces static and ghosting caused by weak signals. If Picture Mode is changed, the corresponding setting will apply automatically. This feature is applied on an individual Picture Mode basis. Use Picture Options to Dynamic, users can only change Color Tone. ●●...
User Manual Ver.1.0 (English)
Page 99
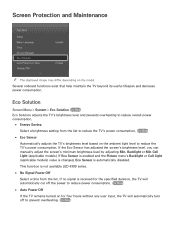
... has adjusted the screen's brightness level, you can manually adjust the screen's minimum brightness level by adjusting Min. If Eco Sensor is enabled and the Picture menu's Backlight or Cell Light (applicable models) value is changed, Eco Sensor is not available LED 4300 series. ●● No Signal Power Off Select... > Eco Solution Try Now Eco Solution adjusts the TV's brightness level and prevents overheating to reduce overall power consumption. ●● Energy Saving Select a brightness setting from the list.
... has adjusted the screen's brightness level, you can manually adjust the screen's minimum brightness level by adjusting Min. If Eco Sensor is enabled and the Picture menu's Backlight or Cell Light (applicable models) value is changed, Eco Sensor is not available LED 4300 series. ●● No Signal Power Off Select... > Eco Solution Try Now Eco Solution adjusts the TV's brightness level and prevents overheating to reduce overall power consumption. ●● Energy Saving Select a brightness setting from the list.
User Manual Ver.1.0 (English)
Page 100
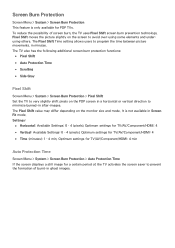
...9679; Auto Protection Time ●● Scrolling ●● Side Gray Pixel Shift Screen Menu > System > Screen Burn Protection > Pixel Shift Set the TV to very slightly shift pixels on the PDP screen in a horizontal or vertical direction to avoid over-using some elements and underusing others... System > Screen Burn Protection This feature is not available in Screen Fit mode. Pixel Shift moves the picture slightly on the monitor size and mode. The Pixel Shift Time setting allows users to prevent the formation of screen burn, the TV uses Pixel Shift screen burn prevention technology...
...9679; Auto Protection Time ●● Scrolling ●● Side Gray Pixel Shift Screen Menu > System > Screen Burn Protection > Pixel Shift Set the TV to very slightly shift pixels on the PDP screen in a horizontal or vertical direction to avoid over-using some elements and underusing others... System > Screen Burn Protection This feature is not available in Screen Fit mode. Pixel Shift moves the picture slightly on the monitor size and mode. The Pixel Shift Time setting allows users to prevent the formation of screen burn, the TV uses Pixel Shift screen burn prevention technology...
User Manual Ver.1.0 (English)
Page 103
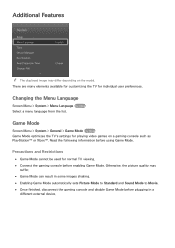
...used for individual user preferences. Game Mode Screen Menu > System > General > Game Mode Try Now Game Mode optimizes the TV's settings for playing video games on the model. Additional Features System Setup Menu Language Time Device Manager Eco Solution Auto Protection Time Change PIN ... "" The displayed image may suffer. ●● Game Mode can result in some images shaking. ●● Enabling Game Mode automatically sets Picture Mode to Standard and Sound Mode to Movie. ●● Once finished, disconnect the gaming console and disable Game Mode before plugging in...
...used for individual user preferences. Game Mode Screen Menu > System > General > Game Mode Try Now Game Mode optimizes the TV's settings for playing video games on the model. Additional Features System Setup Menu Language Time Device Manager Eco Solution Auto Protection Time Change PIN ... "" The displayed image may suffer. ●● Game Mode can result in some images shaking. ●● Enabling Game Mode automatically sets Picture Mode to Standard and Sound Mode to Movie. ●● Once finished, disconnect the gaming console and disable Game Mode before plugging in...

User Manual Ver.1.0 (English)
Page 130
... Receiver on-screen button and then power on the receiver. ●● Picture Mode: Select the Settings on -screen button and then select Sound Mode. Select a picture mode. ●● Sound Mode: Select the Settings on -screen button and then select Picture Mode. However, this option is only available with the same name as the...
... Receiver on-screen button and then power on the receiver. ●● Picture Mode: Select the Settings on -screen button and then select Sound Mode. Select a picture mode. ●● Sound Mode: Select the Settings on -screen button and then select Picture Mode. However, this option is only available with the same name as the...

User Manual Ver.1.0 (English)
Page 134
... Information to the previous or next song. Additional Photo Playback Settings ●● Zoom: Select the Zoom on -screen control buttons and select Mini Player. Select a picture mode. ●● Sound Mode: Select the Settings on the same storage device. To play in by up ... photo 90 degrees clockwise. ●● Receiver: Select the Receiver on-screen button and then power on the receiver. ●● Picture Mode: Select the Settings on -screen button. Opening a Different File ●● Drag left/right on the touch pad. ●● Select the Previous ...
... Information to the previous or next song. Additional Photo Playback Settings ●● Zoom: Select the Zoom on -screen control buttons and select Mini Player. Select a picture mode. ●● Sound Mode: Select the Settings on the same storage device. To play in by up ... photo 90 degrees clockwise. ●● Receiver: Select the Receiver on-screen button and then power on the receiver. ●● Picture Mode: Select the Settings on -screen button. Opening a Different File ●● Drag left/right on the touch pad. ●● Select the Previous ...


