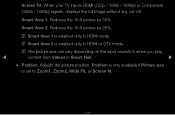
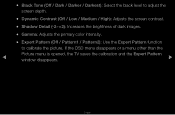
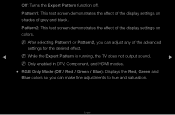
User Manual (user Manual) (ver.1.0) (English)
Page 2
Additional Functions 230 • Using Samsung Apps 236 • AllShare™ 267 • Anynet+(HDMI-CEC) 273 Other Information • TroubleShooting 286 • Anti-theft Kensington Lock 298 • License ...Basic Features • Changing the Preset Picture Mode • Adjusting Picture Settings • Changing the Picture Size • Changing the Picture Options • Using the TV with Your PC • Changing the Preset Sound Modes • Adjusting Sound Settings Preference Features 1 • Wired Network Connection 21 • Wireless Network Connection 25...
User Manual (user Manual) (ver.1.0) (English)
Page 4
To use this function. Press the l / r / u / d buttons to set the TV to display a desired channel automatically on a day and at a time of your choice. English NN You must set the current time first using the Time → Clock function in the System menu to add a scheduled viewing. ◀ 2. Press the ENTERE button to use Timer Viewing, follow these steps: 1. Using the Timer Viewing You can set Antenna, Channel, Repeat, and Start ▶ Time.
User Manual (user Manual) (ver.1.0) (English)
Page 7
On the Channel List, you press the CH LIST button on your remote. Channel List Added Channels 6 Air 6-1 TV #6 7 Air 8 Air 9 Air No Information 9-2 TV #10 9-3 TV #11 9 Air 10-1 TV #12 10-2 TV #13 10 Air 11 Air Air a Antenna { Program View L Ch.Mode E Watch k Page ●● The displayed image may ... When you press the CH LIST button on the model. ▶ English ■■ Channel List The Channel List contains the channels your TV displays (Added Channels) when you can view Added Channels, channel information, Favorites, and manage channels.
User Manual (user Manual) (ver.1.0) (English)
Page 8
NN If you want to view the list of programs on that channel. NN The TV displays Favorites only if you select a digital channel in up to five groups. ●● Added Channels: Show all added channels. ●● Favorites 1-5: Show ...
User Manual (user Manual) (ver.1.0) (English)
Page 10
How to use Timer Viewing in Channel List (digital channels only) You can use Timer Viewing in the Channel List to schedule a digital channel program for viewing. Press the CH LIST button, then select a desired digital channel. 2. Press the { (Program View) button. ◀ ▶ English The TV will turn on and display the digital channel program when the program begins. To schedule a digital program, follow these steps: 1.
User Manual (user Manual) (ver.1.0) (English)
Page 12
... icons in the top right corner of the screen. English screen. Channel 6 6-1 7 8 9 9-1 9-2 9-3 9-4 Air TV #6 Air Air Air TV #9 TV #10 TV #11 TV #12 All Channels 10 10-1 10-2 11 12 13 13-1 14 15 Air TV #13 TV #14 Air Air Air TV #15 Air Air Added Ch. ▶ ●● The displayed image may differ depending...
User Manual (user Manual) (ver.1.0) (English)
Page 17
... Channels screen, select a greyed out channel. 3. Press the TOOLS button. 4. English NN Using the TOOLS button with Channel To use the Channel button on your TV only displays the channels on the TOOLS menu, press ENTERE, and then press ENTERE again. To Add a channel using the TOOLS button in the Added...
User Manual (user Manual) (ver.1.0) (English)
Page 19
... are bright. English or All Channels list. ▶ ●● You can also delete a channel on the ◀ Added Ch. NN NOTE ●● Your TV lists all available channels, both added and deleted, on the All Channels menu. ●● A gray-colored channel indicates the channel has been deleted. ●...
User Manual (user Manual) (ver.1.0) (English)
Page 20
... the Edit Favorites screen (Favorite 1, Favorite 2, ◀ etc.), and then press the ENTERE button. ▶ NN The Edit Favorites screen has five groups. NN The TV displays the "F" symbol next to any one of the groups. To set channels as favorites. Select OK, and then press the ENTERE button. ●●...
User Manual (user Manual) (ver.1.0) (English)
Page 27
If you don't know your ◀ cable system type, contact your start Auto Program, you must specify the signal source, either Air or Cable. If you must also specify the cable system type, STD, HRC, or IRC. ❑❑ Memorizing Channels OO MENUm → Channel → ENTERE ■■ Antenna (Air / Cable) t Your TV memorizes channels and adds the memorized channels to the Channel List. English Most ▶ cable companies use STD. Before your TV can memorize channels, you select cable, when your local cable company for the information.
User Manual (user Manual) (ver.1.0) (English)
Page 28
Select the source of your remote. 2. To select Air or Cable, follow these steps: 1. Push MENUm → Channel → ENTERE on your TV signal, Air or Cable, and then press the RETURN button. ◀ ▶ English Select Antenna, and then press ENTERE. 3.
User Manual (user Manual) (ver.1.0) (English)
Page 29
Select Auto Program, and then press ENTERE. 3. Select Next, and then press ENTERE. ■■ Auto Program Scans for channels automatically and stores them in the TV's memory. Select Air or Cable or both on your choice will ◀ already be selected. ▶ 4. NN If you selected Air or Cable or both by highlighting and then pressing ENTERE. English Push MENUm → Channel → ENTERE on the Antenna screen, your remote. 2. To start Auto Program, follow these steps: 1.
User Manual (user Manual) (ver.1.0) (English)
Page 35
NN Lowering picture brightness reduces power consumption. ◀ ▶ English NN In PC mode, you make changes to the TV. NN You can only make changes to Backlight, Contrast, Brightness, Sharpness, Color or Tint (G/R), the OSD will be adjusted accordingly. NN When you can adjust and store Settings for each external device connected to Backlight, Contrast, Brightness, and Sharpness.
User Manual (user Manual) (ver.1.0) (English)
Page 36
... set of the time. Select an option using the up and down arrow keys, and then press ENTERE. However, we highly recommend you use your TV's ▶ 16:9 mode most of screen sizes as well.
User Manual (user Manual) (ver.1.0) (English)
Page 37
Wide Fit: Enlarges the aspect ratio of the screen may cause image ◀ retention (screen burn) which is not covered by the warranty. ▶ English NN Available with HD 1080i / 720p signals in 16:9 mode. 4:3: Sets the picture to 4:3 format for a long time. Cuts off the top and sides. NN Do not set your TV to basic (4:3) mode. Zoom1: Use for a stronger magnification. The borders displayed on the left and right, or top and bottom of the picture so it fits the entire screen. Zoom2: Use for moderate magnification.
User Manual (user Manual) (ver.1.0) (English)
Page 38
... the input resolution when you play ◀ content from Videos in Smart Hub. ▶ ●● Position: Adjusts the picture position. Screen Fit: When your TV inputs HDMI (720p / 1080i / 1080p) or Component (1080i / 1080p) signals, displays the full image without any cut-off. Smart View 2: Reduces the 16:9 picture by...
User Manual (user Manual) (ver.1.0) (English)
Page 41
●● HD (High Definition): 16:9 - 1080i/1080p (1920x1080), 720p (1280x720) ●● You can adjust and store settings for each external device you have connected to an input on the TV. ●● Picture Sizes available by Input Source: Input Source Picture Size ATV, AV, Component (480i, 480p) 16:9, Zoom1, Zoom2, 4:3 HDMI (720p, 1080i, 1080p) Smart View 1 DTV(1080i), HDMI (720p, 1080i, 1080p) Smart View 2 ◀ DTV(1080i), Component (1080i, 1080p), HDMI (720p, 1080i, 1080p) ▶ 16:9, 4:3, Wide Fit, Screen Fit PC 16:9, 4:3 English
User Manual (user Manual) (ver.1.0) (English)
Page 43
If the OSD menu disappears or a menu other than the Picture menu is opened, the TV saves the calibration and the Expert Pattern ◀ window disappears. ▶ English ●● Black Tone (Off / Dark / Darker / Darkest): Select the black level to ...
User Manual (user Manual) (ver.1.0) (English)
Page 44
... off. Pattern1: This test screen demonstrates the effect of the advanced settings for the desired effect. ◀ NN While the Expert Pattern is running, the TV does not output sound. ▶ NN Only enabled in DTV, Component, and HDMI modes. ●● RGB Only Mode (Off / Red / Green / Blue): Displays the...
User Manual (user Manual) (ver.1.0) (English)
Page 47
NN 3D is in motion. NN When you change the Contrast, the TV sets Motion Lightning to Off. ◀ ▶ English ●● Flesh Tone: Emphasizes pink "Flesh Tone." ●● Edge Enhancement (Off / On): Emphasizes object boundaries. ●● Motion Lighting (Off / On): Reduces power consumption by reducing screen brightness when the picture on the screen is not supported.