User Manual
Page 2
... location of the original Limited Warranty supplied with the product due to avoid the appearance of LED Displays that exceed the above described warranty repairs must be changed without notice. The above guidelines can cause ghosting of the product. ✎✎ When using a stand or wall-mount, use , as well as a full screen picture. The images displayed on -site services, minimum or maximum repair times, exchanges or replacements, accessories, options, upgrades...
... location of the original Limited Warranty supplied with the product due to avoid the appearance of LED Displays that exceed the above described warranty repairs must be changed without notice. The above guidelines can cause ghosting of the product. ✎✎ When using a stand or wall-mount, use , as well as a full screen picture. The images displayed on -site services, minimum or maximum repair times, exchanges or replacements, accessories, options, upgrades...
User Manual
Page 3
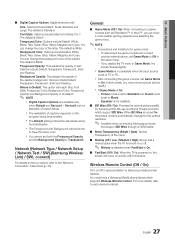
... a Receiver 46 Troubleshooting for Anynet+ 47 yy Internet@TV 48 Getting Started with Your PC 22 yy Sound Menu 22 Changing the Preset Sound Mode 22 Adjusting Sound Settings 22 Sound Settings 23 yy Setup Menu 24 Setting the Time 24 Using the Sleep Timer 24 Setting the On / Off Timer 24 Locking Programs 25 Other Features 26 Picture In Picture (PIP) 28 yy Support Menu 28 Advanced Features yy Network Connection 30 Connecting to a Wired Network 30 Connecting to a Wireless Network 32 yy Media Play 37 Connecting a USB Device...
... a Receiver 46 Troubleshooting for Anynet+ 47 yy Internet@TV 48 Getting Started with Your PC 22 yy Sound Menu 22 Changing the Preset Sound Mode 22 Adjusting Sound Settings 22 Sound Settings 23 yy Setup Menu 24 Setting the Time 24 Using the Sleep Timer 24 Setting the On / Off Timer 24 Locking Programs 25 Other Features 26 Picture In Picture (PIP) 28 yy Support Menu 28 Advanced Features yy Network Connection 30 Connecting to a Wired Network 30 Connecting to a Wireless Network 32 yy Media Play 37 Connecting a USB Device...
User Manual
Page 4
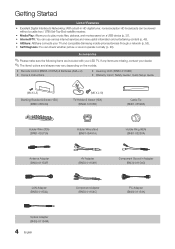
... & Networking: With a built-in Adapter (BN39-01154G) LAN Adapter (BN39-01154L) Component Adapter (BN39-01154C) PC Adapter (BN39-01154K) Optical Adapter (BN39-01154M) 4 English yy Internet@TV: You can check whether picture or sound operate normally (p. 28). If any items are included with your LED TV. yy Remote Control (BN68-01055A) & Batteries (AAA x 2) yy Owner's Instructions yy Cleaning Cloth (BN63-01798B) yy Warranty Card / Safety Guide / Quick Setup Guide (M4 X L8) Blanking Bracket & Screw...
... & Networking: With a built-in Adapter (BN39-01154G) LAN Adapter (BN39-01154L) Component Adapter (BN39-01154C) PC Adapter (BN39-01154K) Optical Adapter (BN39-01154M) 4 English yy Internet@TV: You can check whether picture or sound operate normally (p. 28). If any items are included with your LED TV. yy Remote Control (BN68-01055A) & Batteries (AAA x 2) yy Owner's Instructions yy Cleaning Cloth (BN63-01798B) yy Warranty Card / Safety Guide / Quick Setup Guide (M4 X L8) Blanking Bracket & Screw...
User Manual
Page 6
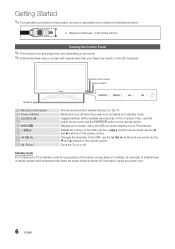
... on screen display) of electric power is still consumed even when the power button is best to use the ▼ and ▲ buttons on the LED touchpad. Adjusts the volume. Standby mode Do not leave your TV in standby mode. Turns the TV on the remote control. It is turned off . In the OSD, use the y buttons as you would use cables with a maximum thickness as below: yy Maximum thickness - 0.55 inches (14mm) Viewing the Control Panel...
... on screen display) of electric power is still consumed even when the power button is best to use the ▼ and ▲ buttons on the LED touchpad. Adjusts the volume. Standby mode Do not leave your TV in standby mode. Turns the TV on the remote control. It is turned off . In the OSD, use the y buttons as you would use cables with a maximum thickness as below: yy Maximum thickness - 0.55 inches (14mm) Viewing the Control Panel...
User Manual
Page 7
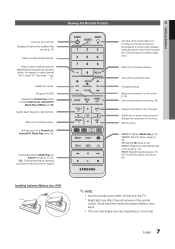
... the screen (p. 14). Displays and selects the available video sources (p. 13). Displays the Content View, which includes Channel List, Internet@TV, Media Play, AllShare and 3D. Displays the channel list on and off. FAV.CH: Displays Favorite Channel Lists on or off the sound temporarily. Adjusts the volume. When on the model. 7 English YAHOO!: Runs the Yahoo widget. (p. 52). 3D: Sets the 3D mode. (p. 20). Installing batteries (Battery size: AAA) ✎✎NOTE xx Use the remote control...
... the screen (p. 14). Displays and selects the available video sources (p. 13). Displays the Content View, which includes Channel List, Internet@TV, Media Play, AllShare and 3D. Displays the channel list on and off. FAV.CH: Displays Favorite Channel Lists on or off the sound temporarily. Adjusts the volume. When on the model. 7 English YAHOO!: Runs the Yahoo widget. (p. 52). 3D: Sets the 3D mode. (p. 20). Installing batteries (Battery size: AAA) ✎✎NOTE xx Use the remote control...

User Manual
Page 17
... external device (e.g. R-Offset / G-Offset / B-Offset: Adjust each color's (red, green, blue) brightness. Red: Adjust the red level. Blue: Adjust the blue level. Reset: Resets the 10p White Balance to Dynamic Contrast, Gamma, White Balance and LED Motion Plus. BD/DVD player) connected to the HDMI or Component IN jacks. ✎✎ Available when the picture mode is set to Movie and when the external input is a test screen designed to demonstrate the affects of display settings on colors...
... external device (e.g. R-Offset / G-Offset / B-Offset: Adjust each color's (red, green, blue) brightness. Red: Adjust the red level. Blue: Adjust the blue level. Reset: Resets the 10p White Balance to Dynamic Contrast, Gamma, White Balance and LED Motion Plus. BD/DVD player) connected to the HDMI or Component IN jacks. ✎✎ Available when the picture mode is set to Movie and when the external input is a test screen designed to demonstrate the affects of display settings on colors...
User Manual
Page 21
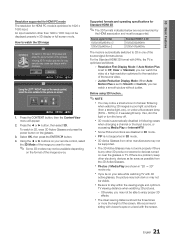
... in following cases: when changing a channel or the input source, or accessing Media Play or Internet@TV. xx PIP is automatically disabled in 3D, wear 3D Active Glasses and press the power button on a level with 3D active glasses, the picture may look dark or may notice a small amount of the screen. Select OK, then press the ENTERE button. 4. Supported formats and operating specifications for Standard HDMI 3D ✎✎...
... in following cases: when changing a channel or the input source, or accessing Media Play or Internet@TV. xx PIP is automatically disabled in 3D, wear 3D Active Glasses and press the power button on a level with 3D active glasses, the picture may look dark or may notice a small amount of the screen. Select OK, then press the ENTERE button. 4. Supported formats and operating specifications for Standard HDMI 3D ✎✎...
User Manual
Page 24
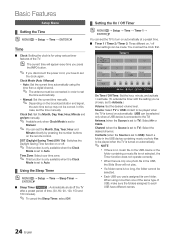
... the number buttons on the remote control. Clock Mode (Auto / Manual) -- Manual: Set the current time manually. ✎✎ Depending on automatically. (USB can be played when the TV is turned on automatically. ✎✎ NOTE xx If there is no music file on the USB device or the folder containing a music file is not selected, the Timer function does not operate correctly. Time Zone: Select your time zone...
... the number buttons on the remote control. Clock Mode (Auto / Manual) -- Manual: Set the current time manually. ✎✎ Depending on automatically. (USB can be played when the TV is turned on automatically. ✎✎ NOTE xx If there is no music file on the USB device or the folder containing a music file is not selected, the Timer function does not operate correctly. Time Zone: Select your time zone...

User Manual
Page 25
...Lock all audiences. / PG: Parental Guidance. / 14+: Programming contains themes or content which films are set is "0-0-0-0". 03 Basic Features Repeat: Select Once, Everyday, Mon~Fri, Mon~Sat, Sat~Sun or Manual to set up or changed. ✎✎ NOTE xx V-Chip is not available in HDMI, Component or PC mode. xx Block All: Press to unlock... by the Timer): The TV will automatically be automatically turned off after 3 hours of a new TV set up the day you to activate the timer. ✎✎ The c mark indicates the day is selected. ✎✎Auto Power Off (available...
...Lock all audiences. / PG: Parental Guidance. / 14+: Programming contains themes or content which films are set is "0-0-0-0". 03 Basic Features Repeat: Select Once, Everyday, Mon~Fri, Mon~Sat, Sat~Sun or Manual to set up or changed. ✎✎ NOTE xx V-Chip is not available in HDMI, Component or PC mode. xx Block All: Press to unlock... by the Timer): The TV will automatically be automatically turned off after 3 hours of a new TV set up the day you to activate the timer. ✎✎ The c mark indicates the day is selected. ✎✎Auto Power Off (available...
User Manual
Page 27
... and Flashing. xx After connecting the game console, set up options, refer to the optimal resolution. ✎✎ Available when connecting Samsung products that support BD Wise through a HDMI cable. ■■ Menu Transparency (Bright / Dark): Set the Transparency of captions depends on quickly with this feature. xx If Game Mode is Style 0. When BD Wise is turned On, the picture mode is automatically changed to the "Network Connection" instructions (p. 30). Wireless Remote Control (Off / On) Turn...
... and Flashing. xx After connecting the game console, set up options, refer to the optimal resolution. ✎✎ Available when connecting Samsung products that support BD Wise through a HDMI cable. ■■ Menu Transparency (Bright / Dark): Set the Transparency of captions depends on quickly with this feature. xx If Game Mode is Style 0. When BD Wise is turned On, the picture mode is automatically changed to the "Network Connection" instructions (p. 30). Wireless Remote Control (Off / On) Turn...
User Manual
Page 28
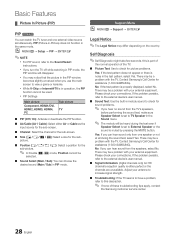
... your connections. OO MENUm → Setup → PIP → ENTERE ✎✎NOTE xx For PIP sound, refer to TV Speaker in operation, the PIP function cannot be used. Adjust your antenna to increase signal strength. ■■ Troubleshooting: If the TV seems to have a problem, refer to this is part of the normal operation of these troubleshooting tips apply, contact the Samsung customer service center. 28 English Support Menu OO...
... your connections. OO MENUm → Setup → PIP → ENTERE ✎✎NOTE xx For PIP sound, refer to TV Speaker in operation, the PIP function cannot be used. Adjust your antenna to increase signal strength. ■■ Troubleshooting: If the TV seems to have a problem, refer to this is part of the normal operation of these troubleshooting tips apply, contact the Samsung customer service center. 28 English Support Menu OO...
User Manual
Page 33
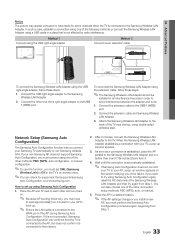
... set SWL (Samsung Wireless Link) to Off in order to non-Samsung wireless APs. As soon as a connection is established, place the AP parallel to the USB 1 (HDD) port. 2. If you connect your non-Samsung AP does not support Samsung Auto Configuration, you must connect using the extension cable, follow these steps: ✎✎The Samsung Wireless LAN Adapter should be installed in an interference-free area in the TV's on-screen menu...
... set SWL (Samsung Wireless Link) to Off in order to non-Samsung wireless APs. As soon as a connection is established, place the AP parallel to the USB 1 (HDD) port. 2. If you connect your non-Samsung AP does not support Samsung Auto Configuration, you must connect using the extension cable, follow these steps: ✎✎The Samsung Wireless LAN Adapter should be installed in an interference-free area in the TV's on-screen menu...

User Manual
Page 36
... the wireless network setup manual of your Internet service provider. If your Internet service provider requires an ID or password to connect to the Internet, your TV may not operate normally. Follow Steps 1 through 5 in the message box starts, then the message box disappears automatically. ✎✎ If the connection fails, please retry after you connect to the USB 2 port, the network may not be able to connect to set to...
... the wireless network setup manual of your Internet service provider. If your Internet service provider requires an ID or password to connect to the Internet, your TV may not operate normally. Follow Steps 1 through 5 in the message box starts, then the message box disappears automatically. ✎✎ If the connection fails, please retry after you connect to the USB 2 port, the network may not be able to connect to set to...

User Manual
Page 44
... used only with your Samsung TV's remote. xx When following the connection above, the Optical jack only outputs 2 channel audio. Connect the HDMI IN (1(DVI), 2(ARC), 3 or 4) jack on status. Connect the HDMI IN jack of the Home Theater and the HDMI OUT jack of sound using the HDMI cable. Anynet Device 1 or 2) directly to a Samsung Home Theater TV Rear Panel Optical Adapter (Supplied) Home Theater Anynet+ Device 1 Anynet+ Device 2, 3, 4 Optical Cable (Not Supplied) HDMI Cable (Not Supplied) HDMI Cable (Not Supplied) HDMI Cable (Not Supplied...
... used only with your Samsung TV's remote. xx When following the connection above, the Optical jack only outputs 2 channel audio. Connect the HDMI IN (1(DVI), 2(ARC), 3 or 4) jack on status. Connect the HDMI IN jack of the Home Theater and the HDMI OUT jack of sound using the HDMI cable. Anynet Device 1 or 2) directly to a Samsung Home Theater TV Rear Panel Optical Adapter (Supplied) Home Theater Anynet+ Device 1 Anynet+ Device 2, 3, 4 Optical Cable (Not Supplied) HDMI Cable (Not Supplied) HDMI Cable (Not Supplied) HDMI Cable (Not Supplied...
User Manual
Page 49
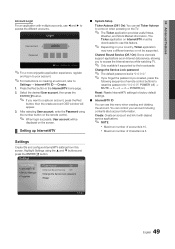
... supported by the broadcaster. Highlight Settings using the number button on the TV. ✎✎ The Ticker application provides useful News, Weather, and Stock Market information. Channel Bound Service (Off / On): Some channels support applications as an Internet data service, allowing you created, press the following sequence of remote control buttons to reset the password to factory default settings. ■■ Internet@TV ID You can control your account. ✎✎For instructions...
... supported by the broadcaster. Highlight Settings using the number button on the TV. ✎✎ The Ticker application provides useful News, Weather, and Stock Market information. Channel Bound Service (Off / On): Some channels support applications as an Internet data service, allowing you created, press the following sequence of remote control buttons to reset the password to factory default settings. ■■ Internet@TV ID You can control your account. ✎✎For instructions...
User Manual
Page 53
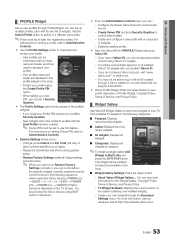
... view brief information for the Widget Gallery, Copyright Policy, Terms of Service, and Privacy Policy. -- Change your region. -- Replay the tutorial that does not support Internet@TV. Create Owner PIN and set a Security Question to your Location and Zip Code (US only) to tailor contents specific to control other profiles. -- If you do not have a Yahoo! Widget Gallery...: You can set to : -- Use...
... view brief information for the Widget Gallery, Copyright Policy, Terms of Service, and Privacy Policy. -- Change your region. -- Replay the tutorial that does not support Internet@TV. Create Owner PIN and set a Security Question to your Location and Zip Code (US only) to tailor contents specific to control other profiles. -- If you do not have a Yahoo! Widget Gallery...: You can set to : -- Use...

User Manual
Page 61
... connections may cause color problems or a blank screen. • Adjust the Picture options in the TV menu (go to Picture mode / Color / Brightness / Sharpness) (p. 16) • Adjust Energy Saving option in fast moving pictures such as possible from SD(Standard Definition) contents. • Adjust the Cable/Sat box video output resolution to 1080i or 720p. When changing channels, the picture freezes or is distorted or delayed. • If the picture size is poor color...
... connections may cause color problems or a blank screen. • Adjust the Picture options in the TV menu (go to Picture mode / Color / Brightness / Sharpness) (p. 16) • Adjust Energy Saving option in fast moving pictures such as possible from SD(Standard Definition) contents. • Adjust the Cable/Sat box video output resolution to 1080i or 720p. When changing channels, the picture freezes or is distorted or delayed. • If the picture size is poor color...
User Manual
Page 62
... will turn on. • Make sure the AC power cord is connected. The speakers are using a DVI to "Remote control does not work" below. Go to MENU - Auto Program then select Auto and make sure there is not connected to the channel list. you are making an inappropriate noise. • Check cable connections. Make sure a video cable is nothing plugged into it matches the resolutions supported by pressing the SOURCE button on digital channels. • Check Caption Setup menu. RF(Cable/Antenna) Connection...
... will turn on. • Make sure the AC power cord is connected. The speakers are using a DVI to "Remote control does not work" below. Go to MENU - Auto Program then select Auto and make sure there is not connected to the channel list. you are making an inappropriate noise. • Check cable connections. Make sure a video cable is nothing plugged into it matches the resolutions supported by pressing the SOURCE button on digital channels. • Check Caption Setup menu. RF(Cable/Antenna) Connection...
User Manual
Page 63
... TV menu when connected via HDMI or Component (p. 26). • Caption must be caused by using cables with digital channels from Store Demo mode to a wireless IP sharer (router). You see small particles when you look • This is part of the product. 63 English For details, refer to Plug & Play Feature (p. 8). ✎✎This TFT LED panel uses a panel consisting of the TV. The remote control does not work. • Replace the remote control...
... TV menu when connected via HDMI or Component (p. 26). • Caption must be caused by using cables with digital channels from Store Demo mode to a wireless IP sharer (router). You see small particles when you look • This is part of the product. 63 English For details, refer to Plug & Play Feature (p. 8). ✎✎This TFT LED panel uses a panel consisting of the TV. The remote control does not work. • Replace the remote control...
User Manual
Page 66
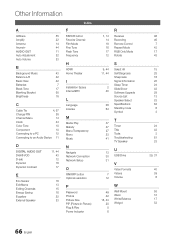
... I Installation Space Internet@TV L Language License M Media Play Melody Menu Transparency Mono Music N Navigate Network Connection Network Setup O ON/OFF button Optimal resolution P Password Photos Picture Size PIP (Picture in Picture) Plug & Play Power Indicator 7, 14 14 19 16 17 12 R Receiver Recording Remote Control Repeat Mode RGB Only Mode Rotate 9, 44 11, 44 2 48 26 64 S Select All Self Diagnosis Sharpness Signal Information Sleep Timer Slide Show Software Upgrade Source List Speaker Select Specifications Standby mode Symbol T 37 27 Timer 27 Title 23 Tools 41 Troubleshooting TV...
... I Installation Space Internet@TV L Language License M Media Play Melody Menu Transparency Mono Music N Navigate Network Connection Network Setup O ON/OFF button Optimal resolution P Password Photos Picture Size PIP (Picture in Picture) Plug & Play Power Indicator 7, 14 14 19 16 17 12 R Receiver Recording Remote Control Repeat Mode RGB Only Mode Rotate 9, 44 11, 44 2 48 26 64 S Select All Self Diagnosis Sharpness Signal Information Sleep Timer Slide Show Software Upgrade Source List Speaker Select Specifications Standby mode Symbol T 37 27 Timer 27 Title 23 Tools 41 Troubleshooting TV...


