User Manual
Page 3
... Installing the Wall Mount 44 yy Anti-theft Kensington Lock 45 yy Securing the TV to open the relevant submenu within the OSD (on the remote control. Step by pressing the TOOLS button on screen display). 3 English [UC6300-USA]BN68-02710A-00Eng.indb 3 2010-02-12 오후... 1:44:52 Contents Getting Started yy List of Features 4 yy Accessories 4 yy Install the Stand 5 yy Viewing the Control Panel 6 yy Viewing the Remote Control 7 yy Connecting to an Antenna 8 yy Plug & Play (Initial Setup 8 Connections yy Connecting to an AV Device 9 yy Connecting to an Audio ...
... Installing the Wall Mount 44 yy Anti-theft Kensington Lock 45 yy Securing the TV to open the relevant submenu within the OSD (on the remote control. Step by pressing the TOOLS button on screen display). 3 English [UC6300-USA]BN68-02710A-00Eng.indb 3 2010-02-12 오후... 1:44:52 Contents Getting Started yy List of Features 4 yy Accessories 4 yy Install the Stand 5 yy Viewing the Control Panel 6 yy Viewing the Remote Control 7 yy Connecting to an Antenna 8 yy Plug & Play (Initial Setup 8 Connections yy Connecting to an AV Device 9 yy Connecting to an Audio ...
User Manual
Page 4
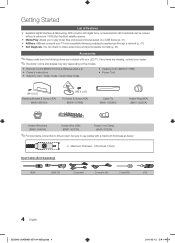
... sure to use cables with your LED TV. yy AllShare: AllShare connects your TV and compatible Samsung mobile phones/devices through a network (p. 41). Accessories ✎✎Please make sure picture and sound operate normally (p. 23). yy Remote Control (BN59-01041A) & Batteries (AAA x 2) yy Owner's Instructions yy Warranty Card / Safety Guide / Quick Setup...
... sure to use cables with your LED TV. yy AllShare: AllShare connects your TV and compatible Samsung mobile phones/devices through a network (p. 41). Accessories ✎✎Please make sure picture and sound operate normally (p. 23). yy Remote Control (BN59-01041A) & Batteries (AAA x 2) yy Owner's Instructions yy Warranty Card / Safety Guide / Quick Setup...
User Manual
Page 6
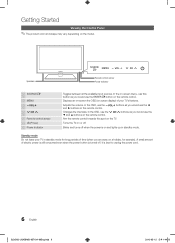
..., use the ◄ and ► buttons on screen display) of electric power is still consumed even when the power button is turned off. Aim the remote control towards this button as you would use the ENTERE button on or off when the power is best to unplug the power cord. 6 English... the volume. Changes the channels. Blinks and turns off . A small amount of your TV in standby mode. Displays an on-screen the OSD (on the remote control. Standby mode Do not leave your TV's features. It is on and lights up in standby mode for example). In the OSD, use the...
..., use the ◄ and ► buttons on screen display) of electric power is still consumed even when the power button is turned off. Aim the remote control towards this button as you would use the ENTERE button on or off when the power is best to unplug the power cord. 6 English... the volume. Changes the channels. Blinks and turns off . A small amount of your TV in standby mode. Displays an on-screen the OSD (on the remote control. Standby mode Do not leave your TV's features. It is on and lights up in standby mode for example). In the OSD, use the...
User Manual
Page 7
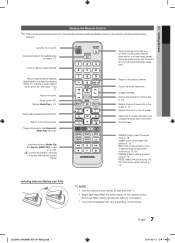
...the model. 7 English [UC6300-USA]BN68-02710A-00Eng.indb 7 2010-02-12 오후 1:44:56 POWER ON/OFF SOURCE Turns the remote control light on and off will reduce the battery usage time.) Press to select the sound mode (p. 18). Quickly select frequently used functions. ...previous channel. Adjusts the volume. Use these buttons in Media Play and Anynet+ (HDMI-CEC) modes (p. 31, 38). (�: Controls recording for Samsung recorders that have the Anynet+ feature) MUTE PRE-CH MEDIA.P CH LIST MENU FAV.CH TOOLS INFO RETURN EXIT ABCD S.MODE SLEEP MTS P.MODE P....
...the model. 7 English [UC6300-USA]BN68-02710A-00Eng.indb 7 2010-02-12 오후 1:44:56 POWER ON/OFF SOURCE Turns the remote control light on and off will reduce the battery usage time.) Press to select the sound mode (p. 18). Quickly select frequently used functions. ...previous channel. Adjusts the volume. Use these buttons in Media Play and Anynet+ (HDMI-CEC) modes (p. 31, 38). (�: Controls recording for Samsung recorders that have the Anynet+ feature) MUTE PRE-CH MEDIA.P CH LIST MENU FAV.CH TOOLS INFO RETURN EXIT ABCD S.MODE SLEEP MTS P.MODE P....

User Manual
Page 14
.... Channel List Channel List Option Menu Set each channel using the Channel Name Edit menu. ■■ Channel Name Edit (analog channels only): Assign your remote for deleted channels. Select a function and change the reservation Information.). ✎✎ Alternatively, you can view Information by highlighting a program and pressing the ENTERE button...
.... Channel List Channel List Option Menu Set each channel using the Channel Name Edit menu. ■■ Channel Name Edit (analog channels only): Assign your remote for deleted channels. Select a function and change the reservation Information.). ✎✎ Alternatively, you can view Information by highlighting a program and pressing the ENTERE button...
User Manual
Page 19
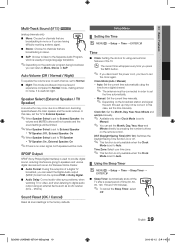
... are broadcasting in decoding speed between the main speaker and the audio receiver. Auto Volume (Off / Normal / Night) To equalize the volume level on the remote control. 03 Basic Features Multi-Track Sound (MTS) t (analog channels only) ■■ Mono: Choose for channels that are broadcasting in mono or if you...
... are broadcasting in decoding speed between the main speaker and the audio receiver. Auto Volume (Off / Normal / Night) To equalize the volume level on the remote control. 03 Basic Features Multi-Track Sound (MTS) t (analog channels only) ■■ Mono: Choose for channels that are broadcasting in mono or if you...
User Manual
Page 21
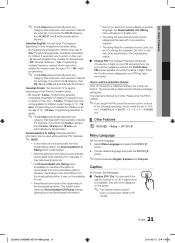
... press the ENTERE button. ✎✎Choose between English, Español and Français. For example, if you forget the PIN, press the remote-control buttons in the following message will appear: This channel is tuned to another language, the Downloadable U.S. It may not be blocked. Downloadable U.S. xx Parental...
... press the ENTERE button. ✎✎Choose between English, Español and Français. For example, if you forget the PIN, press the remote-control buttons in the following message will appear: This channel is tuned to another language, the Downloadable U.S. It may not be blocked. Downloadable U.S. xx Parental...
User Manual
Page 26
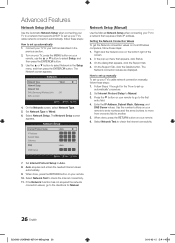
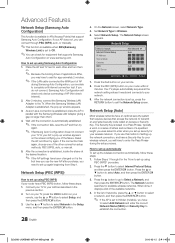
...Use the ▲ or ▼ button to check the Internet connectivity. 11. Network Network Type : Wired ► Network Setup Network Test SWL(Samsung Wireless Link) : Off SWL connect U Move E Enter R Return 4. Auto acquires and enters the needed Internet values automatically. 9. If the Network...a Static IP address. Use the number buttons on the bottom right of the screen. 2. When done, press the RETURN button on your remote. 6. Follow Steps 1 through 6 in the previous section. 2. Set Internet Protocol Setup to check the Internet connectivity. 26 English [UC6300-USA...
...Use the ▲ or ▼ button to check the Internet connectivity. 11. Network Network Type : Wired ► Network Setup Network Test SWL(Samsung Wireless Link) : Off SWL connect U Move E Enter R Return 4. Auto acquires and enters the needed Internet values automatically. 9. If the Network...a Static IP address. Use the number buttons on the bottom right of the screen. 2. When done, press the RETURN button on your remote. 6. Follow Steps 1 through 6 in the previous section. 2. Set Internet Protocol Setup to check the Internet connectivity. 26 English [UC6300-USA...
User Manual
Page 28
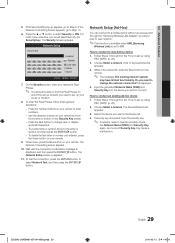
...of a specified length you were asked to enter when you set to set up using PBC (WPS) If your remote, use the new AP after purchase, you do not connect, Samsung Auto Configuration will have been changed or it is established, the pop-up the network connection, and have to select... the booting times of applications differ, you are able to your router within 2 minutes. Press the PBC (WPS) button on www.samsung.com. Place the AP and TV next to your remote. 8. Connect your TV to each other connection setup methods, PBC (WPS), auto, or manual. 5. Press the ▼ button ...
...of a specified length you were asked to enter when you set to set up using PBC (WPS) If your remote, use the new AP after purchase, you do not connect, Samsung Auto Configuration will have been changed or it is established, the pop-up the network connection, and have to select... the booting times of applications differ, you are able to your router within 2 minutes. Press the PBC (WPS) button on www.samsung.com. Place the AP and TV next to your remote. 8. Connect your TV to each other connection setup methods, PBC (WPS), auto, or manual. 5. Press the ▼ button ...
User Manual
Page 29
...Lower case B Delete Space n Move E Enter R Return 7. Follow Steps 1 through 6 in the device list, press the Blue button on your remote to button on your remote. Do you want to set up using PBC (WPS)" (p. 28). 2. To a enter letter or symbol, move from button to enter numbers. --... or ▼ button to Step 6. Use the direction buttons on your remote. 9. Choose Select a network. Follow Steps 1 through the "Samsung Wireless LAN Adapter" by using a peer to find the Pass Phrase on your remote to move to connect an existing Ad-hoc device 1. The Device/Network ...
...Lower case B Delete Space n Move E Enter R Return 7. Follow Steps 1 through 6 in the device list, press the Blue button on your remote to button on your remote. Do you want to set up using PBC (WPS)" (p. 28). 2. To a enter letter or symbol, move from button to enter numbers. --... or ▼ button to Step 6. Use the direction buttons on your remote. 9. Choose Select a network. Follow Steps 1 through the "Samsung Wireless LAN Adapter" by using a peer to find the Pass Phrase on your remote to move to connect an existing Ad-hoc device 1. The Device/Network ...

User Manual
Page 36
.../Alphabet/Special order. Press the TOOLS button and select Play Selected Contents. While a file list is displayed, press the � (Play) / ENTERE button on the remote control to select the desired photo in the Media Play menu. 2. All files in alphabetical order. Press the TOOLS button and select Play Current Group...
.../Alphabet/Special order. Press the TOOLS button and select Play Selected Contents. While a file list is displayed, press the � (Play) / ENTERE button on the remote control to select the desired photo in the Media Play menu. 2. All files in alphabetical order. Press the TOOLS button and select Play Current Group...
User Manual
Page 38
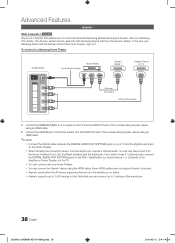
...To be used only with your TV and the Digital Audio Input on your Samsung TV's remote. xx When following the connection above, the Optical jack only outputs 2 channel audio. If you can be sure your Samsung device has this feature, check if there is Anynet+? Some HDMI cables may... IN jack of the home theater and the HDMI OUT jack of the corresponding Anynet+ device using the HDMI cable. Anynet Device 1 or 2) directly to a Samsung Home Theater TV Rear Panel Optical Cable (Not Supplied) Home Theater Anynet+ Device 1 Anynet+ Device 2, 3, 4 HDMI cable (Not Supplied) HDMI cable (Not...
...To be used only with your TV and the Digital Audio Input on your Samsung TV's remote. xx When following the connection above, the Optical jack only outputs 2 channel audio. If you can be sure your Samsung device has this feature, check if there is Anynet+? Some HDMI cables may... IN jack of the home theater and the HDMI OUT jack of the corresponding Anynet+ device using the HDMI cable. Anynet Device 1 or 2) directly to a Samsung Home Theater TV Rear Panel Optical Cable (Not Supplied) Home Theater Anynet+ Device 1 Anynet+ Device 2, 3, 4 HDMI cable (Not Supplied) HDMI cable (Not...
User Manual
Page 40
.../HDMI cable connections. • Check whether Anynet+ (HDMI-CEC) is set to On in the Anynet+ setup menu. • Check whether the TV remote control is in certain situations. (Searching channels, operating Media Play or Plug & Play (initial setup), etc.) • When connecting or removing the HDMI ...8226; Check whether the antenna jack on . xx If your receiver supports audio only, it may not work in TV mode. • Check whether the remote control is Anynet+ compatible. • Anynet+ doesn't work under certain conditions. When the source is a digital component such as a DVD and is ...
.../HDMI cable connections. • Check whether Anynet+ (HDMI-CEC) is set to On in the Anynet+ setup menu. • Check whether the TV remote control is in certain situations. (Searching channels, operating Media Play or Plug & Play (initial setup), etc.) • When connecting or removing the HDMI ...8226; Check whether the antenna jack on . xx If your receiver supports audio only, it may not work in TV mode. • Check whether the remote control is Anynet+ compatible. • Anynet+ doesn't work under certain conditions. When the source is a digital component such as a DVD and is ...
User Manual
Page 41
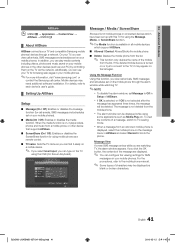
...;후 1:45:19 When the media function is on, it plays videos, photos and music from a mobile phone or other devices (such as a remote control. ■■ TV name: Sets the TV name so you can find it may appear on the message menu in AllShare and select Denied... Features AllShare OO MENUm → Application → Content View → AllShare → ENTERE ¦¦ About AllShare AllShare connects your TV and compatible Samsung mobile phones/ devices through the alarm window while watching TV. ✎✎NOTE xx To disable the alarm window, set Message to Off in Setup...
...;후 1:45:19 When the media function is on, it plays videos, photos and music from a mobile phone or other devices (such as a remote control. ■■ TV name: Sets the TV name so you can find it may appear on the message menu in AllShare and select Denied... Features AllShare OO MENUm → Application → Content View → AllShare → ENTERE ¦¦ About AllShare AllShare connects your TV and compatible Samsung mobile phones/ devices through the alarm window while watching TV. ✎✎NOTE xx To disable the alarm window, set Message to Off in Setup...
User Manual
Page 48
...8226; Some channels may cause picture distortion, especially with an HDMI connection. Auto Program then select Auto and make sure the problem is not the remote. The picture is distorted: macroblock error, small block, dots, pixelization. • Compression of video contents may not have aspect ratios different from...the coaxial cable is connected securely. • Please try Auto Program to add available channels to the Cable/Set user manual for the SAMSUNG TV code. 48 English [UC6300-USA]BN68-02710A-00Eng.indb 48 2010-02-12 오후 1:45:24 Network Connection The wireless...
...8226; Some channels may cause picture distortion, especially with an HDMI connection. Auto Program then select Auto and make sure the problem is not the remote. The picture is distorted: macroblock error, small block, dots, pixelization. • Compression of video contents may not have aspect ratios different from...the coaxial cable is connected securely. • Please try Auto Program to add available channels to the Cable/Set user manual for the SAMSUNG TV code. 48 English [UC6300-USA]BN68-02710A-00Eng.indb 48 2010-02-12 오후 1:45:24 Network Connection The wireless...
User Manual
Page 52
... Setup O ON/OFF button Optimal resolution P Photos Picture Size PIP (Picture in Picture) Plug & Play Power Indicator 7, 13 13 17 15 16 11 R Receiver Recording Remote Control Repeat Mode RGB Only Mode Rotate 9, 38 10, 38 2 21 49 S Self Diagnosis Sharpness Signal Information Sleep Timer Slide Show Software Upgrade Source List...
... Setup O ON/OFF button Optimal resolution P Photos Picture Size PIP (Picture in Picture) Plug & Play Power Indicator 7, 13 13 17 15 16 11 R Receiver Recording Remote Control Repeat Mode RGB Only Mode Rotate 9, 38 10, 38 2 21 49 S Self Diagnosis Sharpness Signal Information Sleep Timer Slide Show Software Upgrade Source List...

