User Manual
Page 2
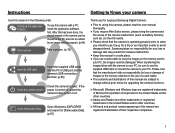
... [Removable Disk] Open Windows's EXPLORER and search for [Removable Disk]. (p.87) Thank you intend to use the supplied USB cable to connect the camera to your PC. Setting up the application software To use this manual are registered trademarks of this camera with the camera to your PC, be sure to use it on the memory card to your PC, the images could be damaged. If the Check the camera's power power is operating properly...
... [Removable Disk] Open Windows's EXPLORER and search for [Removable Disk]. (p.87) Thank you intend to use the supplied USB cable to connect the camera to your PC. Setting up the application software To use this manual are registered trademarks of this camera with the camera to your PC, be sure to use it on the memory card to your PC, the images could be damaged. If the Check the camera's power power is operating properly...

User Manual
Page 5
... mode 021 Using the Photo Help Guide mode 022 How to use the Scene modes 4 023 How to use the Movie clip mode 023 Recording the movie clip without sound 023 Pausing while recording a movie clip (Successive Recording) 024 Things to Watch Out for When Taking Pictures 025 Using the camera buttons to set the camera 025 POWER button 025 SHUTTER button 025 ZOOM button 027 Info (DISP) / Up button 027 Macro / Down button 029 Focus lock 029 Flash / Left button 031 Self-timer / Right button 033 MENU button 033 OK button 033 Functions...
... mode 021 Using the Photo Help Guide mode 022 How to use the Scene modes 4 023 How to use the Movie clip mode 023 Recording the movie clip without sound 023 Pausing while recording a movie clip (Successive Recording) 024 Things to Watch Out for When Taking Pictures 025 Using the camera buttons to set the camera 025 POWER button 025 SHUTTER button 025 ZOOM button 027 Info (DISP) / Up button 027 Macro / Down button 029 Focus lock 029 Flash / Left button 031 Self-timer / Right button 033 MENU button 033 OK button 033 Functions...

User Manual
Page 6
... Sound menu Sound Volume Start up sound Shutter sound Beep Sound AF sound Self Portrait Setup menu Display Language Function Description Start up image 047 Display Bright 047 Quick view 047 Display SAVE 048 Settings 048 Formatting a memory 048 Initialisation 049 Setting up the Date / Time / Date type 049 Time Zone 049 File name 050 Imprinting the recording date 050 Auto power off 051 Selecting Video out type 052 Auto Focus lamp 052 Setting the USB 052 Selecting a battery type PLAY 053 053 053 054 054 055 055 056 056 Starting play mode Playing back a still image Playing back a movie...
... Sound menu Sound Volume Start up sound Shutter sound Beep Sound AF sound Self Portrait Setup menu Display Language Function Description Start up image 047 Display Bright 047 Quick view 047 Display SAVE 048 Settings 048 Formatting a memory 048 Initialisation 049 Setting up the Date / Time / Date type 049 Time Zone 049 File name 050 Imprinting the recording date 050 Auto power off 051 Selecting Video out type 052 Auto Focus lamp 052 Setting the USB 052 Selecting a battery type PLAY 053 053 053 054 054 055 055 056 056 Starting play mode Playing back a still image Playing back a movie...

User Manual
Page 20
... internal memory. Auto Program DIS Photo Help Guide Scene Movie Exit Back Mode Functions Sound Display Settings Exit Auto Program DIS Photo Help Guide Scene Movie Change Auto Program DIS Photo Help Guide Scene Movie Exit Back Auto Program DIS Photo Help Guide Scene Movie Exit Back Auto Program DIS Photo Help Guide Scene Movie Change How to capture an image clearly. å Avoid obstructing the lens or the flash when you capture an image. 19 If the memory card is unable to use the MENU button 1. Insert the batteries taking with minimal user...
... internal memory. Auto Program DIS Photo Help Guide Scene Movie Exit Back Mode Functions Sound Display Settings Exit Auto Program DIS Photo Help Guide Scene Movie Change Auto Program DIS Photo Help Guide Scene Movie Exit Back Auto Program DIS Photo Help Guide Scene Movie Exit Back Auto Program DIS Photo Help Guide Scene Movie Change How to capture an image clearly. å Avoid obstructing the lens or the flash when you capture an image. 19 If the memory card is unable to use the MENU button 1. Insert the batteries taking with minimal user...
User Manual
Page 21
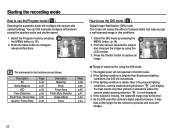
... settings. Starting the recording mode How to use the DIS mode ( ) Digital Image Stabilisation (DIS) mode. Select the DIS mode by pressing the MENU button (p.19). 2. If the lighting condition is brighter than in dim conditions. 1. If the subject is not displayed. 4. Point the camera towards the subject and compose the image by using the DIS mode 1. The submenus for the functions are as follows: Description EV White Balance ISO Face Detection Photo Size / Movie Size...
... settings. Starting the recording mode How to use the DIS mode ( ) Digital Image Stabilisation (DIS) mode. Select the DIS mode by pressing the MENU button (p.19). 2. If the lighting condition is brighter than in dim conditions. 1. If the subject is not displayed. 4. Point the camera towards the subject and compose the image by using the DIS mode 1. The submenus for the functions are as follows: Description EV White Balance ISO Face Detection Photo Size / Movie Size...

User Manual
Page 25
... not take pictures against the sun. To take a picture against the light, please use a tripod, support the camera on shooting conditions and camera settings. å When the Flash Off, Slow synchro mode or DIS mode is highly reflective or shiny. - Things to Watch Out for When Taking Pictures å Pressing the shutter button down to take the picture. [Lightly press the shutter button] [Press the shutter button] å Under certain conditions the auto focus system...
... not take pictures against the sun. To take a picture against the light, please use a tripod, support the camera on shooting conditions and camera settings. å When the Flash Off, Slow synchro mode or DIS mode is highly reflective or shiny. - Things to Watch Out for When Taking Pictures å Pressing the shutter button down to take the picture. [Lightly press the shutter button] [Press the shutter button] å Under certain conditions the auto focus system...

User Manual
Page 31
...], [Sunset], [Dawn], [Firework] scene modes and the Movie clip mode, the flash function will be a white speck in poorly lit conditions, the camera shake warning indicator ( Ã ) will display on the LCD monitor. The intensity of the battery. å Under normal operating conditions the re-charging time for the flash is detected, Red-eye reduction this mode when capturing images in flash The fl...
...], [Sunset], [Dawn], [Firework] scene modes and the Movie clip mode, the flash function will be a white speck in poorly lit conditions, the camera shake warning indicator ( Ã ) will display on the LCD monitor. The intensity of the battery. å Under normal operating conditions the re-charging time for the flash is detected, Red-eye reduction this mode when capturing images in flash The fl...
User Manual
Page 34
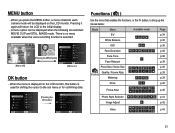
... voice recording function is selected. [Menu off] [Pressing the MENU button] Mode Functions Sound Display Settings Auto Program DIS Photo Help Guide Scene Movie Exit Change [Menu on the LCD monitor, this button is displayed on ] OK button - Mode Functions Sound Display Settings Exit Auto Program DIS Photo Help Guide Scene Movie [Pressing the OK button] Change Auto Program DIS Photo Help Guide Scene Movie Exit Back Functions ( ) Use the menu that enables the functions, or the Fn button, to the sub menu or for confirming data. Pressing it again will be displayed when...
... voice recording function is selected. [Menu off] [Pressing the MENU button] Mode Functions Sound Display Settings Auto Program DIS Photo Help Guide Scene Movie Exit Change [Menu on the LCD monitor, this button is displayed on ] OK button - Mode Functions Sound Display Settings Exit Auto Program DIS Photo Help Guide Scene Movie [Pressing the OK button] Change Auto Program DIS Photo Help Guide Scene Movie Exit Back Functions ( ) Use the menu that enables the functions, or the Fn button, to the sub menu or for confirming data. Pressing it again will be displayed when...

User Manual
Page 38
... some part of the screen, it will be set using the sound setting menu. (See p.46) 37 Camera doesn't detect a face as the brightness is set the camera lens towards the face of the object, and emits a guiding sound. 2. It automatically detects the face of the object. For self-filming, set to its default value. Ê Self Portrait Ä Selectable modes: Auto, Program, DIS, Photo Help Guide, Beauty Shot, Portrait, Beach & Snow 1. Functions...
... some part of the screen, it will be set using the sound setting menu. (See p.46) 37 Camera doesn't detect a face as the brightness is set the camera lens towards the face of the object, and emits a guiding sound. 2. It automatically detects the face of the object. For self-filming, set to its default value. Ê Self Portrait Ä Selectable modes: Auto, Program, DIS, Photo Help Guide, Beauty Shot, Portrait, Beach & Snow 1. Functions...

User Manual
Page 41
...-by time. å If the [Continuous], [Motion Capture], [AEB] sub menu is selected, the flash will be off automatically. å If less than 30 pictures are saved and the images play back on the Rear LCD. When the camera doesn't focus on the subject, the auto focus frame turns to the shooting conditions. Focus Area Set the autofocus method. shutter button is pressed and held down. Functions ( ) Drive mode...
...-by time. å If the [Continuous], [Motion Capture], [AEB] sub menu is selected, the flash will be off automatically. å If less than 30 pictures are saved and the images play back on the Rear LCD. When the camera doesn't focus on the subject, the auto focus frame turns to the shooting conditions. Focus Area Set the autofocus method. shutter button is pressed and held down. Functions ( ) Drive mode...

User Manual
Page 50
... function allows the user to display the local date and time on the captured images and set from 0001 even after deleting all or inserting a new memory card. [Series]* : New files are assigned sequentially from 100 to the DCF (Design rule for Camera File systems) format. File names are named using the reset function, the next file name will be set up the Date / Time / Date type You can change...
... function allows the user to display the local date and time on the captured images and set from 0001 even after deleting all or inserting a new memory card. [Series]* : New files are assigned sequentially from 100 to the DCF (Design rule for Camera File systems) format. File names are named using the reset function, the next file name will be set up the Date / Time / Date type You can change...

User Manual
Page 53
... On :Auto :Alkaline Set Setting the USB If the camera is selected, the camera will light up in low light conditions. Video Out AF Lamp USB Battery Type :NTSC :On Auto:Auto Com:pAulktearline Printer tion mode if the connected external device cannot be Back Set recognized automatically. [Printer] : Sets printer connection mode if the connected external device cannot be optimized according to a PC or a printer using a USB cable, you can turn on and off the Auto Focus lamp. - Sub...
... On :Auto :Alkaline Set Setting the USB If the camera is selected, the camera will light up in low light conditions. Video Out AF Lamp USB Battery Type :NTSC :On Auto:Auto Com:pAulktearline Printer tion mode if the connected external device cannot be Back Set recognized automatically. [Printer] : Sets printer connection mode if the connected external device cannot be optimized according to a PC or a printer using a USB cable, you can turn on and off the Auto Focus lamp. - Sub...

User Manual
Page 69
... the OK button. [Select ] : Selection window for an image to protect specific shots from the [Format] function. Delete Protect Voice memo DPOF Copy To Card Select :Off All Back Set Select Set [All] : Protect / release all files on the LCD monitor. (An unprotected image has no indicator) - It also unprotects images that this will be deleted. To stop the recording, press the shutter button. 68 Important shots should be protected / released is used to be stored on the memory.
... the OK button. [Select ] : Selection window for an image to protect specific shots from the [Format] function. Delete Protect Voice memo DPOF Copy To Card Select :Off All Back Set Select Set [All] : Protect / release all files on the LCD monitor. (An unprotected image has no indicator) - It also unprotects images that this will be deleted. To stop the recording, press the shutter button. 68 Important shots should be protected / released is used to be stored on the memory.
User Manual
Page 70
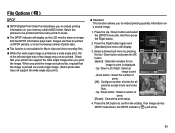
... number of prints [Reset] : Cancel the print setup. Back Set 00 Quantity Set 01 Quantity Set 4. Select a desired sub menu by pressing the Up / Down button and press the OK button. [Select] : Selection window for Movie clips and Voice recording files. Ê When the wide angle image is displayed. - Images can support the wide angle image when you to make. Ê The DPOF indicator will display on your memory card's MISC folder. File Options ( ) DPOF Ê DPOF(Digital Print...
... number of prints [Reset] : Cancel the print setup. Back Set 00 Quantity Set 01 Quantity Set 4. Select a desired sub menu by pressing the Up / Down button and press the OK button. [Select] : Selection window for Movie clips and Voice recording files. Ê When the wide angle image is displayed. - Images can support the wide angle image when you to make. Ê The DPOF indicator will display on your memory card's MISC folder. File Options ( ) DPOF Ê DPOF(Digital Print...

User Manual
Page 72
... [File No.] setup menu is displayed. Then the system will copy only some of the images and display [Memory Full] message. After completing [Copy To Card], the last stored image of the last copied folder is set : The copied file names start from after the last captured file name. Select the [Copy To Card] menu tab by Delete pressing the Up / Down button. After copying has been completed, the screen will return to play mode. - [No] : Cancels "Copy to Card...
... [File No.] setup menu is displayed. Then the system will copy only some of the images and display [Memory Full] message. After completing [Copy To Card], the last stored image of the last copied folder is set : The copied file names start from after the last captured file name. Select the [Copy To Card] menu tab by Delete pressing the Up / Down button. After copying has been completed, the screen will return to play mode. - [No] : Cancels "Copy to Card...
User Manual
Page 75
... locations. - For your printer's default setting, refer to the user's guide that came with wet hands. - Areas exposed to severe shocks or vibrations. - Environments where there is not used, keep it to direct sunlight or the inside the camera. Never drop the camera or subject it in places subject to select Date :Auto the [Reset] menu tab. Protect the large size LCD monitor from an impact...
... locations. - For your printer's default setting, refer to the user's guide that came with wet hands. - Areas exposed to severe shocks or vibrations. - Environments where there is not used, keep it to direct sunlight or the inside the camera. Never drop the camera or subject it in places subject to select Date :Auto the [Reset] menu tab. Protect the large size LCD monitor from an impact...
User Manual
Page 76
... automatical battery discharged. This may damage the body shell of the lens. å If the digital camera is not used for at all moisture is not a malfunction. å When images are uploaded or downloaded, the data transfer may adopt the default settings by static electricity. Take a picture for a long period, an electric discharge can form on the surface of the camera and also affect its protective...
... automatical battery discharged. This may damage the body shell of the lens. å If the digital camera is not used for at all moisture is not a malfunction. å When images are uploaded or downloaded, the data transfer may adopt the default settings by static electricity. Take a picture for a long period, an electric discharge can form on the surface of the camera and also affect its protective...
User Manual
Page 79
...;Reset the date and time correctly The camera buttons do not operate åCamera malfunction à Remove/re-insert battery and switch the camera on A card error has occurred while the memory card is in the memory card à Insert a memory card that supports USB A part of the LCD screen does not occasionally turn on or a spot appears. åAlthough the LCD screen is manufactured with high precision technology, the precision pixels are not occasionally lighted or the red, white...
...;Reset the date and time correctly The camera buttons do not operate åCamera malfunction à Remove/re-insert battery and switch the camera on A card error has occurred while the memory card is in the memory card à Insert a memory card that supports USB A part of the LCD screen does not occasionally turn on or a spot appears. åAlthough the LCD screen is manufactured with high precision technology, the precision pixels are not occasionally lighted or the red, white...

User Manual
Page 80
... Auto Macro 10cm ~ Infinity 50cm ~ Infinity Shutter Exposure - ISO : Auto, 80, 100, 200, 400, 800, 1600 Flash - Soft+, Soft, Normal, Vivid, Vivid+ White Balance - Date, Date & Time, Off (user selectable) Shooting - Still Image ·Mode : Auto, Program, DIS, Photo Help Guide, Scene ·Scene : Beauty Shot, Night, Portrait, Children, Landscape, Close-up, Text, Sunset, Dawn, Backlight, Firework, Beach & Snow ·Shooting : Single, Continuous, Motion Capture, AEB ·Self-timer : 10 sec., 2 sec., Double, Motion Timer 79 Digital Zoom...
... Auto Macro 10cm ~ Infinity 50cm ~ Infinity Shutter Exposure - ISO : Auto, 80, 100, 200, 400, 800, 1600 Flash - Soft+, Soft, Normal, Vivid, Vivid+ White Balance - Date, Date & Time, Off (user selectable) Shooting - Still Image ·Mode : Auto, Program, DIS, Photo Help Guide, Scene ·Scene : Beauty Shot, Night, Portrait, Children, Landscape, Close-up, Text, Sunset, Dawn, Backlight, Firework, Beach & Snow ·Shooting : Single, Continuous, Motion Capture, AEB ·Self-timer : 10 sec., 2 sec., Double, Motion Timer 79 Digital Zoom...
User Manual
Page 95
... PC at the same time as a removable disk. Ã Stop the security programs and connect the camera to the PC? Ã The camera may be a problem in the USB cable again, and then turn on the front of the computer. 94 Restart the PC and connect the camera again. Case 1 USB cable is not connected or it is not recognised by clicking Start (Settings) Control Panel (Performance and Maintenance...
... PC at the same time as a removable disk. Ã Stop the security programs and connect the camera to the PC? Ã The camera may be a problem in the USB cable again, and then turn on the front of the computer. 94 Restart the PC and connect the camera again. Case 1 USB cable is not connected or it is not recognised by clicking Start (Settings) Control Panel (Performance and Maintenance...


