

User Manual
Page 23
... more information about connections, messages and other items. ᮣ Drag your finger downward from the top of the screen to control whether the screen automatically updates when you rotate the phone. Clearing Notifications 1. Connection Icons Touch icons at the top of the Notifications panel to toggle settings: • Bluetooth: Turn Bluetooth...
... more information about connections, messages and other items. ᮣ Drag your finger downward from the top of the screen to control whether the screen automatically updates when you rotate the phone. Clearing Notifications 1. Connection Icons Touch icons at the top of the Notifications panel to toggle settings: • Bluetooth: Turn Bluetooth...
User Manual
Page 33
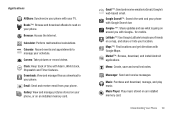
... you download to manage your location. Market™: Browse, download, and install Android applications. Music: Purchase and download, manage, and play music. Google+™: Share updates and see what is going on a map, and share or hide your schedule. Messenger: Send and receive messages. Clock: Keep track of time with Google...
... you download to manage your location. Market™: Browse, download, and install Android applications. Music: Purchase and download, manage, and play music. Google+™: Share updates and see what is going on a map, and share or hide your schedule. Messenger: Send and receive messages. Clock: Keep track of time with Google...
User Manual
Page 39
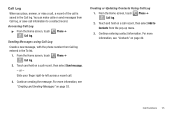
... more information, see "Creating and Sending Messages" on a call record, then select Send message. - Phone ➔ 2. Touch and hold on page 53. or - Creating or Updating Contacts Using Call Log 1. Continue entering contact information. Slide your finger right-to Contacts from the pop-up menu. 3. For more information, see "Contacts" on...
... more information, see "Creating and Sending Messages" on a call record, then select Send message. - Phone ➔ 2. Touch and hold on page 53. or - Creating or Updating Contacts Using Call Log 1. Continue entering contact information. Slide your finger right-to Contacts from the pop-up menu. 3. For more information, see "Contacts" on...
User Manual
Page 41
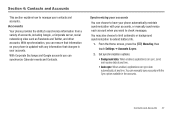
..., and receive data at any time. • Auto-sync: When enabled, applications can sync data automatically, at any information that information on your phone is updated with your contacts and accounts. Synchronizing your accounts You can ensure that changes in the accounts. With synchronization, you can choose to have your accounts...
..., and receive data at any time. • Auto-sync: When enabled, applications can sync data automatically, at any information that information on your phone is updated with your contacts and accounts. Synchronizing your accounts You can ensure that changes in the accounts. With synchronization, you can choose to have your accounts...
User Manual
Page 45
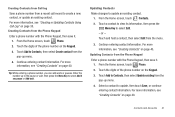
...1. Touch the digits of the phone number on the Keypad. 3. Touch a contact to view its information, then press the Menu Key to update an existing contact. 1. For more information, see "Creating Contacts" on page 40. Creating Contacts from Call log Save a phone number from ...the pop-up menu. 4. Continue entering contact information. Contacts and Accounts 41 For more information, see "Creating or Updating Contacts Using Call Log" on page 40. For more information, see "Creating Contacts" on page 35. Continue entering contact information. or -...
...1. Touch the digits of the phone number on the Keypad. 3. Touch a contact to view its information, then press the Menu Key to update an existing contact. 1. For more information, see "Creating Contacts" on page 40. Creating Contacts from Call log Save a phone number from ...the pop-up menu. 4. Continue entering contact information. Contacts and Accounts 41 For more information, see "Creating or Updating Contacts Using Call Log" on page 40. For more information, see "Creating Contacts" on page 35. Continue entering contact information. or -...
User Manual
Page 46
... as a vCard via Bluetooth, or as an attachment via Gmail™. Choose a sending method, then follow the prompts to create a new contact, or update an existing contact. You can send My profile as a vCard via . 4. Viewing My Profile 1. From the Home screen, touch Contacts. 2. You can... Press the Menu Key, then touch Sync now. 42 My Profile My profile is your contact information. 3. For more information, see "Creating or Updating Contacts Using Call Log" on page 38. 1. Press the Menu Key, then touch My profile to your accounts. From the Home screen, touch Contacts...
... as a vCard via Bluetooth, or as an attachment via Gmail™. Choose a sending method, then follow the prompts to create a new contact, or update an existing contact. You can send My profile as a vCard via . 4. Viewing My Profile 1. From the Home screen, touch Contacts. 2. You can... Press the Menu Key, then touch Sync now. 42 My Profile My profile is your contact information. 3. For more information, see "Creating or Updating Contacts Using Call Log" on page 38. 1. Press the Menu Key, then touch My profile to your accounts. From the Home screen, touch Contacts...
User Manual
Page 47
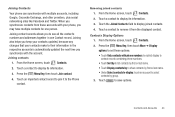
... to display, touch an account to select contacts by group. 3. When you synchronize contacts from the displayed contact. Joining also helps you keep your contacts updated, because any changes that your contacts make to their information in one person. Joining contacts 1. From the Home screen, touch Contacts. 2. Touch a contact... to see all the contact's numbers and addresses together in the respective accounts is automatically updated the next time you synchronize with your phone, you to display its information. 3.
... to display, touch an account to select contacts by group. 3. When you synchronize contacts from the displayed contact. Joining also helps you keep your contacts updated, because any changes that your contacts make to their information in one person. Joining contacts 1. From the Home screen, touch Contacts. 2. Touch a contact... to see all the contact's numbers and addresses together in the respective accounts is automatically updated the next time you synchronize with your phone, you to display its information. 3.
User Manual
Page 50
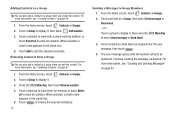
... a contact to Group Members 1. Touch Remove to remove the selected contact(s). 46 Sending a Message to a group when you edit the contact. For more information, see "Updating Contacts" on page 40. 1.
... a contact to Group Members 1. Touch Remove to remove the selected contact(s). 46 Sending a Message to a group when you edit the contact. For more information, see "Updating Contacts" on page 40. 1.
User Manual
Page 51
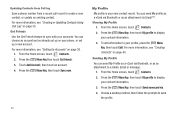
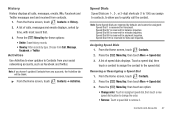
...; Remove: Touch a speed dial to Contacts from Call, Message, Facebook, or Twitter. From the Home screen, touch Contacts ➔ History. 2. Activities Use Activities to view updates to remove it. Press the Menu Key, then touch More ➔ Speed dial. 3. A list of calls, messages and emails displays, sorted by type. Removing or... Key, then touch More ➔ Speed dial. 3. Note: Some Speed Dials are 1-, 2-, or 3-digit shortcuts (1 to 100) you assign to contacts, to allow you haven't updated Contacts from contacts. 1. Assigning Speed Dials 1.
...; Remove: Touch a speed dial to Contacts from Call, Message, Facebook, or Twitter. From the Home screen, touch Contacts ➔ History. 2. Activities Use Activities to view updates to remove it. Press the Menu Key, then touch More ➔ Speed dial. 3. A list of calls, messages and emails displays, sorted by type. Removing or... Key, then touch More ➔ Speed dial. 3. Note: Some Speed Dials are 1-, 2-, or 3-digit shortcuts (1 to 100) you assign to contacts, to allow you haven't updated Contacts from contacts. 1. Assigning Speed Dials 1.
User Manual
Page 61
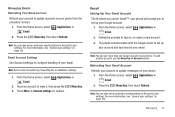
... Note: You can also set up automatic synchronization in Account & sync settings. Managing Emails Refreshing Your Email Account Refresh your account to update accounts on your phone. 1. Touch More ➔ Account settings for options. Touch an account to configure handling of your account to sign... ➔ Gmail. 2. Refreshing Your Gmail Account Refresh your email. For more than one Google account on page 103. Follow the prompts to update messages on your phone. Note: You can also set up automatic synchronization in , or create a new account. 3. Press the Menu Key,...
... Note: You can also set up automatic synchronization in Account & sync settings. Managing Emails Refreshing Your Email Account Refresh your account to update accounts on your phone. 1. Touch More ➔ Account settings for options. Touch an account to configure handling of your account to sign... ➔ Gmail. 2. Refreshing Your Gmail Account Refresh your email. For more than one Google account on page 103. Follow the prompts to update messages on your phone. Note: You can also set up automatic synchronization in , or create a new account. 3. Press the Menu Key,...
User Manual
Page 64
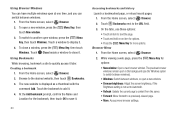
.... 1. From the Home screen, select Browser. 2. Menu Key, then 3. Creating a bookmark 1. Browse to save it . 4. The new website is not set to Automatic. • Refresh: Update the current page's content from the server. • Forward: Move forward to add it later. At the Add bookmark prompt, confirm the Name and Location...
.... 1. From the Home screen, select Browser. 2. Menu Key, then 3. Creating a bookmark 1. Browse to save it . 4. The new website is not set to Automatic. • Refresh: Update the current page's content from the server. • Forward: Move forward to add it later. At the Add bookmark prompt, confirm the Name and Location...
User Manual
Page 105
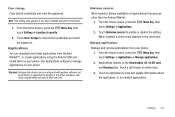
... the password. Touch Unknown sources to clear stored credentials and reset the password. Touch a tab header to uninstall applications. Touch an application to view and update information about the application, or to switch tabs. 3. From the Home screen, press the Menu Key, then touch Settings ➔ Location & security. 2. Applications display on...
... the password. Touch Unknown sources to clear stored credentials and reset the password. Touch a tab header to uninstall applications. Touch an application to view and update information about the application, or to switch tabs. 3. From the Home screen, press the Menu Key, then touch Settings ➔ Location & security. 2. Applications display on...
User Manual
Page 116
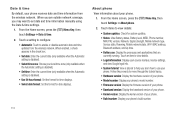
... setting is disabled). • Use 24-hour format: Set the format for time displays. • Select date format: Set the format for system updates. • Status: View Battery status, Battery level, MEID, Phone number, MIN, PRL version, Network, Signal strength, Mobile network type, Service state...your phone. • Build number: Display your phone's build number. 112 Follow the prompts to enable or disable automatic date and time updates from the wireless network. Menu Key, then 2. Date & time By default, your phone receives date and time information from the wireless network...
... setting is disabled). • Use 24-hour format: Set the format for time displays. • Select date format: Set the format for system updates. • Status: View Battery status, Battery level, MEID, Phone number, MIN, PRL version, Network, Signal strength, Mobile network type, Service state...your phone. • Build number: Display your phone's build number. 112 Follow the prompts to enable or disable automatic date and time updates from the wireless network. Menu Key, then 2. Date & time By default, your phone receives date and time information from the wireless network...
User Manual
Page 121
... to the biological effects of RF energy. Additional information on the safety of RF exposures from various sources can be obtained from the following organizations (updated 10/1/2010): • FCC RF Safety Program: http://www.fcc.gov/oet/rfsafety/. • Environmental Protection Agency (EPA): http://www.epa.gov/radtown/wireless-tech...
... to the biological effects of RF energy. Additional information on the safety of RF exposures from various sources can be obtained from the following organizations (updated 10/1/2010): • FCC RF Safety Program: http://www.fcc.gov/oet/rfsafety/. • Environmental Protection Agency (EPA): http://www.epa.gov/radtown/wireless-tech...


