Quick Guide (easy Manual) (ver.1.0) (English)
Page 3
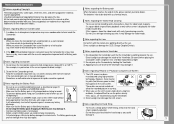
...Safety Instructions Notices regarding Copyright Television programmes, video tapes, DVD titles, films, and other documentation provided with your Samsung product are trademarks or registered trademarks of the Viewfinder. Notes regarding the Battery pack When the battery reaches the ...a clear picture, clean the video heads regularly. Do not use the LCD screen under sunlight or near a window exposed to inside of their respective holders. from inside the Camcorder. Direct sunlight can damage the LCD screen. Direct sunlight can damage the inside during the summer.) Note regarding '...
...Safety Instructions Notices regarding Copyright Television programmes, video tapes, DVD titles, films, and other documentation provided with your Samsung product are trademarks or registered trademarks of the Viewfinder. Notes regarding the Battery pack When the battery reaches the ...a clear picture, clean the video heads regularly. Do not use the LCD screen under sunlight or near a window exposed to inside of their respective holders. from inside the Camcorder. Direct sunlight can damage the LCD screen. Direct sunlight can damage the inside during the summer.) Note regarding '...
Quick Guide (easy Manual) (ver.1.0) (English)
Page 4
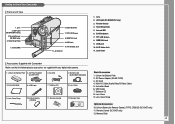
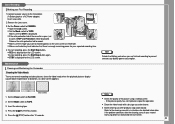
...CR2025) 11. AC Cord 4. USB Jack 10. TFT LCD Screen 8. AV/S-Video Jack 11. Lens Cover 9. Multi-AV Cable (Audio/Video/S-Video Cable) 5. Lithium Battery for Remote Control. (TYPE: CR2025) (SC-D457 only) 11. LED Light (SC-D455/D457 only) 3. AC cord 5. Remote Control 12.... USB Cable 7. LED Light (SC-D455/D457 only) 3. Remote Sensor (SC-D457 only) 4. Memory Stick 4 Lens 2. Remote Control (SC-D457 only) 12. Instruction Book 6. Getting to Know Your Camcorder Front & Left View 1. Jack Cover Accessories Supplied with Camcorder Make sure that the following basic ...
...CR2025) 11. AC Cord 4. USB Jack 10. TFT LCD Screen 8. AV/S-Video Jack 11. Lens Cover 9. Multi-AV Cable (Audio/Video/S-Video Cable) 5. Lithium Battery for Remote Control. (TYPE: CR2025) (SC-D457 only) 11. LED Light (SC-D455/D457 only) 3. AC cord 5. Remote Control 12.... USB Cable 7. LED Light (SC-D455/D457 only) 3. Remote Sensor (SC-D457 only) 4. Memory Stick 4 Lens 2. Remote Control (SC-D457 only) 12. Instruction Book 6. Getting to Know Your Camcorder Front & Left View 1. Jack Cover Accessories Supplied with Camcorder Make sure that the following basic ...
Quick Guide (easy Manual) (ver.1.0) (English)
Page 7
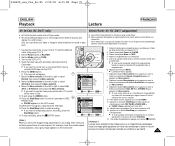
... you have an S-Video jack on the TV set the TV/VIDEO selector on the LCD Screen ✤ It is available on your TV with the Multi-AV cable. s The S-Video Connector transmits video only. Connect the Camcorder to the TV user's manual. 5. s Refer to your TV. 1. Press the (PLAY/STILL) button. Connect...
... you have an S-Video jack on the TV set the TV/VIDEO selector on the LCD Screen ✤ It is available on your TV with the Multi-AV cable. s The S-Video Connector transmits video only. Connect the Camcorder to the TV user's manual. 5. s Refer to your TV. 1. Press the (PLAY/STILL) button. Connect...
Quick Guide (easy Manual) (ver.1.0) (English)
Page 8
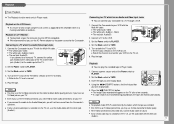
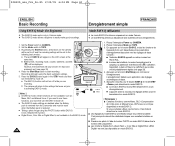
... sure that there is displayed on the LCD screen or Viewfinder. Release the write protection tab to save), STOP and Protection! Set the Mode switch to PLAYER. 2. Press the (STOP) button after the cleaning, consult your nearest Samsung dealer or Authorized Service Center. 8 If... Recording Making your First Recording 1.Connect a power source to the Camcorder. 1 2 (A Battery pack or a AC Power adapter) Insert a cassette. 2.Remove the Lens cover. 3.Set the Power switch to record appears on the LCD screen. s Make sure the battery level indicates that STBY is displayed...
... sure that there is displayed on the LCD screen or Viewfinder. Release the write protection tab to save), STOP and Protection! Set the Mode switch to PLAYER. 2. Press the (STOP) button after the cleaning, consult your nearest Samsung dealer or Authorized Service Center. 8 If... Recording Making your First Recording 1.Connect a power source to the Camcorder. 1 2 (A Battery pack or a AC Power adapter) Insert a cassette. 2.Remove the Lens cover. 3.Set the Power switch to record appears on the LCD screen. s Make sure the battery level indicates that STBY is displayed...

Quick Guide (easy Manual) (ver.1.0) (English)
Page 93
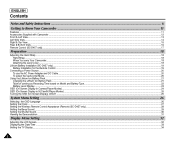
...captura y se guarda en la tarjeta de memoria en pocos segundos. I The indicator appears on the LCD screen during the time it takes to take photos using the remote control. (SC-D457 only) ✤ Audio will not be stored depends on the Memory Card. Coloque el interruptor ...LCD durante el tiempo que se tarda en guardar la imagen. [ Notas ] I En este intervalo no puede grabarse con una imagen fija en la tarjeta de memoria. 1. I Las imágenes fijas guardadas se guardan en la tarjeta de memoria con un formato 800 x 600. I Still images are using the Camcorder...
...captura y se guarda en la tarjeta de memoria en pocos segundos. I The indicator appears on the LCD screen during the time it takes to take photos using the remote control. (SC-D457 only) ✤ Audio will not be stored depends on the Memory Card. Coloque el interruptor ...LCD durante el tiempo que se tarda en guardar la imagen. [ Notas ] I En este intervalo no puede grabarse con una imagen fija en la tarjeta de memoria. 1. I Las imágenes fijas guardadas se guardan en la tarjeta de memoria con un formato 800 x 600. I Still images are using the Camcorder...

User Manual (user Manual) (ver.1.0) (English, French)
Page 6
.... 6. Over rotation may cause damage to the inside of the LCD Screen Please rotate the LCD screen carefully as illustrated. Recording when looking at the LCD screen from the front. 5. Recording when looking at the LCD 4 screen from the left. 5 6. Ecran ACL fermé. Enregistrement en...2/25/05 5:58 PM Page 6 ENGLISH Notes and Safety Instructions Notes regarding the Rotation of the hinge that connects the 1 LCD screen to the Camcorder. 1. LCD screen closed . 6 6 FRANÇAIS Remarques et consignes de sécurité Remarques concernant la rotation de l'écran ...
.... 6. Over rotation may cause damage to the inside of the LCD Screen Please rotate the LCD screen carefully as illustrated. Recording when looking at the LCD screen from the front. 5. Recording when looking at the LCD 4 screen from the left. 5 6. Ecran ACL fermé. Enregistrement en...2/25/05 5:58 PM Page 6 ENGLISH Notes and Safety Instructions Notes regarding the Rotation of the hinge that connects the 1 LCD screen to the Camcorder. 1. LCD screen closed . 6 6 FRANÇAIS Remarques et consignes de sécurité Remarques concernant la rotation de l'écran ...

User Manual (user Manual) (ver.1.0) (English, French)
Page 32
... Menu Setting FRANÇAIS Réglages du menu Affichage Adjusting the LCD Screen Réglage de l'écran ACL ✤ This function works in Camera/Player/M.Cam/M.Player modes. ✤ Your Camcorder is equipped with a 2.5 inch color Liquid Crystal Display(LCD) screen, which enables you to view what you are recording or playing back...
... Menu Setting FRANÇAIS Réglages du menu Affichage Adjusting the LCD Screen Réglage de l'écran ACL ✤ This function works in Camera/Player/M.Cam/M.Player modes. ✤ Your Camcorder is equipped with a 2.5 inch color Liquid Crystal Display(LCD) screen, which enables you to view what you are recording or playing back...

User Manual (user Manual) (ver.1.0) (English, French)
Page 34
... The TV Display function works in Camera/Player/M.Cam/M.Player modes. ✤ You can select the output path of the Camcorder to turn the OSD on/off on the TV screen despite the TV Display has been set to CAMERA or PLAYER. 1 Réglage de l'affichage TV ✤ La ..., then press the Menu selector. 7. To exit, press the MENU button. 6 [ Note ] If a DV cable is connected to your camcorder, no OSD (On-screen Display) item is displayed on the LCD screen/Viewfinder/TV. 1. Set the Power switch to On. Désactivé : l'affichage à l'écran apparaît sur l'é...
... The TV Display function works in Camera/Player/M.Cam/M.Player modes. ✤ You can select the output path of the Camcorder to turn the OSD on/off on the TV screen despite the TV Display has been set to CAMERA or PLAYER. 1 Réglage de l'affichage TV ✤ La ..., then press the Menu selector. 7. To exit, press the MENU button. 6 [ Note ] If a DV cable is connected to your camcorder, no OSD (On-screen Display) item is displayed on the LCD screen/Viewfinder/TV. 1. Set the Power switch to On. Désactivé : l'affichage à l'écran apparaît sur l'é...

User Manual (user Manual) (ver.1.0) (English, French)
Page 39
...[ Note ] Detach the Battery pack when you want to record appears on the LCD screen or Viewfinder. Remove the Lens cover. I Make sure the battery level indicates that STBY is displayed. 4 √ I Set the Mode switch to the Camcorder. (see page 20) 1 (A Battery pack or a AC Power adapter) Insert...de protection en écriture pour pouvoir enregistrer. I Le témoin REC G s'affiche sur l'écran ACL. I Assurez-vous que la scène que vous souhaitez enregistrer apparaît sur l'écran ACL ou dans le viseur. Pour arrêter l'enregistrement, appuyez à...
...[ Note ] Detach the Battery pack when you want to record appears on the LCD screen or Viewfinder. Remove the Lens cover. I Make sure the battery level indicates that STBY is displayed. 4 √ I Set the Mode switch to the Camcorder. (see page 20) 1 (A Battery pack or a AC Power adapter) Insert...de protection en écriture pour pouvoir enregistrer. I Le témoin REC G s'affiche sur l'écran ACL. I Assurez-vous que la scène que vous souhaitez enregistrer apparaît sur l'écran ACL ou dans le viseur. Pour arrêter l'enregistrement, appuyez à...
User Manual (user Manual) (ver.1.0) (English, French)
Page 40
... BLC et Manual focus ne sont pas disponibles en mode EASY.Q. Placez l'interrupteur Mode sur TAPE. 2. By pressing the EASY.Q button, all functions on the LCD screen at the I Battery level, recording mode, counter, date/time, and DIS ( ) will be reset when the Battery pack is set prior to off while...✤ Le mode EASY.Q fonctionne uniquement en mode Camera. ✤ Le mode EASY.Q permet aux débutants de faire, facilement, de bons enregistrements. 1. I Digital Zoom, Color Nite or Digital Effect is removed from the Camcorder and must first turn the EASY.Q mode off .
... BLC et Manual focus ne sont pas disponibles en mode EASY.Q. Placez l'interrupteur Mode sur TAPE. 2. By pressing the EASY.Q button, all functions on the LCD screen at the I Battery level, recording mode, counter, date/time, and DIS ( ) will be reset when the Battery pack is set prior to off while...✤ Le mode EASY.Q fonctionne uniquement en mode Camera. ✤ Le mode EASY.Q permet aux débutants de faire, facilement, de bons enregistrements. 1. I Digital Zoom, Color Nite or Digital Effect is removed from the Camcorder and must first turn the EASY.Q mode off .

User Manual (user Manual) (ver.1.0) (English, French)
Page 51
...10004; ✔ ✔ ✔ 27 ✔ ✔ ✔ ✔ 28 Language Demonstration Selecting the OSD language Demonstration (!): SC-D457 only ✔ ✔ ✔ ✔ 26 ✔ 31 Beep Sound Shutter Sound USB Version Réglage du signal sonore...disponible Player M.Cam M.Player Page Display LCD Bright Setting the Brightness tone of the LCD screen ✔ ✔ ✔ ✔ LCD Color Setting the Color tones of the LCD screen ✔ ✔ ✔ ✔ 32 Display LCD Bright 32 Réglage de la ...
...10004; ✔ ✔ ✔ 27 ✔ ✔ ✔ ✔ 28 Language Demonstration Selecting the OSD language Demonstration (!): SC-D457 only ✔ ✔ ✔ ✔ 26 ✔ 31 Beep Sound Shutter Sound USB Version Réglage du signal sonore...disponible Player M.Cam M.Player Page Display LCD Bright Setting the Brightness tone of the LCD screen ✔ ✔ ✔ ✔ LCD Color Setting the Color tones of the LCD screen ✔ ✔ ✔ ✔ 32 Display LCD Bright 32 Réglage de la ...

User Manual (user Manual) (ver.1.0) (English, French)
Page 69
...Menu selector to PLAYER. 3 2. You will not hear any sound when the volume is connected to the Camcorder, you will hear recorded sound from the built-in Player mode. ✤ When you use the LCD screen for playback, you remove the connected AV cable from the jack of your... Camcorder. 1. Placez l'interrupteur Power sur PLAYER. 2. Placez l'interrupteur Mode sur TAPE. 3. Utilisez le bouton Menu selector pour r&#...
...Menu selector to PLAYER. 3 2. You will not hear any sound when the volume is connected to the Camcorder, you will hear recorded sound from the built-in Player mode. ✤ When you use the LCD screen for playback, you remove the connected AV cable from the jack of your... Camcorder. 1. Placez l'interrupteur Power sur PLAYER. 2. Placez l'interrupteur Mode sur TAPE. 3. Utilisez le bouton Menu selector pour r&#...
User Manual (user Manual) (ver.1.0) (English, French)
Page 75
...05 PM Page 75 ENGLISH Playback Lecture FRANÇAIS AV In/Out (SC-D457 only) Entrée/Sortie AV (SC-D457 uniquement) ✤ AV In/Out function works only in Player ...pages 70-71). cable. (See pages 70~71) 2. Set the Mode switch to PLAYER. 3. Turn on LCD screen. Insert the blank tape with protection tab closed into the VCR. 6. I Si vous voulez enregistrer à partir... 3. I If you want to record or play back the VHS tape. recorded VHS tape into the Camcorder. Press the MENU button. I PAUSE apparaît sur l'écran ACL. 13.Press the Start...
...05 PM Page 75 ENGLISH Playback Lecture FRANÇAIS AV In/Out (SC-D457 only) Entrée/Sortie AV (SC-D457 uniquement) ✤ AV In/Out function works only in Player ...pages 70-71). cable. (See pages 70~71) 2. Set the Mode switch to PLAYER. 3. Turn on LCD screen. Insert the blank tape with protection tab closed into the VCR. 6. I Si vous voulez enregistrer à partir... 3. I If you want to record or play back the VHS tape. recorded VHS tape into the Camcorder. Press the MENU button. I PAUSE apparaît sur l'écran ACL. 13.Press the Start...

User Manual (user Manual) (ver.1.0) (English, French)
Page 93
... to MEMORY. 3. I The number of still images that can take photos using the remote control. (SC-D457 only) ✤ Audio will not be stored depends on the quality of a subject while you ... is useful when you want to take a snapshot of the image. [ Remarques ] I Still images are using the Camcorder. ✤ You can be recorded with a Still image onto the Memory Card. 3 1. Set the Mode switch to... ✤ You may take still images in M.Cam mode and store 1 the images on the LCD screen during the time it takes to save the image. √ Mode Appareil photo numérique ...
... to MEMORY. 3. I The number of still images that can take photos using the remote control. (SC-D457 only) ✤ Audio will not be stored depends on the quality of a subject while you ... is useful when you want to take a snapshot of the image. [ Remarques ] I Still images are using the Camcorder. ✤ You can be recorded with a Still image onto the Memory Card. 3 1. Set the Mode switch to... ✤ You may take still images in M.Cam mode and store 1 the images on the LCD screen during the time it takes to save the image. √ Mode Appareil photo numérique ...

User Manual (user Manual) (ver.1.0) (English, French)
Page 107
...;rique FRANÇAIS Marking Images for Printing Marquage des images pour impression ✤ The Print Mark function works only in M.Player mode. ✤ This Camcorder supports the DPOF (Digital Print Order Format) print format. ✤ You can automatically print images recorded on the LCD screen.
...;rique FRANÇAIS Marking Images for Printing Marquage des images pour impression ✤ The Print Mark function works only in M.Player mode. ✤ This Camcorder supports the DPOF (Digital Print Order Format) print format. ✤ You can automatically print images recorded on the LCD screen.
User Manual (user Manual) (ver.1.0) (English)
Page 6
... only)...17 Preparation ...18 Adjusting the Hand Strap ...18 Hand Strap...18 When You carry Your Camcorder...18 Attaching the Lens Cover ...18 Lithium Battery Installation (SC-D457 only)...19 Battery Installation for the Remote Control...19 Connecting a Power Source ...20 To use the AC Power...Setting the Clock ...27 Setting the Wireless Remote Control Acceptance (Remote) (SC-D457 only)...28 Setting the Beep Sound ...29 Setting the Shutter Sound...30 Viewing the Demonstration ...31 Display Menu Setting...32 Adjusting the LCD Screen...32 Displaying the Date/Time ...33 Setting the TV Display...34 2
... only)...17 Preparation ...18 Adjusting the Hand Strap ...18 Hand Strap...18 When You carry Your Camcorder...18 Attaching the Lens Cover ...18 Lithium Battery Installation (SC-D457 only)...19 Battery Installation for the Remote Control...19 Connecting a Power Source ...20 To use the AC Power...Setting the Clock ...27 Setting the Wireless Remote Control Acceptance (Remote) (SC-D457 only)...28 Setting the Beep Sound ...29 Setting the Shutter Sound...30 Viewing the Demonstration ...31 Display Menu Setting...32 Adjusting the LCD Screen...32 Displaying the Date/Time ...33 Setting the TV Display...34 2
User Manual (user Manual) (ver.1.0) (English)
Page 7
...35 Using the Viewfinder ...35 Adjusting the Focus ...35 Inserting and Ejecting a Cassette ...36 Hints for Stable Image Recording...37 Recording with the LCD Screen...37 Recording with the Viewfinder...37 Various Recording Techniques...38 Making your First Recording ...39 Using EASY.Q Mode (for Beginners)...40 Record Search ...(REC SEARCH) ...41 Setting the Zero Memory (SC-D457 only) ...42 Self Record using the Remote Control (SC-D457 only)...43 Zooming In and Out ...44 Using the Tele Macro...45 Using Quick Menu: Tele Macro ...46 Using the ...
...35 Using the Viewfinder ...35 Adjusting the Focus ...35 Inserting and Ejecting a Cassette ...36 Hints for Stable Image Recording...37 Recording with the LCD Screen...37 Recording with the Viewfinder...37 Various Recording Techniques...38 Making your First Recording ...39 Using EASY.Q Mode (for Beginners)...40 Record Search ...(REC SEARCH) ...41 Setting the Zero Memory (SC-D457 only) ...42 Self Record using the Remote Control (SC-D457 only)...43 Zooming In and Out ...44 Using the Tele Macro...45 Using Quick Menu: Tele Macro ...46 Using the ...
User Manual (user Manual) (ver.1.0) (English)
Page 8
... Digital Effects...64 Selecting the Digital Effects...65 Zooming In and Out with Digital Zoom ...66 Selecting the Digital Zoom ...66 Photo Image Recording ...67 Searching for a Photo Image ...67 Playback ...68 Playing back a Tape you have recorded on the LCD Screen...68 Adjusting the LCD Bright/Color during Playback ...68 Controlling Sound from... ...86 Inserting and Ejecting the Memory Card ...87 Structure of Folders and Files on the Memory Card ...88 Image Format ...88 Selecting the Camcorder Mode ...88 Selecting the Built-in Memory (SC-D455/D457 only) ...89 Using Quick Menu: Memory Type...89 4
... Digital Effects...64 Selecting the Digital Effects...65 Zooming In and Out with Digital Zoom ...66 Selecting the Digital Zoom ...66 Photo Image Recording ...67 Searching for a Photo Image ...67 Playback ...68 Playing back a Tape you have recorded on the LCD Screen...68 Adjusting the LCD Bright/Color during Playback ...68 Controlling Sound from... ...86 Inserting and Ejecting the Memory Card ...87 Structure of Folders and Files on the Memory Card ...88 Image Format ...88 Selecting the Camcorder Mode ...88 Selecting the Built-in Memory (SC-D455/D457 only) ...89 Using Quick Menu: Memory Type...89 4

User Manual (user Manual) (ver.1.0) (English)
Page 10
... when looking at the LCD screen from the left. 5 6. Recording when looking at the LCD screen from the top. 3 LCD open 4. Recording when looking at the LCD screen from the front. 4 5. Over rotation may cause damage to the Camcorder. 1 1. Standard recording using the LCD screen. 2 I Open the LCD screen with the LCD screen closed . 2. Recording with your finger. 3. ENGLISH Notes and Safety Instructions Notes...
... when looking at the LCD screen from the left. 5 6. Recording when looking at the LCD screen from the top. 3 LCD open 4. Recording when looking at the LCD screen from the front. 4 5. Over rotation may cause damage to the Camcorder. 1 1. Standard recording using the LCD screen. 2 I Open the LCD screen with the LCD screen closed . 2. Recording with your finger. 3. ENGLISH Notes and Safety Instructions Notes...

User Manual (user Manual) (ver.1.0) (English)
Page 13
...recorded picture in color) that appear on the LCD screen. Direct sunlight can damage the inside of the Viewfinder. Direct sunlight can damage the LCD screen. Notes regarding electronic Viewfinder 1. Do not pick up the Camcorder by holding the Viewfinder. 3. Notes and Safety ...Instructions Note regarding 'Record' or 'Playback' Using the LCD Screen 1. Direct sunlight can damage the CCD(...
...recorded picture in color) that appear on the LCD screen. Direct sunlight can damage the inside of the Viewfinder. Direct sunlight can damage the LCD screen. Notes regarding electronic Viewfinder 1. Do not pick up the Camcorder by holding the Viewfinder. 3. Notes and Safety ...Instructions Note regarding 'Record' or 'Playback' Using the LCD Screen 1. Direct sunlight can damage the CCD(...


