Quick Guide (easy Manual) (ver.1.0) (English)
Page 2
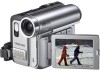
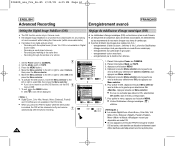
... filmed. Features Multi OSD Language You can transfer standard still images on card. Digital Data Transfer Function with IEEE1394 By incorporating the IEEE1394 (i.LINK™: i.LINK is compatible with sound, while in camera mode. 900x Digital Zoom The 900x Digital Zoom allows you capture an object as the ability to review your recordings immediately. Digital Still Camera Function s Using Memory Card, you to alter the shutter speed and aperture to suit the type of scene/action to record video onto a Memory Card.
... filmed. Features Multi OSD Language You can transfer standard still images on card. Digital Data Transfer Function with IEEE1394 By incorporating the IEEE1394 (i.LINK™: i.LINK is compatible with sound, while in camera mode. 900x Digital Zoom The 900x Digital Zoom allows you capture an object as the ability to review your recordings immediately. Digital Still Camera Function s Using Memory Card, you to alter the shutter speed and aperture to suit the type of scene/action to record video onto a Memory Card.
Quick Guide (easy Manual) (ver.1.0) (English)
Page 3
... Instructions Notices regarding Copyright Television programmes, video tapes, DVD titles, films, and other programme materials may be dirty. All the trade names and registered trademarks mentioned in a dry, warm room with the camera lens pointing directly at a SAMSUNG retailer. - Notes regarding the Hand Strap - Do not use a recommended battery pack as you use the LCD screen under sunlight or near a window exposed to use a wet-type cleaning cassette...
... Instructions Notices regarding Copyright Television programmes, video tapes, DVD titles, films, and other programme materials may be dirty. All the trade names and registered trademarks mentioned in a dry, warm room with the camera lens pointing directly at a SAMSUNG retailer. - Notes regarding the Hand Strap - Do not use a recommended battery pack as you use the LCD screen under sunlight or near a window exposed to use a wet-type cleaning cassette...
Quick Guide (easy Manual) (ver.1.0) (English)
Page 4
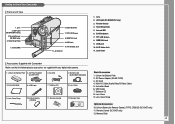
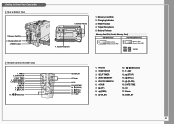
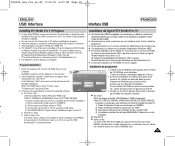
...-AV Cable (Audio/Video/S-Video Cable) 5. Lens Cover 9. Remote Control (SC-D457 only) 12. LED Light (SC-D455/D457 only) 3. Internal MIC 6. IEEE1394 Jack 9. Lithium Ion Battery Pack 2. AC Power Adapter (AA-E8 TYPE) 3. Software CD 8. Lens Cover Strap Optional Accessories 10. Lens 2. AC Cord 4. LED Light (SC-D455/D457 only) 3. Jack Cover Accessories Supplied with Camcorder Make sure that the following basic accessories are supplied with your digital video camera. 1. TFT LCD Screen 8. Hand Strap Hook 5. Remote Control 12. Memory Stick 4 Getting...
...-AV Cable (Audio/Video/S-Video Cable) 5. Lens Cover 9. Remote Control (SC-D457 only) 12. LED Light (SC-D455/D457 only) 3. Internal MIC 6. IEEE1394 Jack 9. Lithium Ion Battery Pack 2. AC Power Adapter (AA-E8 TYPE) 3. Software CD 8. Lens Cover Strap Optional Accessories 10. Lens 2. AC Cord 4. LED Light (SC-D455/D457 only) 3. Jack Cover Accessories Supplied with Camcorder Make sure that the following basic accessories are supplied with your digital video camera. 1. TFT LCD Screen 8. Hand Strap Hook 5. Remote Control 12. Memory Stick 4 Getting...
Quick Guide (easy Manual) (ver.1.0) (English)
Page 6
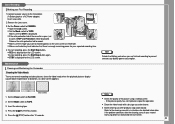
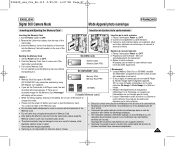
... (Direction) 5. Charging indicator 3. DATE/TIME 14. (SLOW) 13. (STILL) 12. (STOP) 11. PHOTO 2. ZERO MEMORY 5. ADV 12. (STOP) 13. (STILL) 14. (SLOW) 15. Zoom 16. F. ADV 1. PHOTO SEARCH 6. DATE/TIME 16. Zoom 18. PHOTO SEARCH 6. Tripod Receptacle 1. Battery Release Memory Card Slot (Usable Memory Card) SC-D453 only SC-D455/D457 only Memory Stick Memory Stick PRO Memory Stick Memory Stick PRO SD/MMC 18. START/STOP 3. A.DUB 7. (FF) 8. (REW) 9. (PLAY) 10. / (Direction) 11. START/STOP 3. Memory Card Slot 2. X2 15. DISPLAY 6 RESET button Remote Control...
... (Direction) 5. Charging indicator 3. DATE/TIME 14. (SLOW) 13. (STILL) 12. (STOP) 11. PHOTO 2. ZERO MEMORY 5. ADV 12. (STOP) 13. (STILL) 14. (SLOW) 15. Zoom 16. F. ADV 1. PHOTO SEARCH 6. DATE/TIME 16. Zoom 18. PHOTO SEARCH 6. Tripod Receptacle 1. Battery Release Memory Card Slot (Usable Memory Card) SC-D453 only SC-D455/D457 only Memory Stick Memory Stick PRO Memory Stick Memory Stick PRO SD/MMC 18. START/STOP 3. A.DUB 7. (FF) 8. (REW) 9. (PLAY) 10. / (Direction) 11. START/STOP 3. Memory Card Slot 2. X2 15. DISPLAY 6 RESET button Remote Control...
Quick Guide (easy Manual) (ver.1.0) (English)
Page 8
... the cleaning tape. 4. Refer to save), STOP and Protection! s REC q is displayed on the LCD screen or Viewfinder. Maintenance Cleaning and Maintaining the Camcorder Cleaning the Video Heads To ensure normal recording and clear pictures, clean the video heads when the playback pictures display square block-shaped noise or distortion, or a blue screen appears. s Set the Mode switch to TAPE. 4 3 √ Make sure that there is open (set to the cleaning cassette's instructions for your expected recording time. 4.To start recording, press the Start/Stop button...
... the cleaning tape. 4. Refer to save), STOP and Protection! s REC q is displayed on the LCD screen or Viewfinder. Maintenance Cleaning and Maintaining the Camcorder Cleaning the Video Heads To ensure normal recording and clear pictures, clean the video heads when the playback pictures display square block-shaped noise or distortion, or a blue screen appears. s Set the Mode switch to TAPE. 4 3 √ Make sure that there is open (set to the cleaning cassette's instructions for your expected recording time. 4.To start recording, press the Start/Stop button...
Quick Guide (easy Manual) (ver.1.0) (English)
Page 9
... time on the lens. Change to OFF. Insert a tape. Set to a new one . Detach the battery. slow moisture condensation has formed in Camcorder. If this condition, the tape may save you want to record, release the protection. ....D slow the Camcorder has some mechanical 1. Open the cassette compartment and remove the battery. Leave the Camcorder in M.Cam/M.Player Modes Direct Print Related Messages Display Blinking Informs that ... Change to a warm place, moisture may not operate correctly. Erase recorded image. slow The Memory Card...
... time on the lens. Change to OFF. Insert a tape. Set to a new one . Detach the battery. slow moisture condensation has formed in Camcorder. If this condition, the tape may save you want to record, release the protection. ....D slow the Camcorder has some mechanical 1. Open the cassette compartment and remove the battery. Leave the Camcorder in M.Cam/M.Player Modes Direct Print Related Messages Display Blinking Informs that ... Change to a warm place, moisture may not operate correctly. Erase recorded image. slow The Memory Card...
User Manual (user Manual) (ver.1.0) (English, French)
Page 58
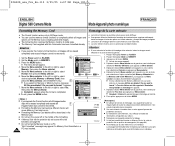
...;lectionner le mode souhaité (Auto , Hold , Indoor ou Outdoor ) puis appuyez sur Menu selector. 7. I When the Auto mode is a recording function that preserves the unique image comme en mode M.Cam. I Indoor ( ) : ce mode permet d'adapter la - White Balance √Auto I Hold ( ) : ce mode permet de mémoriser la valeur de la balance des blancs actuelle. Subject is generally used to TAPE or MEMORY. 3. according to CAMERA. 2. Set the Power switch to the outdoor...
...;lectionner le mode souhaité (Auto , Hold , Indoor ou Outdoor ) puis appuyez sur Menu selector. 7. I When the Auto mode is a recording function that preserves the unique image comme en mode M.Cam. I Indoor ( ) : ce mode permet d'adapter la - White Balance √Auto I Hold ( ) : ce mode permet de mémoriser la valeur de la balance des blancs actuelle. Subject is generally used to TAPE or MEMORY. 3. according to CAMERA. 2. Set the Power switch to the outdoor...
User Manual (user Manual) (ver.1.0) (English, French)
Page 60
... the optical zoom (Under 10x. Appuyez ensuite sur Menu selector. I If you press the PHOTO button while the DIS function is enabled, the DIS will be released shortly and resume 7 automatically after the photo recording. 60 œ Camera Mode √Camera Program AE White Balance Digital Effect Macro DIS Digital Zoom √Auto √Auto √Off √Off √Off √Off Move Select MENU Exit Camera Mode Back Program AE White Balance Digital...
... the optical zoom (Under 10x. Appuyez ensuite sur Menu selector. I If you press the PHOTO button while the DIS function is enabled, the DIS will be released shortly and resume 7 automatically after the photo recording. 60 œ Camera Mode √Camera Program AE White Balance Digital Effect Macro DIS Digital Zoom √Auto √Auto √Off √Off √Off √Off Move Select MENU Exit Camera Mode Back Program AE White Balance Digital...
User Manual (user Manual) (ver.1.0) (English, French)
Page 83
... Media Pro User's Manual is included on the monitor. 2. When CD-ROM drive is connected, please disconnect it in the Memory Card) on the PC. a 2) Set the camcorder Mode switch to TAPE. 1) Placez l'interrupteur Power du caméscope sur CAMERA. 3) Connect the camcorder to complete the DV Driver installation. "D:", tapez "D:\autorun.exe" et appuyez sur Entrée. 3. ordinateur. Autorun.exe pour démarrer l'installation. Click the icons listed below to CAMERA. - Connect a Camcorder to "D:drive", type...
... Media Pro User's Manual is included on the monitor. 2. When CD-ROM drive is connected, please disconnect it in the Memory Card) on the PC. a 2) Set the camcorder Mode switch to TAPE. 1) Placez l'interrupteur Power du caméscope sur CAMERA. 3) Connect the camcorder to complete the DV Driver installation. "D:", tapez "D:\autorun.exe" et appuyez sur Entrée. 3. ordinateur. Autorun.exe pour démarrer l'installation. Click the icons listed below to CAMERA. - Connect a Camcorder to "D:drive", type...
User Manual (user Manual) (ver.1.0) (English, French)
Page 87
... Page 87 ENGLISH Digital Still Camera Mode Mode Appareil photo numérique FRANÇAIS Inserting and Ejecting the Memory Card Insertion et éjection de la carte mémoire Inserting the Memory Card Insertion de la carte mémoire 1. Remove the Lithium-ion battery from the rear of the Camcorder automatically. 3. Ejection de la carte mémoire 1. Ejecting the Memory Card 1. Pull out the Memory Card. SC-D453 only Memory Stick Memory Stick PRO 2. SC-D455...
... Page 87 ENGLISH Digital Still Camera Mode Mode Appareil photo numérique FRANÇAIS Inserting and Ejecting the Memory Card Insertion et éjection de la carte mémoire Inserting the Memory Card Insertion de la carte mémoire 1. Remove the Lithium-ion battery from the rear of the Camcorder automatically. 3. Ejection de la carte mémoire 1. Ejecting the Memory Card 1. Pull out the Memory Card. SC-D453 only Memory Stick Memory Stick PRO 2. SC-D455...
User Manual (user Manual) (ver.1.0) (English, French)
Page 100
... 100 ENGLISH Digital Still Camera Mode Mode Appareil photo numérique FRANÇAIS Formatting the Memory Card Formatage de la carte mémoire ✤ The Format function works only in M.Player mode. ✤ You can use the memory format functions to completely delete all images and options on the Memory Card, including protected images. ✤ The format function restores the Memory Card to format ? Placez l'interrupteur Power sur PLAYER. 1. Placez l'interrupteur Mode sur MEMORY. 3. Memory or Memory Card, a message M.Player Mode √Memory selector...
... 100 ENGLISH Digital Still Camera Mode Mode Appareil photo numérique FRANÇAIS Formatting the Memory Card Formatage de la carte mémoire ✤ The Format function works only in M.Player mode. ✤ You can use the memory format functions to completely delete all images and options on the Memory Card, including protected images. ✤ The format function restores the Memory Card to format ? Placez l'interrupteur Power sur PLAYER. 1. Placez l'interrupteur Mode sur MEMORY. 3. Memory or Memory Card, a message M.Player Mode √Memory selector...
User Manual (user Manual) (ver.1.0) (English)
Page 3
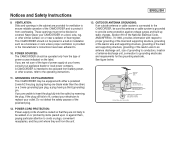
... (NEC SECTION 810-21) GROUND CLAMPS POWER SERVICE GROUNDING ELECTRODE SYSTEM (NEC ART 250, PART H) NEC NATIONAL ELECTRICAL CODE If you are not sure of the type of the polarized plug. 12. POWER-CORD PROTECTION: Power-supply cords should be routed so that they exit from the type of the CAMCORDER and to protect it from battery power, or other sources, refer to . 10...
... (NEC SECTION 810-21) GROUND CLAMPS POWER SERVICE GROUNDING ELECTRODE SYSTEM (NEC ART 250, PART H) NEC NATIONAL ELECTRICAL CODE If you are not sure of the type of the polarized plug. 12. POWER-CORD PROTECTION: Power-supply cords should be routed so that they exit from the type of the CAMCORDER and to protect it from battery power, or other sources, refer to . 10...
User Manual (user Manual) (ver.1.0) (English)
Page 6
... Battery Installation for the Remote Control...19 Connecting a Power Source ...20 To use the AC Power Adapter and DC Cable...20 To select the Camcorder Mode ...20 Using the Lithium Ion Battery Pack...21 Charging the Lithium Ion Battery Pack ...21 Table of continuous Recording Time based on Model and Battery Type...22 Battery Level Display...23 OSD (On Screen Display in Camera/Player Modes) ...24 OSD (On Screen Display in M.Cam/M.Player Modes) ...25 Turning the OSD (On Screen Display) On/Off ...25 System Menu Setting...
... Battery Installation for the Remote Control...19 Connecting a Power Source ...20 To use the AC Power Adapter and DC Cable...20 To select the Camcorder Mode ...20 Using the Lithium Ion Battery Pack...21 Charging the Lithium Ion Battery Pack ...21 Table of continuous Recording Time based on Model and Battery Type...22 Battery Level Display...23 OSD (On Screen Display in Camera/Player Modes) ...24 OSD (On Screen Display in M.Cam/M.Player Modes) ...25 Turning the OSD (On Screen Display) On/Off ...25 System Menu Setting...
User Manual (user Manual) (ver.1.0) (English)
Page 7
... ...35 Adjusting the Focus ...35 Inserting and Ejecting a Cassette ...36 Hints for Stable Image Recording...37 Recording with the LCD Screen...37 Recording with the Viewfinder...37 Various Recording Techniques...38 Making your First Recording ...39 Using EASY.Q Mode (for Beginners)...40 Record Search (REC SEARCH) ...41 Setting the Zero Memory (SC-D457 only) ...42 Self Record using the Remote Control (SC-D457 only)...43 Zooming In and Out ...44 Using the Tele Macro...45 Using Quick Menu: Tele...
... ...35 Adjusting the Focus ...35 Inserting and Ejecting a Cassette ...36 Hints for Stable Image Recording...37 Recording with the LCD Screen...37 Recording with the Viewfinder...37 Various Recording Techniques...38 Making your First Recording ...39 Using EASY.Q Mode (for Beginners)...40 Record Search (REC SEARCH) ...41 Setting the Zero Memory (SC-D457 only) ...42 Self Record using the Remote Control (SC-D457 only)...43 Zooming In and Out ...44 Using the Tele Macro...45 Using Quick Menu: Tele...
User Manual (user Manual) (ver.1.0) (English)
Page 24
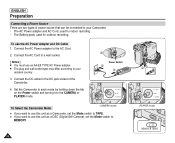
... unit as a Camcorder, set the Mode switch to TAPE. ✤ If you want to use the AC Power Adapter and DC Cable 1. Set the Camcorder to each mode by holding down the tab on the Power switch and turning it to your Camcorder. - To use this unit as a DSC (Digital Still Camera), set the Mode switch to the AC Cord. 2. ENGLISH Preparation Connecting a Power Source There are two types of the Camcorder. 4. The AC Power adapter and AC Cord: used for indoor recording. -
... unit as a Camcorder, set the Mode switch to TAPE. ✤ If you want to use the AC Power Adapter and DC Cable 1. Set the Camcorder to each mode by holding down the tab on the Power switch and turning it to your Camcorder. - To use this unit as a DSC (Digital Still Camera), set the Mode switch to the AC Cord. 2. ENGLISH Preparation Connecting a Power Source There are two types of the Camcorder. 4. The AC Power adapter and AC Cord: used for indoor recording. -
User Manual (user Manual) (ver.1.0) (English)
Page 57
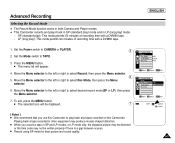
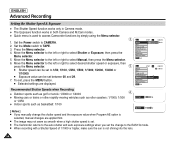
.... 7. I Record using SP mode for best picture and sound quality. SP (standard play ) mode. - Playing back a tape recorded in other equipment may not be distorted or the time code may produce mosaic shaped distortion. Advanced Recording Selecting the Record Mode ✤ The Record Mode function works in both Camera and Player modes. ✤ This Camcorder records and plays back in SP (standard play) mode and in LP (long play ): This mode permits 60 minutes of recording time with a DVM60 tape. - Set the Power switch...
.... 7. I Record using SP mode for best picture and sound quality. SP (standard play ) mode. - Playing back a tape recorded in other equipment may not be distorted or the time code may produce mosaic shaped distortion. Advanced Recording Selecting the Record Mode ✤ The Record Mode function works in both Camera and Player modes. ✤ This Camcorder records and plays back in SP (standard play) mode and in LP (long play ): This mode permits 60 minutes of recording time with a DVM60 tape. - Set the Power switch...
User Manual (user Manual) (ver.1.0) (English)
Page 60
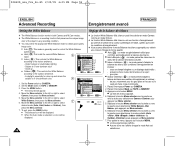
... access Camcorder functions by simply using the Menu selector. 3 STBY SP 0:00:10 1. Set the Power switch to TAPE. 3. White Balance ... Exposure † Manual Focus I Shutter speed can be set between 00 and 29. Set the Mode switch to CAMERA. 2. Move the Menu selector to the left or right to select desired shutter speed or exposure, then press the Menu selector. 5 STBY SP 0:00:10 I Selected settings are applied first. ENGLISH Advanced Recording Setting the Shutter Speed & Exposure ✤ The Shutter Speed function works...
... access Camcorder functions by simply using the Menu selector. 3 STBY SP 0:00:10 1. Set the Power switch to TAPE. 3. White Balance ... Exposure † Manual Focus I Shutter speed can be set between 00 and 29. Set the Mode switch to CAMERA. 2. Move the Menu selector to the left or right to select desired shutter speed or exposure, then press the Menu selector. 5 STBY SP 0:00:10 I Selected settings are applied first. ENGLISH Advanced Recording Setting the Shutter Speed & Exposure ✤ The Shutter Speed function works...
User Manual (user Manual) (ver.1.0) (English)
Page 87
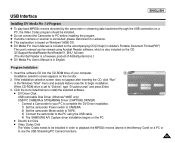
... USB removable Disk Driver (Windows® 98SE only) USB PC CAMERA & STREAMING Driver (CAPTURE DRIVER) - Insert the software CD into the CD-ROM drive of AdobeSystems,Inc.) ✤ DV Media Pro User's Manual is in English. Click the icons listed below to be viewed using the USB cable. 4) The SAMSUNG A/V Capture driver installation begins on the PC. Program Installation 1. USB Interface ENGLISH Installing DV Media Pro 1.0 Program ✤ To play back MPEG4 movies recorded by the camcorder or streaming data transferred through the USB connection on a PC, the Video...
... USB removable Disk Driver (Windows® 98SE only) USB PC CAMERA & STREAMING Driver (CAPTURE DRIVER) - Insert the software CD into the CD-ROM drive of AdobeSystems,Inc.) ✤ DV Media Pro User's Manual is in English. Click the icons listed below to be viewed using the USB cable. 4) The SAMSUNG A/V Capture driver installation begins on the PC. Program Installation 1. USB Interface ENGLISH Installing DV Media Pro 1.0 Program ✤ To play back MPEG4 movies recorded by the camcorder or streaming data transferred through the USB connection on a PC, the Video...
User Manual (user Manual) (ver.1.0) (English)
Page 89
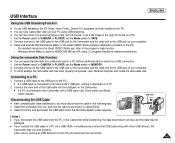
.... Set the Power switch to CAMERA or PLAYER, set the Mode switch to a PC 1. Windows Movie Maker is used for Ulead VIDEO Studio use USB streaming, the DV Driver, Video Codec, DirectX 9.0. Connect a USB cable to the USB jack on cards via a USB HUB or simultaneously connect the USB cable along with a USB cable only, Zoom switch and Mode switch operate. For detailed instructions for WINDOWS ME and XP users. (C:\program files\Movie maker\moviemk.exe) Using the removable Disk Function ✤ You can also store it as a moving picture in...
.... Set the Power switch to CAMERA or PLAYER, set the Mode switch to a PC 1. Windows Movie Maker is used for Ulead VIDEO Studio use USB streaming, the DV Driver, Video Codec, DirectX 9.0. Connect a USB cable to the USB jack on cards via a USB HUB or simultaneously connect the USB cable along with a USB cable only, Zoom switch and Mode switch operate. For detailed instructions for WINDOWS ME and XP users. (C:\program files\Movie maker\moviemk.exe) Using the removable Disk Function ✤ You can also store it as a moving picture in...
User Manual (user Manual) (ver.1.0) (English)
Page 121
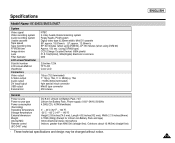
Specifications Model Name: SC-D453/D455/D457 System Video signal Video recording system Audio recording system Usable cassette Tape speed Tape recording time FF/REW time Image device Lens Filter diameter LCD screen/Viewfinder Size/dot number LCD screen Method Viewfinder Connectors Video output S-Video output Audio output DV input/output USB output External mic NTSC 2 rotary heads, Helical scanning system Rotary heads, PCM system Digital video tape (6.35mm width): Mini DV cassette SP: approx. 18.81mm/s LP: approx. 12.56mm/s SP: 60 minutes (when using DVM 60), LP: 90 minutes (when using DVM ...
Specifications Model Name: SC-D453/D455/D457 System Video signal Video recording system Audio recording system Usable cassette Tape speed Tape recording time FF/REW time Image device Lens Filter diameter LCD screen/Viewfinder Size/dot number LCD screen Method Viewfinder Connectors Video output S-Video output Audio output DV input/output USB output External mic NTSC 2 rotary heads, Helical scanning system Rotary heads, PCM system Digital video tape (6.35mm width): Mini DV cassette SP: approx. 18.81mm/s LP: approx. 12.56mm/s SP: 60 minutes (when using DVM 60), LP: 90 minutes (when using DVM ...


