
Quick Guide (easy Manual) (ver.1.0) (English)
Page 1
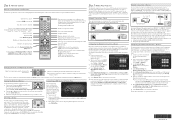
... button on your remote. STOP Please do not return this product, visit: www.samsung.com/ register. xx Make sure that at TV to the wall outlet and the TV. Front Rear Rear 2 3 With your TV displays the current setting. Step 4: Connect External Devices Connecting an AV device (DVD/Blu-ray player, cable...
... button on your remote. STOP Please do not return this product, visit: www.samsung.com/ register. xx Make sure that at TV to the wall outlet and the TV. Front Rear Rear 2 3 With your TV displays the current setting. Step 4: Connect External Devices Connecting an AV device (DVD/Blu-ray player, cable...
Quick Guide (easy Manual) (ver.1.0) (English)
Page 2
...and/or movie files to your user's manual. To use IPTV or Samsung PC Share Manager, you use DHCP to your TV to connect to configure the network connection. On the Wired Network Setup menu, set Internet Protocol Setup and DNS Setup to channels. Auto Setup acquires and... router or modem you must first attach a "Samsung Wireless LAN Adapter" (WIS09ABGN - If your have to check internet connectivity. ✎✎For more information, see your user's manual for the visually impaired and has Braille points on your remote to set to select channel "54-3", press "54", then...
...and/or movie files to your user's manual. To use IPTV or Samsung PC Share Manager, you use DHCP to your TV to connect to configure the network connection. On the Wired Network Setup menu, set Internet Protocol Setup and DNS Setup to channels. Auto Setup acquires and... router or modem you must first attach a "Samsung Wireless LAN Adapter" (WIS09ABGN - If your have to check internet connectivity. ✎✎For more information, see your user's manual for the visually impaired and has Braille points on your remote to set to select channel "54-3", press "54", then...
User Manual (user Manual) (ver.1.0) (English)
Page 3
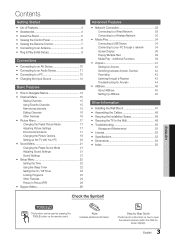
...the Symbol! TOOLS t This function can be used by Step Guide Check here for Anynet+ 44 yy AllShare 45 About AllShare 45 Setting Up AllShare 45 Other Information yy Installing the Wall Mount 47 yy Assembling the Cables 48 yy Securing the Installation Space 48 yy ...the TV to your PC through a network 34 Screen Display 36 Playing Multiple Files 39 Media Play - Additional Functions 39 yy Anynet 41 Setting Up Anynet+ 42 Switching between Anynet+ Devices 42 Recording 43 Listening through a Receiver 43 Troubleshooting for instructions on how to open the relevant...
...the Symbol! TOOLS t This function can be used by Step Guide Check here for Anynet+ 44 yy AllShare 45 About AllShare 45 Setting Up AllShare 45 Other Information yy Installing the Wall Mount 47 yy Assembling the Cables 48 yy Securing the Installation Space 48 yy ...the TV to your PC through a network 34 Screen Display 36 Playing Multiple Files 39 Media Play - Additional Functions 39 yy Anynet 41 Setting Up Anynet+ 42 Switching between Anynet+ Devices 42 Recording 43 Listening through a Receiver 43 Troubleshooting for instructions on how to open the relevant...
User Manual (user Manual) (ver.1.0) (English)
Page 4
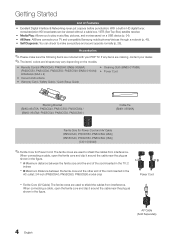
If any items are missing, contact your TV and compatible Samsung mobile phones/devices through a network (p. 45). yy AllShare: AllShare connects your dealer. ✎✎The items' colors and shapes may vary depending on a USB device (p. ... cable near the plug as shown in the figure. 4 English AV Cable (Sold Separately) yy Self Diagnosis: You can be viewed without a cable box / STB (Set-Top-Box) satellite receiver. xx A Maximum distance between the ferrite core and the end of the cord inserted in the TV: 2 inches xx B Maximum Distance...
If any items are missing, contact your TV and compatible Samsung mobile phones/devices through a network (p. 45). yy AllShare: AllShare connects your dealer. ✎✎The items' colors and shapes may vary depending on a USB device (p. ... cable near the plug as shown in the figure. 4 English AV Cable (Sold Separately) yy Self Diagnosis: You can be viewed without a cable box / STB (Set-Top-Box) satellite receiver. xx A Maximum distance between the ferrite core and the end of the cord inserted in the TV: 2 inches xx B Maximum Distance...
User Manual (user Manual) (ver.1.0) (English)
Page 7
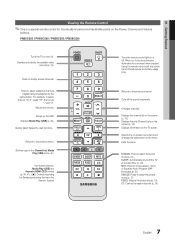
... same station. Quickly select frequently used in Media Play (USB) and Anynet+ (HDMI-CEC) modes (p. 34, 41). (�: Controls recording for Samsung recorders that have the Anynet+ feature) POWER ON/OFF SOURCE PRE-CH MEDIA.P CH LIST MENU FAV.CH TOOLS INFO RETURN EXIT A B CD S....functions. Returns to the previous menu. Changes channels. Press to ON will reduce the battery usage time. Using the remote control with this button set to directly access channels. Exits the menu. MTS: Press to choose stereo, mono or Separate Audio Program (SAP broadcast) (p. 21). CC:...
... same station. Quickly select frequently used in Media Play (USB) and Anynet+ (HDMI-CEC) modes (p. 34, 41). (�: Controls recording for Samsung recorders that have the Anynet+ feature) POWER ON/OFF SOURCE PRE-CH MEDIA.P CH LIST MENU FAV.CH TOOLS INFO RETURN EXIT A B CD S....functions. Returns to the previous menu. Changes channels. Press to ON will reduce the battery usage time. Using the remote control with this button set to directly access channels. Exits the menu. MTS: Press to choose stereo, mono or Separate Audio Program (SAP broadcast) (p. 21). CC:...
User Manual (user Manual) (ver.1.0) (English)
Page 9
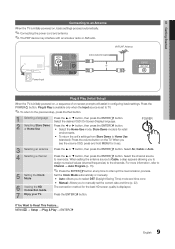
...P IN environments. 01 Getting Started Connecting to an Antenna When the TV is initially powered on -screen prompts will assist in configuring basic settings. or Home Use yy Select the Home Use mode. Press the ▲ or ▼ button, then press the ENTERE button. Select ...) to Cable, a step appears allowing you see the volume OSD, press and hold MENU for 5 sec. 3 Selecting an antenna 4 Selecting a channel 5 Setting the Clock Mode 6 Viewing the HD Connection Guide. 7 Enjoy your TV. For more information, refer to Channel → Auto Program (p. 15). ✎✎...
...P IN environments. 01 Getting Started Connecting to an Antenna When the TV is initially powered on -screen prompts will assist in configuring basic settings. or Home Use yy Select the Home Use mode. Press the ▲ or ▼ button, then press the ENTERE button. Select ...) to Cable, a step appears allowing you see the volume OSD, press and hold MENU for 5 sec. 3 Selecting an antenna 4 Selecting a channel 5 Setting the Clock Mode 6 Viewing the HD Connection Guide. 7 Enjoy your TV. For more information, refer to Channel → Auto Program (p. 15). ✎✎...
User Manual (user Manual) (ver.1.0) (English)
Page 10
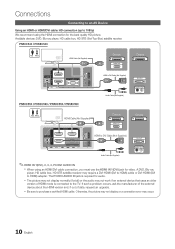
... OUT AUDIO OUT R-AUDIO-L Device HDMI OUT Device HDMI to purchase a certified HDMI cable. Available devices: DVD, Blu-ray player, HD cable box, HD STB (Set-Top-Box) satellite receiver. Connections Connecting to an AV Device Using an HDMI or HDMI/DVI cable: HD connection (up to the TV.
... OUT AUDIO OUT R-AUDIO-L Device HDMI OUT Device HDMI to purchase a certified HDMI cable. Available devices: DVD, Blu-ray player, HD cable box, HD STB (Set-Top-Box) satellite receiver. Connections Connecting to an AV Device Using an HDMI or HDMI/DVI cable: HD connection (up to the TV.
User Manual (user Manual) (ver.1.0) (English)
Page 11
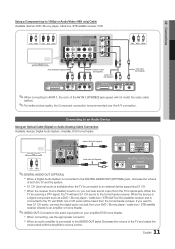
... to the AUDIO OUT jacks: Decrease the volume of both the TV and the system. xx 5.1 CH (channel) audio is available when the TV is set to on, you want to the audio input jacks on your amplifier/DVD home theater. If you can hear sound output from your DVD / Blu... audio amplifier is connected to an external device supporting 5.1 CH. When the source is a digital component such as a DVD / Blu-ray player / cable box / STB (Set-Top-Box) satellite receiver and is connected to the DIGITAL AUDIO OUT (OPTICAL) jack, decrease the volume of the TV and adjust the volume level...
... to the AUDIO OUT jacks: Decrease the volume of both the TV and the system. xx 5.1 CH (channel) audio is available when the TV is set to on, you want to the audio input jacks on your amplifier/DVD home theater. If you can hear sound output from your DVD / Blu... audio amplifier is connected to an external device supporting 5.1 CH. When the source is a digital component such as a DVD / Blu-ray player / cable box / STB (Set-Top-Box) satellite receiver and is connected to the DIGITAL AUDIO OUT (OPTICAL) jack, decrease the volume of the TV and adjust the volume level...
User Manual (user Manual) (ver.1.0) (English)
Page 13
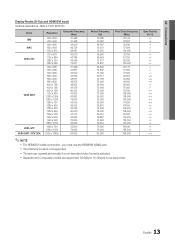
... 148.500 ✎✎NOTE xx For HDMI/DVI cable connection, you must use the HDMI IN 1(DVI) jack. Sync Polarity (H / V) +/-/+ -/-/-/- -/+ -/- +/+ 13 English xx The set may operate abnormally if a non-standard video format is not supported. xx The interlace mode is 1920 X 1080 @ 60 Hz. 02 Connections Display Modes (D-Sub...
... 148.500 ✎✎NOTE xx For HDMI/DVI cable connection, you must use the HDMI IN 1(DVI) jack. Sync Polarity (H / V) +/-/+ -/-/-/- -/+ -/- +/+ 13 English xx The set may operate abnormally if a non-standard video format is not supported. xx The interlace mode is 1920 X 1080 @ 60 Hz. 02 Connections Display Modes (D-Sub...
User Manual (user Manual) (ver.1.0) (English)
Page 14
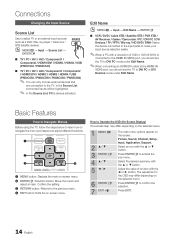
... the Source List, connected inputs will be highlighted. ✎✎ In the Source List, PC is connected to the HDMI IN 1(DVI) port, you should set the TV to Operate the OSD (On Screen Display) The access step may differ depending on -screen menu. Basic Features PRE-CH How to Navigate... DVI PC or DVI Devices mode under Edit Name. ✎✎When connecting an HDMI/DVI cable to the HDMI IN 1(DVI) port, you should set the TV to DVI PC mode under Edit Name. Select the desired submenu with a resolution of an item with the ▲ or ▼ button. Press...
... the Source List, connected inputs will be highlighted. ✎✎ In the Source List, PC is connected to the HDMI IN 1(DVI) port, you should set the TV to Operate the OSD (On Screen Display) The access step may differ depending on -screen menu. Basic Features PRE-CH How to Navigate... DVI PC or DVI Devices mode under Edit Name. ✎✎When connecting an HDMI/DVI cable to the HDMI IN 1(DVI) port, you should set the TV to DVI PC mode under Edit Name. Select the desired submenu with a resolution of an item with the ▲ or ▼ button. Press...
User Manual (user Manual) (ver.1.0) (English)
Page 15
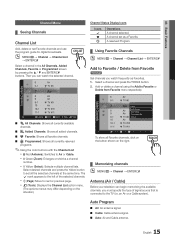
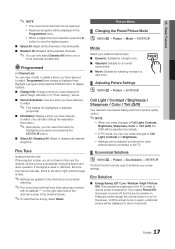
...channels. ■■ Favorite: Shows all favorite channels. ■■ Programmed: Shows all the selected channels at the same time. A channel set Favorite channels and use the program guide for digital broadcasts. Auto Program ■■ Air: Air antenna signal. ■■ Cable: Cable ...6 Air 6-1 * TV #6 7 8 9 9-1 10 10-1 11-1 Air Delete Air Air * TV #9 Air Add to Favorite or Delete from Favorite t Set channels you must specify the type of the selected channels. Select a channel and press the TOOLS button. 2. OO MENUm → Channel → Channel List →...
...channels. ■■ Favorite: Shows all favorite channels. ■■ Programmed: Shows all the selected channels at the same time. A channel set Favorite channels and use the program guide for digital broadcasts. Auto Program ■■ Air: Air antenna signal. ■■ Cable: Cable ...6 Air 6-1 * TV #6 7 8 9 9-1 10 10-1 11-1 Air Delete Air Air * TV #9 Air Add to Favorite or Delete from Favorite t Set channels you must specify the type of the selected channels. Select a channel and press the TOOLS button. 2. OO MENUm → Channel → Channel List →...
User Manual (user Manual) (ver.1.0) (English)
Page 16
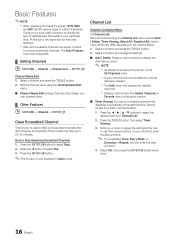
...remove scrambled channels. Press the ENTERE button to use the numeric buttons on your remote to select the desired channel in Channel List. 2. Set the current time first to select Stop. 2. Edit the channel name using the Channel List menu options (Add / Delete, Timer Viewing, ...Select All / Deselect All). xx The Add menu only appears for deleted channels. At this function. 1. Select a function and change its settings. ■■ Add / Delete: Delete or add a channel to filter out scrambled channels after Auto Program is only available in Cable mode. Press...
...remove scrambled channels. Press the ENTERE button to use the numeric buttons on your remote to select the desired channel in Channel List. 2. Set the current time first to select Stop. 2. Edit the channel name using the Channel List menu options (Add / Delete, Timer Viewing, ...Select All / Deselect All). xx The Add menu only appears for deleted channels. At this function. 1. Select a function and change its settings. ■■ Add / Delete: Delete or add a channel to filter out scrambled channels after Auto Program is only available in Cable mode. Press...
User Manual (user Manual) (ver.1.0) (English)
Page 17
... viewing is weak or distorted, fine tune the channel manually. Scroll to the left or right until the image is clear. ✎✎Settings are applied to the channel you're currently watching. ✎✎Fine tuned channels that have to fine tune the channel, as this is...Solution → ENTERE The Eco Function can be adjusted accordingly. xx When a digital channel is done automatically during the search and store operation. xx Settings can be adjusted and stored for picture quality control. ✎✎NOTE xx When you have reserved to view the digital program. ■■...
... viewing is weak or distorted, fine tune the channel manually. Scroll to the left or right until the image is clear. ✎✎Settings are applied to the channel you're currently watching. ✎✎Fine tuned channels that have to fine tune the channel, as this is...Solution → ENTERE The Eco Function can be adjusted accordingly. xx When a digital channel is done automatically during the search and store operation. xx Settings can be adjusted and stored for picture quality control. ✎✎NOTE xx When you have reserved to view the digital program. ■■...
User Manual (user Manual) (ver.1.0) (English)
Page 18
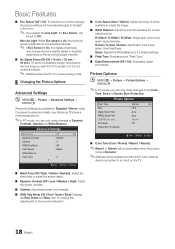
... to the Color Tone, Size and Screen Burn Protection. Basic Features ■■ Eco Sensor (Off / On): To enhance your power savings; Advanced Settings Black Tone Dynamic Contrast Gamma RGB Only Mode Color Space White Balance Flesh Tone : Off ► : Medium : 0 : Off : Native : 0...the range of colors available to create the image. ■■ White Balance: Adjust the color temperature for making fine adjustments to previous models, new Samsung TVs have a more natural picture. R-Gain / G-Gain / B-Gain: Adjust each color's (red, green, blue) darkness. R-Offset / G-Offset...
... to the Color Tone, Size and Screen Burn Protection. Basic Features ■■ Eco Sensor (Off / On): To enhance your power savings; Advanced Settings Black Tone Dynamic Contrast Gamma RGB Only Mode Color Space White Balance Flesh Tone : Off ► : Medium : 0 : Off : Native : 0...the range of colors available to create the image. ■■ White Balance: Adjust the color temperature for making fine adjustments to previous models, new Samsung TVs have a more natural picture. R-Gain / G-Gain / B-Gain: Adjust each color's (red, green, blue) darkness. R-Offset / G-Offset...
User Manual (user Manual) (ver.1.0) (English)
Page 19
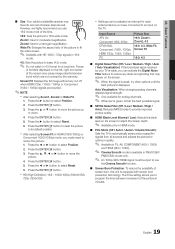
...ENTERE button to reset the picture to an input on the TV. xx HD (High Definition): 16:9 - 1080i/1080p (1920x1080), 720p (1280x720) xx Settings can activate the Digital Noise Filter feature to basic (4:3) mode. ✎✎ Do not watch in minutes. 19 English 03 Basic Features ■■...have its default position. Press the ► button to 16:9 wide mode. Press the ENTERE button. Press the ENTERE button. 3. P.SIZE 16:9: Sets the picture to select Position. 2. Traces of borders displayed on the left, right and center of the screen may cause image retention(screen burn) ...
...ENTERE button to reset the picture to an input on the TV. xx HD (High Definition): 16:9 - 1080i/1080p (1920x1080), 720p (1280x720) xx Settings can activate the Digital Noise Filter feature to basic (4:3) mode. ✎✎ Do not watch in minutes. 19 English 03 Basic Features ■■...have its default position. Press the ► button to 16:9 wide mode. Press the ENTERE button. Press the ENTERE button. 3. P.SIZE 16:9: Sets the picture to select Position. 2. Traces of borders displayed on the left, right and center of the screen may cause image retention(screen burn) ...
User Manual (user Manual) (ver.1.0) (English)
Page 20
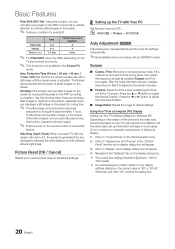
...removes after performing the function, repeat the function again. ✎✎ Press any damage by adjusting the white balance on your display settings dialog box, the correct value is not available in most cases. (If not, contact your current picture mode to 4:3, the ... PC will probably look different, but the same basic set to its default settings. ¦¦ Setting up information will appear. 4. Press the ▲ or ▼ button to default settings. Picture Reset (OK / Cancel) Resets your computer manufacturer or Samsung Dealer.) 1. Click on "Display" and a display ...
...removes after performing the function, repeat the function again. ✎✎ Press any damage by adjusting the white balance on your display settings dialog box, the correct value is not available in most cases. (If not, contact your current picture mode to 4:3, the ... PC will probably look different, but the same basic set to its default settings. ¦¦ Setting up information will appear. 4. Press the ▲ or ▼ button to default settings. Picture Reset (OK / Cancel) Resets your computer manufacturer or Samsung Dealer.) 1. Click on "Display" and a display ...
User Manual (user Manual) (ver.1.0) (English)
Page 21
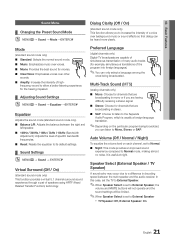
... translations of a voice over voices. ■■ Movie: Provides the best sound for the hearing impaired. ¦¦ Adjusting Sound Settings OO MENUm → Sound → Equalizer →ENTERE Equalizer Adjusts the sound mode (standard sound mode only). ■■ Balance ... to listen to the Separate Audio Program, which is usually a foreign-language translation. ✎✎Depending on each channel, set to its default settings. ¦¦ Sound Settings OO MENUm → Sound → ENTERE Virtual Surround (Off / On) (standard sound mode only) This function provides...
... translations of a voice over voices. ■■ Movie: Provides the best sound for the hearing impaired. ¦¦ Adjusting Sound Settings OO MENUm → Sound → Equalizer →ENTERE Equalizer Adjusts the sound mode (standard sound mode only). ■■ Balance ... to listen to the Separate Audio Program, which is usually a foreign-language translation. ✎✎Depending on each channel, set to its default settings. ¦¦ Sound Settings OO MENUm → Sound → ENTERE Virtual Surround (Off / On) (standard sound mode only) This function provides...
User Manual (user Manual) (ver.1.0) (English)
Page 22
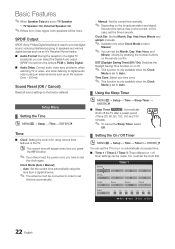
... interference going to speakers and various digital devices such as an AV receiver (0ms ~ 250ms). OO The current time will be mute. In this case, set the Month, Day, Year, Hour, and Minute directly by pressing the number buttons on / off the TV after a preset period of the TV. Time ...Zone: Select your time zone. ✎✎ This function is only available when the Clock Mode is set to Auto. ¦¦ Using the Sleep Timer OO MENUm → Setup → Time → Sleep Timer → ENTERE ■■ Sleep Timer t: Automatically ...
... interference going to speakers and various digital devices such as an AV receiver (0ms ~ 250ms). OO The current time will be mute. In this case, set the Month, Day, Year, Hour, and Minute directly by pressing the number buttons on / off the TV after a preset period of the TV. Time ...Zone: Select your time zone. ✎✎ This function is only available when the Clock Mode is set to Auto. ¦¦ Using the Sleep Timer OO MENUm → Setup → Time → Sleep Timer → ENTERE ■■ Sleep Timer t: Automatically ...

User Manual (user Manual) (ver.1.0) (English)
Page 23
... NC-17: No children under 17 should be accompanied by the Timer): The TV will be automatically turned off after 3 hours of a new TV set is set to TV): Select Air or Cable. Source: Select TV or USB content to be selected only when a USB device is connected to TV): Select .... xx When there is too long, the folder cannot be blocked. Repeat: Select Once, Everyday, Mon~Fri, Mon~Sat, Sat~Sun or Manual to set to USB): Select a folder in the USB, the Slide Show will automatically block certain categories dealing with more sensitive material. Children under age 17. / ...
... NC-17: No children under 17 should be accompanied by the Timer): The TV will be automatically turned off after 3 hours of a new TV set is set to TV): Select Air or Cable. Source: Select TV or USB content to be selected only when a USB device is connected to TV): Select .... xx When there is too long, the folder cannot be blocked. Repeat: Select Once, Everyday, Mon~Fri, Mon~Sat, Sat~Sun or Manual to set to USB): Select a folder in the USB, the Slide Show will automatically block certain categories dealing with more sensitive material. Children under age 17. / ...
User Manual (user Manual) (ver.1.0) (English)
Page 24
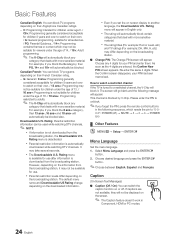
...→ MUTE → 8 → 2 → 4 → POWER (on) ¦¦ Other Features OO MENUm → Setup → ENTERE Menu Language Set the menu language. 1. If captions are entered, the Confirm New PIN screen appears. Rating menu is automatically downloaded while watching DTV channels. xx The rating.... xx Even if you block the G category, then PG, 14+ and 18+ will automatically be blocked also. For example, if you set the on the broadcasting station. ■■ Change PIN: The Change PIN screen will appear. Basic Features Canadian English: You can block TV...
...→ MUTE → 8 → 2 → 4 → POWER (on) ¦¦ Other Features OO MENUm → Setup → ENTERE Menu Language Set the menu language. 1. If captions are entered, the Confirm New PIN screen appears. Rating menu is automatically downloaded while watching DTV channels. xx The rating.... xx Even if you block the G category, then PG, 14+ and 18+ will automatically be blocked also. For example, if you set the on the broadcasting station. ■■ Change PIN: The Change PIN screen will appear. Basic Features Canadian English: You can block TV...


