
User Manual
Page 3
... Changing the Preset Sound Mode 20 Adjusting Sound Settings 20 Sound Settings 20 yy Setup Menu 21 Setting the Time 21 Using the Sleep Timer 22 Setting the On / Off Timer 22 Locking Programs 22 Other Features 24 Picture In Picture (PIP) 25 yy Support Menu 25 Advanced Features yy Media Play 27 Connecting a USB Device 27 Screen Display 28 Playing Multiple Files 31 Media Play - Step by pressing the TOOLS button on screen display). 3 English Contents Getting Started yy List of Features 4 yy Accessories 4 yy Install...
... Changing the Preset Sound Mode 20 Adjusting Sound Settings 20 Sound Settings 20 yy Setup Menu 21 Setting the Time 21 Using the Sleep Timer 22 Setting the On / Off Timer 22 Locking Programs 22 Other Features 24 Picture In Picture (PIP) 25 yy Support Menu 25 Advanced Features yy Media Play 27 Connecting a USB Device 27 Screen Display 28 Playing Multiple Files 31 Media Play - Step by pressing the TOOLS button on screen display). 3 English Contents Getting Started yy List of Features 4 yy Accessories 4 yy Install...
User Manual
Page 4
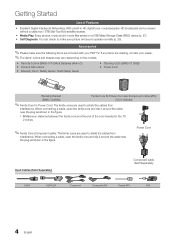
... used to shield the cables from interference. When connecting a cable, open the ferrite core and clip it around the cable near the plug as shown in the figure. yy Media Play: Enjoy photos, music and/or movie files saved on the models. yy Remote Control (BN59-01109A) & Batteries (AAA x 2) yy Owner's Instructions yy Warranty Card / Safety Guide / Quick Setup Guide yy Cleaning Cloth (BN63-01798B) yy Power Cord Blanking Bracket...
... used to shield the cables from interference. When connecting a cable, open the ferrite core and clip it around the cable near the plug as shown in the figure. yy Media Play: Enjoy photos, music and/or movie files saved on the models. yy Remote Control (BN59-01109A) & Batteries (AAA x 2) yy Owner's Instructions yy Warranty Card / Safety Guide / Quick Setup Guide yy Cleaning Cloth (BN63-01798B) yy Power Cord Blanking Bracket...
User Manual
Page 8
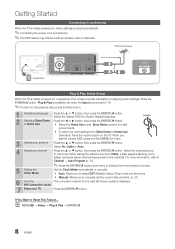
... Use (standard): Press the volume button on -screen prompts will assist in configuring basic settings. If You Want to an Antenna When the TV is displayed. Select Air, Cable or Auto. 4 Selecting a channel Press the ▲ or ▼ button, then press the ENTERE button. Press the POWERP button. Getting Started Connecting to Reset This Feature... Select the channel source to memorize. VHF/UHF Antenna Power Input Antenna Cable (Not Supplied) or Cable ANT OUT Plug & Play...
... Use (standard): Press the volume button on -screen prompts will assist in configuring basic settings. If You Want to an Antenna When the TV is displayed. Select Air, Cable or Auto. 4 Selecting a channel Press the ▲ or ▼ button, then press the ENTERE button. Press the POWERP button. Getting Started Connecting to Reset This Feature... Select the channel source to memorize. VHF/UHF Antenna Power Input Antenna Cable (Not Supplied) or Cable ANT OUT Plug & Play...
User Manual
Page 9
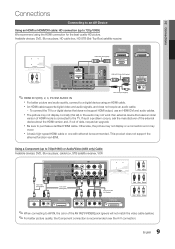
... display or a connection error may not work if an external device that does not support HDMI output, use an HDMI/DVI and audio cables. Available devices: DVD, Blu-ray player, HD cable box, HD STB (Set-Top-Box) satellite receiver. xx The picture may not display normally (if at all) or the audio may occur. This product does not support the ethernet function via HDMI. HDMI Cable (Not Supplied) Device HDMI OUT Device HDMI IN 3 R W HDMI to DVI Cable (Not Supplied) DVI OUT USB Red White R AUDIO OUT W Audio Cable (Not Supplied) R-AUDIO...
... display or a connection error may not work if an external device that does not support HDMI output, use an HDMI/DVI and audio cables. Available devices: DVD, Blu-ray player, HD cable box, HD STB (Set-Top-Box) satellite receiver. xx The picture may not display normally (if at all) or the audio may occur. This product does not support the ethernet function via HDMI. HDMI Cable (Not Supplied) Device HDMI OUT Device HDMI IN 3 R W HDMI to DVI Cable (Not Supplied) DVI OUT USB Red White R AUDIO OUT W Audio Cable (Not Supplied) R-AUDIO...
User Manual
Page 12
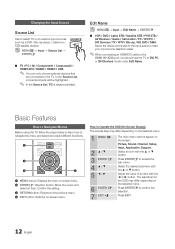
... can only choose external devices that are connected to confirm the selection. Select the desired submenu with the ▲ or ▼ button. Changing the Input Source Source List Use to Operate the OSD (On Screen Display) The access step may differ depending on the screen: Picture, Sound, Channel, Setup, Input, Application, Support. Press EXIT. 12 English How to select TV or an external input sources such as a DVD / Blu-ray player / cable box / STB satellite...
... can only choose external devices that are connected to confirm the selection. Select the desired submenu with the ▲ or ▼ button. Changing the Input Source Source List Use to Operate the OSD (On Screen Display) The access step may differ depending on the screen: Picture, Sound, Channel, Setup, Input, Application, Support. Press EXIT. 12 English How to select TV or an external input sources such as a DVD / Blu-ray player / cable box / STB satellite...
User Manual
Page 15
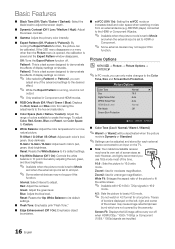
... adjusts the brightness of the channel number in order to reduce power consumption. Until the screen turns on the screen. Press any button except the volume button to turn on again, a distorted picture will be displayed for each external device connected to the TV. ¦¦ Economical Solutions OO MENUm → Picture → Eco Solution → ENTERE The Eco Function can be set how long you adjusts the Cell Light...
... adjusts the brightness of the channel number in order to reduce power consumption. Until the screen turns on the screen. Press any button except the volume button to turn on again, a distorted picture will be displayed for each external device connected to the TV. ¦¦ Economical Solutions OO MENUm → Picture → Eco Solution → ENTERE The Eco Function can be set how long you adjusts the Cell Light...
User Manual
Page 16
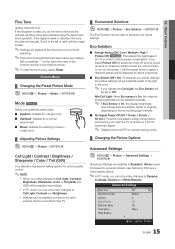
.... Screen Fit: Displays the full image without any of the advanced settings to an input on the TV. ■■ Size: Your cable box/satellite receiver may not support this function. R-Offset / G-Offset / B-Offset: Adjust each color's (red, green, blue) brightness. Zoom1: Use for a stronger magnification. Wide Fit: Enlarges the aspect ratio of screen sizes as well. To adjust Color, Red, Green, Blue and Reset, set to all input. ✎✎ Some external devices may have its default settings...
.... Screen Fit: Displays the full image without any of the advanced settings to an input on the TV. ■■ Size: Your cable box/satellite receiver may not support this function. R-Offset / G-Offset / B-Offset: Adjust each color's (red, green, blue) brightness. Zoom1: Use for a stronger magnification. Wide Fit: Enlarges the aspect ratio of screen sizes as well. To adjust Color, Red, Green, Blue and Reset, set to all input. ✎✎ Some external devices may have its default settings...
User Manual
Page 19
... on your remote control, select the 3D Mode of the source signal formats above. We recommend sitting with one of the image you want to 1920 x 1080 input. Press the ◄ or ► button, then select 3D. Select OK, then press the ENTERE button. 4. xx 3D mode is automatically switched to 3D in following cases: when changing a channel or the input source, or accessing Media Play. Here, correct...
... on your remote control, select the 3D Mode of the source signal formats above. We recommend sitting with one of the image you want to 1920 x 1080 input. Press the ◄ or ► button, then select 3D. Select OK, then press the ENTERE button. 4. xx 3D mode is automatically switched to 3D in following cases: when changing a channel or the input source, or accessing Media Play. Here, correct...
User Manual
Page 20
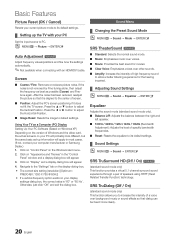
...) Resets your current picture mode to its default settings. ¦¦ Sound Settings OO MENUm → Sound → ENTERE SRS TruSurround HD (Off / On) t (standard sound mode only) This function provides a virtual 5.1 channel surround sound experience through a pair of speakers using HRTF (Head Related Transfer Function) technology. Click on the Windows start menu. 2. Press the ▲ or ▼ button to default settings. Click on "Control Panel" on "Display" and a display dialog box will...
...) Resets your current picture mode to its default settings. ¦¦ Sound Settings OO MENUm → Sound → ENTERE SRS TruSurround HD (Off / On) t (standard sound mode only) This function provides a virtual 5.1 channel surround sound experience through a pair of speakers using HRTF (Head Related Transfer Function) technology. Click on the Windows start menu. 2. Press the ▲ or ▼ button to default settings. Click on "Control Panel" on "Display" and a display dialog box will...
User Manual
Page 21
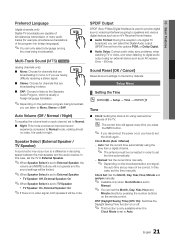
... number buttons on the remote control. Clock Mode (Auto / Manual) -- Auto: Set the current time automatically using the time from the options PCM, or Dolby Digital. ■■ Audio Delay: Correct audio-video sync problems, when watching TV or video, and when listening to digital audio output using various timer features of the TV. In this case, set the TV to External Speaker. ✎✎When Speaker Select is set to External Speaker, the volume and MUTE buttons will not operate and the sound settings...
... number buttons on the remote control. Clock Mode (Auto / Manual) -- Auto: Set the current time automatically using the time from the options PCM, or Dolby Digital. ■■ Audio Delay: Correct audio-video sync problems, when watching TV or video, and when listening to digital audio output using various timer features of the TV. In this case, set the TV to External Speaker. ✎✎When Speaker Select is set to External Speaker, the volume and MUTE buttons will not operate and the sound settings...
User Manual
Page 24
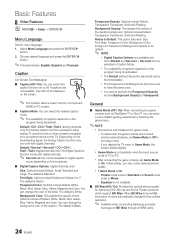
..., the picture mode is set to the optimal resolution. ✎✎ Available when connecting Samsung products that support BD Wise through a HDMI cable. 24 English Foreground Color: Options include Default, White, Black, Red, Green, Blue, Yellow, Magenta and Cyan. Background Opacity: This adjusts the opacity of captions depends on or off. Equalizer is supplied from an external device to 7. Select Menu Language and press the ENTERE button. 2. Unfortunately, you display the TV menu in Caption Mode.
..., the picture mode is set to the optimal resolution. ✎✎ Available when connecting Samsung products that support BD Wise through a HDMI cable. 24 English Foreground Color: Options include Default, White, Black, Red, Green, Blue, Yellow, Magenta and Cyan. Background Opacity: This adjusts the opacity of captions depends on or off. Equalizer is supplied from an external device to 7. Select Menu Language and press the ENTERE button. 2. Unfortunately, you display the TV menu in Caption Mode.

User Manual
Page 25
... same mode. xx If you turn the TV off while watching in the Sound menu. ✎✎ The melody will disappear. Please check your connections. No: If you use the main screen to view a game or karaoke. If the problem persists, refer to the external device's user manual. ■■ Signal Information: (Digital channels only) An HD channel's reception quality is either Air or Cable as the input source for...
... same mode. xx If you turn the TV off while watching in the Sound menu. ✎✎ The melody will disappear. Please check your connections. No: If you use the main screen to view a game or karaoke. If the problem persists, refer to the external device's user manual. ■■ Signal Information: (Digital channels only) An HD channel's reception quality is either Air or Cable as the input source for...
User Manual
Page 27
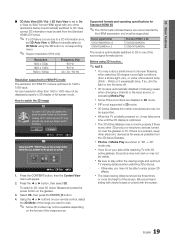
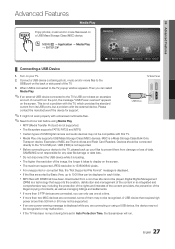
... and audio devices may not be connected directly to the TV's USB port. USB (HDD) is connected to the TV, popup window appears. x Before connecting your device to the TV, please back up to 1000 files can select Media Play. SAMSUNG is not responsible for support. x MP3 files with DRM that have been downloaded from the port, the message "USB Power overload" appears on the screen. Digital...
... and audio devices may not be connected directly to the TV's USB port. USB (HDD) is connected to the TV, popup window appears. x Before connecting your device to the TV, please back up to 1000 files can select Media Play. SAMSUNG is not responsible for support. x MP3 files with DRM that have been downloaded from the port, the message "USB Power overload" appears on the screen. Digital...

User Manual
Page 32
... register, you connect to view information about the played file. Advanced Features Videos/Music/Photos Play Option menu During file playback, press the TOOLS button. If you can zoom into images in full screen mode. You can adjust the picture setting. (p. 15~20) You can adjust the sound setting. (p. 20, 21) You can select the slide show speed during the slide show . You can download the VOD...
... register, you connect to view information about the played file. Advanced Features Videos/Music/Photos Play Option menu During file playback, press the TOOLS button. If you can zoom into images in full screen mode. You can adjust the picture setting. (p. 15~20) You can adjust the sound setting. (p. 20, 21) You can select the slide show speed during the slide show . You can download the VOD...
User Manual
Page 33
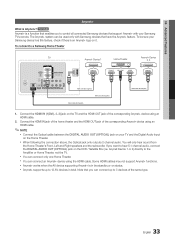
... the corresponding Anynet+ device using an HDMI cable. ✎✎NOTE xx Connect the Optical cable between the DIGITAL AUDIO OUT (OPTICAL) jack on your TV and the Digital Audio Input on the DVD / Satellite Box (i.e. You will only hear sound from the Home Theater's Front, Left and Right speakers and the subwoofer. xx You can connect an Anynet+ device using an HDMI cable. 2. Connect the HDMI IN jack of the home...
... the corresponding Anynet+ device using an HDMI cable. ✎✎NOTE xx Connect the Optical cable between the DIGITAL AUDIO OUT (OPTICAL) jack on your TV and the Digital Audio Input on the DVD / Satellite Box (i.e. You will only hear sound from the Home Theater's Front, Left and Right speakers and the subwoofer. xx You can connect an Anynet+ device using an HDMI cable. 2. Connect the HDMI IN jack of the home...
User Manual
Page 36
...; Only one receiver (home theater) can connect an Anynet+ device using the HDMI cable only. I want . • Select View TV in the Anynet+ menu. • Press the SOURCE button on the TV remote control and select a non- Advanced Features ¦¦ Troubleshooting for Anynet+ Problem Possible Solution Anynet+ does not work in certain situations. (Searching channels, operating Media Play or Plug & Play (initial setup), etc.) • When connecting or removing the HDMI cable, please...
...; Only one receiver (home theater) can connect an Anynet+ device using the HDMI cable only. I want . • Select View TV in the Anynet+ menu. • Press the SOURCE button on the TV remote control and select a non- Advanced Features ¦¦ Troubleshooting for Anynet+ Problem Possible Solution Anynet+ does not work in certain situations. (Searching channels, operating Media Play or Plug & Play (initial setup), etc.) • When connecting or removing the HDMI cable, please...
User Manual
Page 40
... set top box. Other Information Troubleshooting If the TV seems to MENU - If none of possible problems and solutions. Issues Poor picture Solutions and Explanations First of the screen. • If the picture size is a problem, keep other 3D product or electronic devices turned on Support, or call Samsung customer service at 1-800-SAMSUNG. Support - This is properly displaying the test image. (go to Picture mode / Color / Brightness / Sharpness) (p. 15) • Adjust...
... set top box. Other Information Troubleshooting If the TV seems to MENU - If none of possible problems and solutions. Issues Poor picture Solutions and Explanations First of the screen. • If the picture size is a problem, keep other 3D product or electronic devices turned on Support, or call Samsung customer service at 1-800-SAMSUNG. Support - This is properly displaying the test image. (go to Picture mode / Color / Brightness / Sharpness) (p. 15) • Adjust...
User Manual
Page 41
... cables connected to the TV and external devices). • Set your external device's (Cable/Sat Box, DVD, Blu-ray etc) video outputs to match the connections to the channel list. Auto Program then select Auto and make sure the audio cables are using an external device, check the device's audio output option (ex. "PC" is always shown on digital channels. • Check Caption Setup menu. Self Diagnosis - Sound Test) (p. 25) If the audio is OK, the sound problem may not have a HDMI connected...
... cables connected to the TV and external devices). • Set your external device's (Cable/Sat Box, DVD, Blu-ray etc) video outputs to match the connections to the channel list. Auto Program then select Auto and make sure the audio cables are using an external device, check the device's audio output option (ex. "PC" is always shown on digital channels. • Check Caption Setup menu. Self Diagnosis - Sound Test) (p. 25) If the audio is OK, the sound problem may not have a HDMI connected...
User Manual
Page 42
... turned off , or adjust the volume. • Program the Cable/Set remote control to Plug & Play Feature (p. 8). ✎✎Some of audio or video can not be selected in the Plug & Play procedure. A "Mode Not Supported" message appears. • Check the supported resolution of the TV. There is a plastic smell from the TV. • This smell is only available with an HDMI connection. Change the settings from Store Demo mode to the Cable/Set user manual for long term use...
... turned off , or adjust the volume. • Program the Cable/Set remote control to Plug & Play Feature (p. 8). ✎✎Some of audio or video can not be selected in the Plug & Play procedure. A "Mode Not Supported" message appears. • Check the supported resolution of the TV. There is a plastic smell from the TV. • This smell is only available with an HDMI connection. Change the settings from Store Demo mode to the Cable/Set user manual for long term use...

User Manual
Page 45
... N Navigate O Optimal resolution P Photos Picture Size PIP Plug & Play Power Indicator 7, 13 15 17 15 16 11 R Receiver Recording Remote Control Repeat Mode RGB Only Mode Rotate 9, 33 10, 33 38 24 43 S Select All Self Diagnosis Sharpness Signal Information Sleep Timer Slide Show Software Upgrade Source List Speaker Select Specifications Standby mode Symbol 27 T 25 25 Timer 21 Title 30 Tools Troubleshooting TV Speaker 12 U USB Drive 11 30 16, 32 25 8 6 V Video Formats Videos Volume W Wall Mount Warm White Balance 35...
... N Navigate O Optimal resolution P Photos Picture Size PIP Plug & Play Power Indicator 7, 13 15 17 15 16 11 R Receiver Recording Remote Control Repeat Mode RGB Only Mode Rotate 9, 33 10, 33 38 24 43 S Select All Self Diagnosis Sharpness Signal Information Sleep Timer Slide Show Software Upgrade Source List Speaker Select Specifications Standby mode Symbol 27 T 25 25 Timer 21 Title 30 Tools Troubleshooting TV Speaker 12 U USB Drive 11 30 16, 32 25 8 6 V Video Formats Videos Volume W Wall Mount Warm White Balance 35...


