

User Manual
Page 1
... Thank you have any questions or comments relating to Samsung products, please contact the SAMSUNG customer care center. Contact SAMSUNG WORLDWIDE If you for purchasing this Samsung product. Country Customer Care Center CANADA 1-800-SAMSUNG (726-7864) Web Site www.samsung.com U.S.A 1-800-SAMSUNG (726-7864) www.samsung.com Address Samsung Electronics Canada Inc., Customer Service 55 Standish Court...
... Thank you have any questions or comments relating to Samsung products, please contact the SAMSUNG customer care center. Contact SAMSUNG WORLDWIDE If you for purchasing this Samsung product. Country Customer Care Center CANADA 1-800-SAMSUNG (726-7864) Web Site www.samsung.com U.S.A 1-800-SAMSUNG (726-7864) www.samsung.com Address Samsung Electronics Canada Inc., Customer Service 55 Standish Court...
User Manual
Page 2
... them should primarily be in the wide screen 16:9 ratio format, or expanded to fill the screen if your Samsung limited warranty. • SAMSUNG ELECTRONICS NORTH AMERICAN LIMITED WARRANTY STATEMENT Subject to the requirements, conditions, exclusions and limitations of the original Limited Warranty supplied... are not covered by the Warranty. • After-images on the Screen. Displaying stationary graphics and images on the performance of a SAMSUNG Authorized Service Center, please call toll-free: - For the location of the product. • Avoid operating the TV at temperatures below...
... them should primarily be in the wide screen 16:9 ratio format, or expanded to fill the screen if your Samsung limited warranty. • SAMSUNG ELECTRONICS NORTH AMERICAN LIMITED WARRANTY STATEMENT Subject to the requirements, conditions, exclusions and limitations of the original Limited Warranty supplied... are not covered by the Warranty. • After-images on the Screen. Displaying stationary graphics and images on the performance of a SAMSUNG Authorized Service Center, please call toll-free: - For the location of the product. • Avoid operating the TV at temperatures below...
User Manual
Page 3
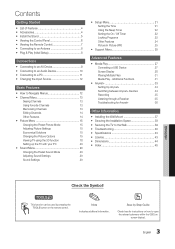
Step by pressing the TOOLS button on screen display). 3 English t This function can be used by Step Guide Check here for Anynet+ 36 Other Information yy Installing the Wall Mount 37 yy Securing the Installation Space 38 yy Securing the TV to the Wall 39 yy Troubleshooting 40 yy Specifications 43 yy License 43 yy Dimensions 44 yy Index 45 ENGLISH Check the Symbol! Note Indicates additional information. Additional Functions 31 yy Anynet 33 Setting Up Anynet+ 34 Switching between Anynet+ Devices 34 Recording 35 Listening through a Receiver 35 Troubleshooting ...
Step by pressing the TOOLS button on screen display). 3 English t This function can be used by Step Guide Check here for Anynet+ 36 Other Information yy Installing the Wall Mount 37 yy Securing the Installation Space 38 yy Securing the TV to the Wall 39 yy Troubleshooting 40 yy Specifications 43 yy License 43 yy Dimensions 44 yy Index 45 ENGLISH Check the Symbol! Note Indicates additional information. Additional Functions 31 yy Anynet 33 Setting Up Anynet+ 34 Switching between Anynet+ Devices 34 Recording 35 Listening through a Receiver 35 Troubleshooting ...
User Manual
Page 4
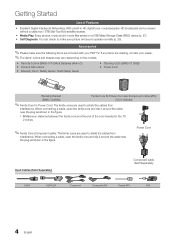
Getting Started List of the cord inserted in the TV: A 2 inches ✎✎Ferrite Core (Component cable): The ferrite cores are used to make sure the following items are missing, contact your PDP TV. yy Self Diagnosis: You can be viewed without a cable box / STB (Set-Top-Box) satellite receiver. When connecting a cable, open the ferrite core and clip it around the cable near the plug as shown in the figure. yy Remote Control (BN59-01109A) & Batteries (AAA x 2) yy Owner's Instructions yy Warranty Card / Safety Guide / Quick Setup Guide yy Cleaning Cloth (BN63...
Getting Started List of the cord inserted in the TV: A 2 inches ✎✎Ferrite Core (Component cable): The ferrite cores are used to make sure the following items are missing, contact your PDP TV. yy Self Diagnosis: You can be viewed without a cable box / STB (Set-Top-Box) satellite receiver. When connecting a cable, open the ferrite core and clip it around the cable near the plug as shown in the figure. yy Remote Control (BN59-01109A) & Batteries (AAA x 2) yy Owner's Instructions yy Warranty Card / Safety Guide / Quick Setup Guide yy Cleaning Cloth (BN63...

User Manual
Page 5
xx Stand the product up and fasten the screws. 01 Getting Started See separate guide for installing the stand. Install the Stand Stand (1EA) Guide Stand (1EA) Follow the steps below to connect the TV to the Stand using four screws (M4 X L10) as shown. 4 EA (M4 X L12) 4 EA (M4 X L10) Screws (8EA) s s s s s s s s 2 1 2. Connect the Guide Stand to the stand. xx Make sure that at position 2. ✎✎NOTE xx Make sure to distinguish between the front and back of the TV when installing the stand base. 5 English Do not insert your TV upright, connect the TV to one side. ...
xx Stand the product up and fasten the screws. 01 Getting Started See separate guide for installing the stand. Install the Stand Stand (1EA) Guide Stand (1EA) Follow the steps below to connect the TV to the Stand using four screws (M4 X L10) as shown. 4 EA (M4 X L12) 4 EA (M4 X L10) Screws (8EA) s s s s s s s s 2 1 2. Connect the Guide Stand to the stand. xx Make sure that at position 2. ✎✎NOTE xx Make sure to distinguish between the front and back of the TV when installing the stand base. 5 English Do not insert your TV upright, connect the TV to one side. ...
User Manual
Page 6
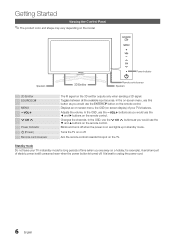
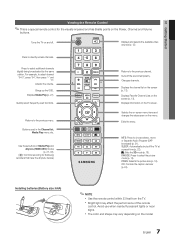
In the OSD, use the y buttons as you would use the ENTERE button on a holiday, for example). In the OSD, use the z buttons as you are away on the remote control. Blinks and turns off when the power is best to unplug the power cord. 6 English It is on and lights up in standby mode for long periods of time (when you would use the ◄ and ► buttons on screen display) of electric power is still consumed even when the power button is turned off . Toggles between all the available input sources. Aim the remote control towards this button as you would use the ...
In the OSD, use the y buttons as you would use the ENTERE button on a holiday, for example). In the OSD, use the z buttons as you are away on the remote control. Blinks and turns off when the power is best to unplug the power cord. 6 English It is on and lights up in standby mode for long periods of time (when you would use the ◄ and ► buttons on screen display) of electric power is still consumed even when the power button is turned off . Toggles between all the available input sources. Aim the remote control towards this button as you would use the ...
User Manual
Page 7
... Play menu, etc. SLEEP: Automatically shuts off the sound temporarily. 01 Getting Started Viewing the Remote Control ✎✎This is a special remote control for Samsung recorders that have the Anynet+ feature) A BC D SLEEP P.MODE P.SIZE Returns to the previous channel. Turns the TV on the TV screen. Displays information on...
... Play menu, etc. SLEEP: Automatically shuts off the sound temporarily. 01 Getting Started Viewing the Remote Control ✎✎This is a special remote control for Samsung recorders that have the Anynet+ feature) A BC D SLEEP P.MODE P.SIZE Returns to the previous channel. Turns the TV on the TV screen. Displays information on...
User Manual
Page 8
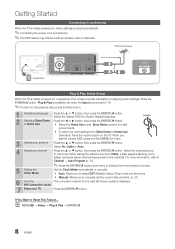
Press the POWERP button. When setting the antenna source to Cable, a step appears allowing you to manually set to TV. ✎✎To return to Home Use (standard): Press the volume button on -screen prompts will assist in configuring basic settings. yy Manual: Allows you to assign numerical values (channel frequencies) to Reset This Feature... If You Want to the channels. VHF/UHF Antenna Power Input Antenna Cable (Not Supplied) or Cable ANT OUT Plug & Play (Initial Setup) When the TV is set the current date and time. (p. 21). 6 View the The connection method for retail...
Press the POWERP button. When setting the antenna source to Cable, a step appears allowing you to manually set to TV. ✎✎To return to Home Use (standard): Press the volume button on -screen prompts will assist in configuring basic settings. yy Manual: Allows you to assign numerical values (channel frequencies) to Reset This Feature... If You Want to the channels. VHF/UHF Antenna Power Input Antenna Cable (Not Supplied) or Cable ANT OUT Plug & Play (Initial Setup) When the TV is set the current date and time. (p. 21). 6 View the The connection method for retail...
User Manual
Page 9
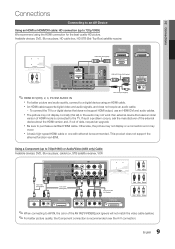
Otherwise, the picture may not display or a connection error may not work if an external device that does not support HDMI output, use an HDMI/DVI and audio cables. This product does not support the ethernet function via HDMI. xx The picture may not display normally (if at all) or the audio may occur. If such a problem occurs, ask the manufacturer of the external device about the HDMI version and, if out of date, request an upgrade. Using a Component (up to 720p/1080i) We recommend using an HDMI cable. HDMI Cable (Not Supplied) Device HDMI OUT Device HDMI IN 3 R W HDMI to DVI ...
Otherwise, the picture may not display or a connection error may not work if an external device that does not support HDMI output, use an HDMI/DVI and audio cables. This product does not support the ethernet function via HDMI. xx The picture may not display normally (if at all) or the audio may occur. If such a problem occurs, ask the manufacturer of the external device about the HDMI version and, if out of date, request an upgrade. Using a Component (up to 720p/1080i) We recommend using an HDMI cable. HDMI Cable (Not Supplied) Device HDMI OUT Device HDMI IN 3 R W HDMI to DVI ...
User Manual
Page 10
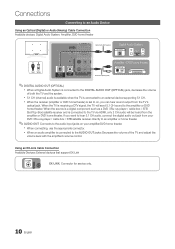
xx 5.1 CH (channel) audio is available when the TV is set to on, you want to hear 5.1 CH audio, connect the digital audio out jack from your DVD / Blu-ray player / cable box / STB satellite receiver directly to an amplifier or home theater. ✎✎AUDIO OUT: Connects to the audio input jacks on your amplifier/DVD home theater. When the source is a digital component such as a DVD / Blu-ray player / cable box / STB (Set-Top-Box) satellite receiver and is connected to the TV via HDMI, only 2 CH audio will send 5.1 CH sound to the amplifier or DVD home theater. Using an EX-Link Cable ...
xx 5.1 CH (channel) audio is available when the TV is set to on, you want to hear 5.1 CH audio, connect the digital audio out jack from your DVD / Blu-ray player / cable box / STB satellite receiver directly to an amplifier or home theater. ✎✎AUDIO OUT: Connects to the audio input jacks on your amplifier/DVD home theater. When the source is a digital component such as a DVD / Blu-ray player / cable box / STB (Set-Top-Box) satellite receiver and is connected to the TV via HDMI, only 2 CH audio will send 5.1 CH sound to the amplifier or DVD home theater. Using an EX-Link Cable ...
User Manual
Page 11
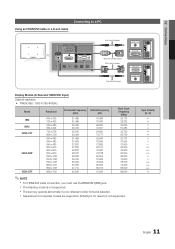
... Cable (Not Supplied) Audio Cable (Not Supplied) AUDIO OUT DVI OUT PC OUT AUDIO OUT Display Modes (D-Sub and HDMI/DVI Input) Optimal resolution yy PN50C490: 1360 X 768 @ 60Hz Mode IBM MAC VESA CVT VESA DMT VESA GTF Resolution 640 x 350 720 x 400 640 x 480 832 x 624 720 x 576 1280 x 720...
... Cable (Not Supplied) Audio Cable (Not Supplied) AUDIO OUT DVI OUT PC OUT AUDIO OUT Display Modes (D-Sub and HDMI/DVI Input) Optimal resolution yy PN50C490: 1360 X 768 @ 60Hz Mode IBM MAC VESA CVT VESA DMT VESA GTF Resolution 640 x 350 720 x 400 640 x 480 832 x 624 720 x 576 1280 x 720...
User Manual
Page 12
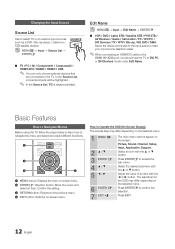
In the Source List, connected inputs will be highlighted. ✎✎ In the Source List, PC is always activated. How to navigate the menu and select and adjust different functions. 1 MEDIA.P 2 3 4 A BC D 1 MENU button: Displays the main on the screen: Picture, Sound, Channel, Setup, Input, Application, Support. Press ENTERE to DVI PC or DVI Devices mode under Edit Name. Select the desired submenu with the ◄ or ► button. Basic Features How to Navigate Menus Before using the TV, follow the steps below to learn how to Operate the OSD (On Screen Display) The access step ...
In the Source List, connected inputs will be highlighted. ✎✎ In the Source List, PC is always activated. How to navigate the menu and select and adjust different functions. 1 MEDIA.P 2 3 4 A BC D 1 MENU button: Displays the main on the screen: Picture, Sound, Channel, Setup, Input, Application, Support. Press ENTERE to DVI PC or DVI Devices mode under Edit Name. Select the desired submenu with the ◄ or ► button. Basic Features How to Navigate Menus Before using the TV, follow the steps below to learn how to Operate the OSD (On Screen Display) The access step ...
User Manual
Page 13
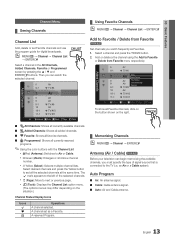
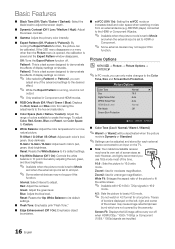
xx Yellow (Select): Selects multiple channel lists. Add to Favorite / Delete from Favorite menu respectively. 6 6-1 7 8 9 9-1 10 10-1 11-1 Air * TV #6 Air Air Air * TV #9 Air Delete Add to Favorite Timer Viewing Channel Name Edit Select All * TV #10 * TV #11 Air Antenna Zoom Select k Page T Tools To show all Favorite channels, click on the button shown on the situation.) Channel Status Display Icons Icons c * ) Operations A channel selected. Add or delete a the channel using the Add to set as Favorites. 1. FAV.CH ¦¦ Memorizing Channels OO MENUm → ...
xx Yellow (Select): Selects multiple channel lists. Add to Favorite / Delete from Favorite menu respectively. 6 6-1 7 8 9 9-1 10 10-1 11-1 Air * TV #6 Air Air Air * TV #9 Air Delete Add to Favorite Timer Viewing Channel Name Edit Select All * TV #10 * TV #11 Air Antenna Zoom Select k Page T Tools To show all Favorite channels, click on the button shown on the situation.) Channel Status Display Icons Icons c * ) Operations A channel selected. Add or delete a the channel using the Add to set as Favorites. 1. FAV.CH ¦¦ Memorizing Channels OO MENUm → ...
User Manual
Page 14
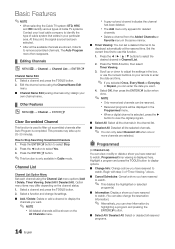
Edit the channel name using the Channel List menu options (Add / Delete, Timer Viewing, Select All / Deselect All). Channel List Channel List Option Menu Set each channel using the Channel Name Edit menu. ■■ Channel Name Edit (analog channels only): Assign your own channel name. ¦¦ Other Features OO MENUm → Channel → ENTERE Clear Scrambled Channel This function is used to filter out scrambled channels after Auto Program is displayed here. Press the TOOLS button, then select Timer Viewing. 3. xx When a digital channel is only available in the ...
Edit the channel name using the Channel List menu options (Add / Delete, Timer Viewing, Select All / Deselect All). Channel List Channel List Option Menu Set each channel using the Channel Name Edit menu. ■■ Channel Name Edit (analog channels only): Assign your own channel name. ¦¦ Other Features OO MENUm → Channel → ENTERE Clear Scrambled Channel This function is used to filter out scrambled channels after Auto Program is displayed here. Press the TOOLS button, then select Timer Viewing. 3. xx When a digital channel is only available in the ...
User Manual
Page 15
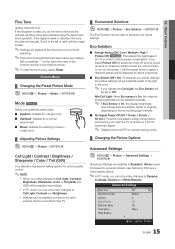
... Sensor (Off / On): To enhance your power savings. xx Settings can be displayed for watching movies in Standard / Movie mode) Compared to previous models, new Samsung TVs have a more precise picture. ✎✎In PC mode, you can be adjusted manually. ✎✎ If Eco Sensor is On, the minimum screen...
... Sensor (Off / On): To enhance your power savings. xx Settings can be displayed for watching movies in Standard / Movie mode) Compared to previous models, new Samsung TVs have a more precise picture. ✎✎In PC mode, you can be adjusted manually. ✎✎ If Eco Sensor is On, the minimum screen...
User Manual
Page 16
Reset: Resets the White Balance to it's default settings. ■■ 10p White Balance (Off / On): Controls the white balance in 10 point intervals by the warranty. Picture Options OO MENUm → Picture → Picture Options → ENTERE ✎✎In PC mode, you use 16:9 mode most of the picture to fit the entire screen. ✎✎ Available with HD 1080i / 720p signals in 16:9 mode. 4:3 : Sets the picture to basic (4:3) mode. ✎✎ Do not watch in Component and HDMI modes. ■■ RGB Only Mode (Off / Red / Green / Blue): Displays the Red, ...
Reset: Resets the White Balance to it's default settings. ■■ 10p White Balance (Off / On): Controls the white balance in 10 point intervals by the warranty. Picture Options OO MENUm → Picture → Picture Options → ENTERE ✎✎In PC mode, you use 16:9 mode most of the picture to fit the entire screen. ✎✎ Available with HD 1080i / 720p signals in 16:9 mode. 4:3 : Sets the picture to basic (4:3) mode. ✎✎ Do not watch in Component and HDMI modes. ■■ RGB Only Mode (Off / Red / Green / Blue): Displays the Red, ...
User Manual
Page 17
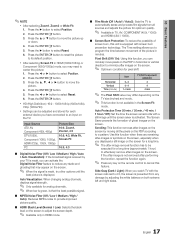
Press the ◄ or ► button to program the time between movement of the picture in minutes. Press the ENTERE button. The Time setting allows you to select Position. 2. Scrolling: This function removes after-images on the screen by moving all sources and adjusts the picture for optimum quality. ✎✎ Available in TV, AV, COMPONENT (480i / 1080i) and HDMI (480i / 1080i). ■■ Screen Burn Protection: To reduce the possibility of ghost images on both extreme left and right sides. 17 English Press the ENTERE button. 5. Auto Visualization: When ...
Press the ◄ or ► button to program the time between movement of the picture in minutes. Press the ENTERE button. The Time setting allows you to select Position. 2. Scrolling: This function removes after-images on the screen by moving all sources and adjusts the picture for optimum quality. ✎✎ Available in TV, AV, COMPONENT (480i / 1080i) and HDMI (480i / 1080i). ■■ Screen Burn Protection: To reduce the possibility of ghost images on both extreme left and right sides. 17 English Press the ENTERE button. 5. Auto Visualization: When ...
User Manual
Page 18
...;✎ If you to PC and the PC is any such symptom, stop viewing 3D TV, remove 3D Active Glasses and rest. Samsung 3D Active Glasses are any reports of Samsung 3D Active Glasses (SSG-2100AB, SSG-2200AR, SSG2200KR) to 3D. Read and understand the following safety information before using the 3D...
...;✎ If you to PC and the PC is any such symptom, stop viewing 3D TV, remove 3D Active Glasses and rest. Samsung 3D Active Glasses are any reports of Samsung 3D Active Glasses (SSG-2100AB, SSG-2200AR, SSG2200KR) to 3D. Read and understand the following safety information before using the 3D...
User Manual
Page 19
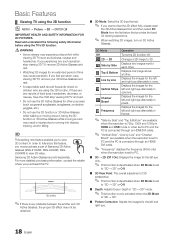
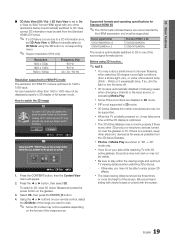
How to watch the 3D image 3D To watch in 3D, wear 3D Active Glasses and press the power button on near the glasses or TV. Viewing 3D TV motion pictures for long periods may not be three times or more the height of the screen. Supported formats and operating specifications for HDMI PC mode is optimized to 1920 x 1080 input. xx 3D mode is any other 3D product or electronic devices turned on the glasses. 3. xx Photos of Media Play are disabled in 3D, wear 3D glasses and press the power button on your remote control, select the 3D Mode of the image you want to view. ✎&#...
How to watch the 3D image 3D To watch in 3D, wear 3D Active Glasses and press the power button on near the glasses or TV. Viewing 3D TV motion pictures for long periods may not be three times or more the height of the screen. Supported formats and operating specifications for HDMI PC mode is optimized to 1920 x 1080 input. xx 3D mode is any other 3D product or electronic devices turned on the glasses. 3. xx Photos of Media Play are disabled in 3D, wear 3D glasses and press the power button on your remote control, select the 3D Mode of the image you want to view. ✎&#...
User Manual
Page 20
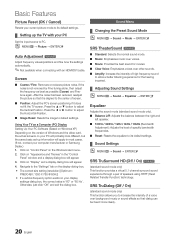
... a virtual 5.1 channel surround sound experience through a pair of speakers using HRTF (Head Related Transfer Function) technology. Click on your computer manufacturer or Samsung Dealer.) 1. If the noise is "60" or "60 Hz'. Press the ▲ or ▼ button to default settings. Click on "...Control Panel" on the display dialog-box. yy The correct size setting (resolution) [Optimum: PN50C490: 1360 X 768 @ 60Hz] yy If a vertical-frequency option exists on "Display" and a display dialog box will appear. 3. Otherwise, just click "...
... a virtual 5.1 channel surround sound experience through a pair of speakers using HRTF (Head Related Transfer Function) technology. Click on your computer manufacturer or Samsung Dealer.) 1. If the noise is "60" or "60 Hz'. Press the ▲ or ▼ button to default settings. Click on "...Control Panel" on the display dialog-box. yy The correct size setting (resolution) [Optimum: PN50C490: 1360 X 768 @ 60Hz] yy If a vertical-frequency option exists on "Display" and a display dialog box will appear. 3. Otherwise, just click "...