

User Manual (user Manual) (ver.1.0) (English)
Page 6
... Installing Batteries in the Remote Control 2.9 Chapter 3: Operation 3.1 Turning the TV On and Off 3.1 Plug & Play Feature 3.1 Using the Perfect Focus Feature 3.3 Adjusting Manual convergence 3.4 Adjust Red Convergence 3.5 Viewing the Menus and On-Screen Displays 3.6 Viewing the Menus 3.6 Viewing the Display 3.6 Selecting a Menu Language 3.7 Selecting the Antenna Input 3.7 Memorizing...Manual Method 3.12 Labeling the Channels 3.13 Picture Control 3.14 Customizing the Picture 3.14 Using Automatic Picture Settings 3.15 Selecting the Color Tone 3.16 Chapter 3: Operation (Cont 3.16
... Installing Batteries in the Remote Control 2.9 Chapter 3: Operation 3.1 Turning the TV On and Off 3.1 Plug & Play Feature 3.1 Using the Perfect Focus Feature 3.3 Adjusting Manual convergence 3.4 Adjust Red Convergence 3.5 Viewing the Menus and On-Screen Displays 3.6 Viewing the Menus 3.6 Viewing the Display 3.6 Selecting a Menu Language 3.7 Selecting the Antenna Input 3.7 Memorizing...Manual Method 3.12 Labeling the Channels 3.13 Picture Control 3.14 Customizing the Picture 3.14 Using Automatic Picture Settings 3.15 Selecting the Color Tone 3.16 Chapter 3: Operation (Cont 3.16
User Manual (user Manual) (ver.1.0) (English)
Page 26
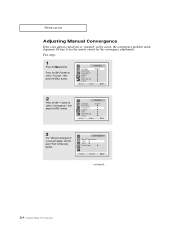
... CH button to select "Convergence", then press the VOL + button. Convergence Manual Convergence Red Blue Perfect Focus continued... 3.4 CHAPTER THREE: TV OPERATION OPERATION Adjusting Manual Convergence If the color appears spread out or "smeared" on the screen, the convergence probably needs alignment. Be sure to use the remote control for the convergence...
... CH button to select "Convergence", then press the VOL + button. Convergence Manual Convergence Red Blue Perfect Focus continued... 3.4 CHAPTER THREE: TV OPERATION OPERATION Adjusting Manual Convergence If the color appears spread out or "smeared" on the screen, the convergence probably needs alignment. Be sure to use the remote control for the convergence...
User Manual (user Manual) (ver.1.0) (English)
Page 28
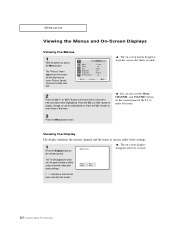
... audio, and the status of certain audio-video settings. 1 Press the Display button on -screen menus disappear from the screen after ten seconds. Mode Adjust Size Digital NR Color tone Demonstration Picture : Custom : Wide : Off : Normal w The on the remote control. w You can also use the selected items. Press the VOL + button...
... audio, and the status of certain audio-video settings. 1 Press the Display button on -screen menus disappear from the screen after ten seconds. Mode Adjust Size Digital NR Color tone Demonstration Picture : Custom : Wide : Off : Normal w The on the remote control. w You can also use the selected items. Press the VOL + button...
User Manual (user Manual) (ver.1.0) (English)
Page 36
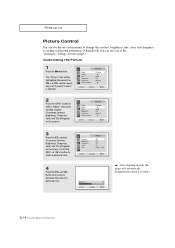
... use one of a particular item. Mode Adjust Size Digital NR Color tone Demonstration Picture : Custom : Wide : Off : Normal 2 Press the CH button to select "Adjust", then press the VOL + button. (The words Contrast, Brightness, Sharpness, Color, and Tint will appear on the screen...of the "automatic" settings. Contrast Brightness Sharpness Color Tint Adjust : 80 : 50 : 50 : 45 : G 50 R: 50 4 Press the VOL + or VOL - Brightness 50 w After adjusting an item, the gauge will appear on the screen.) Mode Adjust Size Digital NR Color tone Demonstration Picture : Custom : Wide : Off...
... use one of a particular item. Mode Adjust Size Digital NR Color tone Demonstration Picture : Custom : Wide : Off : Normal 2 Press the CH button to select "Adjust", then press the VOL + button. (The words Contrast, Brightness, Sharpness, Color, and Tint will appear on the screen...of the "automatic" settings. Contrast Brightness Sharpness Color Tint Adjust : 80 : 50 : 50 : 45 : G 50 R: 50 4 Press the VOL + or VOL - Brightness 50 w After adjusting an item, the gauge will appear on the screen.) Mode Adjust Size Digital NR Color tone Demonstration Picture : Custom : Wide : Off...
User Manual (user Manual) (ver.1.0) (English)
Page 37
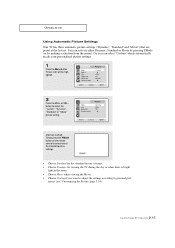
..." or "Movie" picture setting. erence (see "Customizing the Picture, page 3.14). 3.15 CHAPTER THREE: TV OPERATION Or, you want to adjust the settings according to personal pref- Mode Adjust Size Digital NR Color tone Demonstration Picture : Custom : Wide : Off : Normal 2 Press the VOL + or VOL button to select one of the standard picture...
..." or "Movie" picture setting. erence (see "Customizing the Picture, page 3.14). 3.15 CHAPTER THREE: TV OPERATION Or, you want to adjust the settings according to personal pref- Mode Adjust Size Digital NR Color tone Demonstration Picture : Custom : Wide : Off : Normal 2 Press the VOL + or VOL button to select one of the standard picture...
User Manual (user Manual) (ver.1.0) (English)
Page 38
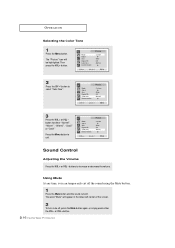
... 2 Press the CH button to exit. Mode Adjust Size Digital NR Color tone Demonstration Picture : Custom : Wide : Off : Normal 3 Press the VOL + or VOL button to select "Normal", "Warm1", "Warm2", "Cool2" or "Cool1" Press the Menu button to select "Color Tone". Using Mute At any time, you can... to increase or decrease the volume. or VOL + button. 3.16 CHAPTER THREE: TV OPERATION Mode Adjust Size Digital NR Color tone Demonstration Picture : Custom : Wide : Off : Warm1 Sound Control Adjusting the Volume Press the VOL + or VOL - The "Picture" icon will appear in the lower-...
... 2 Press the CH button to exit. Mode Adjust Size Digital NR Color tone Demonstration Picture : Custom : Wide : Off : Normal 3 Press the VOL + or VOL button to select "Normal", "Warm1", "Warm2", "Cool2" or "Cool1" Press the Menu button to select "Color Tone". Using Mute At any time, you can... to increase or decrease the volume. or VOL + button. 3.16 CHAPTER THREE: TV OPERATION Mode Adjust Size Digital NR Color tone Demonstration Picture : Custom : Wide : Off : Warm1 Sound Control Adjusting the Volume Press the VOL + or VOL - The "Picture" icon will appear in the lower-...
User Manual (user Manual) (ver.1.0) (English)
Page 45
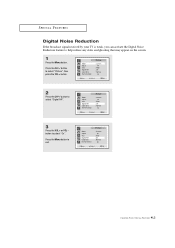
... reduce any static and ghosting that may appear on the screen. 1 Press the Menu button. Mode Adjust Size Digital NR Color tone Demonstration Picture : Custom : Wide : On : Normal 4.2 CHAPTER FOUR: SPECIAL FEATURES Mode Adjust Size Digital NR Color tone Demonstration Picture : Custom : Wide : Off : Normal 2 Press the CH button to select "Picture", then press...
... reduce any static and ghosting that may appear on the screen. 1 Press the Menu button. Mode Adjust Size Digital NR Color tone Demonstration Picture : Custom : Wide : On : Normal 4.2 CHAPTER FOUR: SPECIAL FEATURES Mode Adjust Size Digital NR Color tone Demonstration Picture : Custom : Wide : Off : Normal 2 Press the CH button to select "Picture", then press...
User Manual (user Manual) (ver.1.0) (English)
Page 62
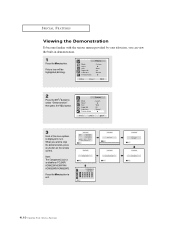
... Nomal Exit Demo Mode 3-2 Pull Down DVD Input Exit Demo Mode Infor Catcher Exit 4.19 CHAPTER FOUR: SPECIAL FEATURES Mode Adjust Size Digital NR Color tone Demonstration Picture : Custom : Wide : Off : Normal 3 Each of the menu options is available on the remote ... on PCL545R/ HCM422W/HCM474W/ HCM553WB/HCM653WB. Note: The Component3 jack is displayed in demonstration. 1 Press the Menu button. SPECIAL FEATURES Viewing the Demonstration To become familiar with the various menus provided by your television, you wish to exit. Mode Adjust Size Digital NR Color tone Demonstration...
... Nomal Exit Demo Mode 3-2 Pull Down DVD Input Exit Demo Mode Infor Catcher Exit 4.19 CHAPTER FOUR: SPECIAL FEATURES Mode Adjust Size Digital NR Color tone Demonstration Picture : Custom : Wide : Off : Normal 3 Each of the menu options is available on the remote ... on PCL545R/ HCM422W/HCM474W/ HCM553WB/HCM653WB. Note: The Component3 jack is displayed in demonstration. 1 Press the Menu button. SPECIAL FEATURES Viewing the Demonstration To become familiar with the various menus provided by your television, you wish to exit. Mode Adjust Size Digital NR Color tone Demonstration...
User Manual (user Manual) (ver.1.0) (English)
Page 66
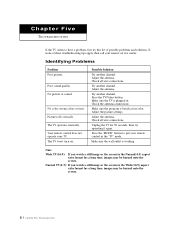
...channel. Make sure the wall outlet is plugged in. No picture or sound. No color, wrong colors or tints. Possible Solution Try another channel. Check all wire connections. Press the TV/Video button. Adjust the antenna. Picture rolls vertically. Make sure the TV is working. Note Wide ... for a long time, images may be burned onto the screen. 5.1 CHAPTER FIVE: TROUBLESHOOTING Adjust the picture settings. If none of possible problems and solutions. Make sure the program is broadcast in color. Press the "MODE" button to have a problem, first try operating it again. Try ...
...channel. Make sure the wall outlet is plugged in. No picture or sound. No color, wrong colors or tints. Possible Solution Try another channel. Check all wire connections. Press the TV/Video button. Adjust the antenna. Picture rolls vertically. Make sure the TV is working. Note Wide ... for a long time, images may be burned onto the screen. 5.1 CHAPTER FIVE: TROUBLESHOOTING Adjust the picture settings. If none of possible problems and solutions. Make sure the program is broadcast in color. Press the "MODE" button to have a problem, first try operating it again. Try ...


