

Open Source Guide (ENGLISH)
Page 1
... your rights to control compilation and installation of the Program by someone else and passed on a medium customarily used for other free programs whose distribution conditions are not covered by running the Program). This General Public License applies to share and change it and this License which contains a notice placed by software patents. When we speak of free software, we need not include...
... your rights to control compilation and installation of the Program by someone else and passed on a medium customarily used for other free programs whose distribution conditions are not covered by running the Program). This General Public License applies to share and change it and this License which contains a notice placed by software patents. When we speak of free software, we need not include...

Open Source Guide (ENGLISH)
Page 2
...USE OR INABILITY TO USE THE LIBRARY (INCLUDING BUT NOT LIMITED TO LOSS OF DATA OR DATA BEING RENDERED INACCURATE OR LOSSES SUSTAINED BY YOU OR THIRD PARTIES OR A FAILURE OF THE LIBRARY TO OPERATE WITH ANY OTHER SOFTWARE...), EVEN IF SUCH HOLDER OR OTHER PARTY HAS BEEN ADVISED OF THE POSSIBILITY OF SUCH DAMAGES. It is found. How to Apply These Terms to Your New Libraries If you develop a new library, and you want it free software... warranty; You can redistribute and change. and each file should have at least the "copyright" line and a pointer to where the...
...USE OR INABILITY TO USE THE LIBRARY (INCLUDING BUT NOT LIMITED TO LOSS OF DATA OR DATA BEING RENDERED INACCURATE OR LOSSES SUSTAINED BY YOU OR THIRD PARTIES OR A FAILURE OF THE LIBRARY TO OPERATE WITH ANY OTHER SOFTWARE...), EVEN IF SUCH HOLDER OR OTHER PARTY HAS BEEN ADVISED OF THE POSSIBILITY OF SUCH DAMAGES. It is found. How to Apply These Terms to Your New Libraries If you develop a new library, and you want it free software... warranty; You can redistribute and change. and each file should have at least the "copyright" line and a pointer to where the...
User Manual (user Manual) (ver.1.0) (English)
Page 4
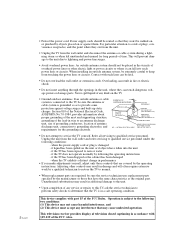
... liquid has been spilled on the TV. • Ground outdoor antennas. when the TV exhibits a distinct change in performance • If you make adjustments yourself, adjust only those that the TV is subject to determine that have fallen into such power lines or circuits. Adjusting other controls may cause undesired operation. Power supply cords should not be sure the service technician uses replacement parts specified by objects placed on...
... liquid has been spilled on the TV. • Ground outdoor antennas. when the TV exhibits a distinct change in performance • If you make adjustments yourself, adjust only those that the TV is subject to determine that have fallen into such power lines or circuits. Adjusting other controls may cause undesired operation. Power supply cords should not be sure the service technician uses replacement parts specified by objects placed on...

User Manual (user Manual) (ver.1.0) (English)
Page 6
...Set-Top Box (480p, 1080i 2.8 Installing Batteries in the Remote Control 2.9 Chapter 3: Operation 3.1 Turning the TV On and Off 3.1 Plug & Play Feature 3.1 Using the Perfect Focus Feature 3.3 Adjusting Manual convergence 3.4 Adjust Red Convergence 3.5 Viewing the Menus and On-Screen Displays 3.6 Viewing the Menus 3.6 Viewing the Display 3.6 Selecting a Menu Language 3.7 Selecting the Antenna Input 3.7 Memorizing the Channels 3.8 Selecting the Video Signal-source 3.8 Storing Channels in Memory (Automatic Method 3.9 Adding and Erasing Channels (Manual Method 3.9 Changing Channels...
...Set-Top Box (480p, 1080i 2.8 Installing Batteries in the Remote Control 2.9 Chapter 3: Operation 3.1 Turning the TV On and Off 3.1 Plug & Play Feature 3.1 Using the Perfect Focus Feature 3.3 Adjusting Manual convergence 3.4 Adjust Red Convergence 3.5 Viewing the Menus and On-Screen Displays 3.6 Viewing the Menus 3.6 Viewing the Display 3.6 Selecting a Menu Language 3.7 Selecting the Antenna Input 3.7 Memorizing the Channels 3.8 Selecting the Video Signal-source 3.8 Storing Channels in Memory (Automatic Method 3.9 Adding and Erasing Channels (Manual Method 3.9 Changing Channels...
User Manual (user Manual) (ver.1.0) (English)
Page 7
...the Sleep Timer 4.6 Extra sound settings 4.7 Choosing a Multi-Channel Sound (MTS) track 4.8 Viewing Closed Captions 4.9 Viewing Picture-in-Picture 4.10 Activating Picture-in-Picture 4.10 Selecting a Signal Source (Antenna or Cable) for PIP . . . . .4.11 Selecting a Signal Source (External A/V) for PIP 4.11 Swapping the Contents of the PIP image and Main image .4.12 Changing the Size of the PIP Window 4.12 Changing the PIP Channel 4.13 Changing the Location (Rotating) the PIP mode 4.13 Scanning the Available Channels 4.13 Using the V-Chip 4.14 Setting Up Your Personal ID Number (PIN...
...the Sleep Timer 4.6 Extra sound settings 4.7 Choosing a Multi-Channel Sound (MTS) track 4.8 Viewing Closed Captions 4.9 Viewing Picture-in-Picture 4.10 Activating Picture-in-Picture 4.10 Selecting a Signal Source (Antenna or Cable) for PIP . . . . .4.11 Selecting a Signal Source (External A/V) for PIP 4.11 Swapping the Contents of the PIP image and Main image .4.12 Changing the Size of the PIP Window 4.12 Changing the PIP Channel 4.13 Changing the Location (Rotating) the PIP mode 4.13 Scanning the Available Channels 4.13 Using the V-Chip 4.14 Setting Up Your Personal ID Number (PIN...
User Manual (user Manual) (ver.1.0) (English)
Page 9
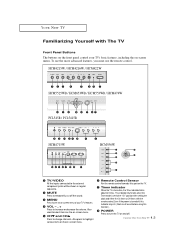
... PCL545R / PCL5415R HCM4715W HCM556W Œ TV/VIDEO All the inputs connected to the external component jacks will be set to increase or decrease the volume. Even if the power is turned on -screen menu. Also used to select items on the on-screen menu. ˆ CHw and CHv Press to highlight various items on the on and off the sound. ˇ MENU Press to see an on-screen menu...
... PCL545R / PCL5415R HCM4715W HCM556W Œ TV/VIDEO All the inputs connected to the external component jacks will be set to increase or decrease the volume. Even if the power is turned on -screen menu. Also used to select items on the on-screen menu. ˆ CHw and CHv Press to highlight various items on the on and off the sound. ˇ MENU Press to see an on-screen menu...

User Manual (user Manual) (ver.1.0) (English)
Page 10
... FOCUS Press to adjust for ventilation. Using the Component Shelf (HCM5525WB/HCM653WB/HCM553WB/HCM474W/HCM556W) You can use the front or side panel jacks to connect an S-Video signal from the front and sides for the optimum picture set in the Factory. ´ VIDEO INPUT jack Use to connect a video signal from a camcorder or a video game. ˇ AUDIO INPUT jacks Use to connect the audio signals from a camcorder or video game. ¨ S-VIDEO INPUT jack Use to connect an...
... FOCUS Press to adjust for ventilation. Using the Component Shelf (HCM5525WB/HCM653WB/HCM553WB/HCM474W/HCM556W) You can use the front or side panel jacks to connect an S-Video signal from the front and sides for the optimum picture set in the Factory. ´ VIDEO INPUT jack Use to connect a video signal from a camcorder or a video game. ˇ AUDIO INPUT jacks Use to connect the audio signals from a camcorder or video game. ¨ S-VIDEO INPUT jack Use to connect an...
User Manual (user Manual) (ver.1.0) (English)
Page 11
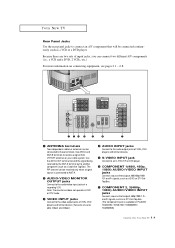
YOUR NEW TV Rear Panel Jacks Use the rear panel jacks to connect an A/V component that outputs 480p/1080i Y, PB and PR signals, such as a DTV Set-Top Box. (The Component3 jack is available on connecting equipment, see pages 2.1 - 2.8. Œ ANTENNA terminals Two independent cables or antennas can be received only when a signal source is connected to ANT-A. ´ AUDIO-VIDEO MONITOR OUTPUT jacks Connect to the audio/video input jacks of input jacks, you can be connected to...
YOUR NEW TV Rear Panel Jacks Use the rear panel jacks to connect an A/V component that outputs 480p/1080i Y, PB and PR signals, such as a DTV Set-Top Box. (The Component3 jack is available on connecting equipment, see pages 2.1 - 2.8. Œ ANTENNA terminals Two independent cables or antennas can be received only when a signal source is connected to ANT-A. ´ AUDIO-VIDEO MONITOR OUTPUT jacks Connect to the audio/video input jacks of input jacks, you can be connected to...
User Manual (user Manual) (ver.1.0) (English)
Page 12
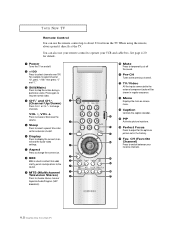
... the previous channel. TV/Video All the inputs connected to the external component jacks will be shown in regular sequence. Ò Menu Displays the main on-screen menu. Ú Caption Controls the caption decoder. Æ PIP Activates picture in picture. ı Perfect Focus Press to adjust for automatic shutoff. Ø Display Press to display the current channel and the audio-video settings. ∏ Aspect Press to change the screen size. YOUR NEW TV Remote Control You can also use the remote control up...
... the previous channel. TV/Video All the inputs connected to the external component jacks will be shown in regular sequence. Ò Menu Displays the main on-screen menu. Ú Caption Controls the caption decoder. Æ PIP Activates picture in picture. ı Perfect Focus Press to adjust for automatic shutoff. Ø Display Press to display the current channel and the audio-video settings. ∏ Aspect Press to change the screen size. YOUR NEW TV Remote Control You can also use the remote control up...
User Manual (user Manual) (ver.1.0) (English)
Page 18
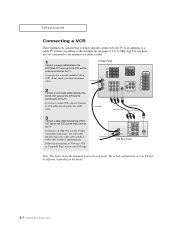
... store). 2 Connect a set of audio cables between the ANTENNA OUT terminal on the VCR and the antenna terminal on the TV. A coaxial cable is usually included with a VCR. (If not, check your TV may be different, depending on the TV. Skip step 1 if you have a mono VCR, connect L(mono) to video 1 simultaneously. INSTALLATION Connecting a VCR These instructions assume that you have a S-VHS VCR, use the S-Video connections and remove the video cable.
... store). 2 Connect a set of audio cables between the ANTENNA OUT terminal on the VCR and the antenna terminal on the TV. A coaxial cable is usually included with a VCR. (If not, check your TV may be different, depending on the TV. Skip step 1 if you have a mono VCR, connect L(mono) to video 1 simultaneously. INSTALLATION Connecting a VCR These instructions assume that you have a S-VHS VCR, use the S-Video connections and remove the video cable.

User Manual (user Manual) (ver.1.0) (English)
Page 19
... view the camcorder tapes without using a VCR. 1 Locate the A/V output jacks on the camcorder. Note: This figure shows the Standard Connector-jack panel. If you have mono camcorder, connect L(mono) to be recorded by a second VCR. INSTALLATION Connecting a Second VCR to Record from the TV Your TV can send out signals of its picture and sound to camcorder audio out using only one audio cable. 3 Connect a video cable between the VIDEO OUTPUT...
... view the camcorder tapes without using a VCR. 1 Locate the A/V output jacks on the camcorder. Note: This figure shows the Standard Connector-jack panel. If you have mono camcorder, connect L(mono) to be recorded by a second VCR. INSTALLATION Connecting a Second VCR to Record from the TV Your TV can send out signals of its picture and sound to camcorder audio out using only one audio cable. 3 Connect a video cable between the VIDEO OUTPUT...
User Manual (user Manual) (ver.1.0) (English)
Page 20
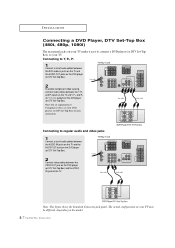
...-jack panel. INSTALLATION Connecting a DVD Player, DTV Set-Top Box (480i, 480p, 1080i) The rear panel jacks on your TV make it easy to connect a DVD player (or DTV Set-Top Box) to your TV may be different, depending on the model. 2.7 CHAPTER TWO: INSTALLATION Connecting to regular audio and video jacks 1 Connect a set of audio cables between the DVD audio in jacks on the TV and the AUDIO OUT jacks on the DVD player (or DTV Set-Top Box). 2 To enable Component video viewing, connect video cables...
...-jack panel. INSTALLATION Connecting a DVD Player, DTV Set-Top Box (480i, 480p, 1080i) The rear panel jacks on your TV make it easy to connect a DVD player (or DTV Set-Top Box) to your TV may be different, depending on the model. 2.7 CHAPTER TWO: INSTALLATION Connecting to regular audio and video jacks 1 Connect a set of audio cables between the DVD audio in jacks on the TV and the AUDIO OUT jacks on the DVD player (or DTV Set-Top Box). 2 To enable Component video viewing, connect video cables...

User Manual (user Manual) (ver.1.0) (English)
Page 21
... video viewing, connect video cables between the Y, PB, and PR inputs on the TV and Y, PB, and PR (or Y, CB, CR) outputs on the DTV Set-Top box. INSTALLATION Connecting a DTV Set-Top Box (480p, 1080i) When switching to the DTV mode, either 480p or 1080i format is automatically selected according to the input signal. Note: Only 480p and 1080i formats are supported. 1 Connect a set of Component video, see your DTV Settop box's owner's instruction...
... video viewing, connect video cables between the Y, PB, and PR inputs on the TV and Y, PB, and PR (or Y, CB, CR) outputs on the DTV Set-Top box. INSTALLATION Connecting a DTV Set-Top Box (480p, 1080i) When switching to the DTV mode, either 480p or 1080i format is automatically selected according to the input signal. Note: Only 480p and 1080i formats are supported. 1 Connect a set of Component video, see your DTV Settop box's owner's instruction...
User Manual (user Manual) (ver.1.0) (English)
Page 25
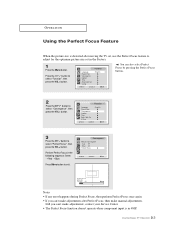
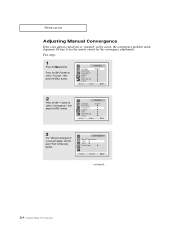
...'t operate when component input is distorted after Perfect Focus, then make adjustments after moving the TV set, use the Perfect Focus feature to adjust for the optimum picture size set in the following sequence: Green ➝ Red ➝ Blue. Convergence Manual Convergence Red Blue Perfect Focus Perfect Focus Mode On Process : 8% Notes • If any error happens during Perfect Focus, then perform Perfect Focus once again. • If you can 't make manual adjustments. Language Plug & Play Convergence Caption Time Auto Clock Set V-Chip Function...
...'t operate when component input is distorted after Perfect Focus, then make adjustments after moving the TV set, use the Perfect Focus feature to adjust for the optimum picture size set in the following sequence: Green ➝ Red ➝ Blue. Convergence Manual Convergence Red Blue Perfect Focus Perfect Focus Mode On Process : 8% Notes • If any error happens during Perfect Focus, then perform Perfect Focus once again. • If you can 't make manual adjustments. Language Plug & Play Convergence Caption Time Auto Clock Set V-Chip Function...
User Manual (user Manual) (ver.1.0) (English)
Page 26
... Set V-Chip Function : English 2 Press the CH button to select "Function", then press the VOL + button. First steps: 1 Press the Menu button. Press the CH button to select "Convergence", then press the VOL + button. Language Plug & Play Convergence Caption Time Auto Clock Set V-Chip Function : English 3 The "Manual Convergence" screen will appear, and the word "Red" will be highlighted. Convergence Manual Convergence Red Blue Perfect Focus continued... 3.4 CHAPTER THREE: TV OPERATION Be sure to use the remote control for the convergence adjustments...
... Set V-Chip Function : English 2 Press the CH button to select "Function", then press the VOL + button. First steps: 1 Press the Menu button. Press the CH button to select "Convergence", then press the VOL + button. Language Plug & Play Convergence Caption Time Auto Clock Set V-Chip Function : English 3 The "Manual Convergence" screen will appear, and the word "Red" will be highlighted. Convergence Manual Convergence Red Blue Perfect Focus continued... 3.4 CHAPTER THREE: TV OPERATION Be sure to use the remote control for the convergence adjustments...
User Manual (user Manual) (ver.1.0) (English)
Page 28
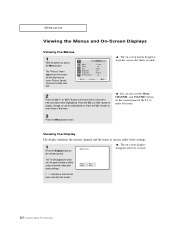
Mode Adjust Size Digital NR Color tone Demonstration Picture : Custom : Wide : Off : Normal w The on the remote control. button to display, change, or use the Menu, CHANNEL, and VOLUME buttons on -screen displays disappear after thirty seconds. 2 Press the CH or CH button to the move items in the menu. Viewing the Display The display identifies the current channel and the status of certain audio-video settings. 1 Press the Display button on -screen menus disappear from the screen after ten seconds. w You...
Mode Adjust Size Digital NR Color tone Demonstration Picture : Custom : Wide : Off : Normal w The on the remote control. button to display, change, or use the Menu, CHANNEL, and VOLUME buttons on -screen displays disappear after thirty seconds. 2 Press the CH or CH button to the move items in the menu. Viewing the Display The display identifies the current channel and the status of certain audio-video settings. 1 Press the Display button on -screen menus disappear from the screen after ten seconds. w You...
User Manual (user Manual) (ver.1.0) (English)
Page 37
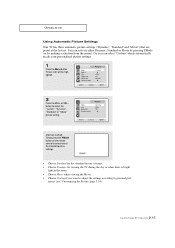
... are preset at the factory. You can select "Custom" which automatically recalls your personalized picture settings. 1 Press the Menu button. Mode Size Digital NR Demonstration Picture : Dynamic : Wide : Off Alternate method: Simply press the P.Mode button on the remote control to select the "Custom", "Dynamic", "Standard" or "Movie" picture setting. erence (see "Customizing the Picture, page 3.14). 3.15 CHAPTER THREE: TV OPERATION Mode Adjust Size Digital NR Color tone Demonstration Picture : Custom : Wide : Off : Normal...
... are preset at the factory. You can select "Custom" which automatically recalls your personalized picture settings. 1 Press the Menu button. Mode Size Digital NR Demonstration Picture : Dynamic : Wide : Off Alternate method: Simply press the P.Mode button on the remote control to select the "Custom", "Dynamic", "Standard" or "Movie" picture setting. erence (see "Customizing the Picture, page 3.14). 3.15 CHAPTER THREE: TV OPERATION Mode Adjust Size Digital NR Color tone Demonstration Picture : Custom : Wide : Off : Normal...
User Manual (user Manual) (ver.1.0) (English)
Page 52
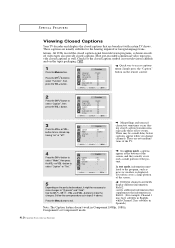
... VOL button to turn closed captioning "on the remote control: 2 Press the CH button to select "Caption", then press the VOL + button. lations. w Different channels and fields display different information: Field 2 carries additional information that are broadcast with certain TV shows. Language Plug & Play Convergence Caption Time Auto Clock Set V-Chip Function : English w Quick way to access captions menu: Simply press the "Caption" button on " or "off". Caption Mode Channels Field Caption : On : Text : 1 : 1 w In caption mode, captions appear at...
... VOL button to turn closed captioning "on the remote control: 2 Press the CH button to select "Caption", then press the VOL + button. lations. w Different channels and fields display different information: Field 2 carries additional information that are broadcast with certain TV shows. Language Plug & Play Convergence Caption Time Auto Clock Set V-Chip Function : English w Quick way to access captions menu: Simply press the "Caption" button on " or "off". Caption Mode Channels Field Caption : On : Text : 1 : 1 w In caption mode, captions appear at...
User Manual (user Manual) (ver.1.0) (English)
Page 53
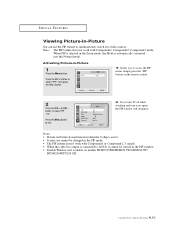
.../CATV Channel PIP : On : TV : Double Screen : ANT : ANT 4 w If you turn TV off while watching and turn it cannot be changed in the PIP mode. • The PIP feature doesn't work with Component1 or Component2, 3 signals. • When the cable box output is automatically converted into the Normal mode. Press the Menu button to select "PIP", then press the VOL + button. SPECIAL FEATURES Viewing Picture-in-Picture You can use the PIP feature to select PIP "On". PIP PIP...
.../CATV Channel PIP : On : TV : Double Screen : ANT : ANT 4 w If you turn TV off while watching and turn it cannot be changed in the PIP mode. • The PIP feature doesn't work with Component1 or Component2, 3 signals. • When the cable box output is automatically converted into the Normal mode. Press the Menu button to select "PIP", then press the VOL + button. SPECIAL FEATURES Viewing Picture-in-Picture You can use the PIP feature to select PIP "On". PIP PIP...
User Manual (user Manual) (ver.1.0) (English)
Page 66
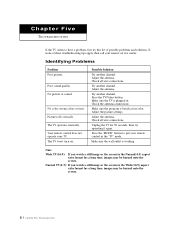
... image or the screen in . No picture or sound. Check all wire connections. Press the TV/Video button. Check the antenna connections. Check all wire connections. Make sure the wall outlet is broadcast in color. Chapter Five TROUBLESHOOTING If the TV seems to put your remote control in the "TV" mode. If none of possible problems and solutions. Identifying Problems Problem Poor picture. Adjust the antenna. Make sure the program is working. Try another channel. Adjust the picture settings. Press the "MODE" button to have a problem...
... image or the screen in . No picture or sound. Check all wire connections. Press the TV/Video button. Check the antenna connections. Check all wire connections. Make sure the wall outlet is broadcast in color. Chapter Five TROUBLESHOOTING If the TV seems to put your remote control in the "TV" mode. If none of possible problems and solutions. Identifying Problems Problem Poor picture. Adjust the antenna. Make sure the program is working. Try another channel. Adjust the picture settings. Press the "MODE" button to have a problem...


