
User Manual (user Manual) (ver.1.0) (English)
Page 5
... subtle, but permanent burned-in ghost images in the wide screen 16:9 ratio format, or expanded to fill the screen if your Samsung limited warranty. 3 SAFETY Important Warranty Information Regarding Television Format Viewing Standard screen format televisions (4:3, the aspect ratio of the screen width to...on them should primarily be limited to view standard format full-motion video. The images displayed on them should be in the television picture. Wide screen format televisions (16:9, the aspect ratio of the screen width to height) are primarily designed to view wide screen...
... subtle, but permanent burned-in ghost images in the wide screen 16:9 ratio format, or expanded to fill the screen if your Samsung limited warranty. 3 SAFETY Important Warranty Information Regarding Television Format Viewing Standard screen format televisions (4:3, the aspect ratio of the screen width to...on them should primarily be limited to view standard format full-motion video. The images displayed on them should be in the television picture. Wide screen format televisions (16:9, the aspect ratio of the screen width to height) are primarily designed to view wide screen...

User Manual (user Manual) (ver.1.0) (English)
Page 6
... Channels 3.11 To Store Your Favorite Channels 3.11 To View Your Favorite Channels 3.11 Adding and Erasing Channels (Manual Method 3.12 Labeling the Channels 3.13 Picture Control 3.14 Customizing the Picture 3.14 Using Automatic Picture Settings 3.15 Selecting the Color Tone 3.16 Chapter 3: Operation (Cont 3.16
... Channels 3.11 To Store Your Favorite Channels 3.11 To View Your Favorite Channels 3.11 Adding and Erasing Channels (Manual Method 3.12 Labeling the Channels 3.13 Picture Control 3.14 Customizing the Picture 3.14 Using Automatic Picture Settings 3.15 Selecting the Color Tone 3.16 Chapter 3: Operation (Cont 3.16
User Manual (user Manual) (ver.1.0) (English)
Page 7
... Feature 4.4 Setting the On/Off Timer 4.5 Setting the Sleep Timer 4.6 Extra sound settings 4.7 Choosing a Multi-Channel Sound (MTS) track 4.8 Viewing Closed Captions 4.9 Viewing Picture-in-Picture 4.10 Activating Picture-in-Picture 4.10 Selecting a Signal Source (Antenna or Cable) for PIP . . . . .4.11 Selecting a Signal Source (External A/V) for PIP 4.11 Swapping the Contents of the PIP...
... Feature 4.4 Setting the On/Off Timer 4.5 Setting the Sleep Timer 4.6 Extra sound settings 4.7 Choosing a Multi-Channel Sound (MTS) track 4.8 Viewing Closed Captions 4.9 Viewing Picture-in-Picture 4.10 Activating Picture-in-Picture 4.10 Selecting a Signal Source (Antenna or Cable) for PIP . . . . .4.11 Selecting a Signal Source (External A/V) for PIP 4.11 Swapping the Contents of the PIP...
User Manual (user Manual) (ver.1.0) (English)
Page 8
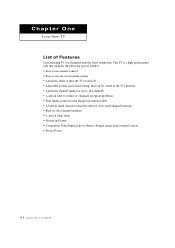
...menu system • Automatic timer to turn the TV on and off • Adjustable picture and sound settings that can be stored in the TV's memory • Automatic channel ...special filter to reduce or eliminate reception problems • Fine tuning control for the sharpest picture possible • A built-in multi-channel sound decoder for stereo and bilingual listening • ...Built-in, dual channel speakers • A special sleep timer • Picture-in-Picture • Component Video Input jacks to obtain a sharper image from external sources • Perfect...
...menu system • Automatic timer to turn the TV on and off • Adjustable picture and sound settings that can be stored in the TV's memory • Automatic channel ...special filter to reduce or eliminate reception problems • Fine tuning control for the sharpest picture possible • A built-in multi-channel sound decoder for stereo and bilingual listening • ...Built-in, dual channel speakers • A special sleep timer • Picture-in-Picture • Component Video Input jacks to obtain a sharper image from external sources • Perfect...

User Manual (user Manual) (ver.1.0) (English)
Page 10
... the door and lift it up . 3 After placing a component on the shelf, hold the center of space from the front and sides for the optimum picture set in the Factory. ´ VIDEO INPUT jack Use to connect a video signal from a camcorder or a video game. ˇ AUDIO INPUT jacks Use to connect...
... the door and lift it up . 3 After placing a component on the shelf, hold the center of space from the front and sides for the optimum picture set in the Factory. ´ VIDEO INPUT jack Use to connect a video signal from a camcorder or a video game. ˇ AUDIO INPUT jacks Use to connect...
User Manual (user Manual) (ver.1.0) (English)
Page 12
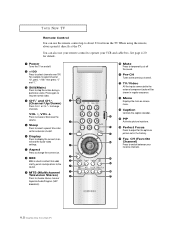
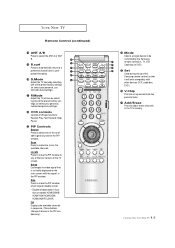
... component jacks will be shown in regular sequence. Ò Menu Displays the main on-screen menu. Ú Caption Controls the caption decoder. Æ PIP Activates picture in picture. ı Perfect Focus Press to switch between your VCR and cable box. See page 4.20 for the optimum... picture set in effect that adds clarity, punch and dynamics to the sound. ' MTS (Multichannel Television Stereo) Press to choose stereo, mono or Separate Audio Program (...
... component jacks will be shown in regular sequence. Ò Menu Displays the main on-screen menu. Ú Caption Controls the caption decoder. Æ PIP Activates picture in picture. ı Perfect Focus Press to switch between your VCR and cable box. See page 4.20 for the optimum... picture set in effect that adds clarity, punch and dynamics to the sound. ' MTS (Multichannel Television Stereo) Press to choose stereo, mono or Separate Audio Program (...
User Manual (user Manual) (ver.1.0) (English)
Page 13
... only). ± Mode Selects a target device to be controlled by selecting one of the preset factory settings (or select your personal, customized picture settings). ˛ VCR controls Controls VCR tape functions: Rewind, Play, Fast Forward, Stop, Pause. ◊ PIP Controls Source Press to...(or select your personal, customized sound settings). ¸ P.Mode Adjust the TV picture by the Samsung remote control(i.e., TV, VCR, Cable box or DVD). ≠ Set Used during set up of this Samsung remote control, so that is currently displayed on models HCM5525WB/ HCM4715W/HCM4215W/ HCM4216W/...
... only). ± Mode Selects a target device to be controlled by selecting one of the preset factory settings (or select your personal, customized picture settings). ˛ VCR controls Controls VCR tape functions: Rewind, Play, Fast Forward, Stop, Pause. ◊ PIP Controls Source Press to...(or select your personal, customized sound settings). ¸ P.Mode Adjust the TV picture by the Samsung remote control(i.e., TV, VCR, Cable box or DVD). ≠ Set Used during set up of this Samsung remote control, so that is currently displayed on models HCM5525WB/ HCM4715W/HCM4215W/ HCM4216W/...

User Manual (user Manual) (ver.1.0) (English)
Page 19
... jacks might be either on the model. 2.6 CHAPTER TWO: INSTALLATION Note: This figure shows the Standard Connector-jack panel. To do this kind of its picture and sound to be different, depending on the front or rear of two cables. INSTALLATION Connecting a Second VCR to Record from the TV Your TV...
... jacks might be either on the model. 2.6 CHAPTER TWO: INSTALLATION Note: This figure shows the Standard Connector-jack panel. To do this kind of its picture and sound to be different, depending on the front or rear of two cables. INSTALLATION Connecting a Second VCR to Record from the TV Your TV...
User Manual (user Manual) (ver.1.0) (English)
Page 25
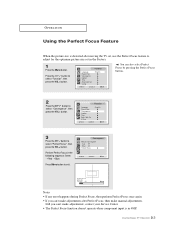
OPERATION Using the Perfect Focus Feature When the picture size is in 480P. 3.3 CHAPTER THREE: TV OPERATION Still you can also select Perfect Focus by pressing the Perfect Focus button. 2 Press the CH button ... Perfect Focus function doesn't operate when component input is distorted after moving the TV set, use the Perfect Focus feature to adjust for the optimum picture size set in the following sequence: Green ➝ Red ➝ Blue. Convergence Manual Convergence Red Blue Perfect Focus Perfect Focus Mode On Process : 8% Notes •...
OPERATION Using the Perfect Focus Feature When the picture size is in 480P. 3.3 CHAPTER THREE: TV OPERATION Still you can also select Perfect Focus by pressing the Perfect Focus button. 2 Press the CH button ... Perfect Focus function doesn't operate when component input is distorted after moving the TV set, use the Perfect Focus feature to adjust for the optimum picture size set in the following sequence: Green ➝ Red ➝ Blue. Convergence Manual Convergence Red Blue Perfect Focus Perfect Focus Mode On Process : 8% Notes •...
User Manual (user Manual) (ver.1.0) (English)
Page 28
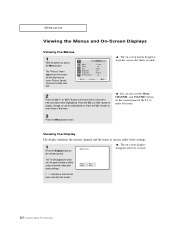
... of the TV to make selections. 3 Press the Menu button to the move items in the menu. Mode Adjust Size Digital NR Color tone Demonstration Picture : Custom : Wide : Off : Normal w The on -screen displays disappear after thirty seconds. 2 Press the CH or CH button to exit. w You ... Press the VOL + button to enter items in the menu (the icons blink when highlighted). Its left side has five icons: Picture, Sound, Channel, Function and PIP. The "Picture" menu appears on , press the Menu button. Press the VOL + or VOL - OPERATION Viewing the Menus and On-Screen Displays...
... of the TV to make selections. 3 Press the Menu button to the move items in the menu. Mode Adjust Size Digital NR Color tone Demonstration Picture : Custom : Wide : Off : Normal w The on -screen displays disappear after thirty seconds. 2 Press the CH or CH button to exit. w You ... Press the VOL + button to enter items in the menu (the icons blink when highlighted). Its left side has five icons: Picture, Sound, Channel, Function and PIP. The "Picture" menu appears on , press the Menu button. Press the VOL + or VOL - OPERATION Viewing the Menus and On-Screen Displays...
User Manual (user Manual) (ver.1.0) (English)
Page 36
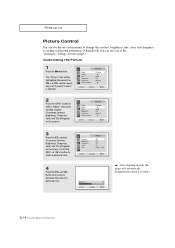
...-screen menus to change the contrast, brightness, tint, color, and sharpness according to increase or decrease the value of the "automatic" settings. The "Picture" icon will be highlighted, then press the VOL + or VOL - Contrast Brightness Sharpness Color Tint Adjust : 80 : 50 : 50 : 45 ...the VOL + or VOL - button to personal preference. (Alternatively, you can use the on the screen.) Mode Adjust Size Digital NR Color tone Demonstration Picture : Custom : Wide : Off : Normal 3 Press the VOL + button. (The words Contrast, Brightness, Sharpness, Color, and Tint will automatically ...
...-screen menus to change the contrast, brightness, tint, color, and sharpness according to increase or decrease the value of the "automatic" settings. The "Picture" icon will be highlighted, then press the VOL + or VOL - Contrast Brightness Sharpness Color Tint Adjust : 80 : 50 : 50 : 45 ...the VOL + or VOL - button to personal preference. (Alternatively, you can use the on the screen.) Mode Adjust Size Digital NR Color tone Demonstration Picture : Custom : Wide : Off : Normal 3 Press the VOL + button. (The words Contrast, Brightness, Sharpness, Color, and Tint will automatically ...
User Manual (user Manual) (ver.1.0) (English)
Page 37
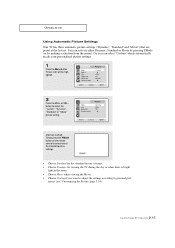
... : Wide : Off : Normal 2 Press the VOL + or VOL button to select one of the standard picture settings. Standard • Choose Standard for the standard factory settings. • Choose Dynamic for viewing the TV during the day or when there is bright ... Custom if you can activate either Dynamic, Standard or Movie by pressing P.Mode (or by making a selection from the menu). Mode Size Digital NR Demonstration Picture : Dynamic : Wide : Off Alternate method: Simply press the P.Mode button on the remote control to select the "Custom", "Dynamic", "Standard" or "Movie...
... : Wide : Off : Normal 2 Press the VOL + or VOL button to select one of the standard picture settings. Standard • Choose Standard for the standard factory settings. • Choose Dynamic for viewing the TV during the day or when there is bright ... Custom if you can activate either Dynamic, Standard or Movie by pressing P.Mode (or by making a selection from the menu). Mode Size Digital NR Demonstration Picture : Dynamic : Wide : Off Alternate method: Simply press the P.Mode button on the remote control to select the "Custom", "Dynamic", "Standard" or "Movie...
User Manual (user Manual) (ver.1.0) (English)
Page 38
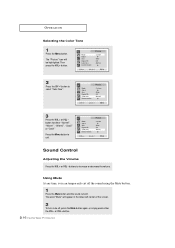
... button and the sound cuts off , press the Mute button again, or simply press either the VOL - Mode Adjust Size Digital NR Color tone Demonstration Picture : Custom : Wide : Off : Normal 3 Press the VOL + or VOL button to select "Normal", "Warm1", "Warm2", "Cool2" or "Cool1" Press the .... 2 To turn mute off . Then press the VOL + button. buttons to increase or decrease the volume. Mode Adjust Size Digital NR Color tone Demonstration Picture : Custom : Wide : Off : Warm1 Sound Control Adjusting the Volume Press the VOL + or VOL - OPERATION Selecting the Color Tone 1 Press the Menu...
... button and the sound cuts off , press the Mute button again, or simply press either the VOL - Mode Adjust Size Digital NR Color tone Demonstration Picture : Custom : Wide : Off : Normal 3 Press the VOL + or VOL button to select "Normal", "Warm1", "Warm2", "Cool2" or "Cool1" Press the .... 2 To turn mute off . Then press the VOL + button. buttons to increase or decrease the volume. Mode Adjust Size Digital NR Color tone Demonstration Picture : Custom : Wide : Off : Warm1 Sound Control Adjusting the Volume Press the VOL + or VOL - OPERATION Selecting the Color Tone 1 Press the Menu...
User Manual (user Manual) (ver.1.0) (English)
Page 45
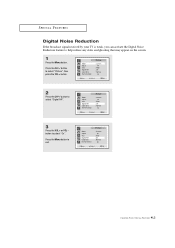
...screen. 1 Press the Menu button. Press the CH button to select "On". Mode Adjust Size Digital NR Color tone Demonstration Picture : Custom : Wide : On : Normal 4.2 CHAPTER FOUR: SPECIAL FEATURES Mode Adjust Size Digital NR Color tone Demonstration... Picture : Custom : Wide : Off : Normal 3 Press the VOL + or VOL button to select "Picture", then press the VOL + button. Mode Adjust Size Digital NR Color tone Demonstration Picture : Custom : Wide : Off : Normal 2 Press the CH button to...
...screen. 1 Press the Menu button. Press the CH button to select "On". Mode Adjust Size Digital NR Color tone Demonstration Picture : Custom : Wide : On : Normal 4.2 CHAPTER FOUR: SPECIAL FEATURES Mode Adjust Size Digital NR Color tone Demonstration... Picture : Custom : Wide : Off : Normal 3 Press the VOL + or VOL button to select "Picture", then press the VOL + button. Mode Adjust Size Digital NR Color tone Demonstration Picture : Custom : Wide : Off : Normal 2 Press the CH button to...
User Manual (user Manual) (ver.1.0) (English)
Page 46
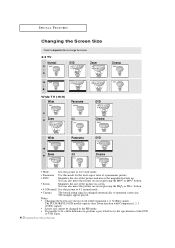
The margins appear grayed. The PCL545R/PCL5415R models operate olny Zoom function with Component1, 2, 3(480p) signals. SPECIAL FEATURES Changing the Screen Size Press the Aspect button to change the screen. 4:3 TV ... 16:9 wide mode. • Panorama: Use this mode for the wide aspect ratio of a panoramic picture. • DVD: Magnifies the size of the picture on screen pressing the CH or CH button. • 4:3(Normal): Sets the picture to 4:3 normal mode. • Cinema: The broadcasting signal is enlarged automatically to perform a grey letterbox by...
The margins appear grayed. The PCL545R/PCL5415R models operate olny Zoom function with Component1, 2, 3(480p) signals. SPECIAL FEATURES Changing the Screen Size Press the Aspect button to change the screen. 4:3 TV ... 16:9 wide mode. • Panorama: Use this mode for the wide aspect ratio of a panoramic picture. • DVD: Magnifies the size of the picture on screen pressing the CH or CH button. • 4:3(Normal): Sets the picture to 4:3 normal mode. • Cinema: The broadcasting signal is enlarged automatically to perform a grey letterbox by...
User Manual (user Manual) (ver.1.0) (English)
Page 52
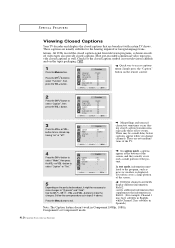
... + button. All VCRs record the closed caption signal from television programs, so home-recorded video tapes also provide closed caption transmissions, especially those of the picture. There may have subtitles in English, while Channel 2 has subtitles in Spanish.) Note: The Caption feature doesn't work in your television schedule and on the...
... + button. All VCRs record the closed caption signal from television programs, so home-recorded video tapes also provide closed caption transmissions, especially those of the picture. There may have subtitles in English, while Channel 2 has subtitles in Spanish.) Note: The Caption feature doesn't work in your television schedule and on the...
User Manual (user Manual) (ver.1.0) (English)
Page 53
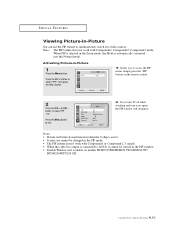
...isn't available on models HCM5525WB/HCM4715W/ HCM4215W/ HCM4216W/PCL5415R. 4.10 CHAPTER FOUR: SPECIAL FEATURES Press the CH button to exit. Notes • Picture-in-Picture doesn't function when the V-chip is active. • Screen size cannot be viewed in the Zoom mode, the Mode is connected to ANT-B, ... or VOL button to access the PIP menu: Simply press the "PIP" button on again, the PIP window will disappear. SPECIAL FEATURES Viewing Picture-in -Picture 1 Press the Menu button. Press the Menu button to select "PIP", then press the VOL + button. Note: The PIP feature does not...
...isn't available on models HCM5525WB/HCM4715W/ HCM4215W/ HCM4216W/PCL5415R. 4.10 CHAPTER FOUR: SPECIAL FEATURES Press the CH button to exit. Notes • Picture-in-Picture doesn't function when the V-chip is active. • Screen size cannot be viewed in the Zoom mode, the Mode is connected to ANT-B, ... or VOL button to access the PIP menu: Simply press the "PIP" button on again, the PIP window will disappear. SPECIAL FEATURES Viewing Picture-in -Picture 1 Press the Menu button. Press the Menu button to select "PIP", then press the VOL + button. Note: The PIP feature does not...
User Manual (user Manual) (ver.1.0) (English)
Page 55
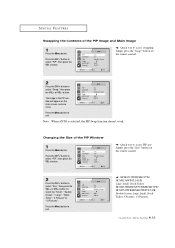
...: Simply press the "Swap" button on the remote control. 2 Press the CH button to select the "Small", "Double Screen", "Large", "Stock Ticker", "4 Pictures" or "13 Pictures". Changing the Size of the PIP Image and Main Image 1 Press the Menu button. Press the CH button to select "Size," then press the... ANT/CATV Channel PIP : On : TV : Double Screen : ANT : ANT 4 w HCM4715W/HCM4215W/ HCM4216W/PCL5415R : Large, Small, Stock Ticker HCM653WB/HCM553WB/HCM474W/ HCM5525WB/HCM422W/PCL545R: Double Screen, Large, Small, Stock Ticker, 4 Pictures, 13 Pictures. 4.12 CHAPTER FOUR: SPECIAL FEATURES
...: Simply press the "Swap" button on the remote control. 2 Press the CH button to select the "Small", "Double Screen", "Large", "Stock Ticker", "4 Pictures" or "13 Pictures". Changing the Size of the PIP Image and Main Image 1 Press the Menu button. Press the CH button to select "Size," then press the... ANT/CATV Channel PIP : On : TV : Double Screen : ANT : ANT 4 w HCM4715W/HCM4215W/ HCM4216W/PCL5415R : Large, Small, Stock Ticker HCM653WB/HCM553WB/HCM474W/ HCM5525WB/HCM422W/PCL545R: Double Screen, Large, Small, Stock Ticker, 4 Pictures, 13 Pictures. 4.12 CHAPTER FOUR: SPECIAL FEATURES
User Manual (user Manual) (ver.1.0) (English)
Page 60
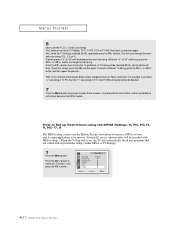
... previous page). SPECIAL FEATURES 6 How to set up Restrictions using the MPAA Ratings: G, PG, PG-13, R, NC-17, X The MPAA rating system uses the Motion Picture Association of America (MPAA) system, and its main application is on the MPAA codes). Note: The V-chip will cycle through the available sub-ratings (FV...
... previous page). SPECIAL FEATURES 6 How to set up Restrictions using the MPAA Ratings: G, PG, PG-13, R, NC-17, X The MPAA rating system uses the Motion Picture Association of America (MPAA) system, and its main application is on the MPAA codes). Note: The V-chip will cycle through the available sub-ratings (FV...
User Manual (user Manual) (ver.1.0) (English)
Page 62
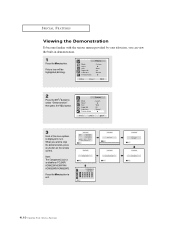
... with the various menus provided by your television, you wish to stop the demonstration, press any button on PCL545R/ HCM422W/HCM474W/ HCM553WB/HCM653WB. Mode Adjust Size Digital NR Color tone Demonstration Picture : Custom : Wide : Off : Normal 2 Press the CH button to exit. Press the Menu button...Mode Color Tone : Nomal Exit Demo Mode 3-2 Pull Down DVD Input Exit Demo Mode Infor Catcher Exit 4.19 CHAPTER FOUR: SPECIAL FEATURES Picture icon will be highlighted (blinking). Note: The Component3 jack is displayed in demonstration. 1 Press the Menu button. Mode Adjust Size Digital ...
... with the various menus provided by your television, you wish to stop the demonstration, press any button on PCL545R/ HCM422W/HCM474W/ HCM553WB/HCM653WB. Mode Adjust Size Digital NR Color tone Demonstration Picture : Custom : Wide : Off : Normal 2 Press the CH button to exit. Press the Menu button...Mode Color Tone : Nomal Exit Demo Mode 3-2 Pull Down DVD Input Exit Demo Mode Infor Catcher Exit 4.19 CHAPTER FOUR: SPECIAL FEATURES Picture icon will be highlighted (blinking). Note: The Component3 jack is displayed in demonstration. 1 Press the Menu button. Mode Adjust Size Digital ...

