

Quick Guide (easy Manual) (English)
Page 1
... Box. ANT IN Connect to an antenna or to the audio output jack on your PC. POWER INPUT PC AUDIO (D-SUB) INPUT Connect to a cable TV system. SUBWOOFER OUTPUT Connect to connect an A/V component that will be connected continuously, such as a VCR or a DVD player. COMPONENT IN 2 Connect component video/audio...
... Box. ANT IN Connect to an antenna or to the audio output jack on your PC. POWER INPUT PC AUDIO (D-SUB) INPUT Connect to a cable TV system. SUBWOOFER OUTPUT Connect to connect an A/V component that will be connected continuously, such as a VCR or a DVD player. COMPONENT IN 2 Connect component video/audio...

Quick Guide (easy Manual) (English)
Page 2
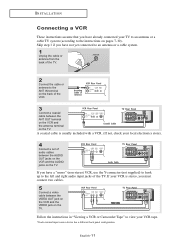
... configuration. Skip step 1 if you have not yet connected to an antenna or a cable system. 1 Unplug the cable or antenna from the back of the TV. 2 Connect the cable or antenna to the ANT IN terminal on the back of the VCR. 3 Connect a coaxial cable between the ANT OUT terminal on... the VCR and the antenna terminal on the TV. I N S TA L L AT I O N Connecting a VCR These instructions assume that you have a "mono" (non-stereo) VCR, use the Y-connector (not supplied) to hook up to the left...
... configuration. Skip step 1 if you have not yet connected to an antenna or a cable system. 1 Unplug the cable or antenna from the back of the TV. 2 Connect the cable or antenna to the ANT IN terminal on the back of the VCR. 3 Connect a coaxial cable between the ANT OUT terminal on... the VCR and the antenna terminal on the TV. I N S TA L L AT I O N Connecting a VCR These instructions assume that you have a "mono" (non-stereo) VCR, use the Y-connector (not supplied) to hook up to the left...

Quick Guide (easy Manual) (English)
Page 3
...electronics store.) * Each external input source device has a different back panel configuration. English-3 I N S TA L L AT I INPUT connector on the TV and the DVI connector on the DVD player/ Set-Top BOX. 2 Connect a set of audio cables between the S-VIDEO OUT jack on the VCR and... different back panel configuration. Connecting a DVI-D Cable 1 Connect a DVI-D cable between the DVI-I O N Connecting an S-VHS VCR Your Samsung TV can be adjusted on the TV. Note:If you are using a DVI-D cable to connect 1.Be sure to connect the audio cable (sold separately)as compared to a standard...
...electronics store.) * Each external input source device has a different back panel configuration. English-3 I N S TA L L AT I INPUT connector on the TV and the DVI connector on the DVD player/ Set-Top BOX. 2 Connect a set of audio cables between the S-VIDEO OUT jack on the VCR and... different back panel configuration. Connecting a DVI-D Cable 1 Connect a DVI-D cable between the DVI-I O N Connecting an S-VHS VCR Your Samsung TV can be adjusted on the TV. Note:If you are using a DVI-D cable to connect 1.Be sure to connect the audio cable (sold separately)as compared to a standard...

Quick Guide (easy Manual) (English)
Page 4
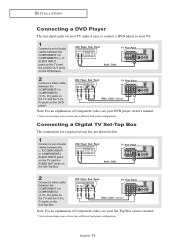
... on the Set-Top Box. 2 Connect a video cable between the COMPONENT1 or COMPONENT2 (Y, PB, PR) jacks on the TV and the Y, PB, PR jacks on the Set-Top Box. English-4 Connecting a Digital TV Set-Top Box The connections for a typical set-top box are shown below. 1 Connect a set of audio cables between... the AUDIO OUT jacks on the DVD player. 2 Connect a video cable between the COMPONENT1 or COMPONENT2 (Y, PB, PR) jacks on the TV and the Y, PB, PR jacks on the DVD player. Note: For an explanation of Component video, see your DVD player owner's manual. * Each external input ...
... on the Set-Top Box. 2 Connect a video cable between the COMPONENT1 or COMPONENT2 (Y, PB, PR) jacks on the TV and the Y, PB, PR jacks on the Set-Top Box. English-4 Connecting a Digital TV Set-Top Box The connections for a typical set-top box are shown below. 1 Connect a set of audio cables between... the AUDIO OUT jacks on the DVD player. 2 Connect a video cable between the COMPONENT1 or COMPONENT2 (Y, PB, PR) jacks on the TV and the Y, PB, PR jacks on the DVD player. Note: For an explanation of Component video, see your DVD player owner's manual. * Each external input ...
Quick Guide (easy Manual) (English)
Page 5
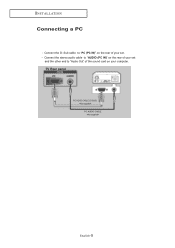
Connect the stereo audio cable to "Audio Out" of your TV may be different, depending on the model. - I N S TA L L AT I O N Connecting a PC Note: This figure shows the Standard Connector-jack panel. The actual configuration on your computer. Sub cable to "PC (PC IN)" on the rear of your set and the other end to "AUDIO (PC IN)" on the rear of the sound card on your set . - TV Rear panel PC VIDEO CABLE ( D-SUB ) PC AUDIO CABLE English-5 Connect the D-
Connect the stereo audio cable to "Audio Out" of your TV may be different, depending on the model. - I N S TA L L AT I O N Connecting a PC Note: This figure shows the Standard Connector-jack panel. The actual configuration on your computer. Sub cable to "PC (PC IN)" on the rear of your set and the other end to "AUDIO (PC IN)" on the rear of the sound card on your set . - TV Rear panel PC VIDEO CABLE ( D-SUB ) PC AUDIO CABLE English-5 Connect the D-
User Manual (user Manual) (ver.1.0) (English)
Page 2
... Connecting VHF and UHF Antennas 7 Antennas with 300-ohm Flat Twin Leads 7 Antennas with 75-ohm Round Leads 8 Separate VHF and UHF Antennas 8 Connecting Cable TV 8 Connecting to a Cable Box that Descrambles All Channels . . . . 9 Connecting to a Cable Box that Descrambles Some Channels . . 9 Connecting a VCR...11 Connecting an S-VHS VCR 12 Connecting a DVI-D Cable 12 Connecting a DVD Player 13 Connecting a Digital TV Set-Top Box 13 Connecting a PC 14 Chapter 3: Operation Turning the TV On and Off 15 Changing Channels 15 Using the Channel Buttons 15 Using the PRE-CH Button to select ...
... Connecting VHF and UHF Antennas 7 Antennas with 300-ohm Flat Twin Leads 7 Antennas with 75-ohm Round Leads 8 Separate VHF and UHF Antennas 8 Connecting Cable TV 8 Connecting to a Cable Box that Descrambles All Channels . . . . 9 Connecting to a Cable Box that Descrambles Some Channels . . 9 Connecting a VCR...11 Connecting an S-VHS VCR 12 Connecting a DVI-D Cable 12 Connecting a DVD Player 13 Connecting a Digital TV Set-Top Box 13 Connecting a PC 14 Chapter 3: Operation Turning the TV On and Off 15 Changing Channels 15 Using the Channel Buttons 15 Using the PRE-CH Button to select ...
User Manual (user Manual) (ver.1.0) (English)
Page 3
... the V-Chip 55 Setting Up Your Personal ID Number (PIN 55 How to Enable/Disable the V-Chip 56 How to Set up Restrictions Using the 'TV Parental Guidelines 57 How to Set up Restrictions Using the MPAA Ratings: G, PG, PG-13, R, NC-17, X 59 How to Reset the... the V-Chip Blocks a Channel ('Emergency Escape 60 Color Weakness 61 Selecting the Melody 62 Chapter 5: PC Display Using Your TV as a Computer (PC) Display 63 How to Set up Your PC Software (Windows only 63 How to Auto Adjust 64 Adjusting the Screen Quality 65 ...
... the V-Chip 55 Setting Up Your Personal ID Number (PIN 55 How to Enable/Disable the V-Chip 56 How to Set up Restrictions Using the 'TV Parental Guidelines 57 How to Set up Restrictions Using the MPAA Ratings: G, PG, PG-13, R, NC-17, X 59 How to Reset the... the V-Chip Blocks a Channel ('Emergency Escape 60 Color Weakness 61 Selecting the Melody 62 Chapter 5: PC Display Using Your TV as a Computer (PC) Display 63 How to Set up Your PC Software (Windows only 63 How to Auto Adjust 64 Adjusting the Screen Quality 65 ...

User Manual (user Manual) (ver.1.0) (English)
Page 4
... built-in speakers: Enables reproduction of the surrounding environment. List of Parts Please make sure the following items are missing, contact your LCD TV. Chapter One YOUR NEW TV List of Features MCC (My Color Control): Users can adjust colors to create optimum contrast. Color Weakness : This feature enables those with a color...
... built-in speakers: Enables reproduction of the surrounding environment. List of Parts Please make sure the following items are missing, contact your LCD TV. Chapter One YOUR NEW TV List of Features MCC (My Color Control): Users can adjust colors to create optimum contrast. Color Weakness : This feature enables those with a color...

User Manual (user Manual) (ver.1.0) (English)
Page 5
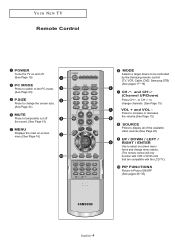
...more advanced features, you must use the remote control. Also press to increase or decrease the volume. MENU Press to turn the TV on . English-2 SOURCE Displays a menu of all of surrounding environment. LIGHT DETECTING SENSOR Adjusts brightness of screen automatically by detecting... brightness of the available input sources (TV, AV, S-VIDEO, Component 1, Component 2, DVI, PC). This sensor works when IBC is in standby mode. SPEAKER POWER INDICATOR Lights ...
...more advanced features, you must use the remote control. Also press to increase or decrease the volume. MENU Press to turn the TV on . English-2 SOURCE Displays a menu of all of surrounding environment. LIGHT DETECTING SENSOR Adjusts brightness of screen automatically by detecting... brightness of the available input sources (TV, AV, S-VIDEO, Component 1, Component 2, DVI, PC). This sensor works when IBC is in standby mode. SPEAKER POWER INDICATOR Lights ...

User Manual (user Manual) (ver.1.0) (English)
Page 6
....) PC VIDEO (D-SUB) INPUT Connect to connect an A/V component that will be connected continuously, such as a VCR or a DVD player. SUBWOOFER OUTPUT Connect to a cable TV system. YOUR NEW TV Rear Panel Jacks Use the rear panel jacks to the video output port on connecting equipment, see pages 7-14.
....) PC VIDEO (D-SUB) INPUT Connect to connect an A/V component that will be connected continuously, such as a VCR or a DVD player. SUBWOOFER OUTPUT Connect to a cable TV system. YOUR NEW TV Rear Panel Jacks Use the rear panel jacks to the video output port on connecting equipment, see pages 7-14.
User Manual (user Manual) (ver.1.0) (English)
Page 7
... can use the remote control up to select on -screen menu.(See Page 16) MODE Selects a target device to be controlled by the Samsung remote control (TV, VCR, Cable, DVD, Samsung STB) (See pages 17~19) CH and CH (Channel UP/Down) Press CH or CH to change menu values. (The remote control... will only function with VCR or DVD units that are compatible with the LCD TV.) PIP FUNCTIONS Picture-in-Picture ON/OFF (See pages 34...
... can use the remote control up to select on -screen menu.(See Page 16) MODE Selects a target device to be controlled by the Samsung remote control (TV, VCR, Cable, DVD, Samsung STB) (See pages 17~19) CH and CH (Channel UP/Down) Press CH or CH to change menu values. (The remote control... will only function with VCR or DVD units that are compatible with the LCD TV.) PIP FUNCTIONS Picture-in-Picture ON/OFF (See pages 34...

User Manual (user Manual) (ver.1.0) (English)
Page 8
...your favorite channel list. (See Page 25) VCR/DVD Functions - Stop - YOUR NEW TV Convenient Buttons You can use . Press to automatically store selected TV/cable channels. (See Page 23) ADD/DEL Use to store and delete channels to see...- Fast/Forward English-5 PRE-CH Tunes to the previous channel. (See Page 15) INFO Use to /from the TV. Press again to select channels over 100. SET BUTTON SET button on the current broadcast.(See Page 16) EXIT Press..., customized sound settings). (See Page 29) STILL Press to exit the menu. TV, VCR, Cable, DVD, or Samsung Set-top box. (See pages 17~19)
...your favorite channel list. (See Page 25) VCR/DVD Functions - Stop - YOUR NEW TV Convenient Buttons You can use . Press to automatically store selected TV/cable channels. (See Page 23) ADD/DEL Use to store and delete channels to see...- Fast/Forward English-5 PRE-CH Tunes to the previous channel. (See Page 15) INFO Use to /from the TV. Press again to select channels over 100. SET BUTTON SET button on the current broadcast.(See Page 16) EXIT Press..., customized sound settings). (See Page 29) STILL Press to exit the menu. TV, VCR, Cable, DVD, or Samsung Set-top box. (See pages 17~19)

User Manual (user Manual) (ver.1.0) (English)
Page 9
...work Check the following: 1. The remote control can be using the remote control for about 23 feet from the TV. (Assuming typical TV usage, the batteries last for a long time. YOUR NEW TV Installing Batteries in a cool, dry place if you won't be used up to match the "+" and "-" ends... reversed? 3. Remove the batteries and store them in the Remote Control 1 Slide the cover out completely. 2 Install two AAA size batteries. Is the TV power switch on? 2. Are the batteries drained? 4. English-6 Are the plus and minus ends of the batteries with the diagram inside the compartment. 3...
...work Check the following: 1. The remote control can be using the remote control for about 23 feet from the TV. (Assuming typical TV usage, the batteries last for a long time. YOUR NEW TV Installing Batteries in a cool, dry place if you won't be used up to match the "+" and "-" ends... reversed? 3. Remove the batteries and store them in the Remote Control 1 Slide the cover out completely. 2 Install two AAA size batteries. Is the TV power switch on? 2. Are the batteries drained? 4. English-6 Are the plus and minus ends of the batteries with the diagram inside the compartment. 3...
User Manual (user Manual) (ver.1.0) (English)
Page 11
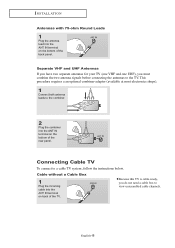
...VHF and one UHF), you do not need a cable box to the combiner. 2 Plug the combiner into the ANT IN terminal on back of the TV. This procedure requires a an optional combiner-adaptor (available at most electronics shops). 1 Connect both antenna leads to view unscrambled cable channels. Cable without a... Cable Box 1 Plug the incoming cable into the ANT IN terminal on the bottom of the back panel. Connecting Cable TV To connect to the TV. Because this TV is cable-ready, you must combine the two antenna signals before connecting the antennas to a cable...
...VHF and one UHF), you do not need a cable box to the combiner. 2 Plug the combiner into the ANT IN terminal on back of the TV. This procedure requires a an optional combiner-adaptor (available at most electronics shops). 1 Connect both antenna leads to view unscrambled cable channels. Cable without a... Cable Box 1 Plug the incoming cable into the ANT IN terminal on the bottom of the back panel. Connecting Cable TV To connect to the TV. Because this TV is cable-ready, you must combine the two antenna signals before connecting the antennas to a cable...
User Manual (user Manual) (ver.1.0) (English)
Page 12
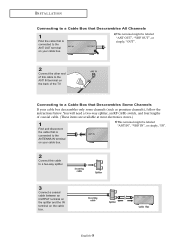
You will need a two-way splitter, an RF (A/B) switch, and four lengths of the TV. English-9 Connecting to a Cable Box that is connected to the ANT OUT terminal on your cable box. This terminal might be labeled "ANT IN", "VHF ...
You will need a two-way splitter, an RF (A/B) switch, and four lengths of the TV. English-9 Connecting to a Cable Box that is connected to the ANT OUT terminal on your cable box. This terminal might be labeled "ANT IN", "VHF ...
User Manual (user Manual) (ver.1.0) (English)
Page 13
... the OUT terminal on the RF (A/B) switch and the VHF/UHF terminal on the rear of the TV. Set the A/B switch to the "B" position to view scrambled channels. (When you will need to tune your TV to the "A" position for normal viewing. After you've made this connection, set the A/B switch to...
... the OUT terminal on the RF (A/B) switch and the VHF/UHF terminal on the rear of the TV. Set the A/B switch to the "B" position to view scrambled channels. (When you will need to tune your TV to the "A" position for normal viewing. After you've made this connection, set the A/B switch to...
User Manual (user Manual) (ver.1.0) (English)
Page 14
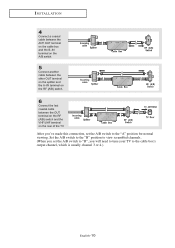
... that you have a "mono" (non-stereo) VCR, use the Y-connector (not supplied) to hook up to the left and right audio input jacks of the TV. A coaxial cable is stereo, you have already connected your local electronics store). 4 Connect a set of the VCR. 3 Connect a coaxial cable between the VIDEO OUT ...jack on the VCR and the VIDEO jack on the TV. English-11 If you must connect two cables. 5 Connect a video cable between the ANT OUT terminal on the VCR and the antenna terminal on pages...
... that you have a "mono" (non-stereo) VCR, use the Y-connector (not supplied) to hook up to the left and right audio input jacks of the TV. A coaxial cable is stereo, you have already connected your local electronics store). 4 Connect a set of the VCR. 3 Connect a coaxial cable between the VIDEO OUT ...jack on the VCR and the VIDEO jack on the TV. English-11 If you must connect two cables. 5 Connect a video cable between the ANT OUT terminal on the VCR and the antenna terminal on pages...

User Manual (user Manual) (ver.1.0) (English)
Page 15
The screen must be connected to an S-Video signal from an S-VHS VCR. (This connection delivers a better picture as shown above to get normal TV sound. 2.See Appendix "Display Modes "for supported resolutions. 3.The screen may have shifted to the right or to your VCR and your local electronics store... set of audio cables between the AUDIO OUT jacks on the VCR and the AUDIO INPUT jacks on the TV. 3 Connect an S-video cable between the DVI-I O N Connecting an S-VHS VCR Your Samsung TV can be adjusted on the source(Set-top box). 4.Each external input source device has a different back panel...
The screen must be connected to an S-Video signal from an S-VHS VCR. (This connection delivers a better picture as shown above to get normal TV sound. 2.See Appendix "Display Modes "for supported resolutions. 3.The screen may have shifted to the right or to your VCR and your local electronics store... set of audio cables between the AUDIO OUT jacks on the VCR and the AUDIO INPUT jacks on the TV. 3 Connect an S-video cable between the DVI-I O N Connecting an S-VHS VCR Your Samsung TV can be adjusted on the source(Set-top box). 4.Each external input source device has a different back panel...
User Manual (user Manual) (ver.1.0) (English)
Page 16
...OUT jacks on the DVD player. 2 Connect a video cable between the COMPONENT1 or COMPONENT2 (Y, PB, PR) jacks on the TV and the Y, PB, PR jacks on the DVD player. Connecting a Digital TV Set-Top Box The connections for a typical set-top box are shown below. 1 Connect a set of audio cables between ...the L, R COMPONENT1 or COMPONENT2 AUDIO INPUT jacks on the TV and the AUDIO OUT jacks on the Set-Top Box. 2 Connect a video cable between the COMPONENT1 or COMPONENT2 (Y, PB, PR) jacks on the...
...OUT jacks on the DVD player. 2 Connect a video cable between the COMPONENT1 or COMPONENT2 (Y, PB, PR) jacks on the TV and the Y, PB, PR jacks on the DVD player. Connecting a Digital TV Set-Top Box The connections for a typical set-top box are shown below. 1 Connect a set of audio cables between ...the L, R COMPONENT1 or COMPONENT2 AUDIO INPUT jacks on the TV and the AUDIO OUT jacks on the Set-Top Box. 2 Connect a video cable between the COMPONENT1 or COMPONENT2 (Y, PB, PR) jacks on the...

User Manual (user Manual) (ver.1.0) (English)
Page 17
Connect the stereo audio cable to "Audio Out" of your TV may be different, depending on the model. - Sub cable to "PC (PC IN)" on the rear of your set and the other end to "AUDIO (PC IN)" on the rear of the sound card on your set . - The actual configuration on your computer. TV Rear panel PC VIDEO CABLE ( D-SUB ) PC AUDIO CABLE English-14 I N S TA L L AT I O N Connecting a PC Note: This figure shows the Standard Connector-jack panel. Connect the D-
Connect the stereo audio cable to "Audio Out" of your TV may be different, depending on the model. - Sub cable to "PC (PC IN)" on the rear of your set and the other end to "AUDIO (PC IN)" on the rear of the sound card on your set . - The actual configuration on your computer. TV Rear panel PC VIDEO CABLE ( D-SUB ) PC AUDIO CABLE English-14 I N S TA L L AT I O N Connecting a PC Note: This figure shows the Standard Connector-jack panel. Connect the D-


