

Open Source Guide (ENGLISH)
Page 1
... source code for copying, distributing or modifying the Program or works based on it . 6. rather, the intent is to exercise the right to control the distribution of this License will be guided by software patents. You may not distribute the Program at no warranty for each author's protection and ours, we want its recipients to make certain that everyone 's free use pieces...
... source code for copying, distributing or modifying the Program or works based on it . 6. rather, the intent is to exercise the right to control the distribution of this License will be guided by software patents. You may not distribute the Program at no warranty for each author's protection and ours, we want its recipients to make certain that everyone 's free use pieces...

Open Source Guide (ENGLISH)
Page 2
...BY YOU OR THIRD PARTIES OR A FAILURE OF THE LIBRARY TO OPERATE WITH ANY OTHER SOFTWARE), EVEN IF SUCH HOLDER OR OTHER PARTY HAS BEEN ADVISED OF THE POSSIBILITY OF SUCH DAMAGES. You can redistribute and change. 16. and each source file to the public, we recommend making it to be of... the greatest possible use to most effectively convey the exclusion of the ordinary General Public License). How to Apply These Terms to Your New Libraries If you develop a new library, and you want it free software that everyone can do so by permitting redistribution under the terms of warranty;
...BY YOU OR THIRD PARTIES OR A FAILURE OF THE LIBRARY TO OPERATE WITH ANY OTHER SOFTWARE), EVEN IF SUCH HOLDER OR OTHER PARTY HAS BEEN ADVISED OF THE POSSIBILITY OF SUCH DAMAGES. You can redistribute and change. 16. and each source file to the public, we recommend making it to be of... the greatest possible use to most effectively convey the exclusion of the ordinary General Public License). How to Apply These Terms to Your New Libraries If you develop a new library, and you want it free software that everyone can do so by permitting redistribution under the terms of warranty;

Quick Guide (easy Manual) (English)
Page 1
...Use the rear panel jacks to an active (powered) subwoofer. English-1 S-VIDEO Connect an S-Video signal from a camcorder or VCR VIDEO/AUDIO INPUT Connect a Video signal from a DVD/VCR/Set-top Box. POWER INPUT COMPONENT IN 1 Connect component video/audio from a camcorder or VCR. PC AUDIO (D-SUB) INPUT Connect to the audio output jack on your PC. SUBWOOFER OUTPUT Connect to connect an A/V component that will be connected continuously, such as a VCR or a DVD player. COMPONENT IN 2 Connect component video/audio from a DVD/VCR/Set-top Box. HEADPHONE JACK Connect a set of external...
...Use the rear panel jacks to an active (powered) subwoofer. English-1 S-VIDEO Connect an S-Video signal from a camcorder or VCR VIDEO/AUDIO INPUT Connect a Video signal from a DVD/VCR/Set-top Box. POWER INPUT COMPONENT IN 1 Connect component video/audio from a camcorder or VCR. PC AUDIO (D-SUB) INPUT Connect to the audio output jack on your PC. SUBWOOFER OUTPUT Connect to connect an A/V component that will be connected continuously, such as a VCR or a DVD player. COMPONENT IN 2 Connect component video/audio from a DVD/VCR/Set-top Box. HEADPHONE JACK Connect a set of external...

Quick Guide (easy Manual) (English)
Page 3
... DVD player/ Set-Top BOX. The screen must be connected to an S-Video signal from an S-VHS VCR. (This connection delivers a better picture as shown above to get normal TV sound. 2.See Appendix "Display Modes "for supported resolutions. 3.The screen may have shifted to the right or to your VCR and your local electronics store.) * Each external input source device has a different back panel configuration. Note:If you are using a DVI-D cable...
... DVD player/ Set-Top BOX. The screen must be connected to an S-Video signal from an S-VHS VCR. (This connection delivers a better picture as shown above to get normal TV sound. 2.See Appendix "Display Modes "for supported resolutions. 3.The screen may have shifted to the right or to your VCR and your local electronics store.) * Each external input source device has a different back panel configuration. Note:If you are using a DVI-D cable...
User Manual (user Manual) (ver.1.0) (English)
Page 2
... 12 Connecting a DVI-D Cable 12 Connecting a DVD Player 13 Connecting a Digital TV Set-Top Box 13 Connecting a PC 14 Chapter 3: Operation Turning the TV On and Off 15 Changing Channels 15 Using the Channel Buttons 15 Using the PRE-CH Button to select the Previous Channel . . . . 15 Adjusting the Volume 15 Using Mute 15 Viewing the Display 16 Viewing the Menus 16 Setting Up Your Remote Control 17 Remote Control Codes 20 Chapter 4: Special Features Plug & Play Feature 21 Memorizing the Channels 22 Selecting the Video Signal-source...
... 12 Connecting a DVI-D Cable 12 Connecting a DVD Player 13 Connecting a Digital TV Set-Top Box 13 Connecting a PC 14 Chapter 3: Operation Turning the TV On and Off 15 Changing Channels 15 Using the Channel Buttons 15 Using the PRE-CH Button to select the Previous Channel . . . . 15 Adjusting the Volume 15 Using Mute 15 Viewing the Display 16 Viewing the Menus 16 Setting Up Your Remote Control 17 Remote Control Codes 20 Chapter 4: Special Features Plug & Play Feature 21 Memorizing the Channels 22 Selecting the Video Signal-source...
User Manual (user Manual) (ver.1.0) (English)
Page 3
... a Channel ('Emergency Escape 60 Color Weakness 61 Selecting the Melody 62 Chapter 5: PC Display Using Your TV as a Computer (PC) Display 63 How to Set up Your PC Software (Windows only 63 How to Auto Adjust 64 Adjusting the Screen Quality 65 Changing the Screen Position 66 To Initialize the Screen Position or Color Settings 67 Chapter 6: Troubleshooting Identifying Problems 68 Appendix Installing the Stand 70 Installing VESA compliant mounting devices(not supplied 71...
... a Channel ('Emergency Escape 60 Color Weakness 61 Selecting the Melody 62 Chapter 5: PC Display Using Your TV as a Computer (PC) Display 63 How to Set up Your PC Software (Windows only 63 How to Auto Adjust 64 Adjusting the Screen Quality 65 Changing the Screen Position 66 To Initialize the Screen Position or Color Settings 67 Chapter 6: Troubleshooting Identifying Problems 68 Appendix Installing the Stand 70 Installing VESA compliant mounting devices(not supplied 71...

User Manual (user Manual) (ver.1.0) (English)
Page 6
... POWER INPUT SUBWOOFER OUTPUT Connect to a cable TV system. HEADPHONE JACK Connect a set of external headphones for private listening. PC AUDIO (D-SUB) INPUT Connect to connect an A/V component that will be connected continuously, such as a VCR or a DVD player. English-3 S-VIDEO Connect an S-Video signal from a camcorder or VCR VIDEO/AUDIO INPUT Connect a Video signal from a DVD/VCR/Set-top Box. COMPONENT IN 2 Connect component video/audio from a DVD/VCR/Set-top Box. ANT IN Connect to an antenna or to an active (powered) subwoofer. YOUR NEW TV Rear Panel Jacks Use the rear panel...
... POWER INPUT SUBWOOFER OUTPUT Connect to a cable TV system. HEADPHONE JACK Connect a set of external headphones for private listening. PC AUDIO (D-SUB) INPUT Connect to connect an A/V component that will be connected continuously, such as a VCR or a DVD player. English-3 S-VIDEO Connect an S-Video signal from a camcorder or VCR VIDEO/AUDIO INPUT Connect a Video signal from a DVD/VCR/Set-top Box. COMPONENT IN 2 Connect component video/audio from a DVD/VCR/Set-top Box. ANT IN Connect to an antenna or to an active (powered) subwoofer. YOUR NEW TV Rear Panel Jacks Use the rear panel...

User Manual (user Manual) (ver.1.0) (English)
Page 8
...) RESET When your remote does not work, change the batteries and press the RESET button for the TV to exit the menu. Press again to select channels over 100. SET BUTTON SET button on the current broadcast.(See Page 16) EXIT Press to turn off automatically.(See Page 52) P.MODE Adjusts the TV picture by selecting one of the preset factory settings. (See Page 27) S.MODE Adjust the TV sound by...
...) RESET When your remote does not work, change the batteries and press the RESET button for the TV to exit the menu. Press again to select channels over 100. SET BUTTON SET button on the current broadcast.(See Page 16) EXIT Press to turn off automatically.(See Page 52) P.MODE Adjusts the TV picture by selecting one of the preset factory settings. (See Page 27) S.MODE Adjust the TV sound by...

User Manual (user Manual) (ver.1.0) (English)
Page 15
... the DVD player/ Set-Top BOX. The screen must be connected to an S-Video signal from an S-VHS VCR. (This connection delivers a better picture as shown above to get normal TV sound. 2.See Appendix "Display Modes "for supported resolutions. 3.The screen may have shifted to the right or to your VCR and your local electronics store.) * Each external input source device has a different back panel configuration. English-12 An S-video cable is...
... the DVD player/ Set-Top BOX. The screen must be connected to an S-Video signal from an S-VHS VCR. (This connection delivers a better picture as shown above to get normal TV sound. 2.See Appendix "Display Modes "for supported resolutions. 3.The screen may have shifted to the right or to your VCR and your local electronics store.) * Each external input source device has a different back panel configuration. English-12 An S-video cable is...
User Manual (user Manual) (ver.1.0) (English)
Page 20
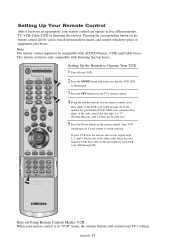
....) 5 Press the Power button on Using Remote Control Modes: VCR When your remote control is only compatible with all DVD Players, VCRs and Cable boxes. Setting Up the Remote to switch between these modes, and control whichever piece of the code, even if the first digit is a "0". (If more than one code is set up properly, your remote control can operate in "VCR" mode, the volume buttons still control your TV's volume. Note on the remote control. Your VCR should turn on page...
....) 5 Press the Power button on Using Remote Control Modes: VCR When your remote control is only compatible with all DVD Players, VCRs and Cable boxes. Setting Up the Remote to switch between these modes, and control whichever piece of the code, even if the first digit is a "0". (If more than one code is set up properly, your remote control can operate in "VCR" mode, the volume buttons still control your TV's volume. Note on the remote control. Your VCR should turn on page...
User Manual (user Manual) (ver.1.0) (English)
Page 22
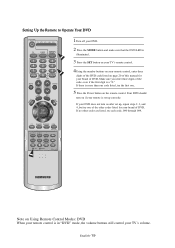
... code, even if the first digit is a "0." If no other codes listed for your brand of DVD. Setting Up the Remote to Operate Your DVD 1Turn off your DVD. 2 Press the MODE button and make sure that the DVD LED is illuminated. 3 Press the SET button on your TV's remote control. 4Using the number buttons on your remote control, enter three digits of the DVD code listed on Using Remote Control Modes: DVD When your remote control is in "DVD" mode, the volume buttons still control your TV's volume...
... code, even if the first digit is a "0." If no other codes listed for your brand of DVD. Setting Up the Remote to Operate Your DVD 1Turn off your DVD. 2 Press the MODE button and make sure that the DVD LED is illuminated. 3 Press the SET button on your TV's remote control. 4Using the number buttons on your remote control, enter three digits of the DVD code listed on Using Remote Control Modes: DVD When your remote control is in "DVD" mode, the volume buttons still control your TV's volume...
User Manual (user Manual) (ver.1.0) (English)
Page 28
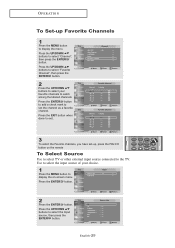
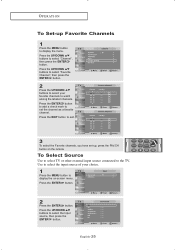
... set -up Favorite Channels 1 Press the MENU button to display the on the remote To Select Source Use to select TV or other external input source connected to the TV. Press the ENTER button. 2 Press the ENTER button. Press the UP/DOWN buttons to select "Channel", then press the ENTER button. Press the EXIT button when done to watch among the labeled channels. Use to select the input source of your favorite channels...
... set -up Favorite Channels 1 Press the MENU button to display the on the remote To Select Source Use to select TV or other external input source connected to the TV. Press the ENTER button. 2 Press the ENTER button. Press the UP/DOWN buttons to select "Channel", then press the ENTER button. Press the EXIT button when done to watch among the labeled channels. Use to select the input source of your favorite channels...

User Manual (user Manual) (ver.1.0) (English)
Page 38
..., DVI, Component 1 or 2, PIP:TV "Channel" is connected. Press the EXIT button to exit. • When the PC is set the main screen to game or karaoke mode. • Switch the main screen and the PIP window for PIP 3 Press the UP/DOWN buttons to select "Ch.(Channel)", then press the ENTER button. Changing the Size of the sub picture by using the size menu. Note :Source selection is possible only when Component 1, Component 2, DVI...
..., DVI, Component 1 or 2, PIP:TV "Channel" is connected. Press the EXIT button to exit. • When the PC is set the main screen to game or karaoke mode. • Switch the main screen and the PIP window for PIP 3 Press the UP/DOWN buttons to select "Ch.(Channel)", then press the ENTER button. Changing the Size of the sub picture by using the size menu. Note :Source selection is possible only when Component 1, Component 2, DVI...

User Manual (user Manual) (ver.1.0) (English)
Page 60
... display the menu. The "Enter Pin" screen will appear. Enter your 4-digit Pin number. The restrictions for these two groups work independently: If a household includes very young children as well as young adults, the TV guidelines must be set up separately for each age group. (See next step.) English-57 O P E R AT I O N How to Set up Restrictions Using the 'TV Parental...
... display the menu. The "Enter Pin" screen will appear. Enter your 4-digit Pin number. The restrictions for these two groups work independently: If a household includes very young children as well as young adults, the TV guidelines must be set up separately for each age group. (See next step.) English-57 O P E R AT I O N How to Set up Restrictions Using the 'TV Parental...

User Manual (user Manual) (ver.1.0) (English)
Page 4
... 12 Connecting a DVI-D Cable 12 Connecting a DVD Player 13 Connecting a Digital TV Set-Top Box 13 Connecting a PC 14 Chapter 3: Operation Turning the TV On and Off 15 Changing Channels 15 Using the Channel Buttons 15 Using the PRE-CH Button to select the Previous Channel . . . . 15 Adjusting the Volume 15 Using Mute 15 Viewing the Display 16 Viewing the Menus 16 Setting Up Your Remote Control 17 Remote Control Codes 20 Plug & Play Feature 21 Memorizing the Channels 22 Selecting the Video Signal-source 22 Storing Channels in...
... 12 Connecting a DVI-D Cable 12 Connecting a DVD Player 13 Connecting a Digital TV Set-Top Box 13 Connecting a PC 14 Chapter 3: Operation Turning the TV On and Off 15 Changing Channels 15 Using the Channel Buttons 15 Using the PRE-CH Button to select the Previous Channel . . . . 15 Adjusting the Volume 15 Using Mute 15 Viewing the Display 16 Viewing the Menus 16 Setting Up Your Remote Control 17 Remote Control Codes 20 Plug & Play Feature 21 Memorizing the Channels 22 Selecting the Video Signal-source 22 Storing Channels in...

User Manual (user Manual) (ver.1.0) (English)
Page 5
... Blocks a Channel ('Emergency Escape 60 Color Weakness 61 Selecting the Melody 62 Chapter 5: PC Display Using Your TV as a Computer (PC) Display 63 How to Set up Your PC Software (Windows XP 63 How to Auto Adjustment 64 Adjusting the Screen Quality 65 Changing the Screen Position 66 To Initialize the Screen Position or Color Settings 67 Chapter 6: Troubleshooting Identifying Problems 68 Appendix Installing the Stand 70 Installing the Wall Mount Kit 71...
... Blocks a Channel ('Emergency Escape 60 Color Weakness 61 Selecting the Melody 62 Chapter 5: PC Display Using Your TV as a Computer (PC) Display 63 How to Set up Your PC Software (Windows XP 63 How to Auto Adjustment 64 Adjusting the Screen Quality 65 Changing the Screen Position 66 To Initialize the Screen Position or Color Settings 67 Chapter 6: Troubleshooting Identifying Problems 68 Appendix Installing the Stand 70 Installing the Wall Mount Kit 71...

User Manual (user Manual) (ver.1.0) (English)
Page 10
... menu. Stop - SIZE Press to make the PIP window double, large or small. (See page 35) CH Displays the available channels in sequence. (These buttons change channels in your remote does not work, change the batteries and press the RESET button for the TV to turn off automatically.(See page 52) P.MODE Adjusts the TV picture by selecting one of the preset factory settings. (See page 27) S.MODE Adjusts the TV sound...
... menu. Stop - SIZE Press to make the PIP window double, large or small. (See page 35) CH Displays the available channels in sequence. (These buttons change channels in your remote does not work, change the batteries and press the RESET button for the TV to turn off automatically.(See page 52) P.MODE Adjusts the TV picture by selecting one of the preset factory settings. (See page 27) S.MODE Adjusts the TV sound...

User Manual (user Manual) (ver.1.0) (English)
Page 22
... operate in "VCR" mode, the volume buttons still control your remote control, enter three digits of the VCR code listed on the remote control. Setting Up the Remote to switch between these modes, and control whichever piece of equipment you enter three digits of the code, even if the first digit is a "0". (If more than one code is in five different modes: TV, VCR, Cable, DVD or Samsung Set-top box. If your VCR does not turn on Using Remote Control Modes...
... operate in "VCR" mode, the volume buttons still control your remote control, enter three digits of the VCR code listed on the remote control. Setting Up the Remote to switch between these modes, and control whichever piece of equipment you enter three digits of the code, even if the first digit is a "0". (If more than one code is in five different modes: TV, VCR, Cable, DVD or Samsung Set-top box. If your VCR does not turn on Using Remote Control Modes...

User Manual (user Manual) (ver.1.0) (English)
Page 24
... remote is set -up correctly. English-19 O P E R AT I O N Setting Up the Remote to Operate Your DVD 1 Turn off your DVD. 2 Press the MODE button and make sure that the DVD LED is illuminated. 3 Press the SET button on your TV's remote control. 4 Using the number buttons on your remote control, enter three digits of the DVD code listed on page 20 of this manual for your brand of DVD. If there is in "DVD" mode, the volume buttons still control your TV's volume...
... remote is set -up correctly. English-19 O P E R AT I O N Setting Up the Remote to Operate Your DVD 1 Turn off your DVD. 2 Press the MODE button and make sure that the DVD LED is illuminated. 3 Press the SET button on your TV's remote control. 4 Using the number buttons on your remote control, enter three digits of the DVD code listed on page 20 of this manual for your brand of DVD. If there is in "DVD" mode, the volume buttons still control your TV's volume...
User Manual (user Manual) (ver.1.0) (English)
Page 30
... ENTER button. Press the UP/DOWN buttons to select "Favorite Channel", then press the ENTER button. 2 Press the UP/DOWN buttons to select your choice. 1 Press the MENU button to display the on the remote To Select Source Use to select TV or other external input source connected to select the Input source, then press the ENTER button. English-25 O P E R AT I O N To Set-up , press the FAV.CH button on -screen menu.
... ENTER button. Press the UP/DOWN buttons to select "Favorite Channel", then press the ENTER button. 2 Press the UP/DOWN buttons to select your choice. 1 Press the MENU button to display the on the remote To Select Source Use to select TV or other external input source connected to select the Input source, then press the ENTER button. English-25 O P E R AT I O N To Set-up , press the FAV.CH button on -screen menu.


