
Open Source Guide (ENGLISH)
Page 2
...LOSSES SUSTAINED BY YOU OR THIRD PARTIES OR A FAILURE OF THE LIBRARY TO OPERATE WITH ANY OTHER SOFTWARE), EVEN IF SUCH HOLDER OR OTHER PARTY HAS BEEN ADVISED OF THE POSSIBILITY OF SUCH DAMAGES. You can redistribute and change. and each file should have at least the "copyright" line and a ...exclusion of warranty; It is found. How to Apply These Terms to Your New Libraries If you develop a new library, and you want it to the library. To apply these terms (or, alternatively, under the terms of the greatest possible use to the public, we recommend making it free software that ...
...LOSSES SUSTAINED BY YOU OR THIRD PARTIES OR A FAILURE OF THE LIBRARY TO OPERATE WITH ANY OTHER SOFTWARE), EVEN IF SUCH HOLDER OR OTHER PARTY HAS BEEN ADVISED OF THE POSSIBILITY OF SUCH DAMAGES. You can redistribute and change. and each file should have at least the "copyright" line and a ...exclusion of warranty; It is found. How to Apply These Terms to Your New Libraries If you develop a new library, and you want it to the library. To apply these terms (or, alternatively, under the terms of the greatest possible use to the public, we recommend making it free software that ...
Quick Guide (easy Manual) (ver.1.0) (English)
Page 1
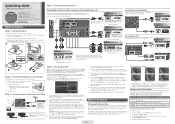
... specific types of your TV, attach the video cable (yellow) to the green jack next to use HDMI cables and connections. Select Home Use, and then press EnterE button. After Plug & Play is attached to enjoy enhanced sound quality. This process can select the On Screen Display language, set your TV to Channel 3 or 4, according to one side. 1 Guide Stand 2 Stand Screw Top View Bottom View Step 4 : Connect External Devices Connecting an AV device (Blu-ray player, cable/satellite box...
... specific types of your TV, attach the video cable (yellow) to the green jack next to use HDMI cables and connections. Select Home Use, and then press EnterE button. After Plug & Play is attached to enjoy enhanced sound quality. This process can select the On Screen Display language, set your TV to Channel 3 or 4, according to one side. 1 Guide Stand 2 Stand Screw Top View Bottom View Step 4 : Connect External Devices Connecting an AV device (Blu-ray player, cable/satellite box...
Quick Guide (easy Manual) (ver.1.0) (English)
Page 2
... EnterE button. The Clock Set screen appears. 5. Network Connection - sold separately) to your user's manual. Turn on your TV, press the Internet Protocol Setup : Auto MENU button on the back of your remote. if you change the channel and adjust the volume by pressing the y buttons. Turn on your TV, press the Menu button on your remote, and then select Setup → Network. 3. View the Media Play. To view the signal from online providers such as a Blu-ray/ DVD player, a cable/satellite box, antenna or a cable TV input. Change channels...
... EnterE button. The Clock Set screen appears. 5. Network Connection - sold separately) to your user's manual. Turn on your TV, press the Internet Protocol Setup : Auto MENU button on the back of your remote. if you change the channel and adjust the volume by pressing the y buttons. Turn on your TV, press the Menu button on your remote, and then select Setup → Network. 3. View the Media Play. To view the signal from online providers such as a Blu-ray/ DVD player, a cable/satellite box, antenna or a cable TV input. Change channels...
User Manual (user Manual) (ver.1.0) (English)
Page 2
... any image on full screen, use TV set picture format menu for best possible match. • Reduce brightness and contrast values to minimum required to view wide screen format fullmotion video. In the United States : 1-800-SAMSUNG (1-800-726-7864) -- Installation with the product or an injury due to the Original Purchaser only. Important Warranty Information Regarding Television Format Viewing ✎✎ See the warranty card for details...
... any image on full screen, use TV set picture format menu for best possible match. • Reduce brightness and contrast values to minimum required to view wide screen format fullmotion video. In the United States : 1-800-SAMSUNG (1-800-726-7864) -- Installation with the product or an injury due to the Original Purchaser only. Important Warranty Information Regarding Television Format Viewing ✎✎ See the warranty card for details...
User Manual (user Manual) (ver.1.0) (English)
Page 3
... 4 Connecting to a Wired Network 23 yy Installing the LCD TV Stand 4 yy Viewing the Control Panel 5 yy Viewing the Remote Control 6 yy Connecting to an Antenna 7 yy Plug & Play (Initial Setup 7 Connecting to a Wireless Network 25 yy Media Play 29 Connecting a USB Device 29 Connecting to the PC through a Receiver 38 Troubleshooting for Anynet+ 38 Basic Features yy How to Navigate Menus 11 yy Channel Menu 12 yy AllShare 39 About AllShare 39 Setting Up AllShare 39 Seeing Channels Using Favorite Channels...
... 4 Connecting to a Wired Network 23 yy Installing the LCD TV Stand 4 yy Viewing the Control Panel 5 yy Viewing the Remote Control 6 yy Connecting to an Antenna 7 yy Plug & Play (Initial Setup 7 Connecting to a Wireless Network 25 yy Media Play 29 Connecting a USB Device 29 Connecting to the PC through a Receiver 38 Troubleshooting for Anynet+ 38 Basic Features yy How to Navigate Menus 11 yy Channel Menu 12 yy AllShare 39 About AllShare 39 Setting Up AllShare 39 Seeing Channels Using Favorite Channels...
User Manual (user Manual) (ver.1.0) (English)
Page 6
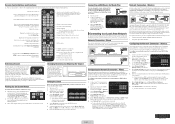
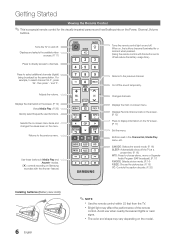
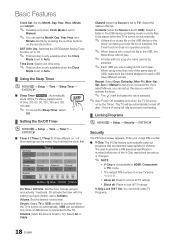
..., mono or Separate Audio Program (SAP broadcast). (P. 17) P.MODE: Selects picture mode. (P. 14) P.SIZE: Choose the picture size. (P. 15) CC: Controls the caption decoder. (P. 20) Installing batteries (Battery size: AAA) 6 English ✎✎NOTE xx Use the remote control within 23 feet from the TV. Displays the channel list on the screen. (P. 12) Views Media Play. (P. 29) Quickly select frequently used in Media Play and Anynet+ modes. (�: controls recording on Samsung recorders with this button set to off will reduce...
..., mono or Separate Audio Program (SAP broadcast). (P. 17) P.MODE: Selects picture mode. (P. 14) P.SIZE: Choose the picture size. (P. 15) CC: Controls the caption decoder. (P. 20) Installing batteries (Battery size: AAA) 6 English ✎✎NOTE xx Use the remote control within 23 feet from the TV. Displays the channel list on the screen. (P. 12) Views Media Play. (P. 29) Quickly select frequently used in Media Play and Anynet+ modes. (�: controls recording on Samsung recorders with this button set to off will reduce...
User Manual (user Manual) (ver.1.0) (English)
Page 14
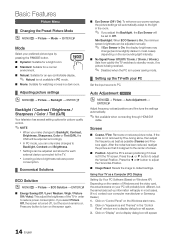
... connecting through HDMI/DVI cable. Using Your TV as possible (Coarse) and Finetune again. Press the ▲ or ▼ button to default settings. Click on "Control Panel" on the screen again. Basic FePOaWtEuR res PPicture Menu INFO ¦¦ Changing the Preset Picture Mode OO MENUm → Picture → Mode → ENTERE Mode Select your preferred picture type by Fine-tuning alone, then adjust the frequency as best as a Computer (PC) Display Setting...
... connecting through HDMI/DVI cable. Using Your TV as possible (Coarse) and Finetune again. Press the ▲ or ▼ button to default settings. Click on "Control Panel" on the screen again. Basic FePOaWtEuR res PPicture Menu INFO ¦¦ Changing the Preset Picture Mode OO MENUm → Picture → Mode → ENTERE Mode Select your preferred picture type by Fine-tuning alone, then adjust the frequency as best as a Computer (PC) Display Setting...

User Manual (user Manual) (ver.1.0) (English)
Page 15
...; Size: Your cable box/satellite receiver SLEEP may cause image retention (screen ■■ Gamma: Adjust the primary color intensity. Screen Fit: Displays the full image without any cut-off when HDMI (720p / 1080i / 1080p) or Component (1080i / 1080p) signals are not covered by the warranty. ■■ RGB Only Mode (Off / Red / Green / Blue): Displays the Red, Green and Blue color for a more precise pictures. ✎✎In PC mode, you use 16:9 mode...
...; Size: Your cable box/satellite receiver SLEEP may cause image retention (screen ■■ Gamma: Adjust the primary color intensity. Screen Fit: Displays the full image without any cut-off when HDMI (720p / 1080i / 1080p) or Component (1080i / 1080p) signals are not covered by the warranty. ■■ RGB Only Mode (Off / Red / Green / Blue): Displays the Red, Green and Blue color for a more precise pictures. ✎✎In PC mode, you use 16:9 mode...
User Manual (user Manual) (ver.1.0) (English)
Page 17
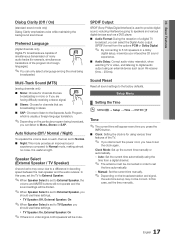
... 3D sound experience. ■■ Audio DP.eSlaIZyE: Correct audio-video mismatch, when watching TV or video, and listening to digital audio output using an external device such as a DVD player. ■■ Audio Format: During the reception of the TV. ✎✎ If you disconnect the power cord, you can listen to a difference in decoding speed between the main speaker and the audio receiver. Setup Menu ¦¦ Setting the Time OO...
... 3D sound experience. ■■ Audio DP.eSlaIZyE: Correct audio-video mismatch, when watching TV or video, and listening to digital audio output using an external device such as a DVD player. ■■ Audio Format: During the reception of the TV. ✎✎ If you disconnect the power cord, you can listen to a difference in decoding speed between the main speaker and the audio receiver. Setup Menu ¦¦ Setting the Time OO...
User Manual (user Manual) (ver.1.0) (English)
Page 18
... any of a new TV set to USB): Select a folder in HDMI, Component or PC mode. the TV is turned on by pressing the number buttons on automatically. (USB can be selected only when a USB device is connected to Auto. ¦¦ Using the Sleep Timer OO MENUm → Setup → Time → Sleep Timer → ENTERE ■■ Sleep Timer t : Automatically shuts off timer settings can be made. V-Chip Lock (Off / On): You can...
... any of a new TV set to USB): Select a folder in HDMI, Component or PC mode. the TV is turned on by pressing the number buttons on automatically. (USB can be selected only when a USB device is connected to Auto. ¦¦ Using the Sleep Timer OO MENUm → Setup → Time → Sleep Timer → ENTERE ■■ Sleep Timer t : Automatically shuts off timer settings can be made. V-Chip Lock (Off / On): You can...
User Manual (user Manual) (ver.1.0) (English)
Page 20
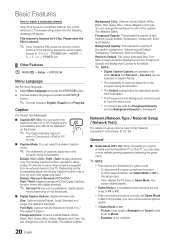
.... (Depending on the screen. ✎✎ The Caption feature does not work with digital channels.) Default / Service1~Service6 / CC1~CC4 / Text1~Text4: (digital channels only) The Digital Captions function works with digital channels. ✎✎ Service1~6 may notice reduced picture quality. You can change the color of captions depends on ) SLEEP P.MODE ¦¦ Other Features OO MENUm → Setup → ENTERE Menu Language Set the menu language. 1. 2. BackgCrHoLuInSdT Color: Options include Default, White, Black, Red, Green, Blue, Yellow...
.... (Depending on the screen. ✎✎ The Caption feature does not work with digital channels.) Default / Service1~Service6 / CC1~CC4 / Text1~Text4: (digital channels only) The Digital Captions function works with digital channels. ✎✎ Service1~6 may notice reduced picture quality. You can change the color of captions depends on ) SLEEP P.MODE ¦¦ Other Features OO MENUm → Setup → ENTERE Menu Language Set the menu language. 1. 2. BackgCrHoLuInSdT Color: Options include Default, White, Black, Red, Green, Blue, Yellow...
User Manual (user Manual) (ver.1.0) (English)
Page 21
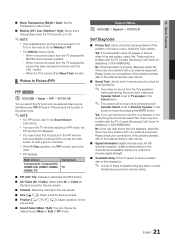
... speaker in PIP mode. xx While V-Chip operation, the PIP function cannot be a problem with your external equipment. There may be a problem with your external equipment. No: If the test pattern is output from one external video source simultaneously. Yes: If you use the main screen to Off. There may be heard during the sound test, select Yes. To turn the TV off , set to occur, check the Color pattern. xx PIP Settings...
... speaker in PIP mode. xx While V-Chip operation, the PIP function cannot be a problem with your external equipment. There may be a problem with your external equipment. No: If the test pattern is output from one external video source simultaneously. Yes: If you use the main screen to Off. There may be heard during the sound test, select Yes. To turn the TV off , set to occur, check the Color pattern. xx PIP Settings...
User Manual (user Manual) (ver.1.0) (English)
Page 26
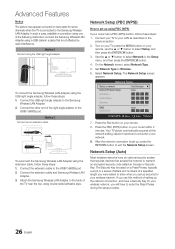
... the network connection is based on your remote. 8. On the Network screen, select Network Type. 5. Press the PBC (WPS) button on your remote, use this method of the right angle adapter to the Samsung Wireless LAN Adapter. Connect the USB right angle adapter to select Network in a place that access the network to set up using double-sided adhesive tape. Turn on your TV, press the Menu button on your wireless network, you set up security for some channels when...
... the network connection is based on your remote. 8. On the Network screen, select Network Type. 5. Press the PBC (WPS) button on your remote, use this method of the right angle adapter to the Samsung Wireless LAN Adapter. Connect the USB right angle adapter to select Network in a place that access the network to set up using double-sided adhesive tape. Turn on your TV, press the Menu button on your wireless network, you set up security for some channels when...

User Manual (user Manual) (ver.1.0) (English)
Page 37
... connected to the recording device's users manual. 37 English Make sure to switch to TV broadcast mode. Anynet+ Menu View TV Device List (device_name) MENU (device_name) INFO Recording: (*recorder) Stop Recording: (*recorder) Receiver Description Changes Anynet+ mode to an Anynet+ device by pressing the SOURCE button, you are listed. ✎✎ If you cannot find a device you have selected external input mode by using the recorder. (This is played through...
... connected to the recording device's users manual. 37 English Make sure to switch to TV broadcast mode. Anynet+ Menu View TV Device List (device_name) MENU (device_name) INFO Recording: (*recorder) Stop Recording: (*recorder) Receiver Description Changes Anynet+ mode to an Anynet+ device by pressing the SOURCE button, you are listed. ✎✎ If you cannot find a device you have selected external input mode by using the recorder. (This is played through...
User Manual (user Manual) (ver.1.0) (English)
Page 38
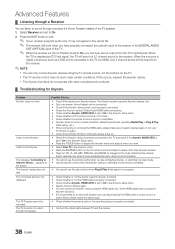
...'s Video/Audio/HDMI cable connections. • Check whether Anynet+ (HDMI-CEC) is set to On in the Anynet+ setup menu. • Check whether the TV remote control is in TV mode. • Check whether the remote control is set to the TV via HDMI, only 2 channel sound will be recorded. xx The Anynet+ functions do not operate with other manufacturers' products. ¦¦ Troubleshooting for Anynet+ Problem Anynet+ does not work when...
...'s Video/Audio/HDMI cable connections. • Check whether Anynet+ (HDMI-CEC) is set to On in the Anynet+ setup menu. • Check whether the TV remote control is in TV mode. • Check whether the remote control is set to the TV via HDMI, only 2 channel sound will be recorded. xx The Anynet+ functions do not operate with other manufacturers' products. ¦¦ Troubleshooting for Anynet+ Problem Anynet+ does not work when...
User Manual (user Manual) (ver.1.0) (English)
Page 40
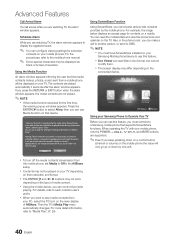
... down on a control button (channel or volume) on your PC, select the PC icon on a mobile. Then the TV's Media Play menu automatically changes. xx Contents may be played on your TV depending on your device is requesting that the media file be displayed on their resolution and format. xx Using the mobile device, you can read the mobile's files and view the phone book...
... down on a control button (channel or volume) on your PC, select the PC icon on a mobile. Then the TV's Media Play menu automatically changes. xx Contents may be played on your TV depending on your device is requesting that the media file be displayed on their resolution and format. xx Using the mobile device, you can read the mobile's files and view the phone book...
User Manual (user Manual) (ver.1.0) (English)
Page 44
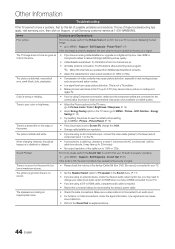
... reconnecting the device's power cable. Support - Make sure a video cable is poor color or brightness. • Adjust the Picture options in the TV menu. (go to Picture mode / Color / Brightness / Sharpness) (P. 14) • Adjust Energy Saving option in the Sound menu. (P. 17) • If you have an analog cable/satellite box, upgrade to a digital set to Screen Fit, change your cable box's audio option to HDMI when you have a HDMI connected to an audio input. • For Antenna or Cable connections, check the signal information.
... reconnecting the device's power cable. Support - Make sure a video cable is poor color or brightness. • Adjust the Picture options in the TV menu. (go to Picture mode / Color / Brightness / Sharpness) (P. 14) • Adjust Energy Saving option in the Sound menu. (P. 17) • If you have an analog cable/satellite box, upgrade to a digital set to Screen Fit, change your cable box's audio option to HDMI when you have a HDMI connected to an audio input. • For Antenna or Cable connections, check the signal information.
User Manual (user Manual) (ver.1.0) (English)
Page 45
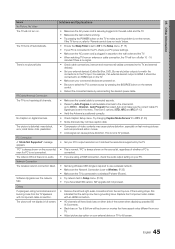
... signal type is set in the Setup menu. (P. 18) • If your PC is connected to the TV, check your connected devices are powered on. • Be sure to use a wireless network. • Make sure the Network Connection is set -top-box has a grounding issue. "PC" is always shown on digital channels. • Check Caption Setup menu. For example, if an external device's output is HDMI, it matches the resolutions supported by reconnecting the device's power cable. Channel - No Caption...
... signal type is set in the Setup menu. (P. 18) • If your PC is connected to the TV, check your connected devices are powered on. • Be sure to use a wireless network. • Make sure the Network Connection is set -top-box has a grounding issue. "PC" is always shown on digital channels. • Check Caption Setup menu. For example, if an external device's output is HDMI, it matches the resolutions supported by reconnecting the device's power cable. Channel - No Caption...
User Manual (user Manual) (ver.1.0) (English)
Page 46
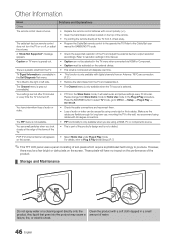
... Test menu. • This function is only available with digital channels from an Antenna / RF/Coax connection. (P. 21) TV is tilted to the right or left side. • Remove the stand base from 5~6 feet away. Press the SOURCE button to select TV mode, go to resolution settings in the Plug & Play procedure. Make sure the cables are using a HDMI, PC or components source. A "Mode Not Supported" message appears. • Check the supported resolution of...
... Test menu. • This function is only available with digital channels from an Antenna / RF/Coax connection. (P. 21) TV is tilted to the right or left side. • Remove the stand base from 5~6 feet away. Press the SOURCE button to select TV mode, go to resolution settings in the Plug & Play procedure. Make sure the cables are using a HDMI, PC or components source. A "Mode Not Supported" message appears. • Check the supported resolution of...
User Manual (user Manual) (ver.1.0) (English)
Page 49
... Antenna Anynet+ Audio out Auto Adjustment Auto Program B Blanking Bracket Balance C Cables Cable Tie Caption Clear Scrambled Channel Clear Voice Component Composite D Device List Digital Audio out DST (Daylight Saving Time) D-sub Dynamic Contrast E Energy Saving Equalizer External Speaker F FAV.CH button Favorite Channel H HD HDMI Home theater Index I 39 Internet Protocol Setup 7 36 L 9 14 License 12 M Media Play 41 Melody 16 Menu Language MP3 Play MTS 10 N 41 20 Network Connection 13 Network Setup 16 8O 10 ON/OFF button Optimal resolution...
... Antenna Anynet+ Audio out Auto Adjustment Auto Program B Blanking Bracket Balance C Cables Cable Tie Caption Clear Scrambled Channel Clear Voice Component Composite D Device List Digital Audio out DST (Daylight Saving Time) D-sub Dynamic Contrast E Energy Saving Equalizer External Speaker F FAV.CH button Favorite Channel H HD HDMI Home theater Index I 39 Internet Protocol Setup 7 36 L 9 14 License 12 M Media Play 41 Melody 16 Menu Language MP3 Play MTS 10 N 41 20 Network Connection 13 Network Setup 16 8O 10 ON/OFF button Optimal resolution...


