Safety Guide (ENGLISH)
Page 7
...adequate ventilation and that you've followed that there is used, use attachments/accessories specified by the manufacturer. 12) Use only with cart, stand, tripod, bracket, or table specified by the manufacturer, or sold with the apparatus. WARNING: To prevent damage which may result in fire...Sec1:7 - 7 - 2009-09-22 5:06:50 Servicing is ENERGYSTAR qualified in a rack or bookcase. Your Samsung TV is required when the apparatus has been damaged in this TV can change the power consumption, possibly beyond the limits required for replacement of the polarized or grounding-type plug....
...adequate ventilation and that you've followed that there is used, use attachments/accessories specified by the manufacturer. 12) Use only with cart, stand, tripod, bracket, or table specified by the manufacturer, or sold with the apparatus. WARNING: To prevent damage which may result in fire...Sec1:7 - 7 - 2009-09-22 5:06:50 Servicing is ENERGYSTAR qualified in a rack or bookcase. Your Samsung TV is required when the apparatus has been damaged in this TV can change the power consumption, possibly beyond the limits required for replacement of the polarized or grounding-type plug....
Quick Guide (ENGLISH)
Page 4
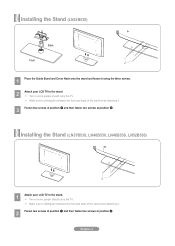
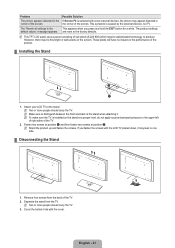
... 1 and then fasten two screws at position 2. Installing the Stand (LN32B530) Back 2 Front 1 1 Place the Guide Stand and Cover Neck onto the stand and fasten it using the three screws. 2 2 1 1 2 Attach your LCD TV to the stand. ➣ Two or more people should carry the TV. ➣ Make sure to distinguish between the front and back...
... 1 and then fasten two screws at position 2. Installing the Stand (LN32B530) Back 2 Front 1 1 Place the Guide Stand and Cover Neck onto the stand and fasten it using the three screws. 2 2 1 1 2 Attach your LCD TV to the stand. ➣ Two or more people should carry the TV. ➣ Make sure to distinguish between the front and back...
User Manual (ENGLISH)
Page 3
... 6 ■ Installing Batteries in the Remote Control 6 Connections (LN32B530, LN37B530, LN40B530, LN46B530) ■ Connecting VHF and UHF Antennas 7 ■ Connecting Cable TV 7 ■ Connecting a DVD / Blu-ray player / Cable Box / Satellite receiver (Set-Top Box) via HDMI 8 ■ Connecting a DVD / Blu...Receiver (Home theater 38 ■ Troubleshooting for Anynet 39 Appendix ■ Troubleshooting 40 ■ Installing the Stand 41 ■ Disconnecting the Stand 41 ■ Wall Mount Kit Specifications (VESA 42 ■ Using the Anti-Theft Kensington Lock 42 ■ Securing...
... 6 ■ Installing Batteries in the Remote Control 6 Connections (LN32B530, LN37B530, LN40B530, LN46B530) ■ Connecting VHF and UHF Antennas 7 ■ Connecting Cable TV 7 ■ Connecting a DVD / Blu-ray player / Cable Box / Satellite receiver (Set-Top Box) via HDMI 8 ■ Connecting a DVD / Blu...Receiver (Home theater 38 ■ Troubleshooting for Anynet 39 Appendix ■ Troubleshooting 40 ■ Installing the Stand 41 ■ Disconnecting the Stand 41 ■ Wall Mount Kit Specifications (VESA 42 ■ Using the Anti-Theft Kensington Lock 42 ■ Securing...
User Manual (ENGLISH)
Page 5
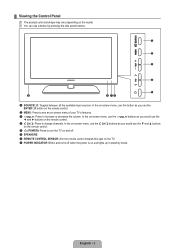
... as you would use a button by mode. ¦ Viewing the Control Panel N The product color and shape may vary depending on and lights up in stand-by pressing the side panel buttons. 1 2 3 4 5 6 8 76 1 SOURCEE: Toggles between all the available input sources. N You can use the ▼ and ▲ ... y buttons as you use the ENTERE button on the remote control. 2 MENU: Press to see an on-screen menu of your TV's features. 3 y: Press to turn the TV on and off. 6 SPEAKERS 7 REMOTE CONTROL SENSOR: Aim the remote control towards this button as you would use this spot on the...
... as you would use a button by mode. ¦ Viewing the Control Panel N The product color and shape may vary depending on and lights up in stand-by pressing the side panel buttons. 1 2 3 4 5 6 8 76 1 SOURCEE: Toggles between all the available input sources. N You can use the ▼ and ▲ ... y buttons as you use the ENTERE button on the remote control. 2 MENU: Press to see an on-screen menu of your TV's features. 3 y: Press to turn the TV on and off. 6 SPEAKERS 7 REMOTE CONTROL SENSOR: Aim the remote control towards this button as you would use this spot on the...

User Manual (ENGLISH)
Page 43
... or more people should carry the TV. 3. The 'Resets all settings to the upper left of right sides of the TV. 2. are reset to the stand. N Stand the product up and fasten the screws. Remove four screws from the TV. Attach your LCD TV to the factory defaults. However, there.... The product settings default values.' This symptom is installed on the stand at position 2. the corner of the TV. 2. N To make sure the TV is caused by the external devices, not TV. Separate the stand from the back of the screen. Problem Possible Solution The picture appears...
... or more people should carry the TV. 3. The 'Resets all settings to the upper left of right sides of the TV. 2. are reset to the stand. N Stand the product up and fasten the screws. Remove four screws from the TV. Attach your LCD TV to the factory defaults. However, there.... The product settings default values.' This symptom is installed on the stand at position 2. the corner of the TV. 2. N To make sure the TV is caused by the external devices, not TV. Separate the stand from the back of the screen. Problem Possible Solution The picture appears...

User Manual (user Manual) (ver.1.0) (English, French)
Page 3
...Remote Control 6 ■ Installing Batteries in the Remote Control 6 Connections (LN32B530, LN37B530, LN40B530, LN46B530) ■ Connecting VHF and UHF Antennas 7 ■ Connecting Cable TV 7 ■ Connecting a DVD / Blu-ray player / Cable Box / Satellite receiver (Set-Top Box) via HDMI 8 ■ Connecting a DVD / Blu-ray ... ■ Disconnecting the Stand 41 ■ Wall Mount Kit Specifications (VESA 42 ■ Using the Anti-Theft Kensington Lock 42 ■ Securing the TV to the Wall 43 ■ Specifications 44 ■ Dimensions 45 ❑ License TruSurround HD, SRS ...
...Remote Control 6 ■ Installing Batteries in the Remote Control 6 Connections (LN32B530, LN37B530, LN40B530, LN46B530) ■ Connecting VHF and UHF Antennas 7 ■ Connecting Cable TV 7 ■ Connecting a DVD / Blu-ray player / Cable Box / Satellite receiver (Set-Top Box) via HDMI 8 ■ Connecting a DVD / Blu-ray ... ■ Disconnecting the Stand 41 ■ Wall Mount Kit Specifications (VESA 42 ■ Using the Anti-Theft Kensington Lock 42 ■ Securing the TV to the Wall 43 ■ Specifications 44 ■ Dimensions 45 ❑ License TruSurround HD, SRS ...

User Manual (user Manual) (ver.1.0) (English, French)
Page 5
...; and ► buttons on the remote control. 4 Z: Press to change channels. In the on -screen menu of your TV's features. 3 y: Press to see an on -screen menu, use the Z buttons as you would use the ▼ and... 2 MENU: Press to increase or decrease the volume. In the on-screen menu, use this spot on the TV. 8 POWER INDICATOR: Blinks and turns off . 6 SPEAKERS 7 REMOTE CONTROL SENSOR: Aim the remote control towards ... and shape may vary depending on and lights up in stand-by pressing the side panel buttons. 1 2 3 4 5 6 8 76 1 SOURCEE: Toggles between all the available input sources...
...; and ► buttons on the remote control. 4 Z: Press to change channels. In the on -screen menu of your TV's features. 3 y: Press to see an on -screen menu, use the Z buttons as you would use the ▼ and... 2 MENU: Press to increase or decrease the volume. In the on-screen menu, use this spot on the TV. 8 POWER INDICATOR: Blinks and turns off . 6 SPEAKERS 7 REMOTE CONTROL SENSOR: Aim the remote control towards ... and shape may vary depending on and lights up in stand-by pressing the side panel buttons. 1 2 3 4 5 6 8 76 1 SOURCEE: Toggles between all the available input sources...
User Manual (user Manual) (ver.1.0) (English, French)
Page 43
...the performance of the screen. N Two or more people should carry the TV. N Stand the product up and fasten the screws. Separate the stand from the back of the TV. 2. N Two or more people should carry the TV. 3. the corner of sub pixels (6 220 800) which require sophisticated ...technology to produce. Remove four screws from the TV. Cover the bottom hole with the LCD TV placed down, it . The 'Resets all settings to the stand. N To make sure the TV is installed on the stand at position 2. The product settings default values.' If you press...
...the performance of the screen. N Two or more people should carry the TV. N Stand the product up and fasten the screws. Separate the stand from the back of the TV. 2. N Two or more people should carry the TV. 3. the corner of sub pixels (6 220 800) which require sophisticated ...technology to produce. Remove four screws from the TV. Cover the bottom hole with the LCD TV placed down, it . The 'Resets all settings to the stand. N To make sure the TV is installed on the stand at position 2. The product settings default values.' If you press...


