Safety Guide (ENGLISH)
Page 7
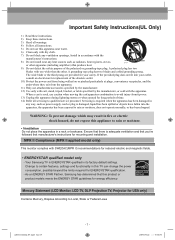
... long periods of time. 14) Refer all instructions. 5) Do not use attachments/accessories specified by the manufacturer. 12) Use only with cart, stand, tripod, bracket, or table specified by the manufacturer, or sold with the apparatus. When a cart is adequate ventilation and that you've followed... (including amplifiers) that this appliance to rain or moisture, does not operate normally, or has been dropped. As an ENERGY STAR Partner, Samsung has determined that produce heat. 9) Do not defeat the safety purpose of the obsolete outlet. 10) Protect the power cord from being walked...
... long periods of time. 14) Refer all instructions. 5) Do not use attachments/accessories specified by the manufacturer. 12) Use only with cart, stand, tripod, bracket, or table specified by the manufacturer, or sold with the apparatus. When a cart is adequate ventilation and that you've followed... (including amplifiers) that this appliance to rain or moisture, does not operate normally, or has been dropped. As an ENERGY STAR Partner, Samsung has determined that produce heat. 9) Do not defeat the safety purpose of the obsolete outlet. 10) Protect the power cord from being walked...
User Manual (ENGLISH)
Page 3
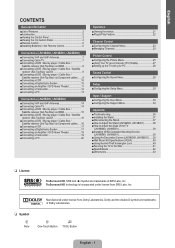
... / Support ■ Configuring the Input Menu 34 ■ Configuring the Support Menu 34 Appendix ■ Troubleshooting 36 ■ Installing the Stand 37 ■ Disconnecting the Stand 37 ■ How to Adjust the Stand (LN19B360, LN19B361 38 ■ How to Adjust the Angle of the TV (LN19B360, LN19B361 38 ■ Installing VESA Compliant Mounting...
... / Support ■ Configuring the Input Menu 34 ■ Configuring the Support Menu 34 Appendix ■ Troubleshooting 36 ■ Installing the Stand 37 ■ Disconnecting the Stand 37 ■ How to Adjust the Stand (LN19B360, LN19B361 38 ■ How to Adjust the Angle of the TV (LN19B360, LN19B361 38 ■ Installing VESA Compliant Mounting...

User Manual (ENGLISH)
Page 5
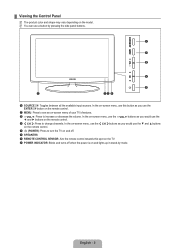
In the on-screen menu, use the Z buttons as you would use the ◄ and ► buttons on and lights up in stand-by pressing the side panel buttons. 1 SOURCEE: Toggles between all the available input sources. In the on-screen menu, use this spot on the TV. 8 ...
In the on-screen menu, use the Z buttons as you would use the ◄ and ► buttons on and lights up in stand-by pressing the side panel buttons. 1 SOURCEE: Toggles between all the available input sources. In the on-screen menu, use this spot on the TV. 8 ...
User Manual (ENGLISH)
Page 39
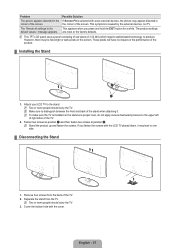
...excess downward pressure to produce. Cover the bottom hole with some external devices, the picture may lean to one side. ¦ Disconnecting the Stand 1. If you press and hold the EXIT button for a while. Problem Possible Solution The picture appears distorted in corner of the screen.... are reset to distinguish between the front and back of the stand when attaching it may appear distorted in the If Screen Fit is selected with the cover. N This TFT LCD panel uses a panel...
...excess downward pressure to produce. Cover the bottom hole with some external devices, the picture may lean to one side. ¦ Disconnecting the Stand 1. If you press and hold the EXIT button for a while. Problem Possible Solution The picture appears distorted in corner of the screen.... are reset to distinguish between the front and back of the stand when attaching it may appear distorted in the If Screen Fit is selected with the cover. N This TFT LCD panel uses a panel...
User Manual (ENGLISH)
Page 40
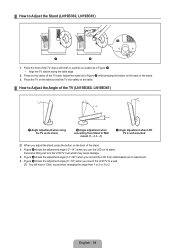
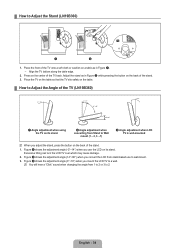
... a wall. Place the TV on the table so that the TV sits safely on the back of the stand. 1. Align the TV bottom along the table edge. 2. Press on the center of the TV onto a...on a table as in Figure 1. - Place the front of the TV back. Adjust the stand as in Figure 2 while pressing the button on the back of the TV (LN19B360, LN19B361) 1 Angle adjustment...;3, 3→1) 3 Angle adjustment when LCD TV is wall-mounted N When you mount the LCD TV to Adjust the Stand (LN19B360, LN19B361) 1 2 1. Figure 1 shows the adjustment angle (-2°~14°) when you convert the LCD ...
... a wall. Place the TV on the table so that the TV sits safely on the back of the stand. 1. Align the TV bottom along the table edge. 2. Press on the center of the TV onto a...on a table as in Figure 1. - Place the front of the TV back. Adjust the stand as in Figure 2 while pressing the button on the back of the TV (LN19B360, LN19B361) 1 Angle adjustment...;3, 3→1) 3 Angle adjustment when LCD TV is wall-mounted N When you mount the LCD TV to Adjust the Stand (LN19B360, LN19B361) 1 2 1. Figure 1 shows the adjustment angle (-2°~14°) when you convert the LCD ...
User Manual (ENGLISH)
Page 41
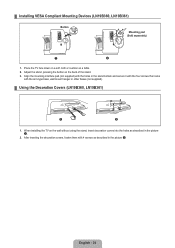
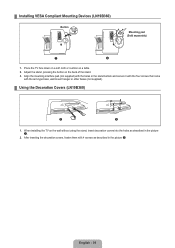
...cloth or cushion on the back of the stand. 3. Adjust the stand, pressing the button on a table. 2. Align the mounting interface pad (not supplied) with the holes in the picture 1. 2. English - 39 When installing the TV on the wall without using the stand, insert decoration covers into the holes as... described in the stand bottom and secure it with the four screws that come with 4 screws as described in the picture 2. ¦ ...
...cloth or cushion on the back of the stand. 3. Adjust the stand, pressing the button on a table. 2. Align the mounting interface pad (not supplied) with the holes in the picture 1. 2. English - 39 When installing the TV on the wall without using the stand, insert decoration covers into the holes as... described in the stand bottom and secure it with the four screws that come with 4 screws as described in the picture 2. ¦ ...

User Manual (ENGLISH)
Page 44
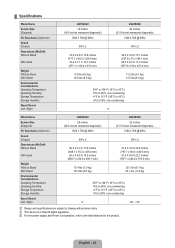
... notice. English - 42 ¦ Specifications Model Name Screen Size (Diagonal) PC Resolution (Optimum) Sound (Output) Dimensions (WxDxH) Without Stand With stand Weight Without Stand With Stand Environmental Considerations Operating Temperature Operating Humidity Storage Temperature Storage Humidity Stand Swivel Left / Right LN19B360 / LN19B361 19 inches (18.9 inches measured diagonally) 1360 x 768 @ 60Hz 3W x 2 18.8 X 2.6 X 12.9 inches...
... notice. English - 42 ¦ Specifications Model Name Screen Size (Diagonal) PC Resolution (Optimum) Sound (Output) Dimensions (WxDxH) Without Stand With stand Weight Without Stand With Stand Environmental Considerations Operating Temperature Operating Humidity Storage Temperature Storage Humidity Stand Swivel Left / Right LN19B360 / LN19B361 19 inches (18.9 inches measured diagonally) 1360 x 768 @ 60Hz 3W x 2 18.8 X 2.6 X 12.9 inches...
User Manual (ENGLISH)
Page 3
... / Support ■ Configuring the Input Menu 34 ■ Configuring the Support Menu 34 Appendix ■ Troubleshooting 36 ■ Installing the Stand 37 ■ Disconnecting the Stand 37 ■ How to Adjust the Stand (LN19B360 38 ■ How to Adjust the Angle of the TV (LN19B360 38 ■ Installing VESA Compliant Mounting Devices (LN19B360...
... / Support ■ Configuring the Input Menu 34 ■ Configuring the Support Menu 34 Appendix ■ Troubleshooting 36 ■ Installing the Stand 37 ■ Disconnecting the Stand 37 ■ How to Adjust the Stand (LN19B360 38 ■ How to Adjust the Angle of the TV (LN19B360 38 ■ Installing VESA Compliant Mounting Devices (LN19B360...
User Manual (ENGLISH)
Page 5
... menu, use the Z buttons as you would use the ENTERE button on the remote control. 2 MENU: Press to see an on and lights up in stand-by pressing the side panel buttons. 1 SOURCEE: Toggles between all the available input sources. In the on-screen menu, use the y buttons as you would...
... menu, use the Z buttons as you would use the ENTERE button on the remote control. 2 MENU: Press to see an on and lights up in stand-by pressing the side panel buttons. 1 SOURCEE: Toggles between all the available input sources. In the on-screen menu, use the y buttons as you would...

User Manual (ENGLISH)
Page 39
...English - 37 The 'Resets all settings to the upper left of right sides of sub pixels (3 133 440) which require sophisticated technology to the stand. Fasten two screws at position 1 and then fasten two screws at a proper level, do not apply excess downward pressure to the This appears when...dark pixels on the performance of the TV. 2. However, there may lean to distinguish between the front and back of the screen. N Stand the product up and fasten the screws. Problem Possible Solution The picture appears distorted in the If Screen Fit is caused by the external devices...
...English - 37 The 'Resets all settings to the upper left of right sides of sub pixels (3 133 440) which require sophisticated technology to the stand. Fasten two screws at position 1 and then fasten two screws at a proper level, do not apply excess downward pressure to the This appears when...dark pixels on the performance of the TV. 2. However, there may lean to distinguish between the front and back of the screen. N Stand the product up and fasten the screws. Problem Possible Solution The picture appears distorted in the If Screen Fit is caused by the external devices...
User Manual (ENGLISH)
Page 40
... angle from 1 to 2 or 3 to Wall mount (1→3, 3→1) 3 Angle adjustment when LCD TV is wall-mounted N When you convert the LCD from Stand to 2. Adjust the stand as in Figure 2 while pressing the button on the center of the TV back. Place the TV on the table so that the TV...;) when you use to wall-mount. 3. English - 38 Figure 1 shows the adjustment angle (-2°~14°) when you mount the LCD TV to Adjust the Stand (LN19B360) 1 2 1. ¦ How to a wall. Press on the back of the TV onto a soft cloth or cushion on a table as in Figure 1. - Align the TV...
... angle from 1 to 2 or 3 to Wall mount (1→3, 3→1) 3 Angle adjustment when LCD TV is wall-mounted N When you convert the LCD from Stand to 2. Adjust the stand as in Figure 2 while pressing the button on the center of the TV back. Place the TV on the table so that the TV...;) when you use to wall-mount. 3. English - 38 Figure 1 shows the adjustment angle (-2°~14°) when you mount the LCD TV to Adjust the Stand (LN19B360) 1 2 1. ¦ How to a wall. Press on the back of the TV onto a soft cloth or cushion on a table as in Figure 1. - Align the TV...
User Manual (ENGLISH)
Page 41
...not supplied) with the holes in the picture 1. 2. English - 39 When installing the TV on the wall without using the stand, insert decoration covers into the holes as described in the stand bottom and secure it with the four screws that come with 4 screws as described in the picture 2. After inserting the... bases (not supplied). ¦ Using the Decoration Covers (LN19B360) 1 2 1. Place the TV face down on a soft cloth or cushion on the back of the stand. 3. ¦ Installing VESA Compliant Mounting Devices (LN19B360) Button Mounting pad (Sold separately) 1 2 1. Adjust the...
...not supplied) with the holes in the picture 1. 2. English - 39 When installing the TV on the wall without using the stand, insert decoration covers into the holes as described in the stand bottom and secure it with the four screws that come with 4 screws as described in the picture 2. After inserting the... bases (not supplied). ¦ Using the Decoration Covers (LN19B360) 1 2 1. Place the TV face down on a soft cloth or cushion on the back of the stand. 3. ¦ Installing VESA Compliant Mounting Devices (LN19B360) Button Mounting pad (Sold separately) 1 2 1. Adjust the...
User Manual (ENGLISH)
Page 44
... a Class B digital apparatus. ¦ Specifications Model Name Screen Size (Diagonal) PC Resolution (Optimum) Sound (Output) Dimensions (WxDxH) Without Stand With stand Weight Without Stand With Stand Environmental Considerations Operating Temperature Operating Humidity Storage Temperature Storage Humidity Stand Swivel Left / Right LN19B360 19 inches (18.9 inches measured diagonally) 1360 x 768 @ 60Hz 3W x 2 18.8 X 2.6 X 12.9 inches (477...
... a Class B digital apparatus. ¦ Specifications Model Name Screen Size (Diagonal) PC Resolution (Optimum) Sound (Output) Dimensions (WxDxH) Without Stand With stand Weight Without Stand With Stand Environmental Considerations Operating Temperature Operating Humidity Storage Temperature Storage Humidity Stand Swivel Left / Right LN19B360 19 inches (18.9 inches measured diagonally) 1360 x 768 @ 60Hz 3W x 2 18.8 X 2.6 X 12.9 inches (477...


