
Open Source Guide (ENGLISH)
Page 2
16. and each file should have at least the "copyright" line and a pointer to where the full notice is safest to attach them to the start of each source file to most effectively convey the exclusion of warranty; IN NO EVENT UNLESS REQUIRED BY APPLICABLE LAW OR AGREED TO IN WRITING WILL ANY COPYRIGHT HOLDER, OR ANY OTHER PARTY WHO MAY MODIFY AND/OR REDISTRIBUTE THE LIBRARY AS PERMITTED ABOVE, BE LIABLE TO YOU FOR DAMAGES, INCLUDING ANY GENERAL, SPECIAL, INCIDENTAL OR CONSEQUENTIAL DAMAGES ARISING OUT OF THE USE OR INABILITY TO USE THE LIBRARY (INCLUDING BUT NOT LIMITED TO LOSS OF DATA ...
16. and each file should have at least the "copyright" line and a pointer to where the full notice is safest to attach them to the start of each source file to most effectively convey the exclusion of warranty; IN NO EVENT UNLESS REQUIRED BY APPLICABLE LAW OR AGREED TO IN WRITING WILL ANY COPYRIGHT HOLDER, OR ANY OTHER PARTY WHO MAY MODIFY AND/OR REDISTRIBUTE THE LIBRARY AS PERMITTED ABOVE, BE LIABLE TO YOU FOR DAMAGES, INCLUDING ANY GENERAL, SPECIAL, INCIDENTAL OR CONSEQUENTIAL DAMAGES ARISING OUT OF THE USE OR INABILITY TO USE THE LIBRARY (INCLUDING BUT NOT LIMITED TO LOSS OF DATA ...
User Manual (ENGLISH)
Page 3
...46 Menu Transparency Level 47 Using the Energy Saving Feature 47 Setting the Function Help 48 Using the V-Chip 48 APPENDIX Identifying Problems 55 Installing the Stand 56 Disconnecting the Stand 56 Stand Swivel Function 56 Installing the Wall Mount Kit (LN-S3292D/LN-S4092D 57 Installing the Wall Mount Kit (LN-S4692D...(Low Noise Amplifier 36 PC DISPLAY Using Your TV as a Computer (PC) Display 37 Display Modes 37 Setting up the TV with your PC 38 TIME SETTING Setting the Clock 40 FUNCTION DESCRIPTION Selecting a Menu Language 43 Setting the Blue Screen Mode 43 Selecting the Film ...
...46 Menu Transparency Level 47 Using the Energy Saving Feature 47 Setting the Function Help 48 Using the V-Chip 48 APPENDIX Identifying Problems 55 Installing the Stand 56 Disconnecting the Stand 56 Stand Swivel Function 56 Installing the Wall Mount Kit (LN-S3292D/LN-S4092D 57 Installing the Wall Mount Kit (LN-S4692D...(Low Noise Amplifier 36 PC DISPLAY Using Your TV as a Computer (PC) Display 37 Display Modes 37 Setting up the TV with your PC 38 TIME SETTING Setting the Clock 40 FUNCTION DESCRIPTION Selecting a Menu Language 43 Setting the Blue Screen Mode 43 Selecting the Film ...
User Manual (ENGLISH)
Page 8
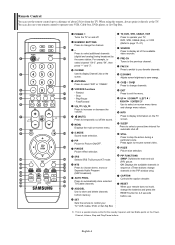
...up to select on the TV screen. When using the remote, always point it directly at the TV. POWER Turns the TV on the screen. SET Sets the remote to control your TV, VCR, Cable, DVD, or Set-Top Box TV, DVD, STB, CABLE, VCR Press to select a preset time interval for 2-3 seconds before ...use. EXIT Press to /from the TV. SLEEP Press to operate your...
...up to select on the TV screen. When using the remote, always point it directly at the TV. POWER Turns the TV on the screen. SET Sets the remote to control your TV, VCR, Cable, DVD, or Set-Top Box TV, DVD, STB, CABLE, VCR Press to select a preset time interval for 2-3 seconds before ...use. EXIT Press to /from the TV. SLEEP Press to operate your...
User Manual (ENGLISH)
Page 9
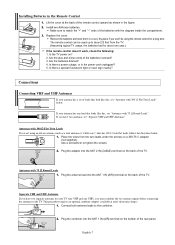
... 2 IN (CABLE) 2. Are the plus and minus ends of the TV. Is there a special fluorescent light or neon sign nearby? Use a screwdriver... Place the wires from the TV. (Assuming typical TV usage, the batteries last for a long time. UHF VHF UHF VHF ANT 1 ...IN (AIR) 2. Lift the cover at most electronics shops). 1. Is the TV ...AIR) terminal on the back of the TV. This procedure requires an optional combiner-adaptor (available at the ... antenna leads to tighten the screws. Make sure to the TV. Plug the antenna lead into the ANT 1 IN (AIR...
... 2 IN (CABLE) 2. Are the plus and minus ends of the TV. Is there a special fluorescent light or neon sign nearby? Use a screwdriver... Place the wires from the TV. (Assuming typical TV usage, the batteries last for a long time. UHF VHF UHF VHF ANT 1 ...IN (AIR) 2. Lift the cover at most electronics shops). 1. Is the TV ...AIR) terminal on the back of the TV. This procedure requires an optional combiner-adaptor (available at the ... antenna leads to tighten the screws. Make sure to the TV. Plug the antenna lead into the ANT 1 IN (AIR...
User Manual (ENGLISH)
Page 15
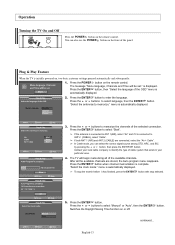
Operation Turning the TV On and Off Press the POWER button on , two basic customer settings proceed automatically and subsequently: 1...."Cable". Press the ENTER button to memorize." continued... English-13 The message "Menu language, Channels and Time will begin memorizing all the available channels are connected, select the "Air + Cable". "Select the antennas...ENTER Switches the Daylight Saving Time function on the remote control. Contact your particular area. 4. Press the or buttons to select language, then the ENTER button. The TV will be set." After all of the selected...
Operation Turning the TV On and Off Press the POWER button on , two basic customer settings proceed automatically and subsequently: 1...."Cable". Press the ENTER button to memorize." continued... English-13 The message "Menu language, Channels and Time will begin memorizing all the available channels are connected, select the "Air + Cable". "Select the antennas...ENTER Switches the Daylight Saving Time function on the remote control. Contact your particular area. 4. Press the or buttons to select language, then the ENTER button. The TV will be set." After all of the selected...
User Manual (ENGLISH)
Page 16
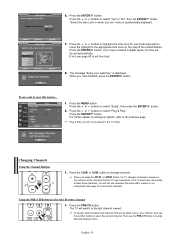
... for your watching." Press the ENTER button. You will switch to change channels. For further details on setting up options, refer to the appropriate time zone on the map of the United States). Changing Channels Using the Channel Buttons 1. Press the CH or CH button to the last channel... area (and to move the highlight to the previous page. Plug & Play can only be set the clock. 8. The TV will see all the channels that the TV has memorized. (The TV must have received a digital signal, the time will not see page 40 to select "Yes" or "No", then the ENTER button. 6....
... for your watching." Press the ENTER button. You will switch to change channels. For further details on setting up options, refer to the appropriate time zone on the map of the United States). Changing Channels Using the Channel Buttons 1. Press the CH or CH button to the last channel... area (and to move the highlight to the previous page. Plug & Play can only be set the clock. 8. The TV will see all the channels that the TV has memorized. (The TV must have received a digital signal, the time will not see page 40 to select "Yes" or "No", then the ENTER button. 6....
User Manual (ENGLISH)
Page 17
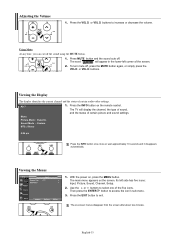
...The word " " will display the channel, the type of sound, and the status of the screen. 2. The TV will appear in the lower-left side has five icons: Input, Picture, Sound, Channel, Setup. 2. Viewing the Menus...channel and the status of the five icons. With the power on the screen. Using Mute At any time, you can cut off . To turn mute off, press the MUTE button again, or simply press the...menu appears on , press the MENU button. Its left corner of certain picture and sound settings. Use the or buttons to access the icon's sub-menu. 3. Then press the ENTER button to select...
...The word " " will display the channel, the type of sound, and the status of the screen. 2. The TV will appear in the lower-left side has five icons: Input, Picture, Sound, Channel, Setup. 2. Viewing the Menus...channel and the status of the five icons. With the power on the screen. Using Mute At any time, you can cut off . To turn mute off, press the MUTE button again, or simply press the...menu appears on , press the MENU button. Its left corner of certain picture and sound settings. Use the or buttons to access the icon's sub-menu. 3. Then press the ENTER button to select...
User Manual (ENGLISH)
Page 27
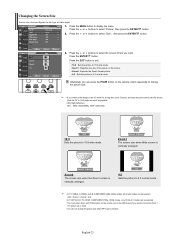
... Zoom 1 or 2 picture up or down. • You can not change the picture size. • If you watch a still image or the 4:3 mode for a long time (over 2 hours), an image may be selected. • You must select Zoom with P.Size button on the remote control repeatedly to change the picture size... when PIP is set to Double. View the TV in the OSD menu) if you can be burned onto the screen. Press the or buttons to select "Picture", then press the ENTER...
... Zoom 1 or 2 picture up or down. • You can not change the picture size. • If you watch a still image or the 4:3 mode for a long time (over 2 hours), an image may be selected. • You must select Zoom with P.Size button on the remote control repeatedly to change the picture size... when PIP is set to Double. View the TV in the OSD menu) if you can be burned onto the screen. Press the or buttons to select "Picture", then press the ENTER...
User Manual (ENGLISH)
Page 42
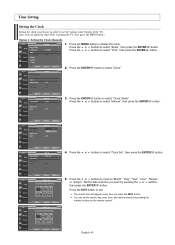
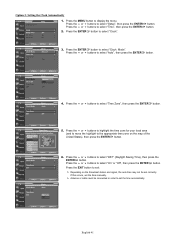
..."Minute", or "am/pm". English-40 Press the ENTER button to select "Clock". 3. You can check the time while watching the TV. (Just press the INFO button.) Option 1: Setting the Clock Manually 1. Press the ENTER button to select "Clock Mode". Also, you want by pressing the number buttons... then press the ENTER button. 4. Press the or buttons to select "Time", then press the ENTER button. Time Setting Setting the Clock Setting the clock is necessary in order to use the various timer features of the TV. The current time will appear every time you press the INFO button.
..."Minute", or "am/pm". English-40 Press the ENTER button to select "Clock". 3. You can check the time while watching the TV. (Just press the INFO button.) Option 1: Setting the Clock Manually 1. Press the ENTER button to select "Clock Mode". Also, you want by pressing the number buttons... then press the ENTER button. 4. Press the or buttons to select "Time", then press the ENTER button. Time Setting Setting the Clock Setting the clock is necessary in order to use the various timer features of the TV. The current time will appear every time you press the INFO button.
User Manual (ENGLISH)
Page 43
... the ENTER button. 4. Press the ENTER button to select "Time Zone", then press the ENTER button. 5. Press the or buttons to select "Clock". Press the EXIT button to set the time manually. Antenna or cable must be set correctly. button. 3. If this occurs, set the time automatically. Depending on the map of the United States), then...
... the ENTER button. 4. Press the ENTER button to select "Time Zone", then press the ENTER button. 5. Press the or buttons to select "Clock". Press the EXIT button to set the time manually. Antenna or cable must be set correctly. button. 3. If this occurs, set the time automatically. Depending on the map of the United States), then...
User Manual (ENGLISH)
Page 44
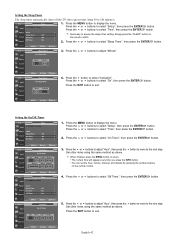
... Press the or buttons to select "Time", then press the ENTER button. 2. Press the or buttons to select "Sleep Timer", then press the ENTER button. 3. button. Setting the Sleep Timer The sleep timer automatically shuts off the TV after a preset time (from 30 to adjust "Hour", ...then press the Set other items using the same method as above . Set other items using the same method as above .
... Press the or buttons to select "Time", then press the ENTER button. 2. Press the or buttons to select "Sleep Timer", then press the ENTER button. 3. button. Setting the Sleep Timer The sleep timer automatically shuts off the TV after a preset time (from 30 to adjust "Hour", ...then press the Set other items using the same method as above . Set other items using the same method as above .
User Manual (ENGLISH)
Page 57
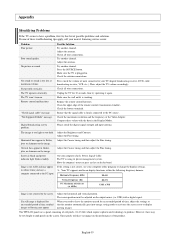
...Make sure the TV is displayed for an extended period of these values with a digital signal. Make sure the wall outlet is too light or too dark. Replace the remote control batteries. Clean the upper edge of the Video Adapter. On your nearest Samsung service center. ...try operating it again. The TFT LCD panel uses a panel consisting of sub pixels (3,147,264) which require sophisticated technology to flicker, jitter or shimmer on the performance of time, adjust the settings so that the signal cable is not correct, use your TV (digital broadcasting receiver, DVD, cable...
...Make sure the TV is displayed for an extended period of these values with a digital signal. Make sure the wall outlet is too light or too dark. Replace the remote control batteries. Clean the upper edge of the Video Adapter. On your nearest Samsung service center. ...try operating it again. The TFT LCD panel uses a panel consisting of sub pixels (3,147,264) which require sophisticated technology to flicker, jitter or shimmer on the performance of time, adjust the settings so that the signal cable is not correct, use your TV (digital broadcasting receiver, DVD, cable...


