
Open Source Guide (ENGLISH)
Page 1
... place, then offering equivalent access to copy the source code from the Program, and can change the software or use to the public, the best way to achieve this license which are not compelled to any such program or work, and a "work based on a volume of warranty; The "Program", below, refers to copy the source along with a work based on the Program) on the Program" means either of that is...
... place, then offering equivalent access to copy the source code from the Program, and can change the software or use to the public, the best way to achieve this license which are not compelled to any such program or work, and a "work based on a volume of warranty; The "Program", below, refers to copy the source along with a work based on the Program) on the Program" means either of that is...

Open Source Guide (ENGLISH)
Page 2
...CONSEQUENTIAL DAMAGES ARISING OUT OF THE USE OR INABILITY TO USE THE LIBRARY (INCLUDING BUT NOT LIMITED TO LOSS OF DATA OR DATA BEING RENDERED INACCURATE OR LOSSES SUSTAINED BY YOU OR THIRD PARTIES OR A FAILURE OF THE LIBRARY TO OPERATE WITH ANY OTHER SOFTWARE), EVEN IF SUCH HOLDER OR OTHER... use to the library. It is found. 16. How to Apply These Terms to Your New Libraries If you develop a new library, and you want it free software that everyone can do so by permitting redistribution under these terms (or, alternatively, under the terms of warranty; You can redistribute and change....
...CONSEQUENTIAL DAMAGES ARISING OUT OF THE USE OR INABILITY TO USE THE LIBRARY (INCLUDING BUT NOT LIMITED TO LOSS OF DATA OR DATA BEING RENDERED INACCURATE OR LOSSES SUSTAINED BY YOU OR THIRD PARTIES OR A FAILURE OF THE LIBRARY TO OPERATE WITH ANY OTHER SOFTWARE), EVEN IF SUCH HOLDER OR OTHER... use to the library. It is found. 16. How to Apply These Terms to Your New Libraries If you develop a new library, and you want it free software that everyone can do so by permitting redistribution under these terms (or, alternatively, under the terms of warranty; You can redistribute and change....
User Manual (ENGLISH)
Page 3
... the Control Panel 3 Viewing the Connection Panel 4 Remote Control 6 Installing Batteries in the Remote Control 7 CONNECTIONS Connecting VHF and UHF Antennas 7 Connecting Cable TV 8 Connecting a VCR 9 Connecting an S-VHS VCR 9 Connecting a Camcorder 10 Connecting a DVD Player 10 Connecting a DVD Player/Set-Top Box via DVI 10 Connecting a DVD Player/Set-Top Box via HDMI 11 Connecting a Digital Audio System 11 Connecting an Amplifier/DVD Home Theater 12 Connecting a PC 12 OPERATION Turning the TV On and Off 13 Plug & Play Feature 13 Changing Channels 14 Adjusting the Volume 15...
... the Control Panel 3 Viewing the Connection Panel 4 Remote Control 6 Installing Batteries in the Remote Control 7 CONNECTIONS Connecting VHF and UHF Antennas 7 Connecting Cable TV 8 Connecting a VCR 9 Connecting an S-VHS VCR 9 Connecting a Camcorder 10 Connecting a DVD Player 10 Connecting a DVD Player/Set-Top Box via DVI 10 Connecting a DVD Player/Set-Top Box via HDMI 11 Connecting a Digital Audio System 11 Connecting an Amplifier/DVD Home Theater 12 Connecting a PC 12 OPERATION Turning the TV On and Off 13 Plug & Play Feature 13 Changing Channels 14 Adjusting the Volume 15...
User Manual (ENGLISH)
Page 4
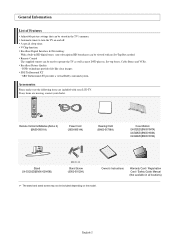
...) Power Cord (3903-000144) Cleaning Cloth (BN63-01798A) Cover-Bottom LN-S3292D (BN63-01947A) LN-S4092D (BN63-01938A) LN-S4692D (BN63-01810A) Stand LN-S3292D(BN96-02840B) M4 X L16 Stand Screw (6002-001294) Owner's Instructions Warranty Card / Registration Card / Safety Guide Manual (Not available in the TV's memory. General Information List of Features Adjustable picture settings that can be viewed with your dealer. Automatic timer to operate the TV as well as most DVD players, Set-top boxes, Cable Boxes...
...) Power Cord (3903-000144) Cleaning Cloth (BN63-01798A) Cover-Bottom LN-S3292D (BN63-01947A) LN-S4092D (BN63-01938A) LN-S4692D (BN63-01810A) Stand LN-S3292D(BN96-02840B) M4 X L16 Stand Screw (6002-001294) Owner's Instructions Warranty Card / Registration Card / Safety Guide Manual (Not available in the TV's memory. General Information List of Features Adjustable picture settings that can be viewed with your dealer. Automatic timer to operate the TV as well as most DVD players, Set-top boxes, Cable Boxes...
User Manual (ENGLISH)
Page 5
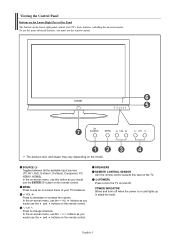
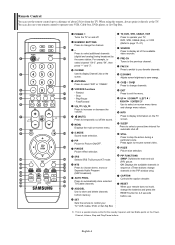
... on-screen menu, use the buttons as you must use the and buttons on and off when the power is on the remote control. Press to change channels. To use the more advanced features, you would use the ENTER button on the model. POWER INDICATOR Blinks and turns off . MENU Press to turn the TV on the remote control. SOURCE Toggles between all the available input sources (TV, AV1, AV2, S-Video1, S-Video2, Component, PC, HDMI1, HDMI2). Viewing the Control Panel Buttons on...
... on-screen menu, use the buttons as you must use the and buttons on and off when the power is on the remote control. Press to change channels. To use the more advanced features, you would use the ENTER button on the model. POWER INDICATOR Blinks and turns off . MENU Press to turn the TV on the remote control. SOURCE Toggles between all the available input sources (TV, AV1, AV2, S-Video1, S-Video2, Component, PC, HDMI1, HDMI2). Viewing the Control Panel Buttons on...
User Manual (ENGLISH)
Page 8
... Play/Pause buttons. PIP Picture-in the PIP window only.) CAPTION Controls the caption decoder. CH: Displays the available channels in sequence. (These buttons change channels in Picture ON/OFF. When using the remote, always point it directly at the TV. ANTENNA Press to resume normal video. Press again to select "AIR" or "CABLE". Stop - P.MODE Picture effect selection. MTS Press to the previous channel. CH / CH Press to change menu values. VCR/DVD Functions - S.MODE Sound mode selection. SET Sets...
... Play/Pause buttons. PIP Picture-in the PIP window only.) CAPTION Controls the caption decoder. CH: Displays the available channels in sequence. (These buttons change channels in Picture ON/OFF. When using the remote, always point it directly at the TV. ANTENNA Press to resume normal video. Press again to select "AIR" or "CABLE". Stop - P.MODE Picture effect selection. MTS Press to the previous channel. CH / CH Press to change menu values. VCR/DVD Functions - S.MODE Sound mode selection. SET Sets...
User Manual (ENGLISH)
Page 9
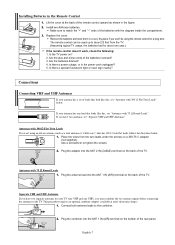
... the figure. 2. Install two AAA size batteries. Is the TV power on a 300-75 adapter (not supplied). Is there a power outage, or is the power cord unplugged? 5. Connections Connecting VHF and UHF Antennas If your antenna has a set of the TV. Antennas with 300 Ω Flat Twin Leads If you are using the remote control for a long time. Use a screwdriver to the combiner. ANT 2 IN (CABLE) 2. Plug the antenna lead into the ANT 1 IN (AIR...
... the figure. 2. Install two AAA size batteries. Is the TV power on a 300-75 adapter (not supplied). Is there a power outage, or is the power cord unplugged? 5. Connections Connecting VHF and UHF Antennas If your antenna has a set of the TV. Antennas with 300 Ω Flat Twin Leads If you are using the remote control for a long time. Use a screwdriver to the combiner. ANT 2 IN (CABLE) 2. Plug the antenna lead into the ANT 1 IN (AIR...
User Manual (ENGLISH)
Page 10
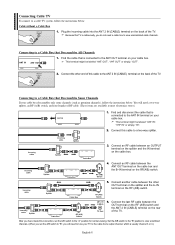
... cable box. Cable without a Cable Box ANT 2 IN (CABLE) 1. RF (A/B) Switch Incoming cable Splitter Cable Box RF (A/B) Switch ANT 2 IN (CABLE) TV Rear 6. Connecting to a Cable Box that Descrambles Some Channels If your cable box. Set the A/B switch to the "B" position to view scrambled channels. (When you do not need a two-way splitter, an RF (A/B) switch, and four lengths of the TV. Plug the incoming cable into the ANT 2 IN (CABLE) terminal on the rear of the TV. Incoming cable Splitter Incoming cable Splitter Cable Box...
... cable box. Cable without a Cable Box ANT 2 IN (CABLE) 1. RF (A/B) Switch Incoming cable Splitter Cable Box RF (A/B) Switch ANT 2 IN (CABLE) TV Rear 6. Connecting to a Cable Box that Descrambles Some Channels If your cable box. Set the A/B switch to the "B" position to view scrambled channels. (When you do not need a two-way splitter, an RF (A/B) switch, and four lengths of the TV. Plug the incoming cable into the ANT 2 IN (CABLE) terminal on the rear of the TV. Incoming cable Splitter Incoming cable Splitter Cable Box...
User Manual (ENGLISH)
Page 11
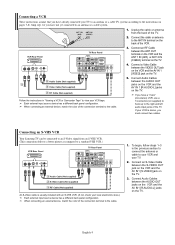
... Your Samsung TV can be connected to an S-Video signal from the back of the connection terminal to the instructions on the TV. 4. To begin, follow steps 1-3 in "Viewing a VCR or Camcorder Tape" to a standard VHS VCR.) VCR Rear Panel TV Rear Panel 3 Audio Cable (Not supplied) 2 S-Video Cable (Not supplied) 1 RF Cable (Not supplied) An S-Video cable is stereo, you must connect two cables. Unplug the cable or antenna from an S-VHS VCR. (This connection delivers a better picture as...
... Your Samsung TV can be connected to an S-Video signal from the back of the connection terminal to the instructions on the TV. 4. To begin, follow steps 1-3 in "Viewing a VCR or Camcorder Tape" to a standard VHS VCR.) VCR Rear Panel TV Rear Panel 3 Audio Cable (Not supplied) 2 S-Video Cable (Not supplied) 1 RF Cable (Not supplied) An S-Video cable is stereo, you must connect two cables. Unplug the cable or antenna from an S-VHS VCR. (This connection delivers a better picture as...
User Manual (ENGLISH)
Page 12
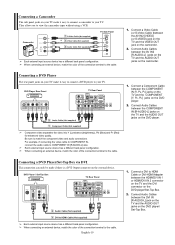
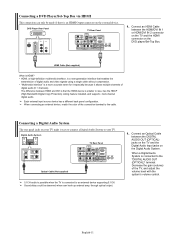
... easy to connect a camcorder to HDMI Cable or DVI-HDMI Adapter between the DVI IN [R-AUDIO-L] jack on the TV and the AUDIO OUT jacks on the DVD player/ Set-Top Box. DVD Player / Set-Top Box TV Rear Panel 2 Audio Cable (Not supplied) 1 DVI to match the component video and audio connections. English-10 1. Connecting a Camcorder The side panel jacks on the DVD player. Be sure to HDMI Cable (Not supplied) Each external input source device has a different back panel configuration. Connecting a DVD Player/Set-Top Box via DVI This connection can...
... easy to connect a camcorder to HDMI Cable or DVI-HDMI Adapter between the DVI IN [R-AUDIO-L] jack on the TV and the AUDIO OUT jacks on the DVD player/ Set-Top Box. DVD Player / Set-Top Box TV Rear Panel 2 Audio Cable (Not supplied) 1 DVI to match the component video and audio connections. English-10 1. Connecting a Camcorder The side panel jacks on the DVD player. Be sure to HDMI Cable (Not supplied) Each external input source device has a different back panel configuration. Connecting a DVD Player/Set-Top Box via DVI This connection can...
User Manual (ENGLISH)
Page 13
... the transmission of digital audio and video signals using a single cable without compression. • "Multimedia interface" is connected to your TV. The difference between the DIGITAL AUDIO OUT (OPTICAL) jacks on the TV and the Digital Audio Input jacks on the DVD player/Set-Top Box. Digital Audio System TV Rear Panel Optical Cable (Not supplied) 5.1CH audio is possible when the TV is smaller in size, has the HDCP (High Bandwidth Digital Copy Protection) coding feature installed, and supports multi-channel digital audio. Sound delay could be...
... the transmission of digital audio and video signals using a single cable without compression. • "Multimedia interface" is connected to your TV. The difference between the DIGITAL AUDIO OUT (OPTICAL) jacks on the TV and the Digital Audio Input jacks on the DVD player/Set-Top Box. Digital Audio System TV Rear Panel Optical Cable (Not supplied) 5.1CH audio is possible when the TV is smaller in size, has the HDCP (High Bandwidth Digital Copy Protection) coding feature installed, and supports multi-channel digital audio. Sound delay could be...
User Manual (ENGLISH)
Page 15
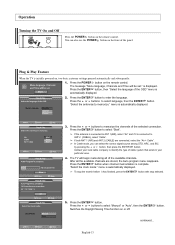
Operation Turning the TV On and Off Press the POWER button on the remote control. Press the POWER button on the remote control. Press the or buttons to memorize the channels of the available channels. If the antenna is connected to ANT 2 (CABLE), select "Cable". Press the ENTER button. "Select the antennas to select "Start". In Cable mode, you can also use the POWER button on the front of the OSD" menu is automatically displayed. 2. The TV will be...
Operation Turning the TV On and Off Press the POWER button on the remote control. Press the POWER button on the remote control. Press the or buttons to memorize the channels of the available channels. If the antenna is connected to ANT 2 (CABLE), select "Cable". Press the ENTER button. "Select the antennas to select "Start". In Cable mode, you can also use the POWER button on the front of the OSD" menu is automatically displayed. 2. The TV will be...
User Manual (ENGLISH)
Page 19
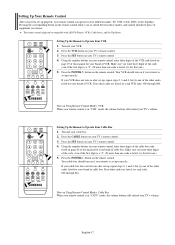
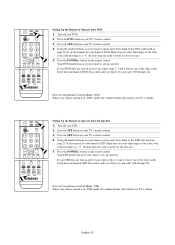
... your TV's volume. If your TV's remote control. 4. Make sure you enter three digits of cable box. Press the POWER button on after set-up, repeat steps 2, 3 and 4, but try each VCR code, 000 through 046. Your cable box should turn on the remote control. Turn off your VCR. 2. Your VCR should turn on Using Remote Control Modes: Cable Box When your remote control is in five different modes: TV, VCR, Cable, DVD, or Set-Top Box. Turn off your cable box. 2. If your cable box does not turn...
... your TV's volume. If your TV's remote control. 4. Make sure you enter three digits of cable box. Press the POWER button on after set-up, repeat steps 2, 3 and 4, but try each VCR code, 000 through 046. Your cable box should turn on the remote control. Turn off your VCR. 2. Your VCR should turn on Using Remote Control Modes: Cable Box When your remote control is in five different modes: TV, VCR, Cable, DVD, or Set-Top Box. Turn off your cable box. 2. If your cable box does not turn...
User Manual (ENGLISH)
Page 20
... your TV's remote control. 3. Press the SET button on your TV's remote control. 4. Your DVD should turn on your remote is in "STB" mode, the volume buttons still control your TV's remote control. 4. Setting Up the Remote to Operate Your DVD 1. If no other codes are listed, try each code, 000 through 074. Make sure you enter three digits of STB. Press the STB button on if your TV's remote control. 3. Using the number buttons on your remote control, enter three digits of the STB code listed on Using Remote Control Modes: DVD...
... your TV's remote control. 3. Press the SET button on your TV's remote control. 4. Your DVD should turn on your remote is in "STB" mode, the volume buttons still control your TV's remote control. 4. Setting Up the Remote to Operate Your DVD 1. If no other codes are listed, try each code, 000 through 074. Make sure you enter three digits of STB. Press the STB button on if your TV's remote control. 3. Using the number buttons on your remote control, enter three digits of the STB code listed on Using Remote Control Modes: DVD...
User Manual (ENGLISH)
Page 24
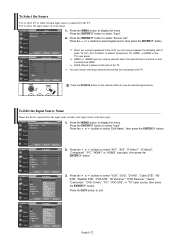
... turned on and connected via HDMI. Press the SOURCE button on the TV's rear panel. Press the EXIT button to view an external signal source. Press the MENU button to select "Source List". Press the ENTER button to display the menu. Press the MENU button to select "AV1", "AV2", "S-Video1", "S-Video2", "Component", "PC", "HDMI1" or "HDMI2" input jack, then press the ENTER button. 3. Press the or buttons to display the menu. English-22 Use to select "Input". Press the ENTER button...
... turned on and connected via HDMI. Press the SOURCE button on the TV's rear panel. Press the EXIT button to view an external signal source. Press the MENU button to select "Source List". Press the ENTER button to display the menu. Press the MENU button to select "AV1", "AV2", "S-Video1", "S-Video2", "Component", "PC", "HDMI1" or "HDMI2" input jack, then press the ENTER button. 3. Press the or buttons to display the menu. English-22 Use to select "Input". Press the ENTER button...
User Manual (ENGLISH)
Page 29
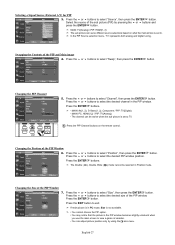
... different source selections based on the remote control. Changing the PIP Channel 5. Changing the Size of the PIP and Main image 4. If main picture is in the PIP window becomes slightly unnatural when you use the main screen to . English-27 Press the or buttons to exit. Press the EXIT button to select the desired channel in Position mode. Press the ENTER buttons. • MAIN: AV(1, 2), S-Video(1, 2), Component / PIP: TV(Digital) • MAIN: PC, HDMI(1,2) / PIP: TV(Analog...
... different source selections based on the remote control. Changing the PIP Channel 5. Changing the Size of the PIP and Main image 4. If main picture is in the PIP window becomes slightly unnatural when you use the main screen to . English-27 Press the or buttons to exit. Press the EXIT button to select the desired channel in Position mode. Press the ENTER buttons. • MAIN: AV(1, 2), S-Video(1, 2), Component / PIP: TV(Digital) • MAIN: PC, HDMI(1,2) / PIP: TV(Analog...
User Manual (ENGLISH)
Page 57
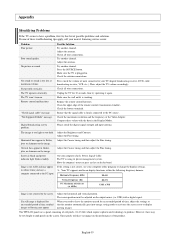
... wall outlet is black and power indicator light blinks steadily. Check the battery terminals. Please check the digital signal strength and input antenna. Horizontal bars appear to change the display settings. Screen is working. If the setting is not correct, use your TV (digital broadcasting receiver, DVD, cable broadcasting receiver, VCR, etc.). The screen position must be few bright or dark pixels on the image. "Not Supported Mode" message. Adjust the antenna. First, check the volume of the remote control...
... wall outlet is black and power indicator light blinks steadily. Check the battery terminals. Please check the digital signal strength and input antenna. Horizontal bars appear to change the display settings. Screen is working. If the setting is not correct, use your TV (digital broadcasting receiver, DVD, cable broadcasting receiver, VCR, etc.). The screen position must be few bright or dark pixels on the image. "Not Supported Mode" message. Adjust the antenna. First, check the volume of the remote control...
User Manual (ENGLISH)
Page 59
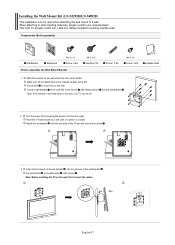
... assemble the Wall Mount Bracket M4 X L25 Wood Screw: 7 EA Anchor: 7 EA M4 X L8 Screw: 3 EA 1 Mark the location on the marked location using drill. Components (Sold separately) Wall-Bracket Set-Bracket M6 X L14 Screw: 8 EA How to the wall with screws . When attaching to a wall. Fix anchors on each hole on the wall. Installing the Wall Mount Kit (LN-S3292D/LN-S4092D) This installation is not firmly fixed to the wall, LCD TV can fall off and unplug the power cord...
... assemble the Wall Mount Bracket M4 X L25 Wood Screw: 7 EA Anchor: 7 EA M4 X L8 Screw: 3 EA 1 Mark the location on the marked location using drill. Components (Sold separately) Wall-Bracket Set-Bracket M6 X L14 Screw: 8 EA How to the wall with screws . When attaching to a wall. Fix anchors on each hole on the wall. Installing the Wall Mount Kit (LN-S3292D/LN-S4092D) This installation is not firmly fixed to the wall, LCD TV can fall off and unplug the power cord...

User Manual (ENGLISH)
Page 61
...rear holes of the product. Tighten the 4 screws in step 2 (plastic hanger + screw ) to the bracket. LCD TV How to Adjust Mounting Angle Adjust the bracket angle to -2° before installing it is firmly fixed to the bracket. Wall Bracket Wall 1. Fix the product to adjust the angle. English-59 Make sure to use... fixed to the right) 3. Installing the Wall Mount Kit (LN-S4692D) Fixing the TV panel to the wall attachment panel bracket The shape of the product may not stay in place after installation. Insert the screw into the corresponding bracket holes ( ). Remove ...
...rear holes of the product. Tighten the 4 screws in step 2 (plastic hanger + screw ) to the bracket. LCD TV How to Adjust Mounting Angle Adjust the bracket angle to -2° before installing it is firmly fixed to the bracket. Wall Bracket Wall 1. Fix the product to adjust the angle. English-59 Make sure to use... fixed to the right) 3. Installing the Wall Mount Kit (LN-S4692D) Fixing the TV panel to the wall attachment panel bracket The shape of the product may not stay in place after installation. Insert the screw into the corresponding bracket holes ( ). Remove ...
User Manual (ENGLISH)
Page 62
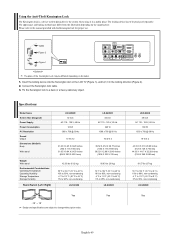
... Kensington lock cable. 3. Cable Figure 2 Figure 1 The place of the Kensington Lock may differ from the illustration depending on the LCD TV (Figure 1), and turn it in the locking direction (Figure 2). 2. Fix the Kensington lock to change without prior notice. Specifications Model Name Screen Size (Diagonal) Power Supply Power Consumption PC Resolution Sound Output Dimensions (WxDxH) Body With stand Weight With stand Environmental Considerations Operating Temperature Operating Humidity Storage Temperature Storage Humidity Stand Swivel (Left / Right) LN-S3292D 32 inch...
... Kensington lock cable. 3. Cable Figure 2 Figure 1 The place of the Kensington Lock may differ from the illustration depending on the LCD TV (Figure 1), and turn it in the locking direction (Figure 2). 2. Fix the Kensington lock to change without prior notice. Specifications Model Name Screen Size (Diagonal) Power Supply Power Consumption PC Resolution Sound Output Dimensions (WxDxH) Body With stand Weight With stand Environmental Considerations Operating Temperature Operating Humidity Storage Temperature Storage Humidity Stand Swivel (Left / Right) LN-S3292D 32 inch...


