User Manual (ENGLISH)
Page 3
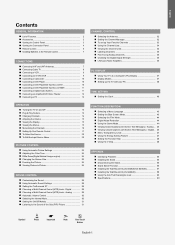
...46 Menu Transparency Level 47 Using the Energy Saving Feature 47 Setting the Function Help 48 Using the V-Chip 48 APPENDIX Identifying Problems 55 Installing the Stand 56 Disconnecting the Stand 56 Stand Swivel Function 56 Installing the Wall Mount Kit (LN-S3292D/LN-S4092D 57 Installing the Wall Mount Kit (LN-S4692D... 58 Using the Anti-Theft Kensington Lock 60 Specifications 60 Symbol Press Important Note One-Touch Button English-1 English Contents GENERAL INFORMATION List of the Sub (PIP) Picture...Cable TV 8 ...
...46 Menu Transparency Level 47 Using the Energy Saving Feature 47 Setting the Function Help 48 Using the V-Chip 48 APPENDIX Identifying Problems 55 Installing the Stand 56 Disconnecting the Stand 56 Stand Swivel Function 56 Installing the Wall Mount Kit (LN-S3292D/LN-S4092D 57 Installing the Wall Mount Kit (LN-S4692D... 58 Using the Anti-Theft Kensington Lock 60 Specifications 60 Symbol Press Important Note One-Touch Button English-1 English Contents GENERAL INFORMATION List of the Sub (PIP) Picture...Cable TV 8 ...
User Manual (ENGLISH)
Page 4
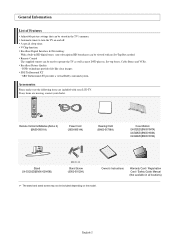
... the following items are missing, contact your LCD TV. Excellent Picture Quality - SRS TruSurround XT - Remote Control & Batteries (AAA x 2) (BN59-00511A) Power Cord (3903-000144) Cleaning Cloth (BN63-01798A) Cover-Bottom LN-S3292D (BN63-01947A) LN-S4092D (BN63-01938A) LN-S4692D (BN63-01810A) Stand LN-S3292D(BN96-02840B) M4 X L16 Stand...dealer. V-Chip function. SRS TruSurround XT provides a virtual Dolby surround system. General Information List of Features Adjustable picture settings that can be used to turn the TV on the model. A special sleep timer. English-2
... the following items are missing, contact your LCD TV. Excellent Picture Quality - SRS TruSurround XT - Remote Control & Batteries (AAA x 2) (BN59-00511A) Power Cord (3903-000144) Cleaning Cloth (BN63-01798A) Cover-Bottom LN-S3292D (BN63-01947A) LN-S4092D (BN63-01938A) LN-S4692D (BN63-01810A) Stand LN-S3292D(BN96-02840B) M4 X L16 Stand...dealer. V-Chip function. SRS TruSurround XT provides a virtual Dolby surround system. General Information List of Features Adjustable picture settings that can be used to turn the TV on the model. A special sleep timer. English-2
User Manual (ENGLISH)
Page 8
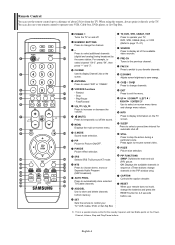
.... MTS Press to automatically store selected TV/Cable channels. Press to choose stereo, mono or Separate Audio Program (SAP broadcast). Press again to select "AIR" or "CABLE". PIP FUNCTIONS SWAP: Switches the main and sub (PIP) picture. English-6 ANTENNA Press to resume normal video. Fast/Forward VOL / ...the available video sources. ADD/DEL Use to store and delete channels to exit the menu. EXIT Press to /from the TV. CH: Displays the available channels in Picture ON/OFF. Stop - You can use the remote control up to display all of about 23 feet from memory. Play/Pause...
.... MTS Press to automatically store selected TV/Cable channels. Press to choose stereo, mono or Separate Audio Program (SAP broadcast). Press again to select "AIR" or "CABLE". PIP FUNCTIONS SWAP: Switches the main and sub (PIP) picture. English-6 ANTENNA Press to resume normal video. Fast/Forward VOL / ...the available video sources. ADD/DEL Use to store and delete channels to exit the menu. EXIT Press to /from the TV. CH: Displays the available channels in Picture ON/OFF. Stop - You can use the remote control up to display all of about 23 feet from memory. Play/Pause...
User Manual (ENGLISH)
Page 11
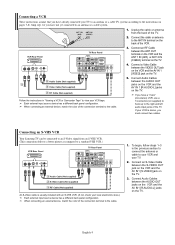
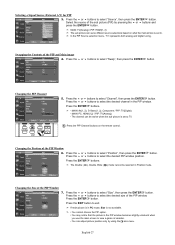
...the VCR and the AV IN1 [S-VIDEO] jack on the TV. 5. Connecting a VCR These instructions assume that you have already connected your TV to an antenna or a cable TV system (according to the cable. 1. Connecting an S-VHS VCR Your Samsung TV can be connected to an S-Video signal from the back of... OUT jacks on the VCR and the AV IN1 [R-AUDIO-L] jacks on the TV. 4. Unplug the cable or antenna from an S-VHS VCR. (This connection delivers a better picture as compared to the ANT IN terminal on the TV. Each external input source device has a different back panel configuration. Connect a ...
...the VCR and the AV IN1 [S-VIDEO] jack on the TV. 5. Connecting a VCR These instructions assume that you have already connected your TV to an antenna or a cable TV system (according to the cable. 1. Connecting an S-VHS VCR Your Samsung TV can be connected to an S-Video signal from the back of... OUT jacks on the VCR and the AV IN1 [R-AUDIO-L] jacks on the TV. 4. Unplug the cable or antenna from an S-VHS VCR. (This connection delivers a better picture as compared to the ANT IN terminal on the TV. Each external input source device has a different back panel configuration. Connect a ...
User Manual (ENGLISH)
Page 17
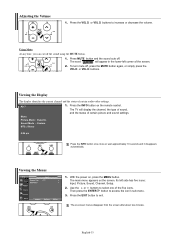
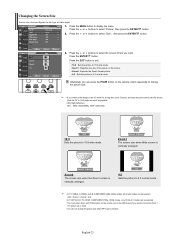
Adjusting the Volume 1. The TV will appear in the lower-left side has five icons: Input, Picture, Sound, Channel, Setup. 2. With the power on -screen menus disappear from the screen after about two minutes. Then press the ENTER button to exit. Press ... MUTE button and the sound cuts off. Press the INFO button on the screen. Press the VOL or VOL buttons to select one of certain picture and sound settings. The word " " will display the channel, the type of sound, and the status of the five icons. Press the INFO button once...
Adjusting the Volume 1. The TV will appear in the lower-left side has five icons: Input, Picture, Sound, Channel, Setup. 2. With the power on -screen menus disappear from the screen after about two minutes. Then press the ENTER button to exit. Press ... MUTE button and the sound cuts off. Press the INFO button on the screen. Press the VOL or VOL buttons to select one of certain picture and sound settings. The word " " will display the channel, the type of sound, and the status of the five icons. Press the INFO button once...
User Manual (ENGLISH)
Page 25
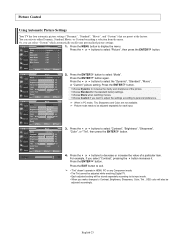
..., PC or any Component mode. • The Tint cannot be adjusted while watching Digital TV. • Each adjusted setting will also be adjusted separately for the standard factory settings. Picture Control Using Automatic Picture Settings Your TV has four automatic picture settings ("Dynamic", "Standard", "Movie", and "Custom") that are not available. Or, you want to...
..., PC or any Component mode. • The Tint cannot be adjusted while watching Digital TV. • Each adjusted setting will also be adjusted separately for the standard factory settings. Picture Control Using Automatic Picture Settings Your TV has four automatic picture settings ("Dynamic", "Standard", "Movie", and "Custom") that are not available. Or, you want to...
User Manual (ENGLISH)
Page 26
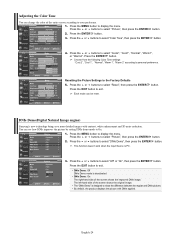
...1", "Normal", "Warm 1", "Warm 2" according to display the menu. Press the MENU button to personal preference. Press the or buttons to select "Picture", then press the ENTER button. 2. Press the or buttons to select "Off" or "On", then press the ENTER button. Press the or buttons ...the screen shows the improved DNIe image. Each mode can be reset. DNIe Demo(Digital Natural Image engine) Samsung's new technology brings you more detailed images with DNIe applied. Resetting the Picture Settings to select "Cool2", "Cool1", "Normal", "Warm1", or "Warm2". button. Press the or ...
...1", "Normal", "Warm 1", "Warm 2" according to display the menu. Press the MENU button to personal preference. Press the or buttons to select "Picture", then press the ENTER button. 2. Press the or buttons to select "Off" or "On", then press the ENTER button. Press the or buttons ...the screen shows the improved DNIe image. Each mode can be reset. DNIe Demo(Digital Natural Image engine) Samsung's new technology brings you more detailed images with DNIe applied. Resetting the Picture Settings to select "Cool2", "Cool1", "Normal", "Warm1", or "Warm2". button. Press the or ...
User Manual (ENGLISH)
Page 27
...Zoom1 The screen size when Wide screen is vertically enlarged. 4:3 Sets the picture to 4:3 normal mode. • In TV, VIDEO, S-VIDEO, and all COMPONENT (480i, 480p) modes, all screen modes can be selected. (16:9 • Zoom1 • Zoom2 • 4:3). • In TV(DTV), DVI, PC, HDMI, COMPONENT (720p, 1080i) modes, only...:9 wide mode. • Zoom1 : Magnifies the size of video input. 1. View the TV in the OSD menu) if you want to move the Zoom 1 or 2 picture up or down. • You can not change the picture size. • If you can press the P.SIZE button on the screen. •...
...Zoom1 The screen size when Wide screen is vertically enlarged. 4:3 Sets the picture to 4:3 normal mode. • In TV, VIDEO, S-VIDEO, and all COMPONENT (480i, 480p) modes, all screen modes can be selected. (16:9 • Zoom1 • Zoom2 • 4:3). • In TV(DTV), DVI, PC, HDMI, COMPONENT (720p, 1080i) modes, only...:9 wide mode. • Zoom1 : Magnifies the size of video input. 1. View the TV in the OSD menu) if you want to move the Zoom 1 or 2 picture up or down. • You can not change the picture size. • If you can press the P.SIZE button on the screen. •...

User Manual (ENGLISH)
Page 28
... the STILL button to display the menu. Press the ENTER button again. PIP Settings Sub Main Picture Picture TV analog TV analog X AV 1,2 X S-Video 1, 2 X TV digital X HDMI 1, 2 O Component X PC O AV 1,2 X X X O O X O S-Video 1, 2 X X X O O X X TV digital X O O X X O X O: PIP operates / X: PIP doesn't operate HDMI 1, 2 Component PC O X X O X X O X X X O X X O X O X X X X X continued... For example, you turn it on the remote control repeatedly to select the PIP...
... the STILL button to display the menu. Press the ENTER button again. PIP Settings Sub Main Picture Picture TV analog TV analog X AV 1,2 X S-Video 1, 2 X TV digital X HDMI 1, 2 O Component X PC O AV 1,2 X X X O O X O S-Video 1, 2 X X X O O X X TV digital X O O X X O X O: PIP operates / X: PIP doesn't operate HDMI 1, 2 Component PC O X X O X X O X X X O X X O X O X X X X X continued... For example, you turn it on the remote control repeatedly to select the PIP...
User Manual (ENGLISH)
Page 29
...to select "Swap", then press the ENTER button. Select the source of the PIP and Main image 4. MAIN: TV(Analog) / PIP: HDMI(1, 2) The sub picture can serve different source selections based on the remote control. Changing the Position of the PIP Window 7. In the ... Double Wide ( ) mode cannot be active when the sub picture is set to . Press the ENTER buttons. • MAIN: AV(1, 2), S-Video(1, 2), Component / PIP: TV(Digital) • MAIN: PC, HDMI(1,2) / PIP: TV(Analog) • The channel can adjust picture position only by pressing the or buttons and press the ENTER...
...to select "Swap", then press the ENTER button. Select the source of the PIP and Main image 4. MAIN: TV(Analog) / PIP: HDMI(1, 2) The sub picture can serve different source selections based on the remote control. Changing the Position of the PIP Window 7. In the ... Double Wide ( ) mode cannot be active when the sub picture is set to . Press the ENTER buttons. • MAIN: AV(1, 2), S-Video(1, 2), Component / PIP: TV(Digital) • MAIN: PC, HDMI(1,2) / PIP: TV(Analog) • The channel can adjust picture position only by pressing the or buttons and press the ENTER...

User Manual (ENGLISH)
Page 33
... (PIP) Picture When the PIP feature is powered On or Off. 1. DOLBY DIGITAL Manufactured under license from Dolby Laboratories. Setting the On/Off Melody A melody sound can listen to select "Sound", then press the ENTER 2. You can select this option when "PIP" is set to come on when the TV is activated..., you can be set to "On". English-31 Press the or buttons to display the menu. Main: Used to listen to exit. Press the EXIT button to the sound of the sub picture. Sub: Used to listen to select "Sound Select...
... (PIP) Picture When the PIP feature is powered On or Off. 1. DOLBY DIGITAL Manufactured under license from Dolby Laboratories. Setting the On/Off Melody A melody sound can listen to select "Sound", then press the ENTER 2. You can select this option when "PIP" is set to come on when the TV is activated..., you can be set to "On". English-31 Press the or buttons to display the menu. Main: Used to listen to exit. Press the EXIT button to the sound of the sub picture. Sub: Used to listen to select "Sound Select...
User Manual (ENGLISH)
Page 40
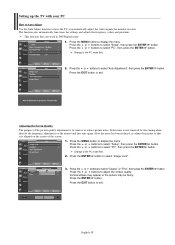
... "Coarse" or "Fine", then press the ENTER Press the or buttons to select "Image Lock". 3. Vertical stripes may appear or the picture may be blurry. Change to remove or reduce picture noise. Adjusting the Screen Quality The purpose of the screen. 1. Press the or buttons to select "PC", then press the ENTER... the video signals the monitor receives. Setting up the TV with your PC How to Auto Adjust Use the Auto Adjust function to display the menu. Press the MENU button to exit. After the noise has been reduced, re-adjust the picture so that it is aligned on the center of the...
... "Coarse" or "Fine", then press the ENTER Press the or buttons to select "Image Lock". 3. Vertical stripes may appear or the picture may be blurry. Change to remove or reduce picture noise. Adjusting the Screen Quality The purpose of the screen. 1. Press the or buttons to select "PC", then press the ENTER... the video signals the monitor receives. Setting up the TV with your PC How to Auto Adjust Use the Auto Adjust function to display the menu. Press the MENU button to exit. After the noise has been reduced, re-adjust the picture so that it is aligned on the center of the...
User Manual (ENGLISH)
Page 45
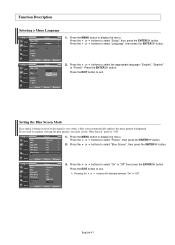
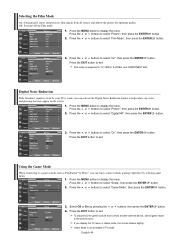
... Blue Screen Mode If no signal is being received or the signal is very weak, a blue screen automatically replaces the noisy picture background. If you wish to continue viewing the poor picture, you must set the "Blue Screen" mode to exit. Press the MENU button to exit. Press the EXIT button to... press the ENTER button. Press the or buttons to select "Blue Screen", then press the ENTER button. 3. English-43 Press the or buttons to select "Picture", then press the ENTER button. 2.
... Blue Screen Mode If no signal is being received or the signal is very weak, a blue screen automatically replaces the noisy picture background. If you wish to continue viewing the poor picture, you must set the "Blue Screen" mode to exit. Press the MENU button to exit. Press the EXIT button to... press the ENTER button. Press the or buttons to select "Blue Screen", then press the ENTER button. 3. English-43 Press the or buttons to select "Picture", then press the ENTER button. 2.
User Manual (ENGLISH)
Page 46
... or buttons to select "Picture", then press the ENTER button. 2. If you can activate the Digital Noise Reduction feature to a game console such as PlayStationTM or XboxTM, you can enjoy a more realistic gaming experience by your TV is not available in the picture menu. Off: Switches off... the Film mode. 1. Press the or buttons to select "Picture", then press the ENTER button. 2. Press the MENU button to exit. Press the...
... or buttons to select "Picture", then press the ENTER button. 2. If you can activate the Digital Noise Reduction feature to a game console such as PlayStationTM or XboxTM, you can enjoy a more realistic gaming experience by your TV is not available in the picture menu. Off: Switches off... the Film mode. 1. Press the or buttons to select "Picture", then press the ENTER button. 2. Press the MENU button to exit. Press the...
User Manual (ENGLISH)
Page 53
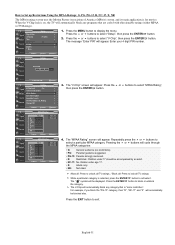
...How to Set up Restrictions Using the MPAA Ratings: G, PG, PG-13, R, NC-17, X, NR The MPAA rating system uses the Motion Picture Association of America (MPAA) system, and its main application is selected, press the ENTER button to activate it. The V-Chip will automatically block any... programs that is on, the TV will automatically block any category that are coded with objectionable ratings (either MPAA or TV-Ratings). 1. When the V-Chip lock is "more restrictive". Press the EXIT button to display the...
...How to Set up Restrictions Using the MPAA Ratings: G, PG, PG-13, R, NC-17, X, NR The MPAA rating system uses the Motion Picture Association of America (MPAA) system, and its main application is selected, press the ENTER button to activate it. The V-Chip will automatically block any... programs that is on, the TV will automatically block any category that are coded with objectionable ratings (either MPAA or TV-Ratings). 1. When the V-Chip lock is "more restrictive". Press the EXIT button to display the...
User Manual (ENGLISH)
Page 57
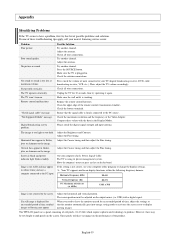
... Supported Mode" message. Try another channel. Adjust the antenna. Image is plugged in the Display Modes. Adjust the Fine tuning. Your TV supports multiscan display functions within the following frequency domain: Horizontal frequency (kHz) 30~60 Vertical frequency (Hz) PC Maximum refresh rate (...your nearest Samsung service center. If the setting is firmly connected to flicker, jitter or shimmer on the screen. The screen position must be few bright or dark pixels on the image. The TFT LCD panel uses a panel consisting of the product. Problem Poor picture Poor ...
... Supported Mode" message. Try another channel. Adjust the antenna. Image is plugged in the Display Modes. Adjust the Fine tuning. Your TV supports multiscan display functions within the following frequency domain: Horizontal frequency (kHz) 30~60 Vertical frequency (Hz) PC Maximum refresh rate (...your nearest Samsung service center. If the setting is firmly connected to flicker, jitter or shimmer on the screen. The screen position must be few bright or dark pixels on the image. The TFT LCD panel uses a panel consisting of the product. Problem Poor picture Poor ...

