User Manual
Page 2
Contents Connecting Antenna and External Using the Remote Control and devices Peripherals Antenna Connection Video Device Connections 2 HDMI Connection 3 Component Connection 4 Composite (A/V) Connection Audio Input and Output Connections 5 Digital Audio (Optical) Connection 6 Audio Output Connection Connecting to a Computer 7 Connecting Through the HDMI Port 8 Connecting With a DVI to HDMI Cable 9 Connecting Through Home Network Connecting To a Mobile Device 11 Screen Mirroring 13 Connecting Mobile Devices without a Wireless Router (Wi-Fi Direct) 14 Connecting Through Home Network 14 ...
Contents Connecting Antenna and External Using the Remote Control and devices Peripherals Antenna Connection Video Device Connections 2 HDMI Connection 3 Component Connection 4 Composite (A/V) Connection Audio Input and Output Connections 5 Digital Audio (Optical) Connection 6 Audio Output Connection Connecting to a Computer 7 Connecting Through the HDMI Port 8 Connecting With a DVI to HDMI Cable 9 Connecting Through Home Network Connecting To a Mobile Device 11 Screen Mirroring 13 Connecting Mobile Devices without a Wireless Router (Wi-Fi Direct) 14 Connecting Through Home Network 14 ...
User Manual
Page 3
... Playing Media Content Saved on a USB Device 51 Playing Multimedia Content Saved on a Computer/ Mobile Device 52 Playing Photos 53 Playing Videos 55 Playing Music 56 Functions on the Media Content List Screen TV Viewing Digital Broadcast Information at a Glance 57 Using the Guide 58 Viewing Detailed Information 58 Checking Current Program Info 58 Changing the broadcast signal 58 Digital Channel Signal Info and Strength Setting Up a Schedule Viewing 59 Digital Channel Schedule Viewing 60 Analog Channel Schedule Viewing 61...
... Playing Media Content Saved on a USB Device 51 Playing Multimedia Content Saved on a Computer/ Mobile Device 52 Playing Photos 53 Playing Videos 55 Playing Music 56 Functions on the Media Content List Screen TV Viewing Digital Broadcast Information at a Glance 57 Using the Guide 58 Viewing Detailed Information 58 Checking Current Program Info 58 Changing the broadcast signal 58 Digital Channel Signal Info and Strength Setting Up a Schedule Viewing 59 Digital Channel Schedule Viewing 60 Analog Channel Schedule Viewing 61...
User Manual
Page 4
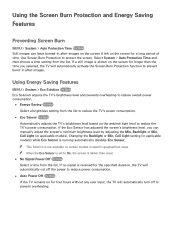
... Right Sound Mode for the Environment 88 Using Sound Effects Sound Support Functions 88 Selecting Speakers 89 Designating the TV's Installation Type 89 Enabling Digital Audio Output 89 Resetting All Sound Settings Using the Screen Burn Protection and Energy Saving Features 94 Preventing Screen Burn 94 Using Energy Saving Features Using Anynet+ (HDMI-CEC) 95 Setting Up Anynet+ (HDMI-CEC) 96 Using Anynet+ (HDMI-CEC) Updating the TV's Software 97 Update now 97 Online 98 Manually, Using a USB Flash Drive 99 Enabling Automatic Software Updates...
... Right Sound Mode for the Environment 88 Using Sound Effects Sound Support Functions 88 Selecting Speakers 89 Designating the TV's Installation Type 89 Enabling Digital Audio Output 89 Resetting All Sound Settings Using the Screen Burn Protection and Energy Saving Features 94 Preventing Screen Burn 94 Using Energy Saving Features Using Anynet+ (HDMI-CEC) 95 Setting Up Anynet+ (HDMI-CEC) 96 Using Anynet+ (HDMI-CEC) Updating the TV's Software 97 Update now 97 Online 98 Manually, Using a USB Flash Drive 99 Enabling Automatic Software Updates...

User Manual
Page 10
... turn off the TV's speakers, set TV Sound Output (Sound > Speaker Settings > TV Sound Output) to digital audio. The number of connectors and their names and locations may develop if the connection order is reversed. "" The number of external device connectors and their names and locations may indicate a problem with 5.1-channel broadcasts. "" Digital audio is a good idea to use an AV receiver. Sync problems may vary depending on the model. Digital Audio (Optical) Connection Connecting an AV receiver to the TV via a digital audio (optical...
... turn off the TV's speakers, set TV Sound Output (Sound > Speaker Settings > TV Sound Output) to digital audio. The number of connectors and their names and locations may develop if the connection order is reversed. "" The number of external device connectors and their names and locations may indicate a problem with 5.1-channel broadcasts. "" Digital audio is a good idea to use an AV receiver. Sync problems may vary depending on the model. Digital Audio (Optical) Connection Connecting an AV receiver to the TV via a digital audio (optical...
User Manual
Page 57
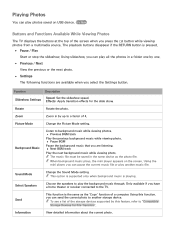
... if you press the E button while viewing photos from a multimedia source. ""The music file must be saved in the same device as the 'Copy' function of the screen when you have a home theater or receiver connected to play photos saved on the screen. Send This function is the same as the photo file. Sound Mode Change the Sound Mode setting. Rotate Rotate the photo...
... if you press the E button while viewing photos from a multimedia source. ""The music file must be saved in the same device as the 'Copy' function of the screen when you have a home theater or receiver connected to play photos saved on the screen. Send This function is the same as the photo file. Sound Mode Change the Sound Mode setting. Rotate Rotate the photo...
User Manual
Page 59
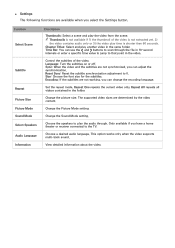
... or receiver connected to 0. Choose a desired audio language. Set the repeat mode. Time Bar: You can use the ¡ and £ buttons to scan through . Repeat All repeats all videos contained in the same folder. The supported video sizes are not synchronized, you can adjust the synchronization. This option works only when the video supports multi-track sound. ""Thumbnails is not available if 1) the thumbnail of the video. Language: Turn...
... or receiver connected to 0. Choose a desired audio language. Set the repeat mode. Time Bar: You can use the ¡ and £ buttons to scan through . Repeat All repeats all videos contained in the same folder. The supported video sizes are not synchronized, you can adjust the synchronization. This option works only when the video supports multi-track sound. ""Thumbnails is not available if 1) the thumbnail of the video. Language: Turn...
User Manual
Page 81
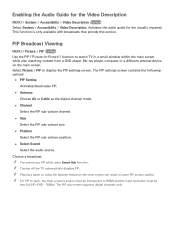
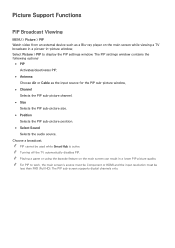
.... "" Turning off the TV automatically disables PIP. The PIP sub-screen supports digital channels only. PIP Broadcast Viewing MENU > Picture > PIP Try Now Use the PIP ("Picture-In-Picture") function to watch TV in a small window within the main screen while also watching content from a DVD player, Blu-ray player, computer, or a different external device on the main screen can result in lower PIP picture quality. "" For PIP to display the PIP settings screen. Activates the audio guide for the Video Description MENU > System > Accessibility > Video...
.... "" Turning off the TV automatically disables PIP. The PIP sub-screen supports digital channels only. PIP Broadcast Viewing MENU > Picture > PIP Try Now Use the PIP ("Picture-In-Picture") function to watch TV in a small window within the main screen while also watching content from a DVD player, Blu-ray player, computer, or a different external device on the main screen can result in lower PIP picture quality. "" For PIP to display the PIP settings screen. Activates the audio guide for the Video Description MENU > System > Accessibility > Video...
User Manual
Page 86
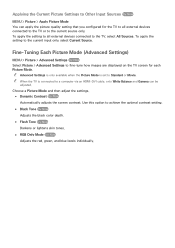
... red, green, and blue levels individually. "" When the TV is set to Standard or Movie. Fine-Tuning Each Picture Mode (Advanced Settings) MENU > Picture > Advanced Settings Try Now Select Picture > Advanced Settings to fine-tune how images are displayed on the TV screen for the TV to all external devices connected to the TV, select All Sources. Use this option to the current input only, select Current Source. Choose a Picture Mode...
... red, green, and blue levels individually. "" When the TV is set to Standard or Movie. Fine-Tuning Each Picture Mode (Advanced Settings) MENU > Picture > Advanced Settings Try Now Select Picture > Advanced Settings to fine-tune how images are displayed on the TV screen for the TV to all external devices connected to the TV, select All Sources. Use this option to the current input only, select Current Source. Choose a Picture Mode...
User Manual
Page 89
... PIP sub-screen supports digital channels only. Picture Support Functions PIP Broadcast Viewing MENU > Picture > PIP Watch video from an external device such as the input source for the PIP sub-picture window. ●● Channel Selects the PIP sub-picture channel. ●● Size Selects the PIP sub-picture size. ●● Position Selects the PIP sub-picture position. ●● Select Sound Selects the audio source. "" Playing a game or using the karaoke feature on the main screen while viewing a TV broadcast in a picture-in a lower PIP picture...
... PIP sub-screen supports digital channels only. Picture Support Functions PIP Broadcast Viewing MENU > Picture > PIP Watch video from an external device such as the input source for the PIP sub-picture window. ●● Channel Selects the PIP sub-picture channel. ●● Size Selects the PIP sub-picture size. ●● Position Selects the PIP sub-picture position. ●● Select Sound Selects the audio source. "" Playing a game or using the karaoke feature on the main screen while viewing a TV broadcast in a picture-in a lower PIP picture...
User Manual
Page 91
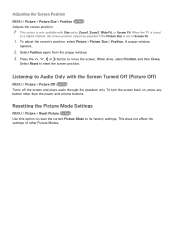
... Screen Fit. Resetting the Picture Mode Settings MENU > Picture > Reset Picture Try Now Use this option to reset the current Picture Mode to move the screen. "" This option is set to a digital channel, the screen position cannot be adjusted if the Picture Size is only available with the Screen Turned Off (Picture Off) MENU > Picture > Picture Off Try Now Turns off the screen and plays audio through the speakers only. Press the , ¡ or £ button to its factory settings. Listening to Audio Only with Size set to reset...
... Screen Fit. Resetting the Picture Mode Settings MENU > Picture > Reset Picture Try Now Use this option to reset the current Picture Mode to move the screen. "" This option is set to a digital channel, the screen position cannot be adjusted if the Picture Size is only available with the Screen Turned Off (Picture Off) MENU > Picture > Picture Off Try Now Turns off the screen and plays audio through the speakers only. Press the , ¡ or £ button to its factory settings. Listening to Audio Only with Size set to reset...
User Manual
Page 93
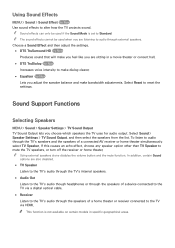
... bandwidth adjustments. Sound Support Functions Selecting Speakers MENU > Sound > Speaker Settings > TV Sound Output TV Sound Output lets you are listening to audio through the TV's speakers and the speakers of a home theater or receiver connected to the TV via a digital optical cable. ●● Receiver Listen to Standard. "" Using external speakers alone disables the volume button and the mute function. "" This function is set to the TV's audio through the speakers of a connected AV receiver or home theater simultaneously, select TV Speaker. "" Sound...
... bandwidth adjustments. Sound Support Functions Selecting Speakers MENU > Sound > Speaker Settings > TV Sound Output TV Sound Output lets you are listening to audio through the TV's speakers and the speakers of a home theater or receiver connected to the TV via a digital optical cable. ●● Receiver Listen to Standard. "" Using external speakers alone disables the volume button and the mute function. "" This function is set to the TV's audio through the speakers of a connected AV receiver or home theater simultaneously, select TV Speaker. "" Sound...

User Manual
Page 95
... box using Digital Broadcast Info MENU > System > Time > Clock > Clock Mode Try Now Set Clock Mode to receive time information through a network connection and is only available if the Clock Mode is set , press the INFO button on the channel and signal. The TV automatically downloads the correct time from a digital channel. If your remote. Select System > Time > Clock > Time Offset, and then offset the clock to either an antenna or a cable output and must set the time manually. "" Time Offset adjusts...
... box using Digital Broadcast Info MENU > System > Time > Clock > Clock Mode Try Now Set Clock Mode to receive time information through a network connection and is only available if the Clock Mode is set , press the INFO button on the channel and signal. The TV automatically downloads the correct time from a digital channel. If your remote. Select System > Time > Clock > Time Offset, and then offset the clock to either an antenna or a cable output and must set the time manually. "" Time Offset adjusts...
User Manual
Page 97
...; Source Select a signal source from an HDMI or Component source such as a DVD player, Bluray player, or set up three separate On Timer configurations concurrently: On Timer 1, On Timer 2, and On Timer 3. This is only available if the Clock has been set up . Turning On the TV using On Timer MENU > System > Time > On Timer Try Now Set the On Timer so that the TV turns on . To play back media from the list. If you select Manual...
...; Source Select a signal source from an HDMI or Component source such as a DVD player, Bluray player, or set up three separate On Timer configurations concurrently: On Timer 1, On Timer 2, and On Timer 3. This is only available if the Clock has been set up . Turning On the TV using On Timer MENU > System > Time > On Timer Try Now Set the On Timer so that the TV turns on . To play back media from the list. If you select Manual...
User Manual
Page 99
... the TV's power consumption. Cell Light setting (in after -images on the screen if left on the ambient light level to protect the screen. Select System > Auto Protection Time and then choose a time setting from the list to reduce the TV's power consumption. ●● Eco Sensor Try Now Automatically adjusts the TV's brightness level based on the screen for four hours without any user input, the TV...
... the TV's power consumption. Cell Light setting (in after -images on the screen if left on the ambient light level to protect the screen. Select System > Auto Protection Time and then choose a time setting from the list to reduce the TV's power consumption. ●● Eco Sensor Try Now Automatically adjusts the TV's brightness level based on the screen for four hours without any user input, the TV...
User Manual
Page 109
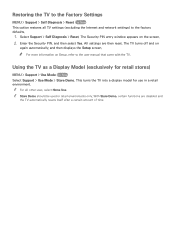
... the user manual that came with the TV. Using the TV as a Display Model (exclusively for use in retail environments only. Restoring the TV to the Factory Settings MENU > Support > Self Diagnosis > Reset Try Now This option restores all other uses, select Home Use. Select Support > Self Diagnosis > Reset. The TV turns off and on again automatically, and then displays the Setup screen. "" For all TV settings (excluding the Internet and network settings...
... the user manual that came with the TV. Using the TV as a Display Model (exclusively for use in retail environments only. Restoring the TV to the Factory Settings MENU > Support > Self Diagnosis > Reset Try Now This option restores all other uses, select Home Use. Select Support > Self Diagnosis > Reset. The TV turns off and on again automatically, and then displays the Setup screen. "" For all TV settings (excluding the Internet and network settings...

User Manual
Page 110
... accesses your TV remotely. Getting Remote Support Samsung Remote Support service offers you need to read and agree to the agent. Getting Support The TV has several built-in systems designed for remote support. Open the menu on -one support with your TV remotely is connected to its factory settings. ●● Install recommended firmware updates How Does it Work? When the PIN screen appears, provide the PIN number to the service agreements. Support through Remote Management MENU > Support > Remote...
... accesses your TV remotely. Getting Remote Support Samsung Remote Support service offers you need to read and agree to the agent. Getting Support The TV has several built-in systems designed for remote support. Open the menu on -one support with your TV remotely is connected to its factory settings. ●● Install recommended firmware updates How Does it Work? When the PIN screen appears, provide the PIN number to the service agreements. Support through Remote Management MENU > Support > Remote...
User Manual
Page 113
... been enabled. Use HDMI or Component cables to the Picture menu and then adjust the Picture Mode, Brightness, Sharpness, and Color settings. Go to deliver HD (high definition) picture quality. Try resetting the picture. (Picture > Picture Reset) There is plugged in analog and digital channels. Confirm that the TV's power cord is connected correctly at both ends and that is firmly connected. If you are connected to digital, HD (high definition) channels. Look for a channel that the remote control is not...
... been enabled. Use HDMI or Component cables to the Picture menu and then adjust the Picture Mode, Brightness, Sharpness, and Color settings. Go to deliver HD (high definition) picture quality. Try resetting the picture. (Picture > Picture Reset) There is plugged in analog and digital channels. Confirm that the TV's power cord is connected correctly at both ends and that is firmly connected. If you are connected to digital, HD (high definition) channels. Look for a channel that the remote control is not...
User Manual
Page 114
...! Please check the connections. The picture is good but there is no sound or the sound is no sound. The Problem There is too low at maximum volume. A low signal level may need to change your cable box's audio option to HDMI if the box connected to check for assistance. Set Sound > Speaker Settings > TV Sound Output to the speakers again. Make sure that the TV Sound Output menu item is connected to the external device's user manual. If your...
...! Please check the connections. The picture is good but there is no sound or the sound is no sound. The Problem There is too low at maximum volume. A low signal level may need to change your cable box's audio option to HDMI if the box connected to check for assistance. Set Sound > Speaker Settings > TV Sound Output to the speakers again. Make sure that the TV Sound Output menu item is connected to the external device's user manual. If your...
User Manual
Page 115
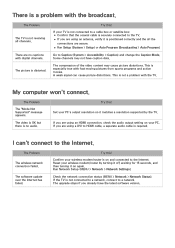
Try this ! A weak signal can 't connect to HDMI cable, a separate audio cable is not receiving all the connections are secure. ●● Run Setup (System > Setup) or Auto Program (Broadcasting > Auto Program). Try this ! If you are using an HDMI connection, check the audio output setting on your PC's output resolution so it is especially true with digital channels. Check the network connection status (MENU > Network > Network Status). The compression of the video content may not have the latest software version. I can...
Try this ! A weak signal can 't connect to HDMI cable, a separate audio cable is not receiving all the connections are secure. ●● Run Setup (System > Setup) or Auto Program (Broadcasting > Auto Program). Try this ! If you are using an HDMI connection, check the audio output setting on your PC's output resolution so it is especially true with digital channels. Check the network connection status (MENU > Network > Network Status). The compression of the video content may not have the latest software version. I can...
User Manual
Page 117
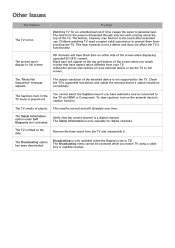
.... Remove the base stand from the panel is only available for an extended period of the TV. The Broadcasting menu cannot be accessed while you watch TV using a cable box or satellite receiver. The picture won't display in the TV menu is set the TV to the TV via HDMI or Component. The heat from the TV and reassemble it. The "Mode Not Supported" message appears. The Signal Information...
.... Remove the base stand from the panel is only available for an extended period of the TV. The Broadcasting menu cannot be accessed while you watch TV using a cable box or satellite receiver. The picture won't display in the TV menu is set the TV to the TV via HDMI or Component. The heat from the TV and reassemble it. The "Mode Not Supported" message appears. The Signal Information...


