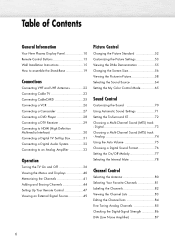
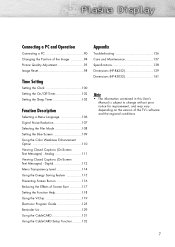
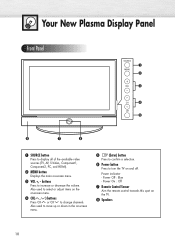
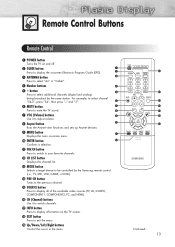
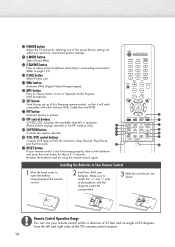
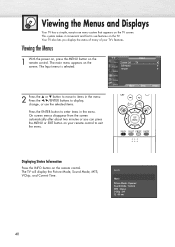
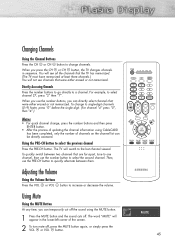
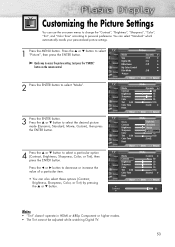
Quick Guide (easy Manual) (ver.1.0) (English)
Page 2
On PDP models that leave subtle, but permanent burned-in ghost images in the wide screen 16:9 ratio format, or expanded to fill the screen if your Samsung limited warranty. This license is limited to private non-commercial use . No rights are not covered by your model offers this feature and the images ...
Quick Guide (easy Manual) (ver.1.0) (English)
Page 3
...1,230,000(SD-level) to 3,150,000(HD-level) pixels which require sophisticated technology to reduce the degree of brightness and contrast of the screen when displaying a still image. Avoid operating the TV at altitudes above effect are not covered by image retention. Playing a DVD or a game... the PDP TV in a location with heavy dust, high or low temperatures, high humidity, and chemical substances, or where it can cause screen image retention. Displaying still images from Video games and PC for longer than several minutes as an airport, train station, etc. Warranty Warranty does...
Quick Guide (easy Manual) (ver.1.0) (English)
Page 4
... cable service provider. Please contact your service provider. It should be noted that CableCARD is called CableCARDs). In order to view the screen properly, you further information. Please refer to page 25 for the first time, this process, the digital cable service provider or CableCARD... may take several minutes to update the channel information depending on the TV screen to these channels, no longer needed with a proper digital cable tuner to receive digital cable signals from your local cable service provider...
Quick Guide (easy Manual) (ver.1.0) (English)
Page 6
... Viewing an External Signal Source 49 Picture Control Changing the Picture Standard 52 Customizing the Picture Settings 53 Viewing the DNIe Demonstration 55 Changing the Screen Size 56 Viewing the Picture-in-Picture 58 Selecting the Sound Source 64 Setting the My Color Control Mode 65 Sound Control Customizing the Sound...
Quick Guide (easy Manual) (ver.1.0) (English)
Page 7
...Reducing the Effects of Screen Burn 117 Setting the Function Help 118 Using the V-Chip 119 Electronic Program Guide 125 Reminder List 129 Using the CableCARD 131 Using the CableCARD Setup Function ..........132 Appendix Troubleshooting 136 Care and Maintenance 137 Specifications 138 Dimensions (HP-R4252 139 Dimensions (HP-R5052 141 Note •... the Sleep Timer 103 Function Description Selecting a Menu Language 106 Digital Noise Reduction 107 Selecting the Film Mode 108 Setting the Blue Screen 109 Using the Color Weakness Enhancement Option 110 Viewing Closed Captions (On...
Quick Guide (easy Manual) (ver.1.0) (English)
Page 10
... control towards this spot on and off. Power indicator - Also used to select or adjust items on the on -screen menu. ˇ VOL +, - Also used to move up or down in the on-screen menu. ˆ (Enter) button Press to confirm a selection. Ø Power button Press to turn the TV on the... button Press to display all of the available video sources (TV, AV, S-Video, Component1, Component2, PC, and HDMI). ´ MENU button Displays the main on -screen menu. ¨ CH( , ) buttons Press CH or CH to change channels.
Quick Guide (easy Manual) (ver.1.0) (English)
Page 13
" Anynet button Runs the Anynet view functions and sets up Anynet devices. ' MENU button Displays the main on-screen menu. ˝ ENTER button Confirms a selection. Ô FAV.CH button Press to switch to your favorite channels. CH LIST button Displays the channel list. ...; POWER button Turns the TV on and off. ´ GUIDE button Press to display the on-screen Electronic Program Guide (EPG). ˇ ANTENNA button Press to select additional channels (digital and analog) being broadcast by the Samsung remote control (i.e., TV, STB, VCR, CABLE, or DVD). Ú PRE-CH button Tunes to the...
Quick Guide (easy Manual) (ver.1.0) (English)
Page 14
...of the preset factory settings (or select your personal, customized picture settings). ¸ S.MODE button Select Sound effect. ˛ E.SAVING button Press to adjust screen brightness according to surrounding environment. (Refer to page 115) ◊ P.SIZE button Select Picture size. ± DNIe button Activates DNIe (Digital Natural Image ..."+" and "-" ends of the batteries with other devices (VCR, Cable Box and DVD). - SET button Used during set up of this Samsung remote control, so that it will work compatibly with the diagram inside the compartment. 3 Slide the cover back into place.
Quick Guide (easy Manual) (ver.1.0) (English)
Page 19
Always store the TV upright. 19 Never lay the TV on the floor because of the set may fall and could cause serious injury. ➤ Two or more people should carry the TV. How to assemble the Stand-Base 1 Using the 4 screws for securing the stand pegs and the monitor, firmly attach the monitor to the stand pegs. (The exterior of possible damage to the TV before moving it, as the stand may be different than the picture.) Warning Firmly secure the stand to the screen.
Quick Guide (easy Manual) (ver.1.0) (English)
Page 25
..., Host ID, and other information will be displayed in about 2~3 minutes. Notes • Once the channel list has been updated, only the channels on the screen. If an error message is displayed on the channel list can now be selected. • Remove the CableCARD by pressing CH LIST button. TV Power...
Quick Guide (easy Manual) (ver.1.0) (English)
Page 31
... displayed on the Set-Top Box using an audio cable. 2 Connect the HDMI input jack on the TV and the VIDEO output jack on the screen in their digital form.
Quick Guide (easy Manual) (ver.1.0) (English)
Page 40
... menu is selected. Air 28 Mono Picture Mode : Dynamic Sound Mode : Custom MTS : Stereo V-Chip : Off 12 : 00 am 40 On screen menus disappear from the screen automatically after about two minutes or you display the status of many of your remote control to -use menu system that appears on the...power on, press the MENU button on the remote control. Press the œ/√/ENTER buttons to display, change, or use features on the TV screen. The TV will display the Picture Mode, Sound Mode, MTS, V-Chip, and Current Time. Move Enter Return Displaying Status Information Press the INFO ...
Quick Guide (easy Manual) (ver.1.0) (English)
Page 45
... lower-left corner of channels on the channel list can temporarily cut off the sound using CableCARD has been completed, only the number of the screen. 2 To turn mute off .
Quick Guide (easy Manual) (ver.1.0) (English)
Page 51
PLASMA DISPLAY PANEL Picture Control Changing the Picture Standard 52 Customizing the Picture Settings 53 Viewing the DNIe Demonstration 55 Changing the Screen Size 56 Viewing the Picture-in-Picture 58 Selecting the Sound Source 64 Setting the My Color Control Mode 65
Quick Guide (easy Manual) (ver.1.0) (English)
Page 53
...; or ▼ button to select "Picture", then press the ENTER button. ➤ Quick way to access the picture setting: Just press the "P.MODE" button on -screen menus to change the "Contrast", "Brightness", "Sharpness", "Color", "Tint", and "Color Tone" according to personal preference. Press the ▲ or ▼ button to select the...
Quick Guide (easy Manual) (ver.1.0) (English)
Page 55
... DNIe Demo to select "Off" or "On", then press the ENTER button. • Off : Switches off the DNIe Demo mode. • On : Switches on the screen, for demonstration purposes. Viewing the DNIe Demonstration This TV includes the DNIe function so as to exit. Press the ▲ or ▼ button to select...
Quick Guide (easy Manual) (ver.1.0) (English)
Page 56
...: On √ : Off √ √ : Off √ Move Enter Return TV Size 16:9 Panorama Zoom1 Zoom2 4:3 4 Press the MENU button to select the screen size you want, then press the ENTER button. Press the ▲ or ▼ button to select "Picture", then press the ENTER button. ➤ Quick way... to change the Screen size: Simply press the P.SIZE button under the cover of video input. 1 Press the MENU button. Move Enter Return • 16:9 : Sets ...
Quick Guide (easy Manual) (ver.1.0) (English)
Page 57
...button under the cover of the remote control, the TV's screen mode should appear in this order: 16:9, Panorama, Zoom1, Zoom2, 4:3. Zoom2 The screen size when the Zoom1 screen is vertically enlarged. 16:9 Panorama Converts regular 4:3 aspect ratio screen to 16:9 wide mode. Zoom1 Move Notes • In...a long time (over 2 hours), an image may be burned onto the screen. The screen displays in sequence. Note • If you can move the picture on screen by pressing the ▲ or ▼ button. (All screen modes) • Picture size will not change when PIP size is vertically ...
Quick Guide (easy Manual) (ver.1.0) (English)
Page 58
... PIP Channel : Air 3 √ Note • If the PIP On/Off will appear in -Picture Selecting the PIP Screen 1 Press the MENU button. The PIP image will not function, check if the V-Chip Lock (refer to page 120)...Return TV PIP PIP : On √ Source : TV √ Swap Size : √ Position : √ PIP Channel : DTV Air 3 - 0 √ Move Enter Return PIP Settings Main screen PIP screen TV Analog Digital (ATSC) A : Analog D : Digital O : PIP and swap operate X : PIP doesn't operate AV(A) S-Video(A) Component(A) PC HDMI(D) Analog TV Digital X (ATSC) X X...
Quick Guide (easy Manual) (ver.1.0) (English)
Page 59
... not connected any equipment to select "Picture", then press the ENTER button. Selecting an External Signal You can not be selected on both the main screen and subscreen. • PC is not available in PIP picture. 59 Press the ▲ or ▼ button to the TV's respective input jacks. The signal...