
Owners Instructions
Page 5
... contact an authorized service center, when installing your set in is normal and does not indicate any damage caused by the Warranty. To prevent this manual to reduce the degree of brightness and contrast of 1,230,000(SD-level) to 3,150,000(HD-level) pixels which require sophisticated technology to do...
... contact an authorized service center, when installing your set in is normal and does not indicate any damage caused by the Warranty. To prevent this manual to reduce the degree of brightness and contrast of 1,230,000(SD-level) to 3,150,000(HD-level) pixels which require sophisticated technology to do...
Owners Instructions
Page 7
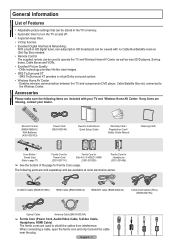
... FAV.CH Remote Control (BN59-00655A) / AAA Batteries (4301-000103) Power Cord (3903-000144) Owner's Instructions / Quick Setup Guide Warranty Card / Registration Card / Safety Guide Manual Cleaning Cloth Cover-Bottom / Screws (2ea) (Refer to shield the cables from interference. S-VIDEO Cable (BN39-00149A) HDMI Cable (BN39-00641A) HDMI/DVI cable (BN39...
... FAV.CH Remote Control (BN59-00655A) / AAA Batteries (4301-000103) Power Cord (3903-000144) Owner's Instructions / Quick Setup Guide Warranty Card / Registration Card / Safety Guide Manual Cleaning Cloth Cover-Bottom / Screws (2ea) (Refer to shield the cables from interference. S-VIDEO Cable (BN39-00149A) HDMI Cable (BN39-00641A) HDMI/DVI cable (BN39...
Owners Instructions
Page 19
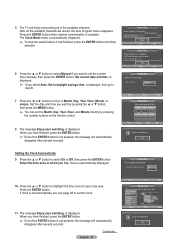
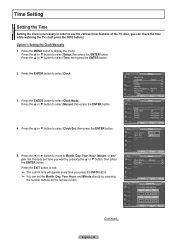
...Auto Program in which you want by pressing the ▲ or ▼ button, then press the MENU button. ➢ You can set the current time manually, then press the ENTER button. Cable Channel 67 68% Stop Enter Skip Plug & Play Auto Program is automatically displayed. Air : 9 , Cable : 5. ... move to daylight savings time. Press the ENTER button. OK Setting the Clock Automatically 9 Press the ▲ or ▼ button to select Manual if you live . Set current date and time. OK Enter Skip Plug & Play Select the clock mode. OK The Clock Mode menu is ...
...Auto Program in which you want by pressing the ▲ or ▼ button, then press the MENU button. ➢ You can set the current time manually, then press the ENTER button. Cable Channel 67 68% Stop Enter Skip Plug & Play Auto Program is automatically displayed. Air : 9 , Cable : 5. ... move to daylight savings time. Press the ENTER button. OK Setting the Clock Automatically 9 Press the ▲ or ▼ button to select Manual if you live . Set current date and time. OK Enter Skip Plug & Play Select the clock mode. OK The Clock Mode menu is ...
Owners Instructions
Page 22
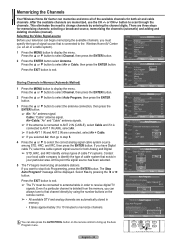
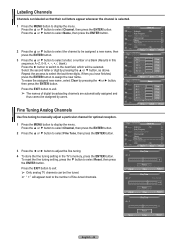
...; The TV must specify the type of the available channels for memorizing channels: selecting a broadcast source, memorizing the channels (automatic) and adding and deleting channels (manual). RETURN Yes Move Enter 68 % No Return You can also press the AUTO PROG. FAV.CH AUTO PROG. There are automatically stored in Memory (Automatic...
...; The TV must specify the type of the available channels for memorizing channels: selecting a broadcast source, memorizing the channels (automatic) and adding and deleting channels (manual). RETURN Yes Move Enter 68 % No Return You can also press the AUTO PROG. FAV.CH AUTO PROG. There are automatically stored in Memory (Automatic...
Owners Instructions
Page 23
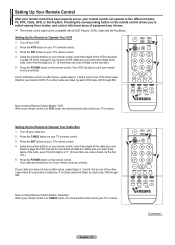
... TV's remote control. 4 Using the number buttons on your remote control, enter three digits of the cable box code listed on page 26 of this manual for your VCR does not turn on after set-up, repeat steps 2, 3 and 4, but try the first one of the other codes RETURN listed for... your TV's remote control. 4 Using the number buttons on your remote control, enter three digits of the VCR code listed on page 25 of this manual for your remote is set up correctly. If your brand of VCR. Note on if your brand of VCR. RETURN FAV.CH AUTO PROG. If...
... TV's remote control. 4 Using the number buttons on your remote control, enter three digits of the cable box code listed on page 26 of this manual for your VCR does not turn on after set-up, repeat steps 2, 3 and 4, but try the first one of the other codes RETURN listed for... your TV's remote control. 4 Using the number buttons on your remote control, enter three digits of the VCR code listed on page 25 of this manual for your remote is set up correctly. If your brand of VCR. Note on if your brand of VCR. RETURN FAV.CH AUTO PROG. If...

Owners Instructions
Page 24
... your TV's remote control. 4 Using the number buttons on your remote control, enter three digits of the STB code listed on page 26 of this manual for your brand of DVD. ADD/DEL English - 24 RETURN Continued... FAV.CH AUTO PROG. If no other codes are listed, try one of the... your TV's remote control. 4 Using the number buttons on your remote control, enter three digits of the DVD code listed on page 27 of this manual for your brand of STB. Make sure you enter three digits of the code, even if the first digit is a "0". (If more than one code...
... your TV's remote control. 4 Using the number buttons on your remote control, enter three digits of the STB code listed on page 26 of this manual for your brand of DVD. ADD/DEL English - 24 RETURN Continued... FAV.CH AUTO PROG. If no other codes are listed, try one of the... your TV's remote control. 4 Using the number buttons on your remote control, enter three digits of the DVD code listed on page 27 of this manual for your brand of STB. Make sure you enter three digits of the code, even if the first digit is a "0". (If more than one code...
Owners Instructions
Page 46
... Enter Return T V Name ▲ Air 6 A ▼ Air 7 Air 9 Air 11 Air 13 ▼ Move Clear Clear Clear Clear Clear Adjust Return Use fine tuning to manually adjust a particular channel for optimal reception. 1 Press the MENU button to select Reset, then press the ENTER button. To reset the fine tuning setting, press...
... Enter Return T V Name ▲ Air 6 A ▼ Air 7 Air 9 Air 11 Air 13 ▼ Move Clear Clear Clear Clear Clear Adjust Return Use fine tuning to manually adjust a particular channel for optimal reception. 1 Press the MENU button to select Reset, then press the ENTER button. To reset the fine tuning setting, press...
Owners Instructions
Page 48
... the ▲ or ▼ button to select Clock Set, then press the ENTER button. Press the ▲ or ▼ button to select Manual, then press the ENTER button. 4 Press the ▲ or ▼ button to select Setup, then press the ENTER button. Press the EXIT button... Day, Year, Hour, and Minute directly by pressing the ▲ or ▼ button, then press the ENTER button. Move Enter Return T V Clock Clock Mode : Manual ► Clock Set ► Time Zone ► DST : Off ► Move Enter Return T V Clock Set Set current date and time. Month ▲ 7 ...
... the ▲ or ▼ button to select Clock Set, then press the ENTER button. Press the ▲ or ▼ button to select Manual, then press the ENTER button. 4 Press the ▲ or ▼ button to select Setup, then press the ENTER button. Press the EXIT button... Day, Year, Hour, and Minute directly by pressing the ▲ or ▼ button, then press the ENTER button. Move Enter Return T V Clock Clock Mode : Manual ► Clock Set ► Time Zone ► DST : Off ► Move Enter Return T V Clock Set Set current date and time. Month ▲ 7 ...

Owners Instructions
Page 49
If this occurs, set the time manually. ➢ Antenna or Cable must be connected in which you are receiving a digital signal. 1 Press the MENU button to select Auto, then press the ENTER ...
If this occurs, set the time manually. ➢ Antenna or Cable must be connected in which you are receiving a digital signal. 1 Press the MENU button to select Auto, then press the ENTER ...
Owners Instructions
Page 75
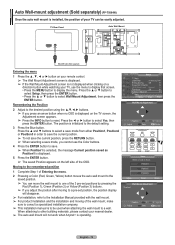
...direction button while watching your nearest dealer. ➢ The auto wall mount will disappear. ➢ For installation, refer to the Installation Manual provided with the wall mount. ➢ For product installation and the installation and moving of the wall mount, make sure to consult... a specialized installation company. ➢ This installation manual is to be easily adjusted. Press the ◄ or ► button to the default setting. 3 Press the Blue button. Position1 ...
...direction button while watching your nearest dealer. ➢ The auto wall mount will disappear. ➢ For installation, refer to the Installation Manual provided with the wall mount. ➢ For product installation and the installation and moving of the wall mount, make sure to consult... a specialized installation company. ➢ This installation manual is to be easily adjusted. Press the ◄ or ► button to the default setting. 3 Press the Blue button. Position1 ...

Owners Instructions
Page 76
... installation instructions. ➢ Our 57" and 63" models do not comply with the VESA standard screw specifications, the length of accidents. ➢ Samsung is not liable for product damage or personal injury when a non-VESA or non-specified wall mount is turned on their specifications. ➢ Do... use screws longer than the standard dimension, as shown in the table above. ➢ When purchasing our wall mount kit, a detailed installation manual and all parts necessary for this model. ➢ Do not exceed 15 degrees tilt when mounting this may result in severe personal injury...
... installation instructions. ➢ Our 57" and 63" models do not comply with the VESA standard screw specifications, the length of accidents. ➢ Samsung is not liable for product damage or personal injury when a non-VESA or non-specified wall mount is turned on their specifications. ➢ Do... use screws longer than the standard dimension, as shown in the table above. ➢ When purchasing our wall mount kit, a detailed installation manual and all parts necessary for this model. ➢ Do not exceed 15 degrees tilt when mounting this may result in severe personal injury...


