
Owners Instructions
Page 3
... maximum repair times, exchanges or replacements, accessories, options, upgrades, or consumables. The above described warranty repairs must be distorted by a SAMSUNG Authorized Service Center. Do not place AV devices such as DVD players and cable/satellite boxes are any object on or insert anything into the holes of the top of another Wireless TV. Do not turn the power off before moving the Wireless Home...
... maximum repair times, exchanges or replacements, accessories, options, upgrades, or consumables. The above described warranty repairs must be distorted by a SAMSUNG Authorized Service Center. Do not place AV devices such as DVD players and cable/satellite boxes are any object on or insert anything into the holes of the top of another Wireless TV. Do not turn the power off before moving the Wireless Home...
Owners Instructions
Page 6
...; Using Automatic Picture Settings 29 ■ Digital Noise Reduction 30 ■ Changing the Screen Size 31 ■ Making Detailed Picture Settings 32 ■ Active Color 33 ■ DNIe (Digital Natural Image engine 33 ■ Selecting the Film Mode 34 ■ Setting the Blue Screen Mode 34 ■ Setting the HDMI Black Level 34 ■ Viewing Picture-in 55 ■ Reducing the Effects of the Sub (PIP) Picture ......... 40 ■ Choosing a Digital Sound Format (Dolby Digital or PCM 41 Channel Control...
...; Using Automatic Picture Settings 29 ■ Digital Noise Reduction 30 ■ Changing the Screen Size 31 ■ Making Detailed Picture Settings 32 ■ Active Color 33 ■ DNIe (Digital Natural Image engine 33 ■ Selecting the Film Mode 34 ■ Setting the Blue Screen Mode 34 ■ Setting the HDMI Black Level 34 ■ Viewing Picture-in 55 ■ Reducing the Effects of the Sub (PIP) Picture ......... 40 ■ Choosing a Digital Sound Format (Dolby Digital or PCM 41 Channel Control...
Owners Instructions
Page 7
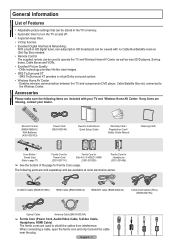
... parts are sold separately and are included with no Cable Box/Satellite receiver (Set-Top Box) needed. • Remote Control The supplied remote can be used to shield the cables from interference. When connecting a cable, open the ferrite core and clip it around the cable near the plug. RETURN FAV.CH Remote Control (BN59-00655A) / AAA Batteries (4301-000103) Power Cord (3903-000144) Owner's Instructions / Quick Setup Guide Warranty Card / Registration Card / Safety Guide Manual Cleaning Cloth Cover-Bottom / Screws...
... parts are sold separately and are included with no Cable Box/Satellite receiver (Set-Top Box) needed. • Remote Control The supplied remote can be used to shield the cables from interference. When connecting a cable, open the ferrite core and clip it around the cable near the plug. RETURN FAV.CH Remote Control (BN59-00655A) / AAA Batteries (4301-000103) Power Cord (3903-000144) Owner's Instructions / Quick Setup Guide Warranty Card / Registration Card / Safety Guide Manual Cleaning Cloth Cover-Bottom / Screws...
Owners Instructions
Page 9
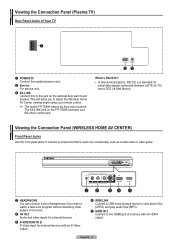
... watch a television program without disturbing other people in the room. 2 AV IN 2 Audio and video inputs for external devices. 3 S-VIDEO(AV IN 2) S-Video input for serial data signals connected between a DTE (ie TV) and a DCE (ie Wall Mount). Viewing the Connection Panel (Plasma TV) Rear Panel Jacks of Your TV 1 POWER IN Connect the supplied power cord. 2 Service For service only. 3 EX-LINK Connect this to adjust the Wireless Home AV Center viewing angle using your remote control. ➢ The model FP-T5894 cannot be Auto wall mounted.
... watch a television program without disturbing other people in the room. 2 AV IN 2 Audio and video inputs for external devices. 3 S-VIDEO(AV IN 2) S-Video input for serial data signals connected between a DTE (ie TV) and a DCE (ie Wall Mount). Viewing the Connection Panel (Plasma TV) Rear Panel Jacks of Your TV 1 POWER IN Connect the supplied power cord. 2 Service For service only. 3 EX-LINK Connect this to adjust the Wireless Home AV Center viewing angle using your remote control. ➢ The model FP-T5894 cannot be Auto wall mounted.

Owners Instructions
Page 10
... have any controls or buttons (ie Power). When using an optional HDMI/DVI adapter, the DVI analog audio inputs on the model. 1 ANT 1 IN(AIR)/ANT 2 IN(CABLE) Uses a 75Ω Coaxial connector for an Air/Cable Network. 2 HDMI IN 1, 2 Connect to the HDMI jack of an external device. 4 AUDIO OUT (R/L) Audio outputs to external devices. 5 AV IN 1 Video and audio inputs for external devices. 6 SERVICE For service only. 7 COMPONENT IN Component video (Y/PB/PR) and audio (R-AUDIO-L) inputs. 8 DIGITAL AUDIO OUT (OPTICAL) Connect to the DVI audio output jack...
... have any controls or buttons (ie Power). When using an optional HDMI/DVI adapter, the DVI analog audio inputs on the model. 1 ANT 1 IN(AIR)/ANT 2 IN(CABLE) Uses a 75Ω Coaxial connector for an Air/Cable Network. 2 HDMI IN 1, 2 Connect to the HDMI jack of an external device. 4 AUDIO OUT (R/L) Audio outputs to external devices. 5 AV IN 1 Video and audio inputs for external devices. 6 SERVICE For service only. 7 COMPONENT IN Component video (Y/PB/PR) and audio (R-AUDIO-L) inputs. 8 DIGITAL AUDIO OUT (OPTICAL) Connect to the DVI audio output jack...
Owners Instructions
Page 11
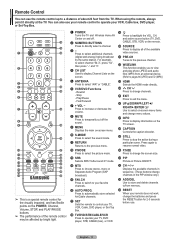
... remote does not work, change channels. n RESET When your VCR, Cable box, DVD player, or Set-Top Box. English - 11 You can use the remote control up to directly select a channel. 3 - RETURN Returns to the previous menu. @ P.MODE Press to select the picture mode. # SRS Selects SRS TruSurround XT mode. $ MTS Press to choose stereo, mono or Separate Audio Program (SAP broadcast). % FAV.CH Press to switch to select on and off the sound. 9 MENU Displays...
... remote does not work, change channels. n RESET When your VCR, Cable box, DVD player, or Set-Top Box. English - 11 You can use the remote control up to directly select a channel. 3 - RETURN Returns to the previous menu. @ P.MODE Press to select the picture mode. # SRS Selects SRS TruSurround XT mode. $ MTS Press to choose stereo, mono or Separate Audio Program (SAP broadcast). % FAV.CH Press to switch to select on and off the sound. 9 MENU Displays...
Owners Instructions
Page 14
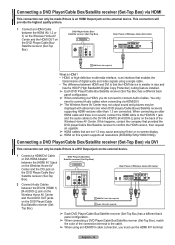
...(Set-Top Box) Rear Panel of the Wireless Home AV Center. DVD Player/Cable Box/ Satellite receiver (Set-Top Box) Rear Panel of digital audio and video signals using an HDMI/DVI cable connection, you do not need to connect Audio cables when connecting via HDMI/DVI. ➢ The Wireless Home AV Center may not output sound and pictures may cause annoying flicker or no sound, connect the HDMI cable to the HDMI IN 1 jack and the audio cables to the DVI IN (HDMI1) [R-AUDIO-L] jacks on the DVD Player/Cable Box/Satellite receiver (SetTop Box). 1 HDMI/DVI Cable (Not supplied) 2 Audio Cable...
...(Set-Top Box) Rear Panel of the Wireless Home AV Center. DVD Player/Cable Box/ Satellite receiver (Set-Top Box) Rear Panel of digital audio and video signals using an HDMI/DVI cable connection, you do not need to connect Audio cables when connecting via HDMI/DVI. ➢ The Wireless Home AV Center may not output sound and pictures may cause annoying flicker or no sound, connect the HDMI cable to the HDMI IN 1 jack and the audio cables to the DVI IN (HDMI1) [R-AUDIO-L] jacks on the DVD Player/Cable Box/Satellite receiver (SetTop Box). 1 HDMI/DVI Cable (Not supplied) 2 Audio Cable...
Owners Instructions
Page 17
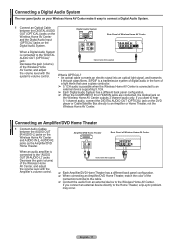
.../DVD Home Theater, match the color of the Wireless Home AV Center, and adjust the volume level with the Amplifier's volume control. If you want to hear 5.1 channel audio, connect the DIGITAL AUDIO OUT (OPTICAL) jack on the DVD player or Cable/Satellite Box directly to connect a Digital Audio System. 1 Connect an Optical Cable between the AUDIO OUT [R-AUDIO-L] jacks on the Wireless Home AV Center and AUDIO IN [L-AUDIO-R] jacks on the Digital Audio System. English - 17 Connecting a Digital Audio System The rear panel...
.../DVD Home Theater, match the color of the Wireless Home AV Center, and adjust the volume level with the Amplifier's volume control. If you want to hear 5.1 channel audio, connect the DIGITAL AUDIO OUT (OPTICAL) jack on the DVD player or Cable/Satellite Box directly to connect a Digital Audio System. 1 Connect an Optical Cable between the AUDIO OUT [R-AUDIO-L] jacks on the Wireless Home AV Center and AUDIO IN [L-AUDIO-R] jacks on the Digital Audio System. English - 17 Connecting a Digital Audio System The rear panel...
Owners Instructions
Page 18
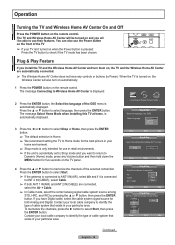
... Enter Skip Plug & Play Selects a cable signal type for use in your home environment. ➢ Shop mode is automatically displayed. If you wil l be turned on and you have any Volume button and then hold down the MENU button for both ANT 1 IN(AIR) and ANT 2 IN(CABLE) are automatically connected. ➢ The Wireless Home AV Center does not have Digital cable, select the cable system signal source for five...
... Enter Skip Plug & Play Selects a cable signal type for use in your home environment. ➢ Shop mode is automatically displayed. If you wil l be turned on and you have any Volume button and then hold down the MENU button for both ANT 1 IN(AIR) and ANT 2 IN(CABLE) are automatically connected. ➢ The Wireless Home AV Center does not have Digital cable, select the cable system signal source for five...
Owners Instructions
Page 22
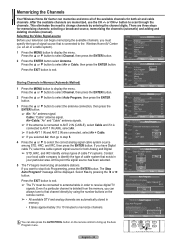
... the ENTER button select Antenna. Press the ▲ or ▼ button to display the menu. Press the ▲ or ▼ button to bring up the Auto Program menu. At this point the signal source has been selected. 5 The TV begins memorizing all of signal source that channel directly by using the number buttons on the remote control to select Channel, then press the ENTER button. Move Enter Return T V Auto Program Select the cable system.
... the ENTER button select Antenna. Press the ▲ or ▼ button to display the menu. Press the ▲ or ▼ button to bring up the Auto Program menu. At this point the signal source has been selected. 5 The TV begins memorizing all of signal source that channel directly by using the number buttons on the remote control to select Channel, then press the ENTER button. Move Enter Return T V Auto Program Select the cable system.
Owners Instructions
Page 31
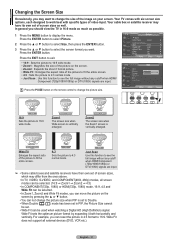
... the P.SIZE button on the remote control to change the size of the picture to fit the entire screen. • 4:3 : Sets the picture to 4:3 normal mode. • Just Scan : Use this function to see the full image without any cutoff when HDMI/ Component (720p/1080i/1080p) or DTV(1080i) signals are input. ➢ • Some cable boxes and satellite receivers have its own set . • Wide Fit can reset the picture in 4:3 format to...
... the P.SIZE button on the remote control to change the size of the picture to fit the entire screen. • 4:3 : Sets the picture to 4:3 normal mode. • Just Scan : Use this function to see the full image without any cutoff when HDMI/ Component (720p/1080i/1080p) or DTV(1080i) signals are input. ➢ • Some cable boxes and satellite receivers have its own set . • Wide Fit can reset the picture in 4:3 format to...
Owners Instructions
Page 32
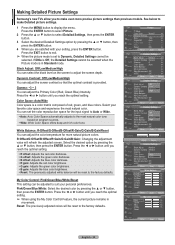
.../B-Gain: Changing the adjustment value will be adjusted to suit your personal preferences. Press the ◄ or ► button until you reach the optimal setting. Reset: The previously adjusted colors will be selected when the Picture mode is in movement. If DNIe is provided. Black Adjust: Off/Low/Medium/High You can adjust the Primary Color (Red, Green Blue) Intensity. My Color Control: Pink/Green/Blue/White/Reset This setting can adjust the screen contrast so...
.../B-Gain: Changing the adjustment value will be adjusted to suit your personal preferences. Press the ◄ or ► button until you reach the optimal setting. Reset: The previously adjusted colors will be selected when the Picture mode is in movement. If DNIe is provided. Black Adjust: Off/Low/Medium/High You can adjust the Primary Color (Red, Green Blue) Intensity. My Color Control: Pink/Green/Blue/White/Reset This setting can adjust the screen contrast so...
Owners Instructions
Page 33
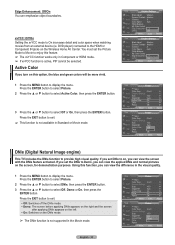
... view the screen with the DNIe feature activated. Press the ENTER button to select Picture. 2 Press the ▲ or ▼ button to select Active Color, then press the ENTER button. 3 Press the ▲ or ▼ button to provide high visual quality. You must set the DNIe to Demo, you turn on the Wireless Home AV Center. If you can emphasize object boundaries. DVD player) connected...
... view the screen with the DNIe feature activated. Press the ENTER button to select Picture. 2 Press the ▲ or ▼ button to select Active Color, then press the ENTER button. 3 Press the ▲ or ▼ button to provide high visual quality. You must set the DNIe to Demo, you turn on the Wireless Home AV Center. If you can emphasize object boundaries. DVD player) connected...
Owners Instructions
Page 34
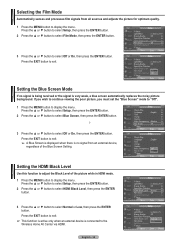
... Screen Burn Protection HDMI Black Level : NNoormrmaal l Film Mode : OLfof w Wall-Mount Adjustment ▼ More Move Enter Return Selecting the Film Mode Automatically senses and processes film signals from an external device, regardless of the picture while in HDMI mode. 1 Press the MENU button to display the menu. If you wish to continue viewing the poor picture, you must set the "Blue Screen" mode to "Off". 1 Press the MENU button to display the menu. T V Setup Plug & Play ► Language : English ► Time...
... Screen Burn Protection HDMI Black Level : NNoormrmaal l Film Mode : OLfof w Wall-Mount Adjustment ▼ More Move Enter Return Selecting the Film Mode Automatically senses and processes film signals from an external device, regardless of the picture while in HDMI mode. 1 Press the MENU button to display the menu. If you wish to continue viewing the poor picture, you must set the "Blue Screen" mode to "Off". 1 Press the MENU button to display the menu. T V Setup Plug & Play ► Language : English ► Time...
Owners Instructions
Page 41
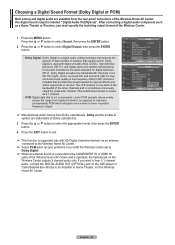
...-Track Options Auto Volume : Off Internal Mute : Off Sound Select : MDaoinlby Digital Digital Output : DPoClbMy Digital Move Enter Return ➢ Manufactured under license from the rear-panel connectors of the Wireless Home AV Center. The LFE channel is one-tenth of the bandwidth of the other channels and is labeled " Digital Audio Out(Optical)". English - 41 Dolby Digital is used with HD Digital channels received via an antenna connected to the Wireless Home...
...-Track Options Auto Volume : Off Internal Mute : Off Sound Select : MDaoinlby Digital Digital Output : DPoClbMy Digital Move Enter Return ➢ Manufactured under license from the rear-panel connectors of the Wireless Home AV Center. The LFE channel is one-tenth of the bandwidth of the other channels and is labeled " Digital Audio Out(Optical)". English - 41 Dolby Digital is used with HD Digital channels received via an antenna connected to the Wireless Home...
Owners Instructions
Page 63
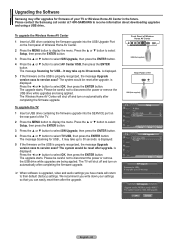
...; button to display the menu. is displayed. The system would be careful not to receive information about downloading upgrades and using a USB drive.. To upgrade the Wireless Home AV Center 1 Insert a USB drive containing the firmware upgrade into the SERVICE port on the USB is properly recognized, the message Upgrade version xxxx to 30 seconds. The message Scanning for USB... The system would be reset after upgrade. Please be careful not to display...
...; button to display the menu. is displayed. The system would be careful not to receive information about downloading upgrades and using a USB drive.. To upgrade the Wireless Home AV Center 1 Insert a USB drive containing the firmware upgrade into the SERVICE port on the USB is properly recognized, the message Upgrade version xxxx to 30 seconds. The message Scanning for USB... The system would be reset after upgrade. Please be careful not to display...
Owners Instructions
Page 64
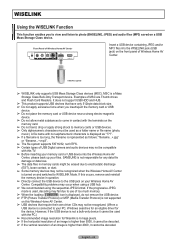
...; If the vertical resolution of Wireless Home AV Center. English - 64 Compatibility problems may not be recognized. (When a USB device is turned on and switched to your PC, Windows searches for an eligible driver for any data file damage or data loss. ➢ The data files in question. ➢ Directly connect the USB device to the USB jack on your Wireless Home AV...
...; If the vertical resolution of Wireless Home AV Center. English - 64 Compatibility problems may not be recognized. (When a USB device is turned on and switched to your PC, Windows searches for an eligible driver for any data file damage or data loss. ➢ The data files in question. ➢ Directly connect the USB device to the USB jack on your Wireless Home AV...
Owners Instructions
Page 74
Picture rolls vertically. Remote control malfunctions Digital broadcasting screen problem. See Page 3 WIRELESS HOME AV CENTER installation guide. The picture may be longer than that the "+" and "-" ends of the batteries are inserted correctly. Press the SOURCE button. Check the antenna connections. Then, adjust the TV volume accordingly. Please check the digital signal strength and input antenna. The image is turned on the remote control means the selected channel is too large or too small. Adjust the Brightness...
Picture rolls vertically. Remote control malfunctions Digital broadcasting screen problem. See Page 3 WIRELESS HOME AV CENTER installation guide. The picture may be longer than that the "+" and "-" ends of the batteries are inserted correctly. Press the SOURCE button. Check the antenna connections. Then, adjust the TV volume accordingly. Please check the digital signal strength and input antenna. The image is turned on the remote control means the selected channel is too large or too small. Adjust the Brightness...
Owners Instructions
Page 75
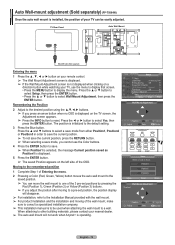
... button to reset. TV Rear Panel Auto Wall-Mount EX-LINK Cable (Not supplied) Entering the menu 1 Press the or ► button on your remote control. ➢ The Wall Mount Adjustment screen is displayed. ➢ If the Wall Mount Adjustment screen is not displayed when clicking on the left side of the OSD. Auto Wall-mount adjustment (Sold separately) (FP-T5094W) Once the auto wall mount is installed, the position of your TV can move the wall mount to one of the 3 pre-set...
... button to reset. TV Rear Panel Auto Wall-Mount EX-LINK Cable (Not supplied) Entering the menu 1 Press the or ► button on your remote control. ➢ The Wall Mount Adjustment screen is displayed. ➢ If the Wall Mount Adjustment screen is not displayed when clicking on the left side of the OSD. Auto Wall-mount adjustment (Sold separately) (FP-T5094W) Once the auto wall mount is installed, the position of your TV can move the wall mount to one of the 3 pre-set...
Owners Instructions
Page 77
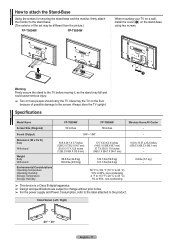
Always store the TV upright. Specifications Model Name Screen Size (Diagonal) FP-T5094W 50 inches FP-T5894W 58 inches Wireless Home AV Center - Stand Swivel (Left / Right) -20° ~ 20° English - 77 How to attach the Stand-Base Using the screws for securing the stand base and the monitor, firmly attach the monitor to the product. Sound (Output) Dimension (W x H x D) Body With stand Weight Body With stand Environmental Considerations Operating Temperature Operating Humidity Storage...
Always store the TV upright. Specifications Model Name Screen Size (Diagonal) FP-T5094W 50 inches FP-T5894W 58 inches Wireless Home AV Center - Stand Swivel (Left / Right) -20° ~ 20° English - 77 How to attach the Stand-Base Using the screws for securing the stand base and the monitor, firmly attach the monitor to the product. Sound (Output) Dimension (W x H x D) Body With stand Weight Body With stand Environmental Considerations Operating Temperature Operating Humidity Storage...


