
User Manual
Page 3
...button 11 ■Cradle 11 ■Self-timer lamp 12 ■Camera Status Lamp 12 ■Mode icon 12 ●Connecting to a Power Source 13 ■Using the SAC-41 14 ■Using the battery 18 ■Removing the battery 18 ●Instructions on how to use the memory card 19 ●...;Inserting the memory card 21 ●Removing the memory card 21 ●When Using the Camera for the First Time 22 RECORDING ●LCD ...
...button 11 ■Cradle 11 ■Self-timer lamp 12 ■Camera Status Lamp 12 ■Mode icon 12 ●Connecting to a Power Source 13 ■Using the SAC-41 14 ■Using the battery 18 ■Removing the battery 18 ●Instructions on how to use the memory card 19 ●...;Inserting the memory card 21 ●Removing the memory card 21 ●When Using the Camera for the First Time 22 RECORDING ●LCD ...
User Manual
Page 5
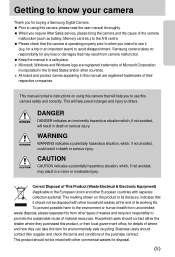
...not avoided, will help you to use it (e.g. Getting to know your camera Thank you for buying a Samsung Digital Camera. ● Prior to using this camera that will help prevent danger and injury to use this camera safely and correctly. Microsoft, Windows and Windows logo are registered trademarks of ...may result in the European Union and other European countries with other types of the camera malfunction (such as battery, Memory card etc.) to the A/S centre. ● Please check that the camera is operating properly prior to when you require After Sales service, please bring the...
...not avoided, will help you to use it (e.g. Getting to know your camera Thank you for buying a Samsung Digital Camera. ● Prior to using this camera that will help prevent danger and injury to use this camera safely and correctly. Microsoft, Windows and Windows logo are registered trademarks of ...may result in the European Union and other European countries with other types of the camera malfunction (such as battery, Memory card etc.) to the A/S centre. ● Please check that the camera is operating properly prior to when you require After Sales service, please bring the...

User Manual
Page 6
... may result in any form of extreme variances in places subject to your dealer or Samsung Camera Service centre. Should this be carried out by your dealer or Samsung Camera Service centre. ■ Please do not use this product in close proximity to flammable or explosive gases, as... a fire or electric shock. ■ Do not operate this product and accessories out of reach of injury from the camera's moving parts. ■ battery and camera may adversely affect the camera's internal components and could pose a risk of electric shock. If an accident should be the case, allow the...
... may result in any form of extreme variances in places subject to your dealer or Samsung Camera Service centre. Should this be carried out by your dealer or Samsung Camera Service centre. ■ Please do not use this product in close proximity to flammable or explosive gases, as... a fire or electric shock. ■ Do not operate this product and accessories out of reach of injury from the camera's moving parts. ■ battery and camera may adversely affect the camera's internal components and could pose a risk of electric shock. If an accident should be the case, allow the...
User Manual
Page 7
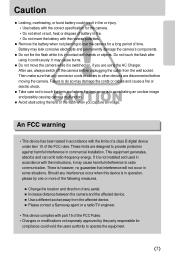
...direction of any connector cords or cables to other devices are disconnected before unplugging the cable from the affected device. ■ Please contact a Samsung agent or a radio/TV engineer. •This device complies with part 15 of the FCC Rules. •Changes or modifications not expressly ...cover is to operate the equipment. 《7》 After use the camera for the camera. •Do not short circuit, heat or dispose of battery in fire. •Do not insert the battery with the limits of a class B digital device under item 15 of the FCC rules. This equipment generates, ...
...direction of any connector cords or cables to other devices are disconnected before unplugging the cable from the affected device. ■ Please contact a Samsung agent or a radio/TV engineer. •This device complies with part 15 of the FCC Rules. •Changes or modifications not expressly ...cover is to operate the equipment. 《7》 After use the camera for the camera. •Do not short circuit, heat or dispose of battery in fire. •Do not insert the battery with the limits of a class B digital device under item 15 of the FCC rules. This equipment generates, ...
User Manual
Page 8
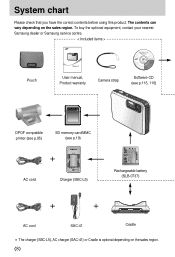
...you have the correct contents before using this product. To buy the optional equipment, contact your nearest Samsung dealer or Samsung service centre. < Included items > Pouch User manual, Product warranty Camera strap Software CD (see p.115, 116) DPOF compatible printer (see p.85) SD memory card/...MMC (see p.19) AC cord Charger (SBC-L5) Rechargeable battery (SLB-0737) AC cord SAC-41 Cradle ※ The ...
...you have the correct contents before using this product. To buy the optional equipment, contact your nearest Samsung dealer or Samsung service centre. < Included items > Pouch User manual, Product warranty Camera strap Software CD (see p.115, 116) DPOF compatible printer (see p.85) SD memory card/...MMC (see p.19) AC cord Charger (SBC-L5) Rechargeable battery (SLB-0737) AC cord SAC-41 Cradle ※ The ...

User Manual
Page 11
Identification of features Bottom / 5-function button Memory card slot Battery chamber Battery holder Battery chamber cover Voice memo/ Voice recording/ UP button MENU/ OK button FLASH/ LEFT button SELF-TIMER/ RIGHT button Macro / DOWN button Play & Pause button Cradle ■ You can recharge your rechargeable battery, transfer a captured image to print, and download images with the cradle. (Refer to page 14, 89 and 127) ● Top Camera connection terminal ● Back DC connection terminal USB port AV connection terminal 《11》
Identification of features Bottom / 5-function button Memory card slot Battery chamber Battery holder Battery chamber cover Voice memo/ Voice recording/ UP button MENU/ OK button FLASH/ LEFT button SELF-TIMER/ RIGHT button Macro / DOWN button Play & Pause button Cradle ■ You can recharge your rechargeable battery, transfer a captured image to print, and download images with the cradle. (Refer to page 14, 89 and 127) ● Top Camera connection terminal ● Back DC connection terminal USB port AV connection terminal 《11》
User Manual
Page 13
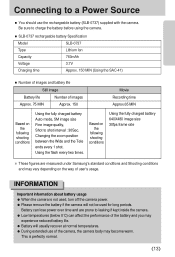
... may vary depending on the way of user's usage. This is not used for long periods. INFORMATION Important information about battery usage ● When the camera is perfectly normal. 《13》 Changing the zoom position between the Wide and the Tele ends every 1 shot. Using the ...flash every two times. Connecting to leaking if kept inside the camera. ● Low temperatures (below 0˚C) can lose power over time and are measured under Samsung's standard conditions and Shooting conditions and may become warm.
... may vary depending on the way of user's usage. This is not used for long periods. INFORMATION Important information about battery usage ● When the camera is perfectly normal. 《13》 Changing the zoom position between the Wide and the Tele ends every 1 shot. Using the ...flash every two times. Connecting to leaking if kept inside the camera. ● Low temperatures (below 0˚C) can lose power over time and are measured under Samsung's standard conditions and Shooting conditions and may become warm.
User Manual
Page 14
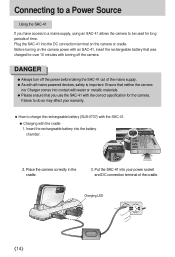
...41 If you use the SAC-41 with the correct specification for the camera. Ensure that neither the camera nor Charger comes into the DC connection terminal on the camera power with an SAC-41, insert the rechargeable battery that you have access to a mains supply, using an SAC-41 allows... the camera to charge the rechargeable battery (SLB-0737) with the SAC-41. ● Charging with the cradle 1. Place the camera correctly in the cradle. ...
...41 If you use the SAC-41 with the correct specification for the camera. Ensure that neither the camera nor Charger comes into the DC connection terminal on the camera power with an SAC-41, insert the rechargeable battery that you have access to a mains supply, using an SAC-41 allows... the camera to charge the rechargeable battery (SLB-0737) with the SAC-41. ● Charging with the cradle 1. Place the camera correctly in the cradle. ...
User Manual
Page 15
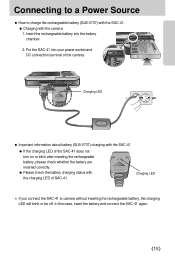
...not turn on or blink after inserting the rechargeable battery, please check whether the battery are inserted correctly. ● Please check the battery charging status with the camera 1. Charging LED ※ If you connect the SAC-41 to charge the rechargeable battery (SLB-0737) with the SAC-41. ●...; Charging with the charging LED of the camera. In this case, insert the battery and connect the SAC-41 again. 《15》 Put the SAC-41 into the battery chamber. 2. Insert the rechargeable battery into your power socket and DC connection terminal of SAC-41...
...not turn on or blink after inserting the rechargeable battery, please check whether the battery are inserted correctly. ● Please check the battery charging status with the camera 1. Charging LED ※ If you connect the SAC-41 to charge the rechargeable battery (SLB-0737) with the SAC-41. ●...; Charging with the charging LED of the camera. In this case, insert the battery and connect the SAC-41 again. 《15》 Put the SAC-41 into the battery chamber. 2. Insert the rechargeable battery into your power socket and DC connection terminal of SAC-41...

User Manual
Page 16
...turned off when you charge it , do not turn the camera off ) - Using the cradle : About 150MIN - Charge the battery for over 10 minutes to charge it . ● If you charge the battery with the camera power on the camera at the same time. Using the SAC-41 : About ...150MIN INFORMATION Important information about the rechargeable battery. ● If you insert the fully discharged battery to use the camera. ● Do not use the flash frequently or...
...turned off when you charge it , do not turn the camera off ) - Using the cradle : About 150MIN - Charge the battery for over 10 minutes to charge it . ● If you charge the battery with the camera power on the camera at the same time. Using the SAC-41 : About ...150MIN INFORMATION Important information about the rechargeable battery. ● If you insert the fully discharged battery to use the camera. ● Do not use the flash frequently or...
User Manual
Page 17
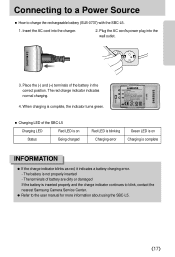
... blinking Charging error Green LED is on Charging is inserted properly and the charge indicator continues to blink, contact the nearest Samsung Camera Service Center. ● Refer to charge the rechargeable battery (SLB-0737) with the SBC-L5. 1. Plug the AC cord's power plug into the charger. 2. Connecting to a Power Source ■ How...
... blinking Charging error Green LED is on Charging is inserted properly and the charge indicator continues to blink, contact the nearest Samsung Camera Service Center. ● Refer to charge the rechargeable battery (SLB-0737) with the SBC-L5. 1. Plug the AC cord's power plug into the charger. 2. Connecting to a Power Source ■ How...
User Manual
Page 18
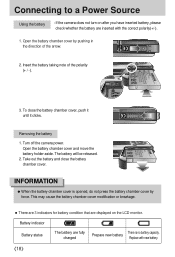
... battery chamber cover. Removing the battery 1. Open the battery chamber cover and move the battery holder aside. charged Replace with the correct polarity(+/-). 1. The battery will be released. 2. Battery indicator Battery status The battery are inserted with new battery. 《18》 Insert the battery taking note of the arrow. 2. Turn off the camera power. Take out the battery and close the battery...
... battery chamber cover. Removing the battery 1. Open the battery chamber cover and move the battery holder aside. charged Replace with the correct polarity(+/-). 1. The battery will be released. 2. Battery indicator Battery status The battery are inserted with new battery. 《18》 Insert the battery taking note of the arrow. 2. Turn off the camera power. Take out the battery and close the battery...
User Manual
Page 21
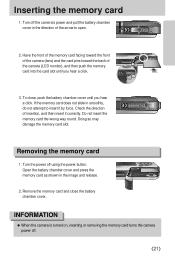
... a click. 3. Doing so may damage the memory card slot. Open the battery chamber cover and press the memory card as shown in smoothly, do not attempt to open. 2. Turn off the camera's power and pull the battery chamber cover in the direction of insertion, and then insert it by force. ...To close the battery chamber cover. If the memory card does not slide in the image and release. 2....
... a click. 3. Doing so may damage the memory card slot. Open the battery chamber cover and press the memory card as shown in smoothly, do not attempt to open. 2. Turn off the camera's power and pull the battery chamber cover in the direction of insertion, and then insert it by force. ...To close the battery chamber cover. If the memory card does not slide in the image and release. 2....

User Manual
Page 22
...T.Chinese, Japanese, Russian, Portuguese, Dutch, Danish, Swedish, Finnish, Thai, BAHASA(MALAY/ INDONESIAN), Arabic, Hungarian, Czech and Polish. ● Even if the camera is restarted, the language setting will be displayed to the [Date&Time] main menu if the cursor is turned on for the First Time ■...; Charge the rechargeable battery fully before using this camera. ● Setting up the date, time and date type 1. Setup Date&Time Language Back:◀ ENGLISH 한국어...
...T.Chinese, Japanese, Russian, Portuguese, Dutch, Danish, Swedish, Finnish, Thai, BAHASA(MALAY/ INDONESIAN), Arabic, Hungarian, Czech and Polish. ● Even if the camera is restarted, the language setting will be displayed to the [Date&Time] main menu if the cursor is turned on for the First Time ■...; Charge the rechargeable battery fully before using this camera. ● Setting up the date, time and date type 1. Setup Date&Time Language Back:◀ ENGLISH 한국어...
User Manual
Page 23
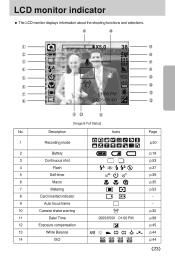
Description Icons 1 Recording mode 2 Battery 3 Continuous shot 4 Flash 5 Self-timer 6 Macro 7 Metering 8 Card inserted indicator 9 Auto focus frame 10 Camera shake warning 11 Date/ Time 12 Exposure compensation 13 White Balance 14 ISO 2005/05/01 01:00 PM Page p.50 p.18 p.53 p.37 p.39 p.35 p.53 p.30 p.98 p.45 p.44 p.44 《23》 LCD monitor indicator ■ The LCD monitor displays information about the shooting functions and selections. ⑳ ⑨⑩ ⑪ [Image & Full Status] No.
Description Icons 1 Recording mode 2 Battery 3 Continuous shot 4 Flash 5 Self-timer 6 Macro 7 Metering 8 Card inserted indicator 9 Auto focus frame 10 Camera shake warning 11 Date/ Time 12 Exposure compensation 13 White Balance 14 ISO 2005/05/01 01:00 PM Page p.50 p.18 p.53 p.37 p.39 p.35 p.53 p.30 p.98 p.45 p.44 p.44 《23》 LCD monitor indicator ■ The LCD monitor displays information about the shooting functions and selections. ⑳ ⑨⑩ ⑪ [Image & Full Status] No.
User Manual
Page 24
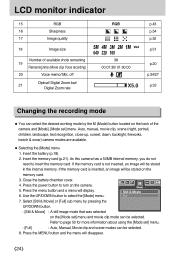
Insert the memory card (p.21). Close the battery chamber cover. 4. If the memory card is not inserted, an image will be selected. Press the power button to insert the memory card. off Optical/ Digital Zoom bar/ 21 Digital Zoom rate RGB 38 00:01:30/ 01:00:00...night, portrait, children, landscape, text recognition, close-up, sunset, dawn, backlight, fireworks, beach & snow) camera modes are available. ■ Selecting the [Mode] menu 1. Insert the battery (p.18). 2. As this camera has a 50MB internal memory, you do not need to turn on the memory card. 3. If the memory...
Insert the memory card (p.21). Close the battery chamber cover. 4. If the memory card is not inserted, an image will be selected. Press the power button to insert the memory card. off Optical/ Digital Zoom bar/ 21 Digital Zoom rate RGB 38 00:01:30/ 01:00:00...night, portrait, children, landscape, text recognition, close-up, sunset, dawn, backlight, fireworks, beach & snow) camera modes are available. ■ Selecting the [Mode] menu 1. Insert the battery (p.18). 2. As this camera has a 50MB internal memory, you do not need to turn on the memory card. 3. If the memory...
User Manual
Page 30
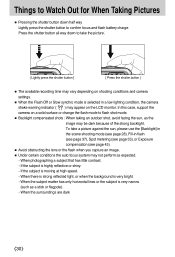
To take the picture. [ Lightly press the shutter button ] [ Press the shutter button ] ■ The available recording time may vary depending on shooting conditions and camera settings. ■ When the Flash Off or Slow synchro mode is selected in flash (see page 37), Spot metering (see page 53), or Exposure compensation (... down to take a picture against the sun, please use the [Backlight] in the scene shooting mode (see page 28), Fill-in a low lighting condition, the camera shake warning indicator ( ) may appear on a solid surface or change the flash mode to confirm focus and flash...
To take the picture. [ Lightly press the shutter button ] [ Press the shutter button ] ■ The available recording time may vary depending on shooting conditions and camera settings. ■ When the Flash Off or Slow synchro mode is selected in flash (see page 37), Spot metering (see page 53), or Exposure compensation (... down to take a picture against the sun, please use the [Backlight] in the scene shooting mode (see page 28), Fill-in a low lighting condition, the camera shake warning indicator ( ) may appear on a solid surface or change the flash mode to confirm focus and flash...
User Manual
Page 31
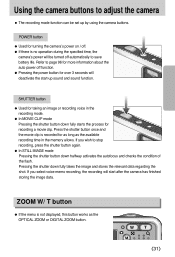
... CLIP mode Pressing the shutter button down fully starts the process for more information about the auto power off automatically to save battery life. Using the camera buttons to stop recording, press the shutter button again. ● In STILL IMAGE mode Pressing the shutter button down halfway ... button ● Used for as long as the OPTICAL ZOOM or DIGITAL ZOOM button. 《31》 SHUTTER button ● Used for over 3 seconds will start -up by using the camera buttons. If you wish to adjust the camera ■ The recording mode function can be turned off function. ...
... CLIP mode Pressing the shutter button down fully starts the process for more information about the auto power off automatically to save battery life. Using the camera buttons to stop recording, press the shutter button again. ● In STILL IMAGE mode Pressing the shutter button down halfway ... button ● Used for as long as the OPTICAL ZOOM or DIGITAL ZOOM button. 《31》 SHUTTER button ● Used for over 3 seconds will start -up by using the camera buttons. If you wish to adjust the camera ■ The recording mode function can be turned off function. ...

User Manual
Page 37
...menu is displayed on the LCD monitor, pressing the LEFT button makes the cursor shift to select a Recording mode with the exception of the battery. ● Under normal operating conditions the charging time for the flash is normally within the flash range. ● The image quality is not.... 3. Press the Flash button until the desired flash mode indicator displays on the LCD monitor, the LEFT button operates as the Flash Off. If the battery is fixed as the FLASH ( ) button. ● Selecting the flash mode 1. Use the correct flash to suit the environment. ● Flash range...
...menu is displayed on the LCD monitor, pressing the LEFT button makes the cursor shift to select a Recording mode with the exception of the battery. ● Under normal operating conditions the charging time for the flash is normally within the flash range. ● The image quality is not.... 3. Press the Flash button until the desired flash mode indicator displays on the LCD monitor, the LEFT button operates as the Flash Off. If the battery is fixed as the FLASH ( ) button. ● Selecting the flash mode 1. Use the correct flash to suit the environment. ● Flash range...

User Manual
Page 47
... exception of VOICE RECORDING mode, pressing the MENU button displays the menu on the mode you have selected. Using the LCD monitor to adjust the camera settings ■ You can use the menu on the LCD monitor to set Size (Still image) Size (Movie) Quality Sub menu... Camera working mode Page Still & Movie p.49 Full Auto Manual Movie Night Portrait Children Landscape Close up recording functions. While image data is being processed. - The ...
... exception of VOICE RECORDING mode, pressing the MENU button displays the menu on the mode you have selected. Using the LCD monitor to adjust the camera settings ■ You can use the menu on the LCD monitor to set Size (Still image) Size (Movie) Quality Sub menu... Camera working mode Page Still & Movie p.49 Full Auto Manual Movie Night Portrait Children Landscape Close up recording functions. While image data is being processed. - The ...


