
User Manual Ver.1.0 (English)
Page 13
... • Viewing files as thumbnails f 86 • Deleting all files on the memory f 88 • Viewing files as a slide show f 90 • Viewing files on a TV f 98 • Connecting your camera to a computer f 99 • Sending photos or videos via email f 120 • Using photo or video sharing websites f 122 • Adjusting sound and volume f 130 • Adjusting the brightness of the display f 131 • Changing the display language f 132 • Setting the date and time f 132...
... • Viewing files as thumbnails f 86 • Deleting all files on the memory f 88 • Viewing files as a slide show f 90 • Viewing files on a TV f 98 • Connecting your camera to a computer f 99 • Sending photos or videos via email f 120 • Using photo or video sharing websites f 122 • Adjusting sound and volume f 130 • Adjusting the brightness of the display f 131 • Changing the display language f 132 • Setting the date and time f 132...
User Manual Ver.1.0 (English)
Page 15
... red-eye 66 Using the flash ...66 Adjusting the ISO sensitivity 68 Changing the camera's focus 69 Using macro ...69 Changing the focus option 69 Adjusting the focus area 70 Using Face Detection 72 Detecting faces ...72 Capturing a smile shot 72 Detecting eye blinking 73 Tips for detecting faces 73 Adjusting brightness and color 74 Adjusting the exposure manually (EV 74 Compensating for backlighting (ACB 75 Changing the metering option 75 Selecting a White Balance setting 76 Using burst modes 78 Adjusting images...
... red-eye 66 Using the flash ...66 Adjusting the ISO sensitivity 68 Changing the camera's focus 69 Using macro ...69 Changing the focus option 69 Adjusting the focus area 70 Using Face Detection 72 Detecting faces ...72 Capturing a smile shot 72 Detecting eye blinking 73 Tips for detecting faces 73 Adjusting brightness and color 74 Adjusting the exposure manually (EV 74 Compensating for backlighting (ACB 75 Changing the metering option 75 Selecting a White Balance setting 76 Using burst modes 78 Adjusting images...
User Manual Ver.1.0 (English)
Page 16
... Playback mode 84 Starting Playback mode 84 Viewing photos ...88 Playing a video ...91 Editing a photo ...94 Resizing photos ...94 Rotating a photo ...94 Applying Smart Filter effects 95 Adjusting your photos 96 Viewing files on a TV 98 Transferring files to the computer 99 Transferring files to your Windows OS computer 99 Transferring files to your Mac OS computer 100 Using programs on a computer 101 Installing i-Launcher 101 Using i-Launcher 102 Wireless network ...107 Connecting to a WLAN and configuring network settings...
... Playback mode 84 Starting Playback mode 84 Viewing photos ...88 Playing a video ...91 Editing a photo ...94 Resizing photos ...94 Rotating a photo ...94 Applying Smart Filter effects 95 Adjusting your photos 96 Viewing files on a TV 98 Transferring files to the computer 99 Transferring files to your Windows OS computer 99 Transferring files to your Mac OS computer 100 Using programs on a computer 101 Installing i-Launcher 101 Using i-Launcher 102 Wireless network ...107 Connecting to a WLAN and configuring network settings...
User Manual Ver.1.0 (English)
Page 41
...; Set ISO sensitivity options. (p.68) focus frame appears in green. • Change the composition and half-press [Shutter] again if the focus frame appears in red. Basic functions 40 The aperture remains open longer and it may be harder to hold the camera steady long enough to capture a clear photo. • Use a tripod or set the flash option to Slow Sync or Off. Reducing camera shake Set the Digital Image...
...; Set ISO sensitivity options. (p.68) focus frame appears in green. • Change the composition and half-press [Shutter] again if the focus frame appears in red. Basic functions 40 The aperture remains open longer and it may be harder to hold the camera steady long enough to capture a clear photo. • Use a tripod or set the flash option to Slow Sync or Off. Reducing camera shake Set the Digital Image...
User Manual Ver.1.0 (English)
Page 47
... "Shooting options". (p.62) 4 Press [Shutter] to start recording. 5 Press [Shutter] again to 20 minutes in length. This mode is available only when you insert a memory card into the camera. • H.264 (MPEG-4 part10/AVC) is a high-compression video format established by the international standards organizations ISO-IEC and ITU-T. • If you use memory cards with slow writing speeds will not support high-resolution videos. The camera saves recorded videos as MP4 (H.264) files. Extended functions...
... "Shooting options". (p.62) 4 Press [Shutter] to start recording. 5 Press [Shutter] again to 20 minutes in length. This mode is available only when you insert a memory card into the camera. • H.264 (MPEG-4 part10/AVC) is a high-compression video format established by the international standards organizations ISO-IEC and ITU-T. • If you use memory cards with slow writing speeds will not support high-resolution videos. The camera saves recorded videos as MP4 (H.264) files. Extended functions...
User Manual Ver.1.0 (English)
Page 51
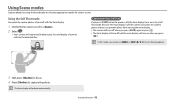
... front display turns on when you cannot use [m] or [D/c/F/t] to set shooting options. 3 Half-press [Shutter] to focus. 4 Press [Shutter] to indicate the detected face. Using the Self Shot mode Conveniently capture photos of yourself with the front display. 1 On the Home screen, scroll to . 2 Select . • Your camera will turn off when you can prevent others from viewing the main display. • The camera will turn off and the main display will...
... front display turns on when you cannot use [m] or [D/c/F/t] to set shooting options. 3 Half-press [Shutter] to focus. 4 Press [Shutter] to indicate the detected face. Using the Self Shot mode Conveniently capture photos of yourself with the front display. 1 On the Home screen, scroll to . 2 Select . • Your camera will turn off when you can prevent others from viewing the main display. • The camera will turn off and the main display will...
User Manual Ver.1.0 (English)
Page 60
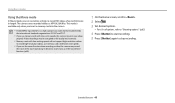
... the camera. 1 On the Home screen, scroll to create unique images. Apply a black and white effect. Extended functions 59 Using Magic modes 4 Align your videos to . 2 Select . 3 Select an effect. Using the Movie Filter mode Apply various filter effects to your subject in the frame, and then half-press [Shutter] to focus. 5 Press [Shutter] to capture a photo. • Depending on the option you select, the recording speed may change...
... the camera. 1 On the Home screen, scroll to create unique images. Apply a black and white effect. Extended functions 59 Using Magic modes 4 Align your videos to . 2 Select . 3 Select an effect. Using the Movie Filter mode Apply various filter effects to your subject in the frame, and then half-press [Shutter] to focus. 5 Press [Shutter] to capture a photo. • Depending on the option you select, the recording speed may change...
User Manual Ver.1.0 (English)
Page 63
... red-eye 66 Using the flash 66 Adjusting the ISO sensitivity 68 Changing the camera's focus 69 Using macro 69 Changing the focus option 69 Adjusting the focus area 70 Using Face Detection 72 Detecting faces 72 Capturing a smile shot 72 Detecting eye blinking 73 Tips for detecting faces 73 Adjusting brightness and color 74 Adjusting the exposure manually (EV 74 Compensating for backlighting (ACB 75 Changing the metering option 75 Selecting a White Balance setting 76 Using burst modes 78 Adjusting images...
... red-eye 66 Using the flash 66 Adjusting the ISO sensitivity 68 Changing the camera's focus 69 Using macro 69 Changing the focus option 69 Adjusting the focus area 70 Using Face Detection 72 Detecting faces 72 Capturing a smile shot 72 Detecting eye blinking 73 Tips for detecting faces 73 Adjusting brightness and color 74 Adjusting the exposure manually (EV 74 Compensating for backlighting (ACB 75 Changing the metering option 75 Selecting a White Balance setting 76 Using burst modes 78 Adjusting images...
User Manual Ver.1.0 (English)
Page 85
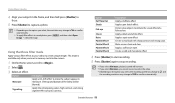
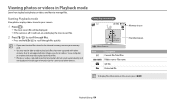
... files. Photo file information Memory in use File Information Album/Zoom In Icon Description Current file/Total files Folder name-File name GIF file Protected file To display file information on and display the most recent file. 2 Press [F/t] to scroll through files. • Press and hold [F/t] to scroll through files quickly. • If you want to view files stored in the internal memory, remove your camera. 1 Press [P]. • The most recent file will be able to edit or play back files...
... files. Photo file information Memory in use File Information Album/Zoom In Icon Description Current file/Total files Folder name-File name GIF file Protected file To display file information on and display the most recent file. 2 Press [F/t] to scroll through files. • Press and hold [F/t] to scroll through files quickly. • If you want to view files stored in the internal memory, remove your camera. 1 Press [P]. • The most recent file will be able to edit or play back files...
User Manual Ver.1.0 (English)
Page 91
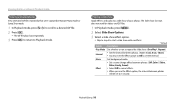
...; Set a scene change effect between photos will be set the interval. The slide show function does not work for videos and GIF files. 1 In Playback mode, press [m]. 2 Select Slide Show Options. 3 Select a slide show effect option. • Skip to step 4 to start a slide show with no effects. * Default Option Description Play Mode Set whether or not to repeat the slide show. (One Play*, Repeat) Interval • Set...
...; Set a scene change effect between photos will be set the interval. The slide show function does not work for videos and GIF files. 1 In Playback mode, press [m]. 2 Select Slide Show Options. 3 Select a slide show effect option. • Skip to step 4 to start a slide show with no effects. * Default Option Description Play Mode Set whether or not to repeat the slide show. (One Play*, Repeat) Interval • Set...

User Manual Ver.1.0 (English)
Page 108
... a remote shutter release 114 Saving files to a smart phone automatically ... 116 Using Auto Backup to send photos or videos ... 117 Installing the program for Auto Backup on devices that support AllShare Play 125 Sending photos using Wi-Fi Direct 127 Wireless network Learn to connect to online storage 124 Viewing photos or videos on your PC 117 Sending photos or videos to a PC 117 Sending photos or videos via email 119 Changing email settings 119 Sending photos...
... a remote shutter release 114 Saving files to a smart phone automatically ... 116 Using Auto Backup to send photos or videos ... 117 Installing the program for Auto Backup on devices that support AllShare Play 125 Sending photos using Wi-Fi Direct 127 Wireless network Learn to connect to online storage 124 Viewing photos or videos on your PC 117 Sending photos or videos to a PC 117 Sending photos or videos via email 119 Changing email settings 119 Sending photos...
User Manual Ver.1.0 (English)
Page 112
... and password to connect to playback the files. Wireless network 111 Costs will vary based on the AP List. For information about registering or the service, contact the network service providers. • Be cautious when you select free WLANs provided by country. • The WLAN feature of your camera must comply with radio transmission laws in English, the camera may...
... and password to connect to playback the files. Wireless network 111 Costs will vary based on the AP List. For information about registering or the service, contact the network service providers. • Be cautious when you select free WLANs provided by country. • The WLAN feature of your camera must comply with radio transmission laws in English, the camera may...
User Manual Ver.1.0 (English)
Page 117
... capture a photo with the iOS 4.3 or higher. The Samsung Smart Camera app is compatible with Samsung camera models manufactured in 2013 or later. • You must insert a memory card to use this feature. • If you set this function, the setting is maintained even when you change the Shooting mode. • This feature may not be supported in some modes. 1 On the camera, in Shooting mode, press [m]. 2 On the camera, select AutoShare...
... capture a photo with the iOS 4.3 or higher. The Samsung Smart Camera app is compatible with Samsung camera models manufactured in 2013 or later. • You must insert a memory card to use this feature. • If you set this function, the setting is maintained even when you change the Shooting mode. • This feature may not be supported in some modes. 1 On the camera, in Shooting mode, press [m]. 2 On the camera, select AutoShare...
User Manual Ver.1.0 (English)
Page 127
... meet the device's specifications. • Transferring photos or videos to the AllShare Play device may take some time depending on the network connection, the number of files to be shared, or the sizes of the files. • If you power off the camera abnormally while viewing photos or videos on an AllShare Play device (for example, by removing the battery), the device considers the camera to still be connected. • The order...
... meet the device's specifications. • Transferring photos or videos to the AllShare Play device may take some time depending on the network connection, the number of files to be shared, or the sizes of the files. • If you power off the camera abnormally while viewing photos or videos on an AllShare Play device (for example, by removing the battery), the device considers the camera to still be connected. • The order...

User Manual Ver.1.0 (English)
Page 134
... shooting options. Date, time, language, and video output settings will not be displayed on captured photos. (Off*, Date, Date & Time) • The date and time will delete all files, including protected files. (Yes, No) Errors can occur if you select Live Panorama, Self Shot, Children, Jump Shot, Beauty Shot, Beauty Palette, or Motion Photo mode -- Settings menu Item Imprint Auto Power Off * Default Description Set whether or not to help you focus. (Off, On*) Format the internal memory and the memory card. you select Text in the camera before using...
... shooting options. Date, time, language, and video output settings will not be displayed on captured photos. (Off*, Date, Date & Time) • The date and time will delete all files, including protected files. (Yes, No) Errors can occur if you select Live Panorama, Self Shot, Children, Jump Shot, Beauty Shot, Beauty Palette, or Motion Photo mode -- Settings menu Item Imprint Auto Power Off * Default Description Set whether or not to help you focus. (Off, On*) Format the internal memory and the memory card. you select Text in the camera before using...

User Manual Ver.1.0 (English)
Page 135
Appendixes Get information about error messages, specifications, and maintenance. Error messages 135 Camera maintenance 136 Cleaning your camera 136 Using or storing the camera 137 About memory cards 138 About the battery 141 Before contacting a service center 145 Camera specifications 148 Glossary 152 Index 157
Appendixes Get information about error messages, specifications, and maintenance. Error messages 135 Camera maintenance 136 Cleaning your camera 136 Using or storing the camera 137 About memory cards 138 About the battery 141 Before contacting a service center 145 Camera specifications 148 Glossary 152 Index 157
User Manual Ver.1.0 (English)
Page 136
... microSDXC memory card. • The camera cannot connect to a device that supports AllShare Play. Transfer the files from the memory card to the other devices. Delete the damaged file or contact a service center. Invalid password. Transfer failed. Try sending again. • The camera has failed to send an email or transfer a photo to the network using the selected access point. Error message Card Error Card not supported. Reselect a device that contains some photos. Low Battery Memory Full No Image File Photo transfer...
... microSDXC memory card. • The camera cannot connect to a device that supports AllShare Play. Transfer the files from the memory card to the other devices. Delete the damaged file or contact a service center. Invalid password. Transfer failed. Try sending again. • The camera has failed to send an email or transfer a photo to the network using the selected access point. Error message Card Error Card not supported. Reselect a device that contains some photos. Low Battery Memory Full No Image File Photo transfer...
User Manual Ver.1.0 (English)
Page 148
... camera is correctly connected to the TV with the A/V cable. • Make sure that your memory card contains photos. • Make sure that the USB cable is connected correctly. • Make sure that your camera is not functioning properly Your TV or computer cannot display photos and videos that are using a supported operating system. In this case, click Start “ All Programs “ Samsung “ i-Launcher “ Samsung i-Launcher on your Windows computer. (For Windows 8, open Start screen...
... camera is correctly connected to the TV with the A/V cable. • Make sure that your memory card contains photos. • Make sure that the USB cable is connected correctly. • Make sure that your camera is not functioning properly Your TV or computer cannot display photos and videos that are using a supported operating system. In this case, click Start “ All Programs “ Samsung “ i-Launcher “ Samsung i-Launcher on your Windows computer. (For Windows 8, open Start screen...

User Manual Ver.1.0 (English)
Page 158
... Shot mode 53 Blink Detection 73 Brightness Playback mode 96 Shooting mode 74 Burst modes Auto Exposure Bracket (AEB) 78 Continuous 78 Motion Capture 78 C Camera maintenance 136 Camera specifications 148 Capturing an image from video 93 Charging 23 Children mode 51 Cleaning Camera body 136 Display 136 Lens 136 Close-up Shot mode 55 Connecting to a computer Mac 100 Windows 99 Contrast Playback mode 96 Shooting mode 79 D Date/Time Set 132 Deleting files 87 Digital Image Stabilization (DIS) 38 Digital zoom 37 DIRECT LINK button 21 Disconnecting the camera 99 Display...
... Shot mode 53 Blink Detection 73 Brightness Playback mode 96 Shooting mode 74 Burst modes Auto Exposure Bracket (AEB) 78 Continuous 78 Motion Capture 78 C Camera maintenance 136 Camera specifications 148 Capturing an image from video 93 Charging 23 Children mode 51 Cleaning Camera body 136 Display 136 Lens 136 Close-up Shot mode 55 Connecting to a computer Mac 100 Windows 99 Contrast Playback mode 96 Shooting mode 79 D Date/Time Set 132 Deleting files 87 Digital Image Stabilization (DIS) 38 Digital zoom 37 DIRECT LINK button 21 Disconnecting the camera 99 Display...
User Manual Ver.1.0 (English)
Page 160
... Power save mode 131 Program mode 44 Protecting a file 87 Q Quick view 131 R Red-eye Playback mode 97 Shooting mode 66 Remote Viewfinder 114 Reset 133 Resolution Playback mode 94 Shooting mode 63 Retouching faces Playback mode 97 Shooting mode 53 Rotating 94 S Saturation Playback mode 96 Shooting mode 79 Scene mode 47 Service center 145 Settings 129 Sharpness 79 Shooting portraits Blink Detection 73 Face Detection 72 Smile Shot 72 Shutter button 19 Slide show 90 Smart Album 85 Smart Auto mode 43 Smart Filter Photo shooting mode 58 Playback mode 95 Video recording mode...
... Power save mode 131 Program mode 44 Protecting a file 87 Q Quick view 131 R Red-eye Playback mode 97 Shooting mode 66 Remote Viewfinder 114 Reset 133 Resolution Playback mode 94 Shooting mode 63 Retouching faces Playback mode 97 Shooting mode 53 Rotating 94 S Saturation Playback mode 96 Shooting mode 79 Scene mode 47 Service center 145 Settings 129 Sharpness 79 Shooting portraits Blink Detection 73 Face Detection 72 Smile Shot 72 Shutter button 19 Slide show 90 Smart Album 85 Smart Auto mode 43 Smart Filter Photo shooting mode 58 Playback mode 95 Video recording mode...


