
User Manual (ENGLISH)
Page 4
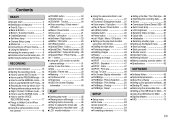
... monitor to set the camera settings 31 ƈHow to use the VOICE RECORDING mode 17 ƃThings to Watch Out for MAC 70 ƃDigimax Master 71 ƃFAQ 73 ŝ3Ş Contents READY ƃSystem chart 4 ƃIdentification of features 5 ƈFront & Top 5 ƈBack &... 49 ƈPictBridge 49 ƈPictBridge : Picture Selection 50 ƈPictBridge : Print Setting 50 ƈPictBridge : Printing 51 ƈPictBridge : Reset 52 SETUP ƃSetup menu 52 ƈFile name 53 ƈAuto power off 54 ƈLanguage 54 ƈFormatting a memory 55 ƈ...
... monitor to set the camera settings 31 ƈHow to use the VOICE RECORDING mode 17 ƃThings to Watch Out for MAC 70 ƃDigimax Master 71 ƃFAQ 73 ŝ3Ş Contents READY ƃSystem chart 4 ƃIdentification of features 5 ƈFront & Top 5 ƈBack &... 49 ƈPictBridge 49 ƈPictBridge : Picture Selection 50 ƈPictBridge : Print Setting 50 ƈPictBridge : Printing 51 ƈPictBridge : Reset 52 SETUP ƃSetup menu 52 ƈFile name 53 ƈAuto power off 54 ƈLanguage 54 ƈFormatting a memory 55 ƈ...

User Manual (ENGLISH)
Page 15
... subject and compose the image by rotating the mode dial. 2. Press the shutter button to configure advanced functions such as if the object is incorrect, reset the date / time before taking note of the polarity (+ / -). 2. You can manually configure all functions except the aperture value and shutter speed. 1. Press the menu...
... subject and compose the image by rotating the mode dial. 2. Press the shutter button to configure advanced functions such as if the object is incorrect, reset the date / time before taking note of the polarity (+ / -). 2. You can manually configure all functions except the aperture value and shutter speed. 1. Press the menu...

User Manual (ENGLISH)
Page 44
... menu button. 2. Press the play back function using the LCD monitor Menu tab Main menu Sub menu Type CUSTOM SET Quality Date PRINT DPOF PRINT RESET File name Standard Index No Yes No Yes Secondary menu Auto Plain Photo Fastphoto Auto Draft Normal Fine Auto Off On Auto Off On - Press...
... menu button. 2. Press the play back function using the LCD monitor Menu tab Main menu Sub menu Type CUSTOM SET Quality Date PRINT DPOF PRINT RESET File name Standard Index No Yes No Yes Secondary menu Auto Plain Photo Fastphoto Auto Draft Normal Fine Auto Off On Auto Off On - Press...
User Manual (ENGLISH)
Page 49
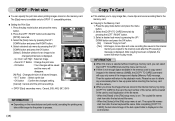
... and display [Memory Full!] message. Select the [COPY TO CARD] menu tab by pressing the UP / DOWN button and press the RIGHT button. 4. When the [Reset] of the [File] setup menu is set : The copied file names start from after the last stored file name. - After completing [COPY TO CARD], the...
... and display [Memory Full!] message. Select the [COPY TO CARD] menu tab by pressing the UP / DOWN button and press the RIGHT button. 4. When the [Reset] of the [File] setup menu is set : The copied file names start from after the last stored file name. - After completing [COPY TO CARD], the...
User Manual (ENGLISH)
Page 53
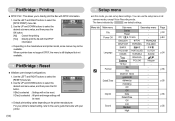
... - Off - When a printer does not support DPOF, the menu is selected : All print and image settings will not be reset. Menu tab Main menu File Power Off Sub menu Secondary menu Series - Reset - Date&Time dd/mm/yy - Off - Imprint Date - p.55 Date&Time - If [No] is selected : Settings ...then press the OK button. No Format Yes - p.55 - 06/01/01 13:00 - Off - Use the LEFT and RIGHT buttons to select the [RESET] menu tab. 2. Use the LEFT and RIGHT buttons to select the [DPOF PRINT] menu tab. 2. p.55 mm/dd/yy - Use the UP and DOWN...
... - Off - When a printer does not support DPOF, the menu is selected : All print and image settings will not be reset. Menu tab Main menu File Power Off Sub menu Secondary menu Series - Reset - Date&Time dd/mm/yy - Off - Imprint Date - p.55 Date&Time - If [No] is selected : Settings ...then press the OK button. No Format Yes - p.55 - 06/01/01 13:00 - Off - Use the LEFT and RIGHT buttons to select the [RESET] menu tab. 2. Use the LEFT and RIGHT buttons to select the [DPOF PRINT] menu tab. 2. p.55 mm/dd/yy - Use the UP and DOWN...
User Manual (ENGLISH)
Page 54
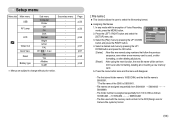
... button twice and the menu will be set from 0001 even after formatting, deleting all pictures. [Reset] : After using the reset function, the next file name will disappear. - SETUP File Series Power Off Reset Language Format Date&Time Back: Set:OK 4. The files used with the exception of the S500... by pressing the UP / DOWN button and press the RIGHT button. Setup menu Menu tab Main menu USB AF Lamp LCD Video Out Quick View Reset Battery type Sub menu Computer Printer Off On Dark Normal Bright NTSC PAL Off / 0.5, 1, 3 sec No Yes Alkaline Ni-MH Secondary menu - &#...
... button twice and the menu will be set from 0001 even after formatting, deleting all pictures. [Reset] : After using the reset function, the next file name will disappear. - SETUP File Series Power Off Reset Language Format Date&Time Back: Set:OK 4. The files used with the exception of the S500... by pressing the UP / DOWN button and press the RIGHT button. Setup menu Menu tab Main menu USB AF Lamp LCD Video Out Quick View Reset Battery type Sub menu Computer Printer Off On Dark Normal Bright NTSC PAL Off / 0.5, 1, 3 sec No Yes Alkaline Ni-MH Secondary menu - &#...

User Manual (ENGLISH)
Page 59
...deleted by are subject to the selected battery type. ƃ [Battery Type] sub Menu: Alkaline / Ni-MH SETUP LCD Video Out Quick View Reset Battery Type Alkaline Ni-MH Back: Set:OK Setting up the Mycam menu ƈ You can select the image that is first displayed on .... are default settings. The start -up image : [Off], [LOGO], [User Image1], [User Image2] - The items indicated by [Reset] menu. SETUP AF Lamp No LCD Yes Video Out Quick View Reset Back: Set:OK [ Selecting a battery type ] ƈ If a battery type is turned on the LCD monitor whenever the camera...
...deleted by are subject to the selected battery type. ƃ [Battery Type] sub Menu: Alkaline / Ni-MH SETUP LCD Video Out Quick View Reset Battery Type Alkaline Ni-MH Back: Set:OK Setting up the Mycam menu ƈ You can select the image that is first displayed on .... are default settings. The start -up image : [Off], [LOGO], [User Image1], [User Image2] - The items indicated by [Reset] menu. SETUP AF Lamp No LCD Yes Video Out Quick View Reset Back: Set:OK [ Selecting a battery type ] ƈ If a battery type is turned on the LCD monitor whenever the camera...
User Manual (ENGLISH)
Page 63
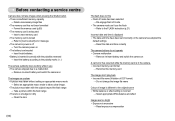
... (p.21) Incorrect date and time is displayed ҮThe date and time have been set incorrectly or the camera has adopted the default settings ƍ Reset the date and time correctly The camera buttons do not operate ҮCamera malfunction ƍ Remove /re-insert battery and switch the camera on A card... scene ҮWhite balance or effect setting is incorrect ƍ Select appropriate White balance and effect Images are too bright ҮExposure is excessive ƍ Reset exposure compensation
... (p.21) Incorrect date and time is displayed ҮThe date and time have been set incorrectly or the camera has adopted the default settings ƍ Reset the date and time correctly The camera buttons do not operate ҮCamera malfunction ƍ Remove /re-insert battery and switch the camera on A card... scene ҮWhite balance or effect setting is incorrect ƍ Select appropriate White balance and effect Images are too bright ҮExposure is excessive ƍ Reset exposure compensation


