
User Manual (ENGLISH)
Page 2
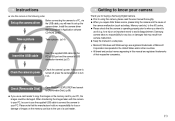
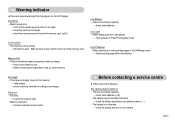
... you will need to turn it (e.g. Check [Removable Disk] Open WindowŖs EXPLORER and search for buying a Samsung Digital Camera. ƃ Prior to avoid disappointment. Install the camera driver that the camera is operating properly prior to when you intend to use it on the memory card due to the use the supplied USB cable to connect the camera to your PC. If the power is contained in this camera, please read the user manual thoroughly...
... you will need to turn it (e.g. Check [Removable Disk] Open WindowŖs EXPLORER and search for buying a Samsung Digital Camera. ƃ Prior to avoid disappointment. Install the camera driver that the camera is operating properly prior to when you intend to use it on the memory card due to the use the supplied USB cable to connect the camera to your PC. If the power is contained in this camera, please read the user manual thoroughly...
User Manual (ENGLISH)
Page 3
... the camera's internal components and could cause a fire. ƈ When in use, do not cover the camera or Charger. the memory card slot and battery chamber. Then make sure that any connector cords or cables to other places of extreme variances in temperature. Exposure to extreme temperatures may cause heat to build up and distort the camera body or cause a fire. After use, always switch...
... the camera's internal components and could cause a fire. ƈ When in use, do not cover the camera or Charger. the memory card slot and battery chamber. Then make sure that any connector cords or cables to other places of extreme variances in temperature. Exposure to extreme temperatures may cause heat to build up and distort the camera body or cause a fire. After use, always switch...
User Manual (ENGLISH)
Page 4
... Screen Display) information 34 PLAY ƃStarting play mode 35 ƈPlaying back a still image 35 ƈPlaying back a movie clip 35 ƈHow to capture the movie clip 35 ƈPlaying back a recorded voice 36 ƃLCD monitor Indicator 36 ƃUsing the camera buttons to set the camera 18 ƈPOWER button 18 ƈShutter button 18 ƈZOOM W / T button 18 ƈVoice recording / Voice memo / UP button 20 ƈMacro / Down button 20 ƈFocus lock 21 ƈFlash / Left button...
... Screen Display) information 34 PLAY ƃStarting play mode 35 ƈPlaying back a still image 35 ƈPlaying back a movie clip 35 ƈHow to capture the movie clip 35 ƈPlaying back a recorded voice 36 ƃLCD monitor Indicator 36 ƃUsing the camera buttons to set the camera 18 ƈPOWER button 18 ƈShutter button 18 ƈZOOM W / T button 18 ƈVoice recording / Voice memo / UP button 20 ƈMacro / Down button 20 ƈFocus lock 21 ƈFlash / Left button...
User Manual (ENGLISH)
Page 5
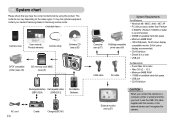
... equipment, contact your nearest Samsung dealer or Samsung service centre. < Included items > Camera case User manual, Product warranty Camera strap Software CD (see p.65) DPOF compatible printer (see p.46) SD memory card/ MMC (see p.9) Rechargeable battery Rechargeable battery (SBP-2524) (SNB-2512) AA Alkaline Batteries AC cord ŝ4Ş Cradle Charger(SBC-N1) Computer (see p.67) USB cable PictBridge compatible printer (see p.49) System Requirements For Windows ҮWindows 98 / 98SE / 2000 / ME...
... equipment, contact your nearest Samsung dealer or Samsung service centre. < Included items > Camera case User manual, Product warranty Camera strap Software CD (see p.65) DPOF compatible printer (see p.46) SD memory card/ MMC (see p.9) Rechargeable battery Rechargeable battery (SBP-2524) (SNB-2512) AA Alkaline Batteries AC cord ŝ4Ş Cradle Charger(SBC-N1) Computer (see p.67) USB cable PictBridge compatible printer (see p.49) System Requirements For Windows ҮWindows 98 / 98SE / 2000 / ME...
User Manual (ENGLISH)
Page 9
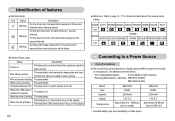
... When the printer is printing The lamp blinks The lamp turns on (The camera focus on the subject) When the AF activates The lamp blinks (The camera doesn't focus on the subject) ŝ8Ş ƈ Mode icon Refer to a Power Source Using the batteries ƃ We recommend using batteries for a digital camera (Within a year from the date of features ƈ Self-timer lamp Icon Status Blinking Blinking Blinking Description For the 2 seconds, the lamp blinks quickly at...
... When the printer is printing The lamp blinks The lamp turns on (The camera focus on the subject) When the AF activates The lamp blinks (The camera doesn't focus on the subject) ŝ8Ş ƈ Mode icon Refer to a Power Source Using the batteries ƃ We recommend using batteries for a digital camera (Within a year from the date of features ƈ Self-timer lamp Icon Status Blinking Blinking Blinking Description For the 2 seconds, the lamp blinks quickly at...

User Manual (ENGLISH)
Page 15
... all functions except the aperture value and shutter speed. 1. Insert the batteries (p.9). As this camera has a 20MB internal memory, you press the shutter button down half way, It means that is displayed on the LCD monitor is unable to capture an image clearly. ŝ14Ş ƈ How to use the AUTO mode ( ) Please select this be stored in a still image as image size (p.32), quality (p.32), metering (p.33), continuous shooting...
... all functions except the aperture value and shutter speed. 1. Insert the batteries (p.9). As this camera has a 20MB internal memory, you press the shutter button down half way, It means that is displayed on the LCD monitor is unable to capture an image clearly. ŝ14Ş ƈ How to use the AUTO mode ( ) Please select this be stored in a still image as image size (p.32), quality (p.32), metering (p.33), continuous shooting...
User Manual (ENGLISH)
Page 18
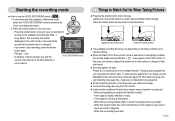
File type : *.wav * A distance of Movie clip mode, select the VOICE RECORDING mode by using the LCD monitor. ƈ Under certain conditions the auto focus system may make the picture dark. Things to record sound. Lightly press the shutter button to record a voice. - To take a picture against the sun, please use a tripod, support the camera on a solid surface or change to flash shot mode. ƈ Shooting against the sun may not perform as expected. - When the surroundings are...
File type : *.wav * A distance of Movie clip mode, select the VOICE RECORDING mode by using the LCD monitor. ƈ Under certain conditions the auto focus system may make the picture dark. Things to record sound. Lightly press the shutter button to record a voice. - To take a picture against the sun, please use a tripod, support the camera on a solid surface or change to flash shot mode. ƈ Shooting against the sun may not perform as expected. - When the surroundings are...
User Manual (ENGLISH)
Page 29
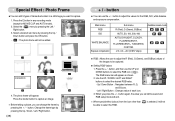
... menu RGB ISO WHITE BALANCE Exposure compensation Sub menu R (Red), G (Green), B (Blue) AUTO, 50, 100, 200, 400 AUTO, DAYLIGHT, CLOUDY, FLUORESCENT H, FLUORESCENT L, TUNGSTEN, CUSTOM. -2.0~0.0~+2.0 (0.5EV steps) Available camera mode ƈ RGB : Allows the user to adjust the R (Red), G (Green), and B (Blue) values of the images to be able to select the RGB. Press the + / - is selected, it will not be saved and RGB setup mode will appear. Special Effect : Photo Frame...
... menu RGB ISO WHITE BALANCE Exposure compensation Sub menu R (Red), G (Green), B (Blue) AUTO, 50, 100, 200, 400 AUTO, DAYLIGHT, CLOUDY, FLUORESCENT H, FLUORESCENT L, TUNGSTEN, CUSTOM. -2.0~0.0~+2.0 (0.5EV steps) Available camera mode ƈ RGB : Allows the user to adjust the R (Red), G (Green), and B (Blue) values of the images to be able to select the RGB. Press the + / - is selected, it will not be saved and RGB setup mode will appear. Special Effect : Photo Frame...
User Manual (ENGLISH)
Page 34
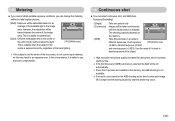
... of the available light in an exposure error. Use the mode if it is released. Metering ƈ If you cannot obtain suitable exposure conditions, you can select continuous shot, and AEB (Auto Exposure Bracketing). - [Single] : Take one picture only - [Continuous] : Images will be METERING Multi Spor biased towards the centre of the image area. However, the calculation will be taken continuously until the shutter button is hard to...
... of the available light in an exposure error. Use the mode if it is released. Metering ƈ If you cannot obtain suitable exposure conditions, you can select continuous shot, and AEB (Auto Exposure Bracketing). - [Single] : Take one picture only - [Continuous] : Images will be METERING Multi Spor biased towards the centre of the image area. However, the calculation will be taken continuously until the shutter button is hard to...

User Manual (ENGLISH)
Page 45
... screen effects can be used to protect specific shots from being accidentally erased (Lock). Select a desired sub menu by pressing the UP / DOWN button and press the RIGHT button. 2. Zoom W / T Button : Protect / release the images - If you protect an image, the protect icon will be saved and the menu will be displayed on the LCD monitor. (An unprotected image has no indicator) - Press the play mode button and press the menu button. 2. OK button : Your changes will disappear. Use the Up / Down button...
... screen effects can be used to protect specific shots from being accidentally erased (Lock). Select a desired sub menu by pressing the UP / DOWN button and press the RIGHT button. 2. Zoom W / T Button : Protect / release the images - If you protect an image, the protect icon will be saved and the menu will be displayed on the LCD monitor. (An unprotected image has no indicator) - Press the play mode button and press the menu button. 2. OK button : Your changes will disappear. Use the Up / Down button...
User Manual (ENGLISH)
Page 48
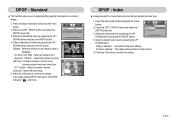
... select the [DPOF] menu tab. 3. Up / Down / Left / Right : Select an image to confirm the setting. Zoom W / T Button : Select the number of prints. [All Pics] : Configure number of prints [Cancel] : Cancel the print setup. 5. Select the [Standard] menu by pressing the UP / DOWN button and press the OK button. [Select] : Selection window for all pictures except movie and voice files. - Press the OK button to print. - Press the play mode button and press the menu button. 2.
... select the [DPOF] menu tab. 3. Up / Down / Left / Right : Select an image to confirm the setting. Zoom W / T Button : Select the number of prints. [All Pics] : Configure number of prints [Cancel] : Cancel the print setup. 5. Select the [Standard] menu by pressing the UP / DOWN button and press the OK button. [Select] : Selection window for all pictures except movie and voice files. - Press the OK button to print. - Press the play mode button and press the menu button. 2.
User Manual (ENGLISH)
Page 49
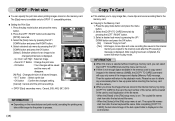
... and print model, canceling the printing may take a little longer for DPOF 1.1 compatible printers. ƃ Setting the Print Size 1. Press the play mode button and press the menu button. 2. DPOF : Print size ƈ You can 't be saved and the menu will disappear. [All Pics] : Change print size of all of the print size settings. Please be sure to delete any unnecessary files to free up space before inserting the memory card into the camera. ƃ When you to copy image files, movie clips and voice recording files...
... and print model, canceling the printing may take a little longer for DPOF 1.1 compatible printers. ƃ Setting the Print Size 1. Press the play mode button and press the menu button. 2. DPOF : Print size ƈ You can 't be saved and the menu will disappear. [All Pics] : Change print size of all of the print size settings. Please be sure to delete any unnecessary files to free up space before inserting the memory card into the camera. ƃ When you to copy image files, movie clips and voice recording files...
User Manual (ENGLISH)
Page 52
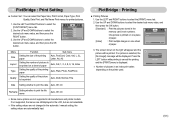
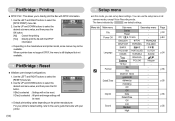
... not changed in the automatic / manual setting, the setting values are not supported in set numbers. One picture is selected, the [No Image!] message will be displayed. PictBridge : Printing ƈ Printing Pictures 1. Now Printing 001 / 001 Cancel: ŝ51Ş Use the UP and DOWN buttons to select the desired sub menu value, and then press the OK button. [Standard] : Print the pictures stored in the memory card in all manufacturer and printer models. Use the...
... not changed in the automatic / manual setting, the setting values are not supported in set numbers. One picture is selected, the [No Image!] message will be displayed. PictBridge : Printing ƈ Printing Pictures 1. Now Printing 001 / 001 Cancel: ŝ51Ş Use the UP and DOWN buttons to select the desired sub menu value, and then press the OK button. [Standard] : Print the pictures stored in the memory card in all manufacturer and printer models. Use the...
User Manual (ENGLISH)
Page 53
... Voice Recording mode. Use the LEFT and RIGHT buttons to select the desired sub menu value, and then press the OK button. [No] : Cancel the printing [Yes] : Directly print the file with the DPOF information DPOF PRINT No Yes Exit:MENU Move: ſ Depending on the printer manufacturer. PictBridge : Reset ƈ Initialises user-changed configurations. 1. RESET No Yes Exit:MENU Move: ſ Default print setting varies depending on the manufacturer and printer model...
... Voice Recording mode. Use the LEFT and RIGHT buttons to select the desired sub menu value, and then press the OK button. [No] : Cancel the printing [Yes] : Directly print the file with the DPOF information DPOF PRINT No Yes Exit:MENU Move: ſ Depending on the printer manufacturer. PictBridge : Reset ƈ Initialises user-changed configurations. 1. RESET No Yes Exit:MENU Move: ſ Default print setting varies depending on the manufacturer and printer model...

User Manual (ENGLISH)
Page 59
... their defaults. SETUP AF Lamp No LCD Yes Video Out Quick View Reset Back: Set:OK [ Selecting a battery type ] ƈ If a battery type is turned on. ƃ Start up image will be restored to their default values. Start up image ƈ You can set up a start up image, start up image with the exception of Voice recording mode) has the MyCAM menu. Setup menu [ Initialisation ] ƈ All camera menu and function settings will not be deleted by [DELETE] or [Format] menu. - The start -up sound and shutter sound.
... their defaults. SETUP AF Lamp No LCD Yes Video Out Quick View Reset Back: Set:OK [ Selecting a battery type ] ƈ If a battery type is turned on. ƃ Start up image will be restored to their default values. Start up image ƈ You can set up a start up image, start up image with the exception of Voice recording mode) has the MyCAM menu. Setup menu [ Initialisation ] ƈ All camera menu and function settings will not be deleted by [DELETE] or [Format] menu. - The start -up sound and shutter sound.
User Manual (ENGLISH)
Page 62
... the battery and turn it on again ƍ Insert the memory card again ƍ Insert the memory card and format the memory card. (p.55) Card Locked! ҮThe memory card is locked ƍ SD memory card : Slide the write protect switch to the top of the memory card Memory Full! ҮThere is insufficient memory capacity to take an image ƍ Insert a new memory card ƍ Delete unnecessary image files to free up some images File Error! ҮFile error ƍ Format the memory card ҮMemory card error ƍ Contact a camera service centre...
... the battery and turn it on again ƍ Insert the memory card again ƍ Insert the memory card and format the memory card. (p.55) Card Locked! ҮThe memory card is locked ƍ SD memory card : Slide the write protect switch to the top of the memory card Memory Full! ҮThere is insufficient memory capacity to take an image ƍ Insert a new memory card ƍ Delete unnecessary image files to free up some images File Error! ҮFile error ƍ Format the memory card ҮMemory card error ƍ Contact a camera service centre...
User Manual (ENGLISH)
Page 63
... default settings ƍ Reset the date and time correctly The camera buttons do not operate ҮCamera malfunction ƍ Remove /re-insert battery and switch the camera on A card error has occurred while the memory card is in the camera. ҮIncorrect memory card format ƍ Re-format the memory card The images don't play back ҮIncorrect file name (Violation of DCF format) ƍ Do not change the image file name Colour of image is different to the original scene ҮWhite balance...
... default settings ƍ Reset the date and time correctly The camera buttons do not operate ҮCamera malfunction ƍ Remove /re-insert battery and switch the camera on A card error has occurred while the memory card is in the camera. ҮIncorrect memory card format ƍ Re-format the memory card The images don't play back ҮIncorrect file name (Violation of DCF format) ƍ Do not change the image file name Colour of image is different to the original scene ҮWhite balance...
User Manual (ENGLISH)
Page 66
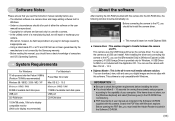
... that you can download, view, edit and save your digital images and movie clips with this software. If the frame does not show, run . A USB Driver for MAC is based on model Digimax S600. ƈ Camera driver : This enables images to transfer between the camera and PC. This camera uses the USB Storage Driver as a USB card reader. You can use . ҮThe attached software is the all or part of either the software or the user manual be held...
... that you can download, view, edit and save your digital images and movie clips with this software. If the frame does not show, run . A USB Driver for MAC is based on model Digimax S600. ƈ Camera driver : This enables images to transfer between the camera and PC. This camera uses the USB Storage Driver as a USB card reader. You can use . ҮThe attached software is the all or part of either the software or the user manual be held...
User Manual (ENGLISH)
Page 68
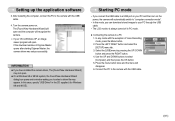
... menu will open. INFORMATION ƃ If you have installed the camera driver, The [Found New Hardware Wizard] may appear. In any mode with the USB cable. Format Date&time Imprint Sound USB Back: SETUP Computer Printer Set:OK ŝ67Ş The [Found New Hardware Wizard] will open . ƃ On a Windows 98 or 98 SE system, the Found New Hardware Wizard dialog box opens and a window asking you can download stored images...
... menu will open. INFORMATION ƃ If you have installed the camera driver, The [Found New Hardware Wizard] may appear. In any mode with the USB cable. Format Date&time Imprint Sound USB Back: SETUP Computer Printer Set:OK ŝ67Ş The [Found New Hardware Wizard] will open . ƃ On a Windows 98 or 98 SE system, the Found New Hardware Wizard dialog box opens and a window asking you can download stored images...
User Manual (ENGLISH)
Page 74
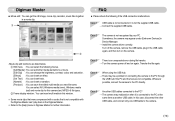
... [Help] menu in Digimax Master for this camera (avi, MPEG-4) file types. ںFrame display window : You can insert multi media in this case, disconnect the other USB cable, and connect only one USB cable to the PC directly. Case 2 The camera is an unexpected error during file transfer. ƍ Turn the camera power off the camera, remove the USB cable, plug in the USB cable again, and then turn on again. Digimax Master ƃ Movie edit...
... [Help] menu in Digimax Master for this camera (avi, MPEG-4) file types. ںFrame display window : You can insert multi media in this case, disconnect the other USB cable, and connect only one USB cable to the PC directly. Case 2 The camera is an unexpected error during file transfer. ƍ Turn the camera power off the camera, remove the USB cable, plug in the USB cable again, and then turn on again. Digimax Master ƃ Movie edit...


