
User Manual
Page 2
... set up the camera driver Before connecting the camera to a PC, via the USB cable, you will need to the use of a card reader. ŝ1Ş When transferring the images taken with the camera to your PC, be sure to use the supplied USB cable to connect the camera to your PC, the images could be damaged. Check [Removable Disk] Open WindowŖs EXPLORER and search for a trip or an important event) to turn it (e.g. Samsung camera takes...
... set up the camera driver Before connecting the camera to a PC, via the USB cable, you will need to the use of a card reader. ŝ1Ş When transferring the images taken with the camera to your PC, be sure to use the supplied USB cable to connect the camera to your PC, the images could be damaged. Check [Removable Disk] Open WindowŖs EXPLORER and search for a trip or an important event) to turn it (e.g. Samsung camera takes...
User Manual
Page 3
... battery with the polarities reversed. ƈ Remove the battery when not planning to use the camera as a sealed vehicle, direct sunlight or other places of time. Exposure to extreme temperatures may be carried out by your dealer or Samsung Camera Service centre. You must contact your dealer or Samsung Camera Service centre. ƈ Please do not use and it may result in camera malfunction. Switch off the camera...
... battery with the polarities reversed. ƈ Remove the battery when not planning to use the camera as a sealed vehicle, direct sunlight or other places of time. Exposure to extreme temperatures may be carried out by your dealer or Samsung Camera Service centre. You must contact your dealer or Samsung Camera Service centre. ƈ Please do not use and it may result in camera malfunction. Switch off the camera...
User Manual
Page 4
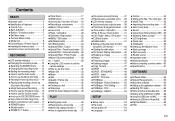
... / 5-function buttonōōōō7 ƈSelf-timer lamp 7 ƈCamera Status Lamp ōōōōō7 ƈMode icon 8 ƃConnecting to a Power Source ōō8 ƃInserting the memory card ōōōō9 ƃInstructions on how to use the memory card ō9 RECORDING ƃLCD monitor indicator ōōōōō11 ƃChanging the recording modeōō12 ƈSelecting the [MODE] menu ō...
... / 5-function buttonōōōō7 ƈSelf-timer lamp 7 ƈCamera Status Lamp ōōōōō7 ƈMode icon 8 ƃConnecting to a Power Source ōō8 ƃInserting the memory card ōōōō9 ƃInstructions on how to use the memory card ō9 RECORDING ƃLCD monitor indicator ōōōōō11 ƃChanging the recording modeōō12 ƈSelecting the [MODE] menu ō...
User Manual
Page 9
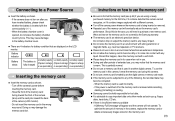
... - Connecting to a Power Source ƈ You should use of the camera, the camera body may become warm. Changing the zoom position between the Wide and the Tele ends every 1 shot. INFORMATION Important information about the camera mode setting. Using the flash every two times Based on the fol owing shooting conditions Using the fully charged battery 640X480 image size 30fps frame rate ſThese figures are measured under Samsung's standard conditions and Shooting...
... - Connecting to a Power Source ƈ You should use of the camera, the camera body may become warm. Changing the zoom position between the Wide and the Tele ends every 1 shot. INFORMATION Important information about the camera mode setting. Using the flash every two times Based on the fol owing shooting conditions Using the fully charged battery 640X480 image size 30fps frame rate ſThese figures are measured under Samsung's standard conditions and Shooting...
User Manual
Page 10
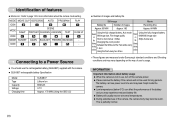
... turn on the memory card is not covered by another digital camera. Battery indicator Battery status The battery is an electronic precision device. Should this camera. ƃ Do not use a memory card formatted by the Samsung warranty. ƃ The memory card is fully charged Low battery capacity Low battery capacity Low battery capacity (Prepare to recharge (Prepare to recharge (Prepare to purchase a new memory card. Turn off or the memory card is removed while recording, deleting (formatting) or reading. ƃ Samsung...
... turn on the memory card is not covered by another digital camera. Battery indicator Battery status The battery is an electronic precision device. Should this camera. ƃ Do not use a memory card formatted by the Samsung warranty. ƃ The memory card is fully charged Low battery capacity Low battery capacity Low battery capacity (Prepare to recharge (Prepare to recharge (Prepare to purchase a new memory card. Turn off or the memory card is removed while recording, deleting (formatting) or reading. ƃ Samsung...
User Manual
Page 14
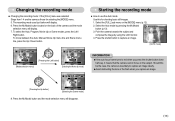
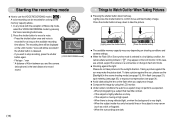
... for shooting basic still images. 1. Press the M (Mode) button located on the [MODE] menu (p.12). 2. The recording mode used just before will disappear. Starting the recording mode ƈ How to red when you capture an image. ŝ13Ş Press the shutter button to capture an image clearly. ƃAvoid obstructing the lens or the flash when you press the shutter button down half way, it means that the camera cannot focus on...
... for shooting basic still images. 1. Press the M (Mode) button located on the [MODE] menu (p.12). 2. The recording mode used just before will disappear. Starting the recording mode ƈ How to red when you capture an image. ŝ13Ş Press the shutter button to capture an image clearly. ƃAvoid obstructing the lens or the flash when you press the shutter button down half way, it means that the camera cannot focus on...
User Manual
Page 17
... the shutter button all way down half way. File type : *.wav * A distance of Movie clip mode, select the VOICE RECORDING mode by using the LCD monitor. ƈ Under certain conditions the auto focus system may appear on the LCD monitor. Taking a picture against the light : Please do not take the picture. [Lightly press the shutter button] [Press the shutter button] ƈ The available memory capacity may make the picture dark. Press the shutter button to confirm focus and flash battery charge...
... the shutter button all way down half way. File type : *.wav * A distance of Movie clip mode, select the VOICE RECORDING mode by using the LCD monitor. ƈ Under certain conditions the auto focus system may appear on the LCD monitor. Taking a picture against the light : Please do not take the picture. [Lightly press the shutter button] [Press the shutter button] ƈ The available memory capacity may make the picture dark. Press the shutter button to confirm focus and flash battery charge...
User Manual
Page 39
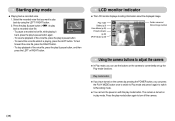
... play mode button. Play mode Battery (p.9) Voice Memo (p.40) Protect indicator (p.46) DPOF indicator (p.48) Folder name and Stored image number Using the camera buttons to adjust the camera ƈ In Play mode, you can turn off the camera. ŝ38Ş Starting play back by pressing the POWER button, you can press the PLAY MODE button once to switch to Play mode and press it again to switch to Recording mode. ƈ You can use the buttons on the camera to conveniently set up the Play mode functions. Select the recorded...
... play mode button. Play mode Battery (p.9) Voice Memo (p.40) Protect indicator (p.46) DPOF indicator (p.48) Folder name and Stored image number Using the camera buttons to adjust the camera ƈ In Play mode, you can turn off the camera. ŝ38Ş Starting play back by pressing the POWER button, you can press the PLAY MODE button once to switch to Play mode and press it again to switch to Recording mode. ƈ You can use the buttons on the camera to conveniently set up the Play mode functions. Select the recorded...
User Manual
Page 48
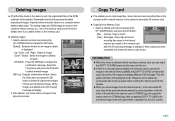
... will be changed to avoid duplication of the images and display [Memory Full!] message. After copying has been completed, the screen will be automatically renumbered to the play mode. After completing [COPY TO CARD], the last stored image of the last copied folder is not enough space available in the memory card to copy saved images in internal memory to the camera's removable SD memory card. ƃ Copying to copy image files, movie clips and voice recording files on the memory card. ƃ Deleting images 1. Yes...
... will be changed to avoid duplication of the images and display [Memory Full!] message. After copying has been completed, the screen will be automatically renumbered to the play mode. After completing [COPY TO CARD], the last stored image of the last copied folder is not enough space available in the memory card to copy saved images in internal memory to the camera's removable SD memory card. ƃ Copying to copy image files, movie clips and voice recording files on the memory card. ƃ Deleting images 1. Yes...
User Manual
Page 49
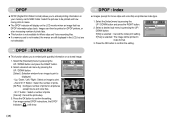
W / T button : Select a number of photo labs. ƈ This function is not available for all pictures except movie and voice files. - If an image carries DPOF instructions, the DPOF indicator ( ) will display on your memory card's MISC folder. Standard Index Size DPOF Select All Pics Cancel Back: Set:OK WȜ 0 Prints ȞT Set:OK WȜ 0 Prints ȞT ŝ48Ş Set:OK DPOF : Index ƈ Images (except for movie clips and voice file) are not selectable...
W / T button : Select a number of photo labs. ƈ This function is not available for all pictures except movie and voice files. - If an image carries DPOF instructions, the DPOF indicator ( ) will display on your memory card's MISC folder. Standard Index Size DPOF Select All Pics Cancel Back: Set:OK WȜ 0 Prints ȞT Set:OK WȜ 0 Prints ȞT ŝ48Ş Set:OK DPOF : Index ƈ Images (except for movie clips and voice file) are not selectable...
User Manual
Page 50
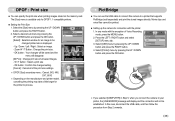
... camera for DPOF 1.1 compatible printers. ƃ Setting the Print Size 1. Movie clips and voice files cannot be saved and the menu will not be changed setting. [Cancel] : Cancel all saved images. - Select [USB] menu by pressing the UP / DOWN button and press the RIGHT button. 2. In this camera to your printer, the [USB ERROR!] message will display and the connection will disappear. [All Pics] : Change print size of Voice Recording mode, press the MENU button. 2. Press the LEFT / RIGHT button and select [SETUP] menu tab. 3. Select [Printer] menu...
... camera for DPOF 1.1 compatible printers. ƃ Setting the Print Size 1. Movie clips and voice files cannot be saved and the menu will not be changed setting. [Cancel] : Cancel all saved images. - Select [USB] menu by pressing the UP / DOWN button and press the RIGHT button. 2. In this camera to your printer, the [USB ERROR!] message will display and the connection will disappear. [All Pics] : Change print size of Voice Recording mode, press the MENU button. 2. Press the LEFT / RIGHT button and select [SETUP] menu tab. 3. Select [Printer] menu...
User Manual
Page 55
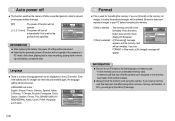
...; After replacing the battery, the power off setting will be displayed on the LCD monitor. If you run [Format] on the memory, all images, including the protected images, will be formatted. If you ran FORMAT in Play mode, a [No Image!] message will not operate if the camera is a choice of memory card. - Auto power off ƈ This function switches the camera off after a specified period in PC mode, slide show, playing back a voice recording, playing back a movie clip and taking a composite shot. Language ƈ...
...; After replacing the battery, the power off setting will be displayed on the LCD monitor. If you run [Format] on the memory, all images, including the protected images, will be formatted. If you ran FORMAT in Play mode, a [No Image!] message will not operate if the camera is a choice of memory card. - Auto power off ƈ This function switches the camera off after a specified period in PC mode, slide show, playing back a voice recording, playing back a movie clip and taking a composite shot. Language ƈ...

User Manual
Page 56
... image file. [Date] : Only the DATE will be imprinted on the image file. [Date&Time] : The DATE & TIME will not light up. Auto Focus lamp ƈ You can turn the Auto Focus lamp on the LCD monitor. Refer to page AF Lamp Sound USB LCD Video Out Back: SETUP Computer Printer Set:OK 49 for the images taken in poorly lit conditions or select the [Night] scene mode, the camera may not be able to the [Date&Time] main menu...
... image file. [Date] : Only the DATE will be imprinted on the image file. [Date&Time] : The DATE & TIME will not light up. Auto Focus lamp ƈ You can turn the Auto Focus lamp on the LCD monitor. Refer to page AF Lamp Sound USB LCD Video Out Back: SETUP Computer Printer Set:OK 49 for the images taken in poorly lit conditions or select the [Night] scene mode, the camera may not be able to the [Date&Time] main menu...
User Manual
Page 60
Out Of Number ҮWhen selecting too many printing pages in Flash Photography mode. In this case, disconnect and re-connect the USB cable before trying the transfer again. ƈ Before an important event or going on again ƍ Insert the memory card again ƍ Insert the memory card and format the memory card. (p.54) Card Locked! ҮThe memory card is locked ƍ SD memory card : Slide the write protect switch to free up some memory No Image! Ү...
Out Of Number ҮWhen selecting too many printing pages in Flash Photography mode. In this case, disconnect and re-connect the USB cable before trying the transfer again. ƈ Before an important event or going on again ƍ Insert the memory card again ƍ Insert the memory card and format the memory card. (p.54) Card Locked! ҮThe memory card is locked ƍ SD memory card : Slide the write protect switch to free up some memory No Image! Ү...
User Manual
Page 61
... battery and switch the camera on The images are exhausted ƍ Insert charged battery ҮThe Camera is turned off mode ҮThe camera mode can't use ҮThe battery are unclear ҮA picture was taken without setting an appropriate macro mode ƍ Select an appropriate macro mode to take images when pressing the Shutter button ҮThere is insufficient memory capacity ƍ Delete unnecessary image files ҮThe memory card has not been formatted ƍ Format the memory card (p.54) ҮThe memory card...
... battery and switch the camera on The images are exhausted ƍ Insert charged battery ҮThe Camera is turned off mode ҮThe camera mode can't use ҮThe battery are unclear ҮA picture was taken without setting an appropriate macro mode ƍ Select an appropriate macro mode to take images when pressing the Shutter button ҮThere is insufficient memory capacity ƍ Delete unnecessary image files ҮThe memory card has not been formatted ƍ Format the memory card (p.54) ҮThe memory card...
User Manual
Page 62
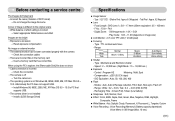
... : 0.4 ~ 2.0m (ISO AUTO) - Recharging Time : 4.0sec (Full), 5.0sec (Low battery) ƈ Sharpness : Soft, Normal, Vivid ƈ Effect : Color, B&W, Sepia, Red, Green, Blue, Negative, RGB, Highlight, Composite, Frame ƈ White Balance : Auto, Daylight, Cloudy, Fluorescent_H, Fluorescent_L, Tungsten, Custom ƈ Voice Recording : Voice Recording (Memory & Battery capacity dependant) Voice Memo in flash, Slow sync, Flash off ƍ Turn the camera on ҮThe operating system is not installed ƍ Install a [USB Storage Driver] Specifications ƈ Image Sensor...
... : 0.4 ~ 2.0m (ISO AUTO) - Recharging Time : 4.0sec (Full), 5.0sec (Low battery) ƈ Sharpness : Soft, Normal, Vivid ƈ Effect : Color, B&W, Sepia, Red, Green, Blue, Negative, RGB, Highlight, Composite, Frame ƈ White Balance : Auto, Daylight, Cloudy, Fluorescent_H, Fluorescent_L, Tungsten, Custom ƈ Voice Recording : Voice Recording (Memory & Battery capacity dependant) Voice Memo in flash, Slow sync, Flash off ƍ Turn the camera on ҮThe operating system is not installed ƍ Install a [USB Storage Driver] Specifications ƈ Image Sensor...
User Manual
Page 63
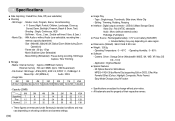
... 21 24 32 39 50 85 138 ſ These figures are measured under Samsung's standard conditions and may vary depending on DSC), Effect Key Powerful Effect (Colour, Highlight, Composite, Photo Frame) Easy Mode Change using "M" button ſ Specifications are the property of their respective owners. Specifications ƈ Date Imprinting : Date&Time, Date, Off (user selectable) ƈ Shooting - File Format : Still Image : JPEG (DCF), EXIF 2.2, DPOF 1.1, PictBridge 1.0 Movie Clip : AVI (MPEG-4) Audio : WAV -
... 21 24 32 39 50 85 138 ſ These figures are measured under Samsung's standard conditions and may vary depending on DSC), Effect Key Powerful Effect (Colour, Highlight, Composite, Photo Frame) Easy Mode Change using "M" button ſ Specifications are the property of their respective owners. Specifications ƈ Date Imprinting : Date&Time, Date, Off (user selectable) ƈ Shooting - File Format : Still Image : JPEG (DCF), EXIF 2.2, DPOF 1.1, PictBridge 1.0 Movie Clip : AVI (MPEG-4) Audio : WAV -
User Manual
Page 64
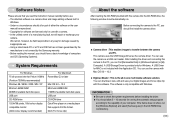
...; Camera driver : This enables images to transfer between the camera and PC. After installing the driver and connecting this manual, you read the instruction manual carefully before installing the driver. ƃ You should allow 5 ~ 10 seconds for running the automatic setup program according to check the system requirements before use the camera with Mac OS 9.0 ~ 10.3. ƈ Digimax Master : This is provided only for MAC is only compatible with Windows. This software...
...; Camera driver : This enables images to transfer between the camera and PC. After installing the driver and connecting this manual, you read the instruction manual carefully before installing the driver. ƃ You should allow 5 ~ 10 seconds for running the automatic setup program according to check the system requirements before use the camera with Mac OS 9.0 ~ 10.3. ƈ Digimax Master : This is provided only for MAC is only compatible with Windows. This software...
User Manual
Page 66
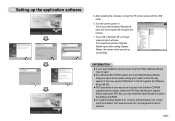
... "USB Driver" in the CD supplied. (for Windows 98 and 98 SE). ƃ PDF documents of Digmax Master opens after starting Digimax Master, the camera driver was set up the application software 3. If the download window of user manual are included in the Software CD-ROM. ƃ To install the Adobe Reader 6.0.1 correctly, Internet Explorer 5.01 or later had to select a driver file may appear. Setting up successfully. Before opening the PDF files...
... "USB Driver" in the CD supplied. (for Windows 98 and 98 SE). ƃ PDF documents of Digmax Master opens after starting Digimax Master, the camera driver was set up the application software 3. If the download window of user manual are included in the Software CD-ROM. ƃ To install the Adobe Reader 6.0.1 correctly, Internet Explorer 5.01 or later had to select a driver file may appear. Setting up successfully. Before opening the PDF files...
User Manual
Page 73
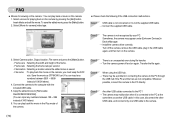
... the [Make] button. - Transfer the file again. Wherever possible, connect the camera to [Removable Disk\DCIM\XXXSSCAM]. (You can input any numbers between 100 ~ 999 instead of XXXX letters). 4. Select a movie for camera] video type. ƈ Please check the following if the USB connection malfunctions. Copy the edited movie to the PC directly. Case 5 Are other USB cable, and connect only one USB cable to the PC at the same time as STP6XXXX...
... the [Make] button. - Transfer the file again. Wherever possible, connect the camera to [Removable Disk\DCIM\XXXSSCAM]. (You can input any numbers between 100 ~ 999 instead of XXXX letters). 4. Select a movie for camera] video type. ƈ Please check the following if the USB connection malfunctions. Copy the edited movie to the PC directly. Case 5 Are other USB cable, and connect only one USB cable to the PC at the same time as STP6XXXX...


